Enable OpenWrt to run on LXD (Linux Containers), enabling full routing, firewall and IPv6 capability while creating virtual networks within LXD.
This does not require rebuilding or compiling. Because of that, it should support any processor type including ARM.
Although OpenWrt 19.07 has not been released (as of Sept 2019), it is possible to run a 19.07 snapshot image in LXD. OpenWrt makes armvirt rootfs snapshots available. Download the armvirt32 rootfs snapshot, and create an LXD image following the steps below.
19.07 fixes the procd bug which prevented OpenWrt from fully booting. Therefore, init.sh script is no longer required to run OpenWrt 19.07 in LXD containers.
The rootfs snapshot does not include the web-based LuCI management tool. To install LuCI with opkg:
opkg update
opkg install luci
The benefits of a virtual OpenWrt Router are:
- Full IPv4/IPv6 firewall - protecting the containers behind it, thus reducing the threat surface
- Excellent IPv6 support, including DHCPv6-PD (Prefix Delegation) which allows automatic IPv6 prefix (think: subnet) on the lxdbr0 bridge
- Full routing protocol support via
birdandbird6(see RIPng the forgotten routing protocol )
The benifits of using LXD are:
- Excellent networking support for both IPv4 and IPv6. Any container can connect to any bridge on the host
- Containerized applications, once configured are very easy to roll out
- Containers launch quickly
- Snapshots & Migration, it is possible to back up your container or migrate the container to another host with a one line command
OpenWrt project does an excellent job of creating images for hundreds of routers. I wanted to take a generic existing image and make it work on LXD without recompiling, or building OpenWrt from source.
Additionally, I wanted it to run on a Raspberry Pi (ARM processor). Most implementations of OpenWrt in virtual environments run on x86 machines.
If you would rather build OpenWrt, please see the github project https://github.com/mikma/lxd-openwrt (x86 support only)
Unfortunately the default Raspian image does not support name spaces or cgroups which are used to isolate the Linux Containers. Fortunately, there is an Unofficial Ubuntu 18.04 image available for the Pi which does. Be sure to follow the login directions on the ARM Ubuntu Page
Additionally follow the steps to boot the unofficial image on the Raspberry 3B+. Be sure to update the config.txt file and update the bootloader files. The Raspsberry 3B can boot the unofficial image without these extra steps.
LXD binaries are already installed on the image, but lxd init must still be run. If you are not familiar with LXD, please look at Linux Containers on the Pi blog post.
NOTE: Unless otherwise stated, all commands are run on the Raspberry Pi
Using lxc image import an image can pulled into LXD. The steps are:
- Download the OpenWrt rootfs tarball
- Create a metadata.yaml file, and place into a tar file
- Import the rootfs tarball and metadata tarball to create an image
The OpenWrt project not only provides squashfs and ext4 images, but also simple tar.gz files of the rootfs. The current release is 18.06.2, and I recommend starting with it.
The ARM-virt rootfs tarball can be found at OpenWrt
Download the OpenWrt 18.06.2 rootfs tarball for Arm.
The x86 rootfs is here
Although the yaml file can contain quite a bit of information the minimum requirement is architecture and creation_date. Use your favourite editor to create a file named metadata.yaml
architecture: "armhf"
creation_date: 1544922658
The creation date is the current time (in seconds) since the unix epoch (1 Jan 1970). Easiest way to get this value it to find it on the web, such as the EpochConverter
Once the metadata.yaml file is created, tar it up and name it anything that makes sense to you.
tar cvf openwrt-meta.tar metadata.yaml
Place both tar files (metadata & rootfs) in the same directory on the Raspberry Pi. And use the following command to import the image:
lxc image import openwrt-meta.tar default-root.tar.gz --alias openwrt_armhf
Unfortunately, the OpenWrt image won't boot with the imported image. So a helper script has been developed to create devices in /dev before OpenWrt will boot properly.
The steps to get your virtual OpenWrt up and running are:
- Create the container
- Adjust some of the parameters of the container
- Copy the
init.shscript to/rooton the image - Log into the OpenWrt container and execute
sh init.sh - Validate that OpenWrt has completed booting
I use router as the name of the OpenWrt container
lxc init local:openwrt_armhf router
lxc config set router security.privileged true
In order for init.sh to run the mknod command the container must run as privileged.
Since this is going to be a router, it is useful to have two interfaces (for WAN & LAN), and therefore a profile for this network config must be created. Create the profile, and edit to match the config below (assuming you have br0 as a WAN and lxdbr0 as LAN).
lxc profile create twointf
lxc profile edit twointf
	config: {}
	description: 2 interfaces
	devices:
	  eth0:
	    name: eth0
	    nictype: bridged
	    parent: lxdbr0
	    type: nic
	  eth1:
	    name: eth1
	    nictype: bridged
	    parent: br0
	    type: nic
	  root:
	    path: /
	    pool: default
	    type: disk
	name: twointf
And then edit the router container to have 2 interfaces. The only line you need to add is the eth1 line, and be sure to have a unique MAC address (or just increment the eth0 MAC). You base_image id will be different.
lxc config edit router
architecture: armv7l
config:
  image.architecture: armhf
  image.description: 'OpenWrt 18.06.2 from armvirt/32 '
  image.os: openwrt
  image.release: 18.06.2
  raw.lxc: lxc.apparmor.profile=unconfined
  security.privileged: "true"
  volatile.base_image: eae3ea75333699a733ecb9f1e134fdad99e44416a4757e372ecc6950b2de3bfa
  volatile.eth0.hwaddr: 00:16:3e:72:44:b5
  volatile.eth1.hwaddr: 00:16:3e:72:44:b6
  volatile.idmap.base: "0"
  volatile.idmap.next: '[]'
  volatile.last_state.idmap: '[]'
  volatile.last_state.power: RUNNING
devices: {}
ephemeral: false
profiles:
- twointf
stateful: false
description: ""
Now assign the twointf profile to the router container, and remove the default profile (which only has one interface)
lxc profile assign router twointf
lxc profile remove router default
In order to use the lxc push command the container must be running, so we'll restart it.
lxc start router
Then copy the `init.sh script to the container
lxc file push init.sh router/root/
With the container started, the OpenWrt container boot will stall after running procd (think init in linux). By running init.sh the boot process will continue, and OpenWrt should be up and running.
Log into the router container using the lxc exec command, and run the init.sh script.
lxc exec router sh
#
# sh init.sh
wait..
wait..
wait..
wait..
508
Chain INPUT (policy ACCEPT)
target     prot opt source               destination

...
Chain FORWARD (policy ACCEPT)
target     prot opt source               destination

Chain OUTPUT (policy ACCEPT)
target     prot opt source               destination
Warning: Unable to locate ipset utility, disabling ipset support
 * Flushing IPv4 filter table
 * Flushing IPv6 filter table
 * Populating IPv4 filter table
...
   * Zone 'lan'
   * Zone 'wan'
 * Populating IPv6 filter table
...
   * Zone 'lan'
   * Zone 'wan'
 * Set tcp_ecn to off
 * Set tcp_syncookies to on
 * Set tcp_window_scaling to on
 * Running script '/etc/firewall.user'
~ #
You can see if OpenWrt is up and running by looking at the processes. An unhappy container will only have three. A happy container will have about 12. Type ps inside the container should look like this:
~ # ps
  PID USER       VSZ STAT COMMAND
    1 root      1324 S    /sbin/procd
   78 root      1064 S    sh
  107 root      1000 S    /sbin/ubusd
  196 root      1016 S    /sbin/logd -S 64
  213 root      1328 S    /sbin/rpcd
  322 root      1512 S    /sbin/netifd
  357 root      1228 S    /usr/sbin/odhcpd
  409 root       828 S    /usr/sbin/dropbear -F -P /var/run/dropbear.1.pid -p 22 -K 300 -T 3
  467 root       820 S    odhcp6c -s /lib/netifd/dhcpv6.script -Ntry -P0 -t120 eth1
  469 root      1064 S    udhcpc -p /var/run/udhcpc-eth1.pid -s /lib/netifd/dhcp.script -f -t 0 -i eth1 -x hostname:router
  508 root      1116 S    /usr/sbin/uhttpd -f -h /www -r OpenWrt -x /cgi-bin -t 60 -T 30 -k 20 -A 1 -n 3 -N 100 -R -p 0.0.
  850 dnsmasq   1152 S    /usr/sbin/dnsmasq -C /var/etc/dnsmasq.conf.cfg01411c -k -x /var/run/dnsmasq/dnsmasq.cfg01411c.pi
 1191 root      1064 R    ps
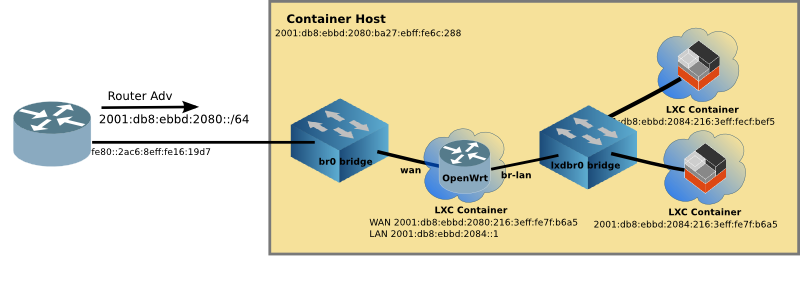
Additionally, if you have connected the router up the right way (e.g. WAN=eth1/br0 LAN=eth0,lxdbr0) then your addressing should look something like this:
~ # ip addr
1: lo: <LOOPBACK,UP,LOWER_UP> mtu 65536 qdisc noqueue state UNKNOWN qlen 1000
    link/loopback 00:00:00:00:00:00 brd 00:00:00:00:00:00
    inet 127.0.0.1/8 scope host lo
       valid_lft forever preferred_lft forever
    inet6 ::1/128 scope host
       valid_lft forever preferred_lft forever
2: br-lan: <BROADCAST,MULTICAST,UP,LOWER_UP> mtu 1500 qdisc noqueue state UP qlen 1000
    link/ether 00:16:3e:72:44:b5 brd ff:ff:ff:ff:ff:ff
    inet 192.168.1.1/24 brd 192.168.1.255 scope global br-lan
       valid_lft forever preferred_lft forever
    inet6 fd6a:c19d:b07:2084::1/62 scope global
       valid_lft forever preferred_lft forever
    inet6 2001:db8:ebbd:2084::1/62 scope global
       valid_lft forever preferred_lft forever
    inet6 fd4b:7e4:111::1/60 scope global
       valid_lft forever preferred_lft forever
    inet6 fe80::216:3eff:fe72:44b5/64 scope link
       valid_lft forever preferred_lft forever
85: eth0@if86: <BROADCAST,MULTICAST,UP,LOWER_UP,M-DOWN> mtu 1500 qdisc noqueue master br-lan state UP qlen 1000
    link/ether 00:16:3e:72:44:b5 brd ff:ff:ff:ff:ff:ff
87: eth1@if88: <BROADCAST,MULTICAST,UP,LOWER_UP,M-DOWN> mtu 1500 qdisc noqueue state UP qlen 1000
    link/ether 00:16:3e:72:44:b6 brd ff:ff:ff:ff:ff:ff
    inet 192.168.215.198/24 brd 192.168.215.255 scope global eth1
       valid_lft forever preferred_lft forever
    inet6 fd6a:c19d:b07:2080:216:3eff:fe72:44b6/64 scope global
       valid_lft forever preferred_lft forever
    inet6 2001:db8:ebbd:2080:216:3eff:fe72:44b6/64 scope global
       valid_lft forever preferred_lft forever
    inet6 fd6a:c19d:b07:2080::93b/128 scope global
       valid_lft forever preferred_lft forever
    inet6 2001:db8:ebbd:2080::93b/128 scope global
       valid_lft forever preferred_lft forever
    inet6 fe80::216:3eff:fe72:44b6/64 scope link
       valid_lft forever preferred_lft forever
~ #
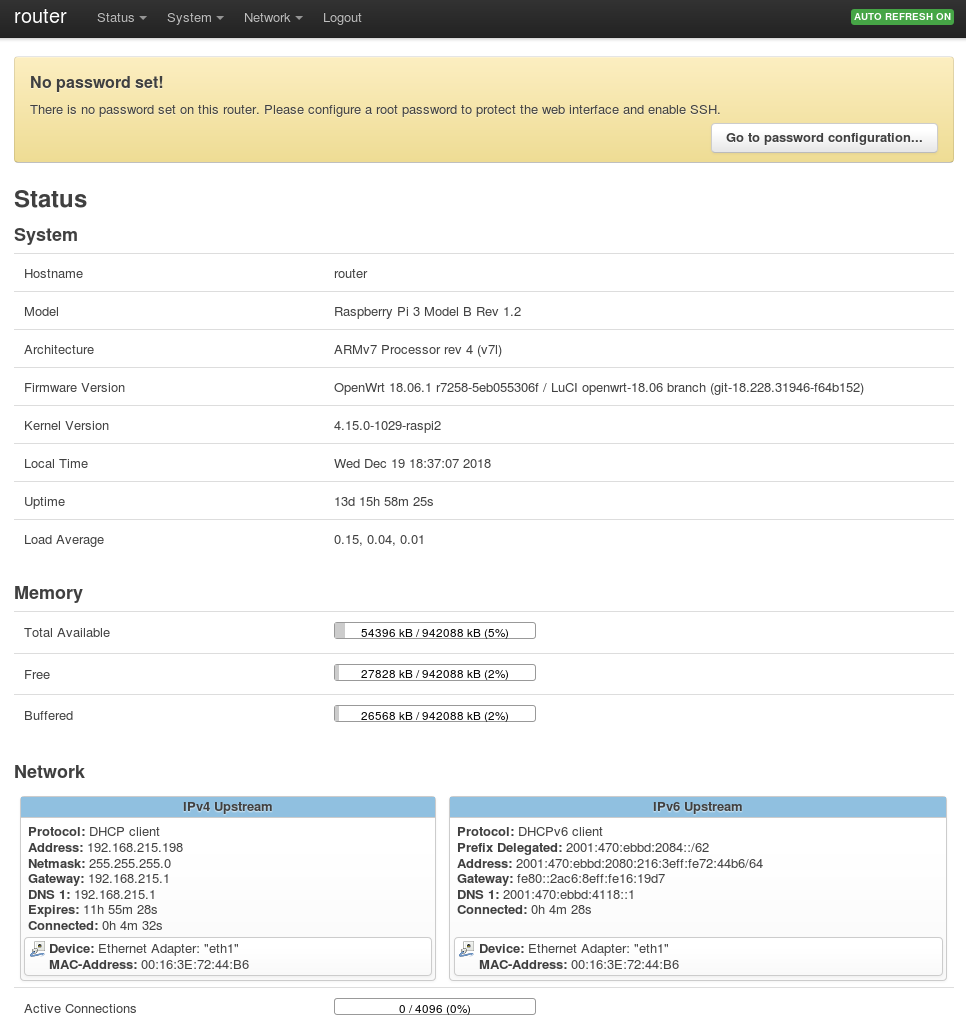
The LuCI web interface by default is blocked on the WAN interface. However it is the easiest way to manage the router. A firewall rule allowing web access from the WAN must be inserted.
The standard way it to add the following to bottom of the /etc/config/firewall file within the OpenWrt container.
lxc exec router sh

# vi /etc/config/firewall

...
config rule
        option target 'ACCEPT'
        option src 'wan'
        option proto 'tcp'
        option dest_port '80'
        option name 'ext_web'
Save the file and then restart the firewall within the OpenWrt container.
/etc/init.d/firewall restart
Now you should be able to point your web browser to the WAN address (see eth1 above). and login, password is blank.
http://[2001:db8:ebbd:2080::93b]/
Follow the instructions to set a password.
Type exit to return to the Raspberry Pi prompt. By looking at some lxc output, we can see the virtual network up and running.
$ lxc ls
+---------+---------+------------------------+-----------------------------------------------+------------+-----------+
|  NAME   |  STATE  |          IPV4          |                     IPV6                      |    TYPE    | SNAPSHOTS |
+---------+---------+------------------------+-----------------------------------------------+------------+-----------+
| docker1 | RUNNING | 192.168.215.220 (eth0) | fd6a:c19d:b07:2080:216:3eff:fe58:1ac9 (eth0)  | PERSISTENT | 0         |
|         |         | 172.17.0.1 (docker0)   | fd4b:7e4:111:0:216:3eff:fe58:1ac9 (eth0)      |            |           |
|         |         |                        | 2001:db8:ebbd:2080:216:3eff:fe58:1ac9 (eth0)  |            |           |
+---------+---------+------------------------+-----------------------------------------------+------------+-----------+
| router  | RUNNING | 192.168.215.198 (eth1) | fd6a:c19d:b07:2084::1 (br-lan)                | PERSISTENT | 1         |
|         |         | 192.168.1.1 (br-lan)   | fd6a:c19d:b07:2080::8d1 (eth1)                |            |           |
|         |         |                        | fd6a:c19d:b07:2080:216:3eff:fe72:44b6 (eth1)  |            |           |
|         |         |                        | fd4b:7e4:111::1 (br-lan)                      |            |           |
|         |         |                        | fd4b:7e4:111:0:216:3eff:fe72:44b6 (eth1)      |            |           |
|         |         |                        | 2001:db8:ebbd:2084::1 (br-lan)                |            |           |
|         |         |                        | 2001:db8:ebbd:2080::8d1 (eth1)                |            |           |
|         |         |                        | 2001:db8:ebbd:2080:216:3eff:fe72:44b6 (eth1)  |            |           |
+---------+---------+------------------------+-----------------------------------------------+------------+-----------+
| www     | RUNNING | 192.168.1.158 (eth0)   | fd6a:c19d:b07:2084:216:3eff:fe01:e0a3 (eth0)  | PERSISTENT | 0         |
|         |         |                        | fd4b:7e4:111:0:216:3eff:fe01:e0a3 (eth0)      |            |           |
|         |         |                        | fd42:dc68:dae9:28e9:216:3eff:fe01:e0a3 (eth0) |            |           |
|         |         |                        | 2001:db8:ebbd:2084:216:3eff:fe01:e0a3 (eth0)  |            |           |
+---------+---------+------------------------+-----------------------------------------------+------------+-----------+
The docker1 container is still running from Linux Containers on the Pi, and still connected to the outside network br0. You can see this by the addressing assigned (both v4 and v6).
The router container (which is running OpenWrt) has both eth1 (aka WAN) and br-lan (aka LAN) interfaces. The br-lan interface is connected to the inside lxdbr0 virtual network. And OpenWrt routes between the two networks.
Lastly the www container is just another instantiation of the web container (created in Linux Containers on the Pi), but connected to the inside network. It was started with the following command:
lxc launch -p default local:web_image www
In order to permit access to webservers, a firewall rule on the virtual OpenWrt must allow the traffic. Add a new rule to allow port 80 traffic to pass to any host on the inside network (the lxdbr0 bridge) using the Web GUI (LuCI).
The init.sh script has been tested with LXD 3.0.2 and OpenWrt 18.06.2 on a Raspberry Pi 3B & 3B+ running 4.15.0-1030-raspi2 #31-Ubuntu
Not everything is perfect, even in the virtual world. There are some limitations to running OpenWrt in a Linux Container.
-
As of version 0.93, ssh if fixed (on Pi 3B+). Login via ssh normally
ssh root@<router addr>- Prior to v0.93, ssh is tricky. Must use the
ssh root@<router addr> "/bin/sh" -i - But you can continue to use scp, rsync, and run non-interactive commands with ssh.
- Prior to v0.93, ssh is tricky. Must use the
-
init.shdoesn't run at boot. Haven't figured out how to do this yet, since the boot stalls very early in the process. (it is reported that in the next version of OpenWrt,procdwill fix this problem, andinit.shwill no longer be unnecessary) -
Container will not stop via the
lxc stopcommand. You must use:lxc stop --force routerorlxc exec router -- halt
-
If you took all the defaults when running
lxd initthen lxd will have a DHCP4 server running on the bridgelxdbr0. Downstream containers may not get the correct IPv4 address. DHCP4 on LXD can be disabled withlxc network set lxdbr0 ipv4.address none -
wireless interfaces don't work. What is a virtual wireless interface anyway?
Thanks to melato for pointing me on the right path. Thanks also to gjedeer for the ssh fix. All current code by Craig Miller cvmiller at gmail dot com. But ideas, and ports to other embedded platforms beyond the Raspberry Pi are welcome.
This project is open source, under the MIT license (see LICENSE)