


- Prerequisites
- Start the Demo
- Use CQL API
- Use REST API
- Use Document API
- Use GraphQL API
- Create an Astra Instance
To run the demo you need docker and docker-compose. Skip this steps if you have them available already
Docker is an open-source project that automates the deployment of software applications inside containers by providing an additional layer of abstraction and automation of OS-level virtualization on Linux.
 : To install on windows please use the following installer Docker Desktop for Windows Installer
 : To install on MAC OS use Docker Desktop for MAC Installer or homebrew with following commands:
# Fetch latest version of homebrew and formula.
brew update
# Tap the Caskroom/Cask repository from Github using HTTPS.
brew tap caskroom/cask
# Searches all known Casks for a partial or exact match.
brew search docker
# Displays information about the given Cask
brew cask info docker
# Install the given cask.
brew cask install docker
# Remove any older versions from the cellar.
brew cleanup
# Validate installation
docker -v
: To install on linux (centOS) you can use the following commands
# Remove if already install
sudo yum remove docker \
                  docker-client \
                  docker-client-latest \
                  docker-common \
                  docker-latest \
                  docker-latest-logrotate \
                  docker-logrotate \
                  docker-engine
# Utils
sudo yum install -y yum-utils

# Add docker-ce repo
sudo dnf config-manager --add-repo=https://download.docker.com/linux/centos/docker-ce.repo
# Install
sudo dnf -y  install docker-ce --nobest
# Enable service
sudo systemctl enable --now docker
# Get Status
systemctl status  docker

# Logout....Lougin
exit
# Create user
sudo usermod -aG docker $USER
newgrp docker

# Validation
docker images
docker run hello-world
docker -vDocker Compose is a tool for defining and running multi-container Docker applications. It uses YAML files to configure the application's services and performs the creation and start-up process of all the containers with a single command. The docker-compose CLI utility allows users to run commands on multiple containers at once, for example, building images, scaling containers, running containers that were stopped, and more. Please refer to Reference Documentation if you have for more detailed instructions.
: Already included in the previous package Docker for Windows
: Already included in the previous package Docker for Mac
: To install on linux (centOS) you can use the following commands
# Download deliverable and move to target location
sudo curl -L "https://github.com/docker/compose/releases/download/1.23.2/docker-compose-$(uname -s)-$(uname -m)" -o /usr/local/bin/docker-compose

# Allow execution
sudo chmod +x /usr/local/bin/docker-compose : Already included as stated here
: Use brew
brew install curl
:Use your package installer like yum or apt-get
sudo apt-get install curl
Download the repository as a zip here or clone with the following git command
git clone https://github.com/datastaxdevs/conference-2021-apachecon-stargate.gitWe provide a docker-compose.yaml file ready to go with a Cassandra 3.11.8 backend and stargate in version 1.0.34
export CASSTAG=3.11.8
export SGTAG=v1.0.34
docker-compose up -d backend-1docker-compose up -d backend-2docker-compose up -d backend-3docker exec -it `docker ps | grep backend-1 | cut -b 1-12` nodetool status- Extract variable
export backend1ip=$(docker inspect -f '{{range .NetworkSettings.Networks}}{{.IPAddress}}{{end}}' `docker ps | grep backend-1 | cut -b 1-12`)- Check that we are OK
echo $backend1ipdocker exec -it `docker ps | grep backend-1 | cut -b 1-12` cqlsh $backend1ip -u cassandra -p cassandraThe stargate node executes query with LOCAL_QUORUM, the table handling the token data_endpoint_auth must have a replication factory of 3.
The datacenter used everywhere is datacenter1
Also here we create an sample keyspace ks1 for tests.
- Create keyspace
DROP KEYSPACE IF EXISTS data_endpoint_auth;
CREATE KEYSPACE data_endpoint_auth WITH replication = {'class': 'NetworkTopologyStrategy', 'datacenter1': '3'} AND durable_writes = true;- Exit CQLSH
exit
- Start the node
docker-compose up -d stargate
- Wait for the node to be up
echo "Waiting for stargate to start up..."
while [[ "$(curl -s -o /dev/null -w ''%{http_code}'' http://localhost:8082/health)" != "200" ]]; do
    printf '.'
    sleep 5
done
- Extract variable
export stargateip=$(docker inspect -f '{{range .NetworkSettings.Networks}}{{.IPAddress}}{{end}}' `docker ps | grep stargateio | cut -b 1-12`)
- check we are OK
echo $stargateip
echo "Check Status...."
echo "Backend-1 IP: $backend1ip"
echo "Stargate IP: $stargateip"
docker ps
docker exec -it `docker ps | grep backend-1 | cut -b 1-12` nodetool status
👁️ Expected output
Check Status....
Backend-1 IP: 172.19.0.2
Stargate IP: 172.19.0.5

PROMPT> docker ps
CONTAINER ID   IMAGE                              COMMAND                  CREATED       STATUS       PORTS                                                                                                                                                 NAMES
2200f5c86bfd   stargateio/stargate-3_11:v1.0.34   "./starctl"              3 hours ago   Up 3 hours   0.0.0.0:8080-8082->8080-8082/tcp, :::8080-8082->8080-8082/tcp, 0.0.0.0:8084->8084/tcp, :::8084->8084/tcp, 0.0.0.0:9045->9042/tcp, :::9045->9042/tcp   cassandra-3_stargate_1
16cb48746e72   cassandra:3.11.8                   "docker-entrypoint.s…"   3 hours ago   Up 3 hours   7000-7001/tcp, 7199/tcp, 9042/tcp, 9160/tcp                                                                                                           cassandra-3_backend-3_1
31bd64f67237   cassandra:3.11.8                   "docker-entrypoint.s…"   3 hours ago   Up 3 hours   7000-7001/tcp, 7199/tcp, 9042/tcp, 9160/tcp                                                                                                           cassandra-3_backend-2_1
835408a3d2d0   cassandra:3.11.8                   "docker-entrypoint.s…"   3 hours ago   Up 3 hours   7000-7001/tcp, 7199/tcp, 9160/tcp, 0.0.0.0:9044->9042/tcp, :::9044->9042/tcp                                                                          cassandra-3_backend-1_1

PROMPT>  docker exec -it `docker ps | grep backend-1 | cut -b 1-12` nodetool status

Datacenter: datacenter1
=======================
Status=Up/Down
|/ State=Normal/Leaving/Joining/Moving
--  Address     Load       Tokens       Owns (effective)  Host ID                               Rack
UN  172.19.0.3  355.37 KiB  256          100.0%            75b42435-3197-42ed-bdd8-fdb00294865b  rack1
UN  172.19.0.2  331.99 KiB  256          100.0%            45a33f3a-9115-4878-a1c2-54d00b4c3ff0  rack1
UN  172.19.0.4  320.44 KiB  256          100.0%            9cb00b9d-3bc6-44bb-95a8-e0152d9db9f8  rack1
- You should be able to access the GRAPHQL Playground on http://localhost:8080/playground
👁️ Expected output
- You should be able to access the Swagger UI on http://localhost:8082/swagger-ui/#/
👁️ Expected output

- You should be able to access the Metrics UI http://localhost:8084/metrics
👁️ Expected output

- Use this IP to connect with a cqlsh. Note that the stargate image itself does not provide it we use the cqlsh from backend-1 as a sample client.
docker exec -it `docker ps | grep backend-1 | cut -b 1-12` cqlsh $stargateip -u cassandra -p cassandraCREATE KEYSPACE ks1 WITH replication = {'class': 'NetworkTopologyStrategy', 'datacenter1': '3'} AND durable_writes = true;
use ks1;
CREATE TYPE IF NOT EXISTS video_format (
width int,
height int
);
CREATE TABLE IF NOT EXISTS videos (
videoid uuid,
title text,
upload timestamp,
email text,
url text,
tags set <text>,
frames list<int>,
formats map <text,frozen<video_format>>,
PRIMARY KEY (videoid)
);
describe ks1- Insert value using plain CQL
INSERT INTO videos(videoid, email, title, upload, url, tags, frames, formats)
VALUES(uuid(), 'clu@sample.com', 'sample video',
     toTimeStamp(now()), 'http://google.fr',
     { 'cassandra','accelerate','2020'},
     [ 1, 2, 3, 4],
{ 'mp4':{width:1,height:1},'ogg':{width:1,height:1}});- Insert Value using JSON
INSERT INTO videos JSON '{
   "videoid":"e466f561-4ea4-4eb7-8dcc-126e0fbfd573",
     "email":"clunven@sample.com",
     "title":"A Second videos",
     "upload":"2020-02-26 15:09:22 +00:00",
     "url": "http://google.fr",
     "frames": [1,2,3,4],
     "tags":   [ "cassandra","accelerate", "2020"],
     "formats": {
        "mp4": {"width":1,"height":1},
        "ogg": {"width":1,"height":1}
     }
}';- Read values
select * from videos;- Read by id
select * from videos where videoid=e466f561-4ea4-4eb7-8dcc-126e0fbfd573;- Quit
cqlsh
exitThis walkthrough has been realized using the REST API Quick Start. Here we will the the DATA or SwaggerUI

curl -L -X POST 'http://localhost:8081/v1/auth' \
  -H 'Content-Type: application/json' \
  --data-raw '{
    "username": "cassandra",
    "password": "cassandra"
}'
Copy the token value (here 74be42ef-3431-4193-b1c1-cd8bd9f48132) in your clipboard.
👁️ Expected output
{"authToken":"74be42ef-3431-4193-b1c1-cd8bd9f48132"}

- Click
Try it out - Provide your token in the field
X-Cassandra-Token - Click on
Execute

- Click
Try it out - Provide your token in the field
X-Cassandra-Token - keyspace:
ks1 - Click on
Execute

- Click
Try it out - X-Cassandra-Token:
<your_token> - keyspace:
ks1 - Click on
Execute

- Click
Try it out - X-Cassandra-Token:
<your_token> - keyspace:
ks1 - Data
{
  "name": "users",
  "columnDefinitions":
    [
        {
        "name": "firstname",
        "typeDefinition": "text"
      },
        {
        "name": "lastname",
        "typeDefinition": "text"
      },
      {
        "name": "email",
        "typeDefinition": "text"
      },
        {
        "name": "color",
        "typeDefinition": "text"
      }
    ],
  "primaryKey":
    {
      "partitionKey": ["firstname"],
      "clusteringKey": ["lastname"]
    },
  "tableOptions":
    {
      "defaultTimeToLive": 0,
      "clusteringExpression":
        [{ "column": "lastname", "order": "ASC" }]
    }
}
👁️ Expected output
{
  "name": "users"
}Notice than for the DML you move to DATA. Make sure you are using url with V2, V1 would also work but this is NOT the same payload.

- X-Cassandra-Token:
<your_token> - keyspaceName:
ks1 - tableName:
users - Data
{
    "firstname": "Cedrick",
    "lastname": "Lunven",
    "email": "c.lunven@gmail.com",
    "color": "blue"
}
You can note that the output code is 201 and return your primary key `{ "firstname": "Cedrick","lastname": "Lunven" }
- You can add a second record changing only the payload
{
    "firstname": "David",
    "lastname": "Gilardi",
    "email": "d.gilardi@gmail.com",
    "color": "blue"
}- Add a third
{
    "firstname": "Kirsten",
    "lastname": "Hunter",
    "email": "k.hunter@gmail.com",
    "color": "pink"
}-
X-Cassandra-Token:
<your_token> -
keyspaceName:
ks1 -
tableName:
users -
Click Execute
-
Notice how now you can only limited return fields
-
fields:
firstname, lastname


- X-Cassandra-Token:
<your_token> - keyspaceName:
ks1 - tableName:
users - primaryKey; 'Cedrick`
- Click Execute
- Important: The Swagger user interface is limited as of now and you cannot test a composite key (here adding Lunven). This is a bug in the UI not the API.
- X-Cassandra-Token:
<your_token> - keyspaceName:
ks1 - tableName:
users - primaryKey; 'Cedrick`
- Click Execute

- X-Cassandra-Token:
<your_token> - keyspaceName:
ks1 - tableName:
users - whereClause; '{"firstname": {"$eq":"David"}}`
- Click Execute
I let you try with {"lastname": {"$eq":"Gilardi"}}.. expected right ?
This walkthrough has been realized using the Quick Start
✅ 5a. List Namespaces :

✅ 5b. Create a document :
Note: operations requiring providing namespace and collections on the swagger UI seems not functional. We are switching to CURL the API is working, this is a documentation bug that has been notified to the development team.

{
   "videoid":"e466f561-4ea4-4eb7-8dcc-126e0fbfd573",
     "email":"clunven@sample.com",
     "title":"A Second videos",
     "upload":"2020-02-26 15:09:22 +00:00",
     "url": "http://google.fr",
     "frames": [1,2,3,4],
     "tags":   [ "cassandra","accelerate", "2020"],
     "formats": {
        "mp4": {"width":1,"height":1},
        "ogg": {"width":1,"height":1}
     }
}
✅ 5c. Retrieve documents :

✅ 5d. Retrieve 1 document :

✅ 5e. Search for document by properties :
- WhereClause
{"email": {"$eq": "clunven@sample.com"}}This walkthrough has been realized using the GraphQL Quick Start
Same as Rest API generate a auth token
✅ 6a Generate Auth token :
curl -L -X POST 'http://localhost:8081/v1/auth' \
  -H 'Content-Type: application/json' \
  --data-raw '{
    "username": "cassandra",
    "password": "cassandra"
}'
Save output as an environment variable
export AUTH_TOKEN=7c37bda5-7360-4d39-96bc-9765db5773bc
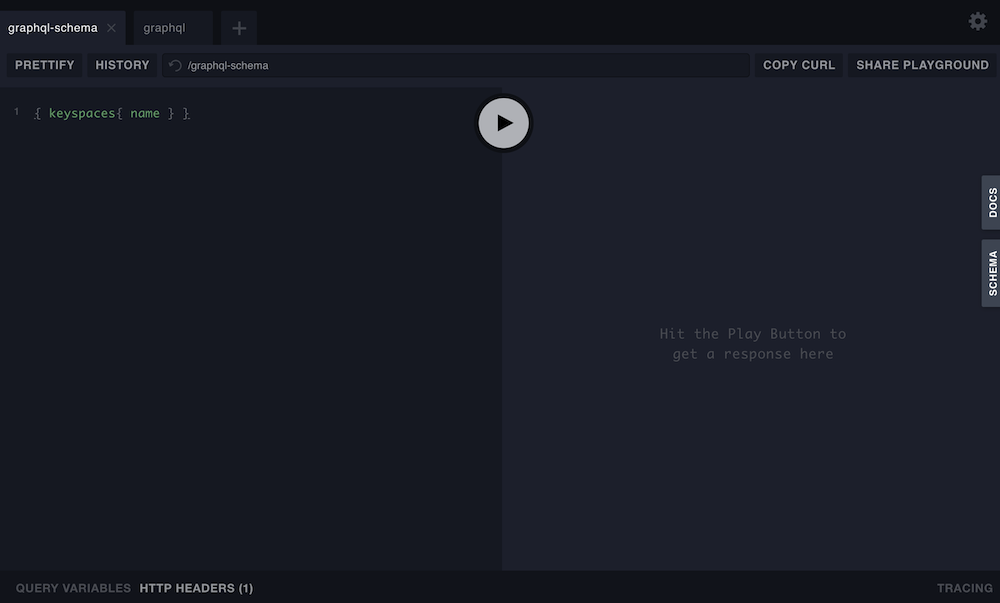
✅ 6b. Open GraphQL Playground :
- You should be able to access the GRAPH QL PORTAL on http://localhost:8080/playground
You can check on the right of the playground that you have access to documentation and schema which is the neat part about graphQL
👁️ Expected output
✅ 6c. Creating a Table :
- Use this query
mutation {
  books: createTable(
    keyspaceName:"library",
    tableName:"books",
    partitionKeys: [ # The keys required to access your data
      { name: "title", type: {basic: TEXT} }
    ]
    values: [ # The values associated with the keys
      { name: "author", type: {basic: TEXT} }
    ]
  )
  authors: createTable(
    keyspaceName:"library",
    tableName:"authors",
    partitionKeys: [
      { name: "name", type: {basic: TEXT} }
    ]
    clusteringKeys: [ # Secondary key used to access values within the partition
      { name: "title", type: {basic: TEXT}, order: "ASC" }
    ]
  )
}
👁️ Expected output

✅ 6d. Populating Table :
Any of the created APIs can be used to interact with the GraphQL data, to write or read data.
First, let’s navigate to your new keyspace library inside the playground. Change tab to graphql and pick url /graphql/library.
- Use this query
mutation {
  moby: insertBooks(value: {title:"Moby Dick", author:"Herman Melville"}) {
    value {
      title
    }
  }
  catch22: insertBooks(value: {title:"Catch-22", author:"Joseph Heller"}) {
    value {
      title
    }
  }
}
- Don't forget to update the header again
{
  "x-cassandra-token":"7c37bda5-7360-4d39-96bc-9765db5773bc"
}
👁️ Expected output

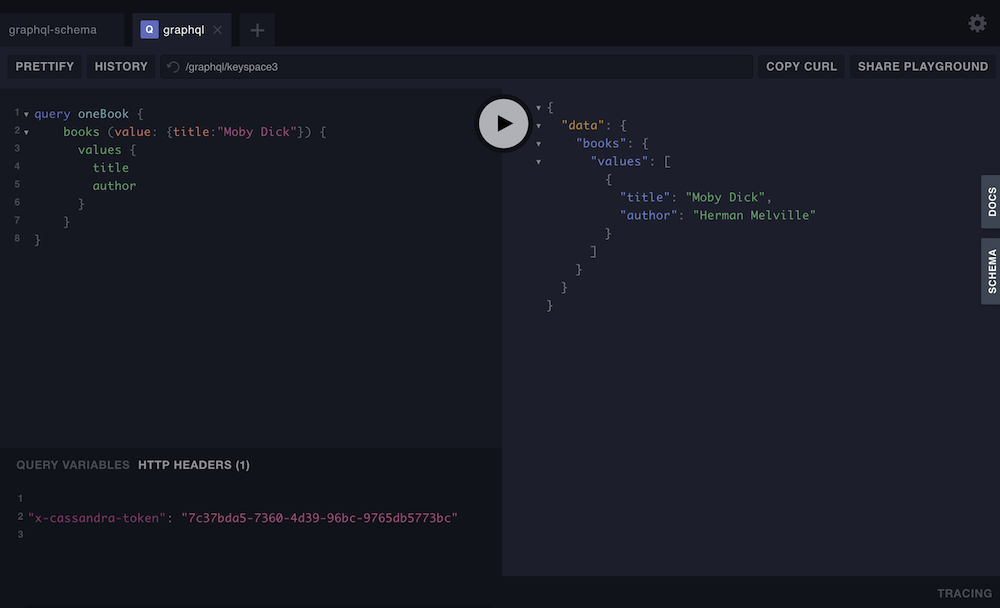
✅ 6e. Read data :
Stay on the same screen and sinmply update the query with
query oneBook {
    books (value: {title:"Moby Dick"}) {
      values {
        title
        author
      }
    }
}
👁️ Expected output
✅ Create an free-forever Cassandra database with DataStax Astra: click here to get started 🚀

✅ Use the form to create new database
On the Astra home page locate the Add Database button

Select the free tier plan, this is a true free tier, free forever and no payment method asked 🎉 🎉

Select the proper region and click the configure button. The number of regions and cloud providers are limited in the free tier but please notice you can run the DB on any cloud with any VPC Peering.

Fill the database name, keyspace name, username and password. Please remember your password as you will be asked to provide it when application start the first time.

✅ View your Database and connect
View your database. It may take 2-3 minutes for your database to spin up. You will receive an email at that point.
👁️ Expected output
Initializing

Once the database is ready, notice how the status changes from pending to Active and Astra enables the connect button.
