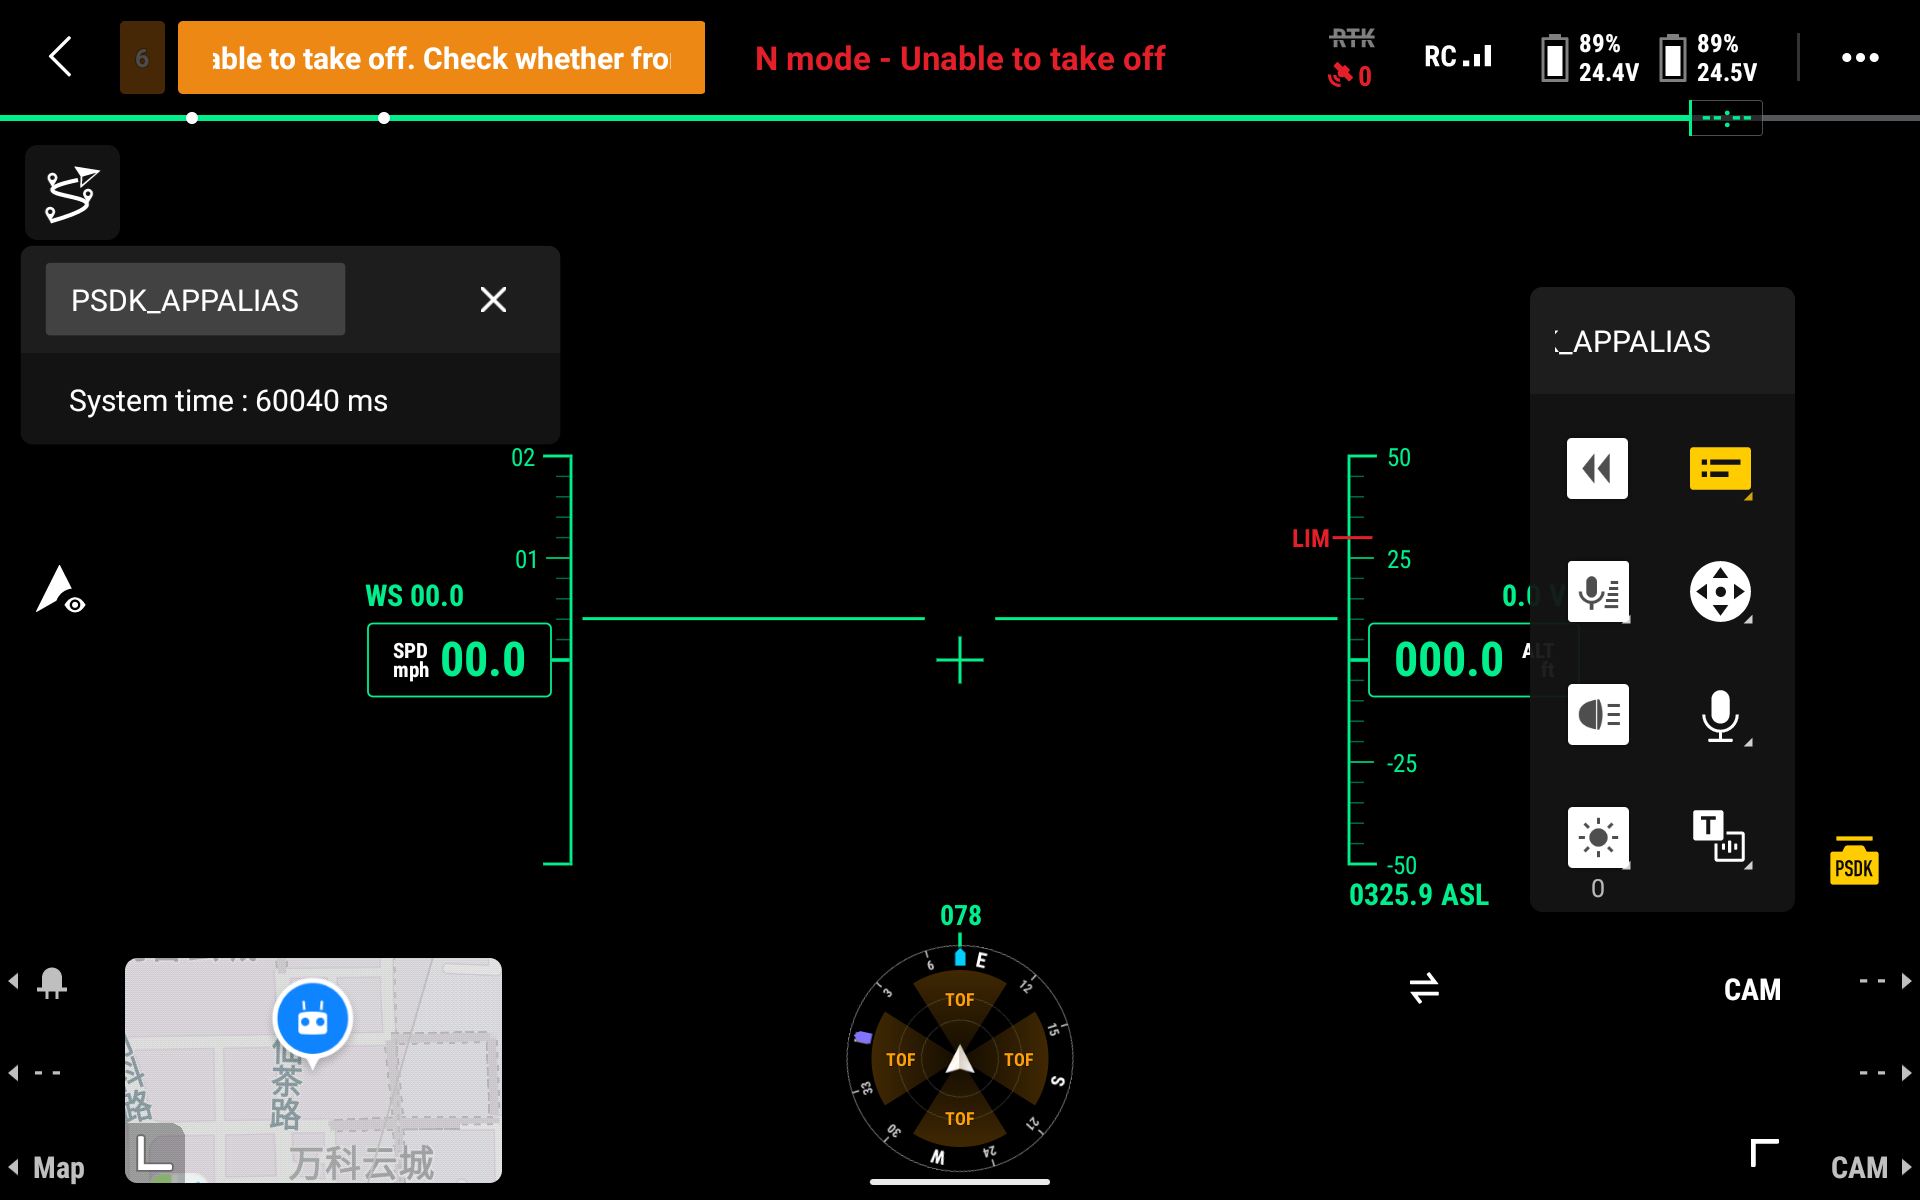
"Custom Widget" is a function that encapsulates "functions of the payload" into controls such as buttons, switches, and range bars; using DJI Pilot or a Mobile App developed based on MSDK can identify the configuration information of controls in the payload and generate UI Controls, which are convenient for users to quickly set the parameters of the load device and control the load device to perform the specified actions; at the same time, DJI Pilot or the Mobile App developed based on MSDK can also display the status information of the load device in the form of a floating window; in addition, the user can also According to the needs of use, the functions of the load equipment are mapped to the reserved buttons on the remote control, and the load equipment can be controlled in a more convenient way by using the reserved buttons on the remote control.
- Action bar controls: The action bar supports four control types: button, switch, range bar and selection list, and supports setting up to 8 custom widgets.
- Floating window: Display the status information of the load equipment in real time.
Figure 1. Main interface
The user can operate the controls in the configuration interface, such as buttons, switches, range bars, selection lists, text input boxes, and integer value input boxes, as shown in Figure 2. Configuration interface.
Figure 2. Configuration interface

Description
- The configuration interface only supports displaying a "text input box" control, the text box supports the input of characters of up to 128 bytes.
- The payload device developed with PSDK can obtain the information (the encoding format is UTF-8) sent by the user to the payload device in the DJI Pilot text input box control through the
DjiLowSpeedDataChannel_RegRecvDataCallback(ReceiveDataFromMobile)function.- Due to the length of the log, all characters entered by the user may not be displayed.
Description
- The path of the control configuration file:
sample/sample_c/module_sample/widget/widget_file- When the DJI Pilot system language is Chinese, the control configuration file is
cn_big_screen- When the DJI Pilot system language is English, the control configuration file is
en_big_screen- Configuration information in different languages, such as control number, quantity and type, needs to be consistent.
Note: The control configuration file includes static configuration file and control UI icon, it is recommended to configure control properties in static configuration file first , and then design the control icon.
widget_config.json is a file used to configure the static properties of controls. When modifying the widget_config.json file, be sure to strictly follow the syntax rules of JSON, otherwise configure The file will not be available.
Tips
- The configuration items in the JSON file are wrapped in a {}, and the data is expressed by key-value;
- The Key of JSON must be wrapped in a double quotation mark, do not lose the double quotation mark of the Key value;
- JSON values only support numbers (including floats and integers), strings, Bool values (such as true and false), arrays (need to be wrapped in []) and objects (need to be wrapped in {})
Note: The content after "//" in the following code is a code comment, please do not add this content in the actual JSON configuration file.
{
"version": { // The version of the custom control configuration file, the user cannot change this version number
"major" : 1,
"minor" : 0
},
"main_interface": { // DJI Pilot main interface control settings
"floating_window": {// floating window configuration
"is_enable": true // Whether the floating window is displayed, true: display, false: hidden
},
"widget_list": [ // Main interface action bar control list
{
"widget_index": 0, // widget number
"widget_type": "button", // Control type, the main interface Action control supports "button": button, "switch": switch, "range": range bar, "list": selection list
"widget_name": "Button_1", // Widget name
"icon_file_set": { // control icon file set
name of the control icon file in the selected state
"icon_file_name_unselected" : "icon_button1.png" // The name of the control icon file in the unselected state
}
},
{
"widget_index": 1,
"widget_type": "button",
"widget_name": "Button_2",
"icon_file_set": {
"icon_file_name_selected" : "icon_button2.png",
"icon_file_name_unselected" : "icon_button2.png"
}
},
{
"widget_index": 2,
"widget_type": "list",
"widget_name": "List",
"list_item": [
{
"item_name": "Item_1",
"icon_file_set": {
"icon_file_name_selected" : "icon_list_item1.png",
"icon_file_name_unselected" : "icon_list_item1.png"
}
},
{
"item_name": "Item_2",
"icon_file_set": {
"icon_file_name_selected" : "icon_list_item2.png",
"icon_file_name_unselected" : "icon_list_item2.png"
}
}
]
},
{
"widget_index": 3,
"widget_type": "switch",
"widget_name": "Switch",
"icon_file_set": {
"icon_file_name_selected" : "icon_switch_select.png",
"icon_file_name_unselected" : "icon_switch_unselect.png"
}
},
{
"widget_index": 4,
"widget_type": "scale",
"widget_name": "Scale",
"icon_file_set": {
"icon_file_name_selected" : "icon_scale.png",
"icon_file_name_unselected" : "icon_scale.png"
}
}
]
},
"config_interface": {
"text_input_box": { // text input box
"widget_name":"TextInputBox", //text input box name
"placeholder_text":"Please input message", //Text input box placeholder text
"is_enable":false // Whether the text input box is displayed, false: not displayed, true: displayed
},
"widget_list": [
{
"widget_index": 5,
"widget_type": "button",
"widget_name": "Button 5"
},
{
"widget_index": 6,
"widget_type": "scale",
"widget_name": "Scale 6"
},
{
"widget_index": 7,
"widget_type": "int_input_box",
"widget_name": "Integer Input Box 7",
"int_input_box_hint": "unit:s"
},
{
"widget_index": 8,
"widget_type": "switch",
"widget_name": "Switch 8"
},
{
"widget_index": 9,
"widget_type": "list",
"widget_name": "List 9",
"list_item": [
{
"item_name": "Item 1"
},
{
"item_name": "Item 2"
},
{
"item_name": "Item 3"
},
{
"item_name": "Item 4"
}
]
}
]
}To improve the compatibility between user-defined controls and DJI Pilot controls, please follow the following specifications to design control icons.
Tips: Use the [Sketch file] (https://terra-1-g.djicdn.com/71a7d383e71a4fb8887a310eb746b47f/psdk/psdk_widget.sketch) provided by DJI to quickly design a control icon suitable for DJI Pilot.
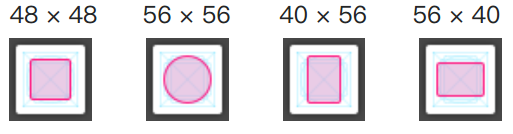
- Icon size
- Standard size: 96px
- Bottom Frame: 80px (Color: #000000; Transparency: 0.6 Alapha; Blur = 4)
- Circle : 4px
- colour
Figure 3. Control color

- Icon format: PNG
- Visual fixes:
Figure 4. Visual correction
RTOS system does not support file system, please follow the steps below to convert the configuration file to .h type file:
- Use the tool
file2cin thetools/file2cdirectory to generate.hheader files for all custom control configuration files. For details, please refer to theReadme.txtfile in the directory; .hheader file is in thesample/api_sample/widget/widget_file_cdirectory;- Call the interface
DjiWidget_RegDefaultUiConfigByBinaryArrayandDjiWidget_RegUiConfigByBinaryArrayto call the control configuration file.
Configuration References
- Chinese configuration files:
file_binary_array_list_cn.handfile_binary_array_list_cn.c- English configuration files:
file_binary_array_list_en.handfile_binary_array_list_en.c
To develop the custom control function of the load device, you need to complete the initialization of the custom control first, obtain the directory where the control configuration file is located, configure the configuration files displayed by the control in different system languages, and apply the custom control function by setting the control processing function list and finally implement the custom control function.
Before using the "custom control" function, you need to use the following code to initialize the control of the load device.
djiStat = DjiWidget_Init();
if (djiStat != DJI_ERROR_SYSTEM_MODULE_CODE_SUCCESS) {
USER_LOG_ERROR("Dji test widget init error, stat = 0x%08llX", djiStat);
return djiStat;
}When developing load devices on Linux and RTOS systems, it is necessary to set the configuration information of the controls, such as the default configuration files of the controls and the control configuration files corresponding to different system languages. Make sure that the DJI Pilot can get the configuration information of the controls and display them correctly on the DJI Pilot.
Description: The configuration items in the control configuration files in different system languages, such as control number, control quantity and control type , need to be consistent.
//Step 2 : Set UI Config (Linux environment)
char curFileDirPath[WIDGET_DIR_PATH_LEN_MAX];
char tempPath[WIDGET_DIR_PATH_LEN_MAX];
djiStat = DjiUserUtil_GetCurrentFileDirPath(__FILE__, WIDGET_DIR_PATH_LEN_MAX, curFileDirPath);
if (djiStat != DJI_ERROR_SYSTEM_MODULE_CODE_SUCCESS) {
USER_LOG_ERROR("Get file current path error, stat = 0x%08llX", djiStat);
return djiStat;
}

if (s_isWidgetFileDirPathConfigured == true) {
snprintf(tempPath, WIDGET_DIR_PATH_LEN_MAX, "%swidget_file/en_big_screen", s_widgetFileDirPath);
} else {
snprintf(tempPath, WIDGET_DIR_PATH_LEN_MAX, "%swidget_file/en_big_screen", curFileDirPath);
}

//set default ui config path
djiStat = DjiWidget_RegDefaultUiConfigByDirPath(tempPath);
if (djiStat != DJI_ERROR_SYSTEM_MODULE_CODE_SUCCESS) {
USER_LOG_ERROR("Add default widget ui config error, stat = 0x%08llX", djiStat);
return djiStat;
}

//set ui config for English language
djiStat = DjiWidget_RegUiConfigByDirPath(DJI_MOBILE_APP_LANGUAGE_ENGLISH,
DJI_MOBILE_APP_SCREEN_TYPE_BIG_SCREEN,
tempPath);
if (djiStat != DJI_ERROR_SYSTEM_MODULE_CODE_SUCCESS) {
USER_LOG_ERROR("Add widget ui config error, stat = 0x%08llX", djiStat);
return djiStat;
}

//set ui config for Chinese language
if (s_isWidgetFileDirPathConfigured == true) {
snprintf(tempPath, WIDGET_DIR_PATH_LEN_MAX, "%swidget_file/cn_big_screen", s_widgetFileDirPath);
} else {
snprintf(tempPath, WIDGET_DIR_PATH_LEN_MAX, "%swidget_file/cn_big_screen", curFileDirPath);
}

djiStat = DjiWidget_RegUiConfigByDirPath(DJI_MOBILE_APP_LANGUAGE_CHINESE,
DJI_MOBILE_APP_SCREEN_TYPE_BIG_SCREEN,
tempPath);
if (djiStat != DJI_ERROR_SYSTEM_MODULE_CODE_SUCCESS) {
USER_LOG_ERROR("Add widget ui config error, stat = 0x%08llX", djiStat);
return djiStat;
}//Step 2 : Set UI Config (RTOS environment)
T_DjiWidgetBinaryArrayConfig enWidgetBinaryArrayConfig = {
.binaryArrayCount = g_EnBinaryArrayCount,
.fileBinaryArrayList = g_EnFileBinaryArrayList
};
//set default ui config
djiStat = DjiWidget_RegDefaultUiConfigByBinaryArray(&enWidgetBinaryArrayConfig);
if (djiStat != DJI_ERROR_SYSTEM_MODULE_CODE_SUCCESS) {
USER_LOG_ERROR("Add default widget ui config error, stat = 0x%08llX", djiStat);
return djiStat;
}Register a function of the load device and the corresponding control parameters through the DjiWidget_RegHandlerList interface, and bind the function of the load device to the specified control.
djiStat = DjiWidget_RegHandlerList(s_widgetHandlerList, s_widgetHandlerListCount);
if (djiStat != DJI_ERROR_SYSTEM_MODULE_CODE_SUCCESS) {
USER_LOG_ERROR("Set widget handler list error, stat = 0x%08llX", djiStat);
return djiStat;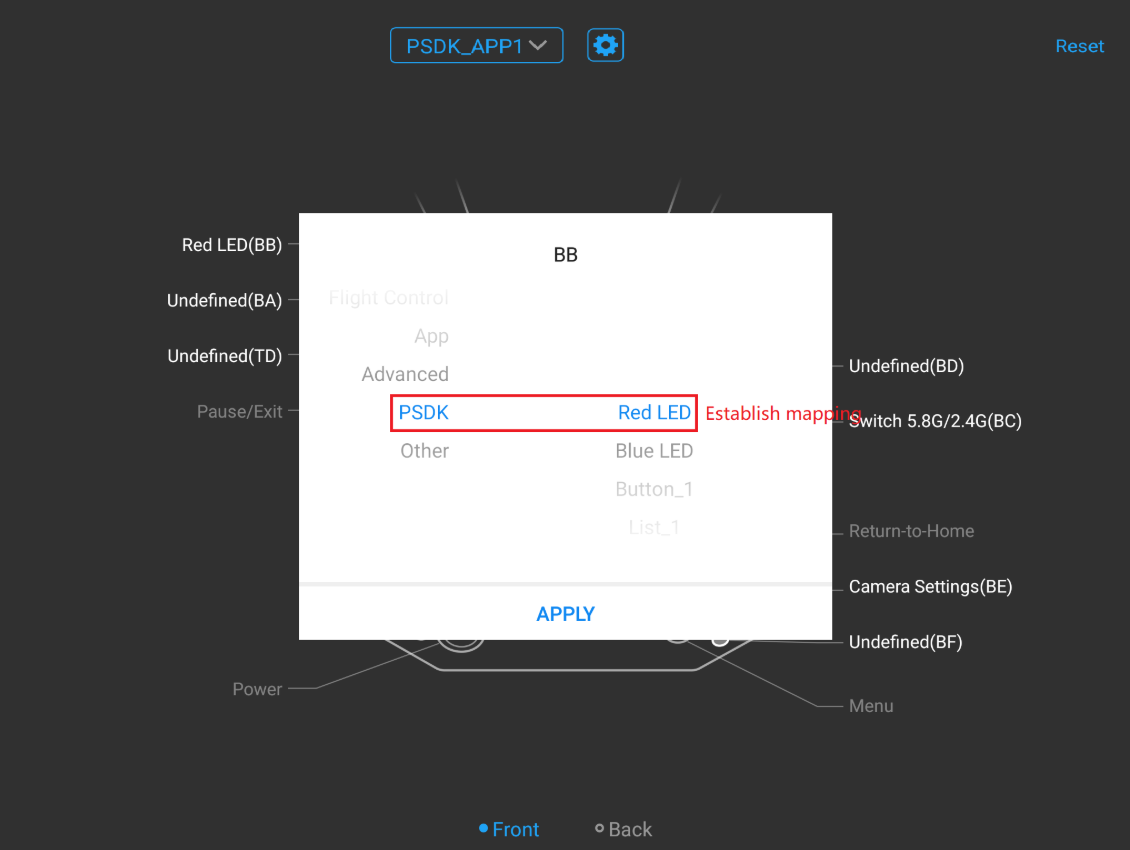
}After mapping the functions of the load device to the reserved buttons on the remote control Cendence GL900A, the user can use the reserved buttons to quickly control the load device to perform specified actions. For the detailed correspondence, please refer to Table 1. UI controls correspond to reserved buttons relationship, the mapping effect is shown in Figure 5. Button mapping.
Table 1. Correspondence between UI controls and reserved buttons| Control Type | Reserved keys | Trigger |
| Button | Keys: C1-C4/BA-BH | ·Key press: triggers a "button" control press command ·Key release: triggers a button control release command |
| Switch | Alternate trigger: the key is pressed and released, triggering the "switch" control to open or close the command | |
| Dropdown list | Click trigger: the button is pressed and released to trigger the command to select the next item | |
| Scope bar | Left and right levers: LS/RS | Toggle trigger: toggle the lever to trigger the range bar control, which can modify the range bar value |
| input box | Focus Knob: TD | Knob trigger: toggle the focus knob to trigger the input box control, and the value of the input box can be modified |
Figure 5. Button mapping
Description
- DJI Pilot supports creating multiple mapping tables to adapt to different load devices.
- Only M200 V2 series and GL900A remote control support control mapping.
DJI's drones allow users to add custom control operations to waypoint missions when using payload devices with custom controls, so that the drone can automatically control the designated waypoints when performing the waypoint mission. The controls of the load equipment, such as switch controls, button controls and range bar controls that control the load, realize tasks such as automatic inspection. The custom control function allows developers to add the following controls to the waypoint task:
- button
- switch
- Range bar
The steps to add controls while the drone is performing a waypoint mission are as follows:
- Go to the DJI Pilot flight route page
- Add waypoints on the map
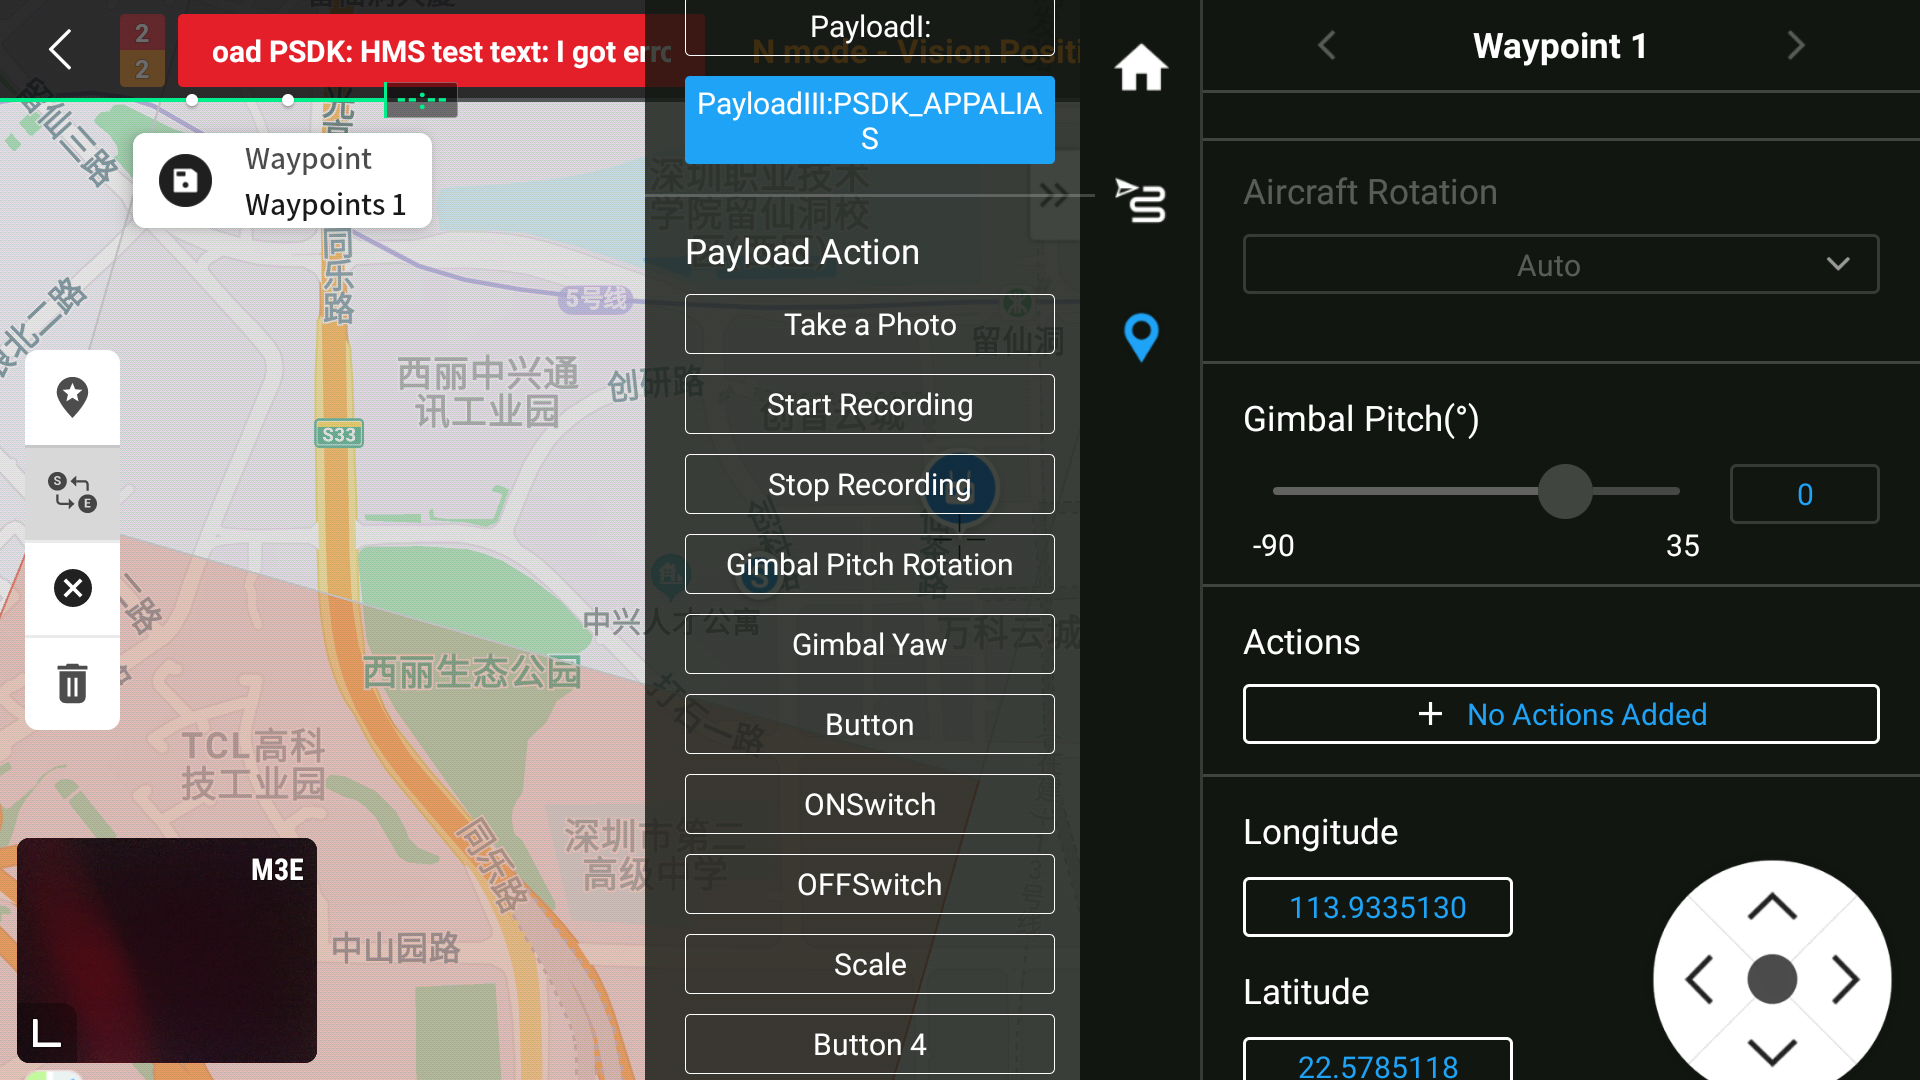
- When adding a waypoint, add a custom control action, such as turning the switch on and off, as shown in Figure 6. Add custom control action.
- Save the route
Figure 6. Add custom control action
- Execute the waypoint flight mission, when the drone flies to a specific waypoint, it will automatically trigger the action specified by the custom control, as shown in Figure 7. Triggering the custom control.
Figure 7. Triggering custom controls

Description
- DJI Pilot supports the creation of multiple flight missions for different payloads and different locations where the payloads are mounted. *Only Matrice 300 RTK supports developers adding the ability to control custom controls as actions when using waypoint missions.
Related References