Microsoft SharePoint Online, OneDrive, and Microsoft Teams can help organizations keep their files safe, share information more effectively, and communicate with ease. In this post, learn the basics of how to configure and manage SharePoint Online, OneDrive, and Microsoft Teams. I will explain how to create a SharePoint site, manage SharePoint storage, and share documents in OneDrive. I will also outline the basics of working with Microsoft Teams, as well as how to deploy the communications platform within your organization.
- SharePoint Online team sites
- Creating a SharePoint Online site
- Configuring external sharing for a site
- Managing SharePoint Online social collaboration and themes
- Managing SharePoint Online storage limits
- Managing files using OneDrive and OneDrive for Business
- Working with Microsoft Teams
- Moving from Skype for Business Online to Teams
SharePoint Online is a ready to use cloud-based application which provides solutions for document management, collaborative working, and information distribution. SharePoint Online uses web technologies and creates a website known as a team site for your teams or projects that your team members can use. This team site is a portal, allowing your end users to view information, access apps, and collaborate with others in their team. Within the team site you can share news, documents, and edit these either locally or in the web. Additionally, you can collaborate with other users by sharing access to the documents. You can also access your team site's own documents from the Files area of Office 365 apps. Documents can also be accessed from File Explorer and from OneDrive for Business. Let's review some of the core SharePoint Online functionality that's available for you to use. You have the central information repository for files, a familiar environment, offering a customizable platform, plus various information creation tools. You also have information sharing tools, controls for data protection and security, tools for tracking tasks and processes, and tools to manage workflow. Let's review some of these in more detail. At the heart of SharePoint Online is a central information repository. You can think of this as an online database management system which is used to securely store and manage documents, share documents, allow documents to be edited by multiple users all at the same time, and retain the previous versions of a document whilst editing the current version. Because SharePoint has been around for many years, the SharePoint Online interface is likely to offer many of your users a familiar working environment, and new users to SharePoint Online can become productive quickly since they can use the Office 365 tools to create and share content within SharePoint Online. SharePoint Online provides you with a highly customizable platform to build out either a simple or complex website which can include many add-ons and features. Sites can be branded, have a bespoke color scheme, personalized background, fonts, and page layouts, and much more. For all SharePoint Online users there are user-friendly information creation tools embedded within the pages, which offer access to Office applications including Word and Excel directly from the team site. SharePoint online includes several information sharing tools, which provides users with access to enterprise information and applications. This includes collaborative software functionality, such as project scheduling, social collaboration, access to shared mailboxes, and project-related document storage. Additionally, if you enable news feeds, all members can be kept up to date with team news. To keep your data secure, SharePoint Online offers several data protection controls. These allow you to implement different levels of data protection and permissions within your site. These settings can be based on your users and groups, content, devices, and even the data location. Collaboration, task, and process tracking is very important for project teams, and in SharePoint Online you can follow activities related to individual documents, people, sites, and metatags. You also have some enhanced search tools allowing to search documents and also within the metadata. And for process tracking, you can set deadlines and track projects and tasks. By building workflows into organizational processes, you can use SharePoint Online to control and track activities. For example you can automate document reviews, where reviewers will be automatically notified when their attention is required. The use of workflows can help ensure that businesses adhere to consistent practices. You can see that SharePoint Online offers a rich set of tools and capabilities for enterprises which go far beyond a simple website management system.
-- Team Site
A SharePoint team site connects you and your team to the content, information, and apps you rely on every day. For example, you can use a team site to store and collaborate on files or to create and manage lists of information. On a team site home page, you can view links to important team files, apps, and web pages and see recent site activity in the activity feed.
-- Communication Site
A SharePoint communication site is a great place to share information with others. You can share news, reports, statuses, and other information in a visually compelling format. Communication site content is read only, and these type of site are used to disperse information, such as news, messages, and other company information.
-- Hub Site
SharePoint hub sites provide an important building block for your intranet. They are the "connective tissue" you use when organizing families of team sites and communication sites together.

SharePoint hub sites help you meet the needs of your organization by connecting and organizing sites based on project, department, division, region, etc. making it easier to:
- Discover related content such as news and other site activities
- Apply common navigation, branding, and site structure across associated sites.
- Search across all associated sites.
SharePoint administrators determine how many hub sites can be created in your organization, who can associate sites with each hub site, and whether associating a site to a hub requires approval. Planning your SharePoint hub sites will ensure you get the most out of using hub sites.
A SharePoint online team site is usually created for a new project or a new group within an organization. The team site is the portal where group members can access apps, store documents, and importantly, collaborate with others in their group. It can be the central and primary location that your end users use to connect and collaborate with each other. Team site is used as a collaboration platform. When a team site is first created, it will have a home page. The team site home page is where your users can view links to team library files, apps, lists, and discussions. Let's look SharePoint Admin Center for team sites at Microsoft 365 Admin Center to view in more detail. We can see the group owners, a description, external sharing information, and, notice, we can edit many of these attributes. When you launch the site. You can see the home page. If I click the plus then New from drop down, here we can see I can add documents, pages, news posts, and more. Lets look at different app types availabe. I want to add an app option, so I'll select app. Here we can see your app screen appears. And we can see a selection of the apps that we can add to our team site. These include apps for the Document Library, Custom Lists, Tasks, Site Mailboxes, Links, Announcements, Contacts, and Calendars, and many more. Let's click the Document Library App Details. And here we can see more information related to this app. We can see in the description that Document Library is used to store documents with people, and that users can upload and create documents, collaborate with files, and share and track changes on documents. With the Wiki Page Library, we can see that this app allows you to collect and share ideas within your organization using a set of linked and editable web pages. And finally the Survey app allows you to poll team members. Here you can create questions and view the graphical summaries of their responses. As you can see, there are lots of different web app types that you can use on a SharePoint online team site that are built into SharePoint online. You should click on each of the App Details links and understand what each app can offer.
To Create a site:
- Select + Create site on the SharePoint start page. In the wizard: Select whether you'd like to create a Team site or a Communication site.
- Enter the title (and a description, if you want) for the site. You can select Edit Image of the pencil icon for editing a flow. and then edit the group email name, if you want.
- Select whether the group will be public or private. (If you configure a site to be private, then individual members need to request access to the site. ) Choose a sensitivity level for your site information.
- Select a default language for your site and then click Next. In the next pane, enter the owners and members. Select Finish.
A modern SharePoint Online site is provisioned and ready for use in seconds. If you selected a team site, a Microsoft 365 Group is also created.
Once you've created a site in SharePoint in Microsoft 365 or SharePoint Server, you can make changes to the site's settings, such as the name, logo, description, privacy level, and site classification, as well as service limits and permissions for the site.
Go to your SharePoint team or communication site.
In the top right corner, click Settings Settings icon and then click Site settings.
We have two primary ways we can achieve this. Through various levels of administrators, and also by giving users access permissions. There are three types of administrator accounts pre-configured in SharePoint Online. These are global admin, the SharePoint admin, and site admins. The global admin is the administrator for the Microsoft 365 portal. A global admin is also a SharePoint Online admin. The primary job of a SharePoint admin is to manage SharePoint Online. They can do this through the SharePoint Online admin center. They'll manage the Office 365 groups, and create and manage sites. Manage site administrators, and other user profiles, and manage service requests and monitor service health. Site admins, which were previously called site collection admins, are users with administrative positions to manage a team site. A team site can have several admins, but only one primary admin. You can also delegate the ability to manage your SharePoint sites to someone outside of your organization, such as a Microsoft partner, who might, for example, specialize in SharePoint Online administration.
Once we've created a SharePoint team site, we need to consider who will use it. This can be either users from our own organization or external users, such as partners, vendors, clients, or customers. Access is configured by assigning permissions directly to users or groups of users. Administrators also need to manage other aspects, such as removing users from a group, deleting groups, or amending the permissions for a group. Users and groups can be given one of five default permission levels. These are full control, design, edit, contribute, and read. The main difference between edit and contribute is that editors can also delete lists.
SharePoint Online is usually used as an internal intranet resource. However, you may want to share a site or document with people from outside of your organization. For example, with vendors, clients, or contractors. The external sharing facility is turned on by default for your entire SharePoint Online environment. You can turn it off globally if needed. The SharePoint Online sharing option allows you to share team sites with external users. Microsoft defines an external user as someone outside of your organization who does not have a license for your SharePoint Online or Microsoft 365 subscription. You can set sharing in three ways. You can share an entire team site or documents with external users who are already in your office 365 user directory or have accepted a sharing invitation. These are known users. You can share the entire site or documents with authenticated external users. These are external users who have a Microsoft account or work or school account from another Office 365 subscription or an Azure Active Directory subscription. Finally, you can give users a guest link that they can use to view individual documents and folders on your site anonymously. These users do not have access to the rest of your site. When you share a document or site with an authenticated external user, an invitation is sent to them via email. This contains a link to the resource, such as a site or a document. When they click the link, they'll need to log on with their Microsoft account or their work or school account. They are then added to the users list in your Office 365 subscription. You'll see them listed with EXT in their user name. You can discontinue sharing with them by removing their permissions or deleting them from Office 365. When you share content with anonymous users you can allow them to edit or to view a document or even upload to a folder. The view and edit links are created separately. And you can set them to expire at a specified time in the future. You should note that once you've created a link they can be reused and anyone with the link can access the document. Unlike authenticated external users, anonymous users are not added to the user list in Office 365 and cannot access sites or be assigned Office 365 licenses. And finally, you can discontinue sharing with them by deleting the anonymous link. A team site can be shared by a site owner or by any user with full control permissions to a team site. Any external users will inherit the usage rights of the Office 365 customer who provides them with an invitation. Also, external users can perform tasks that are consistent with the permission level that have been assigned. For example, an external user added to the editors group will have the same permissions as an internal member of the editors group. However, by default external users cannot access the search center and cannot execute searches against everything.
Let's see how to configure external sharing for SharePoint Online. First, we'll take a look at how to turn on or off the global external sharing option. In Microsoft 365 admin center select the SharePoint admin center. On the left hand side, under policies, select Sharing. We can now manage the sharing options for both SharePoint Online and OneDrive and manage their settings for all team sites. Here you can see the sliders that allow us to set permissions with choices of most permissive, least permissive, or somewhere in between. Selecting the most permissive option allows everyone to share content and selecting the least permissive option sets the sharing permissions to no external sharing allowed. This will then prevent all users on all teams sites from sharing sites or sharing content on team sites with external users. Other options include new and existing guests who must sign in or user a verification code. And there's also an option for only guests who are already in your directory option. These external users may exist in your directory because they have previously been shared to before. If they have the EXT in their user name then they are external users. There are other sharing settings that we can manage, such as advanced settings to limit external sharing, settings for the default type of link used when sharing a document, managing any one permissions, so if you have the setting, allow anyone with the link to access a file then you can grant them permissions, such as view only on that file. Let's now move to team site level to configure external sharing for individual team sites. You'll need to be a SharePoint Online admin. In the admin center, on the left hand side under Sites, click Active sites and then we need to select one of the pages that we want to configure. Then, on the right hand side, under the Properties, we can edit the external sharing. Click Edit and here you can see the various options we saw earlier. Remember that if the global or tenant-wide setting prevents sharing then the global settings will override any settings on the individual team sites. I'll choose to limit the sharing to only people in my organization and click Save. The site permissions are updates and take effect immediately. Invitations are usually sent to external users by email. By default, invitations expire after 90 days and can only be used once and expire after use. However, if an invitation is not used, it can be forwarded to someone else. The recipient of the invitation uses a link and must long onto the site with a Microsoft account or a work account. If the share was via an anonymous link then they don't need to sign in and the links can be used multiple times and shared to others. When sharing access to external users you have three levels of access. These are full control, edit, and read. Most commonly, you would allocate read access to anonymous users and edit permissions to known users. You should be careful issuing full control, since this could give users too much access to resources. Let's see how to share a site using SharePoint Online. You'll need to be a site owner or have full control permissions to be able to share a site with external users. From home page, set the site that you want to share. For example a communication site and on the right hand side we can see a link to share the site. This allows us to share the site to external users and also other users within our organization. We share this site to a specific person. we can include an email message and then click Share. That person will receive an email. That person can click the link in the email to get access to the SharePoint site. By default, any invitations that you send to external users will expire in 90 days. You can also send links to share specific documents or folders within SharePoint. Lets say I want to share a launch campaign. Let's take a look. On the left hand side I'll select Documents and I want to select one of files. On the top menu bar we can see a link to share and here we can define how we want the share to perform. By default, anyone with a link within the organization can see the content. We can share to people with existing access or define specific people. Note that a link who has, note that anyone with a link at the top is grayed out because external sharing for this site has been disabled. Additionally, we can configure if we want the recipients to edit the document. We'll enter the user's name or email address, add an optional message and then we can either choose to send the message directly from SharePoint or we can choose to copy the link and we can send the link. Click Send and the link is sent to the email address. Another method is to click Copy link and this will generate a link directly to the file. Again, we can review the settings for the link and here we can see that anyone within our organization with the link can edit the file. We would then send the link in social media, a teams chat, or via email. If I open a new browser tab and paste the link, the page displays just the item and not the website.
SharePoint Online has been developed beyond a document management system. It now offers tools to allow users to view, share, and collaborate with others, both inside and external to an organization. With the rise in popularity of social media such as Facebook and Twitter, SharePoint Online now incorporates some limited social collaboration tools. These tools enable users to engage with others within a safe and secure environment of SharePoint Online. In this way, enterprises are able to support and encourage users to participate and interact with social networking in relation to work projects which often leads to increased collaboration within the workforce. Some of the social collaboration tools that can be incorporated into SharePoint Online include Ask Me About where staff members are experts or product leads, Blogs, communities and groups, Reputation, Badging, and Moderation, public news feed or Company Feed, and Yammer conversations. Let's take a look at what some of these social features can offer. When you need to engage help or assistance from within your organization, you can use the Ask Me About feature. This allows users to add information to their profile listing, such as expertise and skills and experience and history. Other users within your organization can then see who has the relevant experience to help with projects and tasks. Most users will have come across blogs on the Internet. These can be great places for sharing information. Within an organization, blogs can be useful for sharing guidance information about new procedures or practices with employees, partners, or customers. By encouraging and facilitating a virtual online community within the workplace, users can become more connected at work, especially when contributing to a project or a shared task. A community in SharePoint is a great place to discuss ideas and share expertise. Reputation and badging allows participants to be rewarded and receive feedback for their participation in community discussions. Over time, a reputation can build through active participation and by earning points, badges, or accolades. If you have users who like to help support the community environment, then they should be encouraged to become moderator. The Company Feed is the organization's public newsfeed and it can be a useful method of disseminating information to staff or customers. A group of users, for example, members from the marketing team, can contribute to the news feed and posts will appear which will originate from the same company source. A feed is similar to a company public blog but often the messages are more frequent and smaller such as a microblog with viewers being allowed to reply to posts. Your Office subscription may also include Yammer, which is an enterprise tool that allows secure communication within an organization based on conversations around a topic or a group activity. You can think of Yammer as a private version of Facebook. Yammer is fully integrated into Office 365 and SharePoint Online and can downwardly access files stored in the document library or within OneDrive for Business. Within the organization, there may be many dozens of groups that you can follow or you can easily create your own groups. Users can also subscribe to new posts or replies that might interest them. In addition to the enterprise features of SharePoint Online it's worth mentioning that each SharePoint Online user can create their own personal site for free within the platform. This could be personalized for their own hobbies, interests, or even as a blog and can include items such as a newsfeed, site pages, and even a personal document library.

When you start to deploy some of the social collaboration tools within SharePoint Online, you need to be aware of several features, such as Photos and Presence, Ratings, Shared with Me, Site Feedback, Enterprise Keywords, Tasks, and even a Wiki Page Library. Let's review some of these items now. Allowing your profile photos and online presence to be synced between applications can be useful within the enterprise, as this allows other users to see when colleagues are available or offline or away. Ratings allow site users to rate items within a SharePoint Online Document Library, using a star rating of one to five stars or giving an item, such as a micro-article, a like and allow users to gauge the relative usefulness or appeal of rated items. In this way, the use of ratings can help your users prioritize content to read and identify good practices in relation to content production. Users who create online content, such as a blog page or wiki entry, should use Enterprise Keywords. In fact, whenever authors create new content, they're offered existing keywords to tag to their work. Enterprise Keywords help readers group and sort content and search and filter similar articles by clicking on the related keyword links. While over time, these keywords can form a metadata keyword cloud, which enriches the library and provides metadata consistency. Previously, this feature was referred to as Tags. And finally, a Wiki Page Library can be created in SharePoint Online. This can quickly capture and share ideas by creating a library of webpages and linking them all together. Within a large enterprise, wikis are used as intranet information sites, containing thousands of related documents all stored and made available online. On a smaller scale, you may want to create a wiki for a specific project to gather and share ideas about a project within a team.
When moving to a hosted SharePoint Online solution, one of the major advantages that administrators appreciate is that you get a large amount of storage which is included as part of your tenant subscription. Unless your enterprise has a huge data storage requirement, it's unlikely that your site will breach the SharePoint Online tenant storage allowance. Let's explore the storage allowances and see how they're applied. With a hosted SharePoint Online solution storage space is allocated depending on the subscription that you've purchased. We can see the differences in the table on the screen. For most subscriptions you're granted one terabyte of total storage per organization plus an extra 10 gigabytes per user license purchased. If you own an Office 365 subscription and then you add a new stand-alone SharePoint Online subscription, the storage amounts of both subscriptions are added together. The total storage capacity is pulled and then made available to all team sites within the tenant to draw upon. Storage allocation for sites is automatic by default. Therefore administrators do not need to allocate space to each team site. There's a hard maximum of 25 terabytes or 25,600 gigabytes to be precise. But in practice the tenant capacity will be much less than this. Finally, it's worth keeping an eye on the recycle bin. If you're ever near a storage limit for a team site, you can consider emptying the recycle bin, since this storage space is also included in the organization's total file storage limit. Ideally you should leave the storage limits as automatic. If you really must you can set storage limits to manual. And then you'll have to carry out some admin tasks regularly including you'll have to monitor the storage usage, track and analyze usage trends and patterns, you'll need to manually reallocate available storage space to sites, and you can set and configure warning levels which will email site owners when a set percentage of the space is used up.
Go to the Settings page of the new SharePoint admin center, and sign in with an account that has admin permissions for your organization.
Select Storage Limits
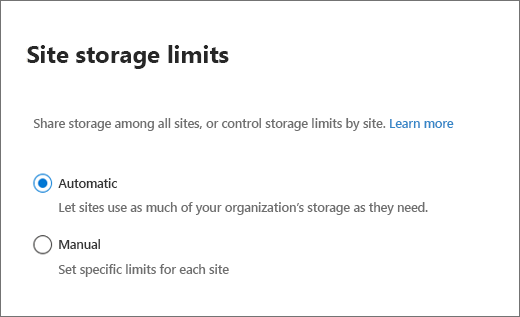
Select Automatic or Manual, and then select Save.
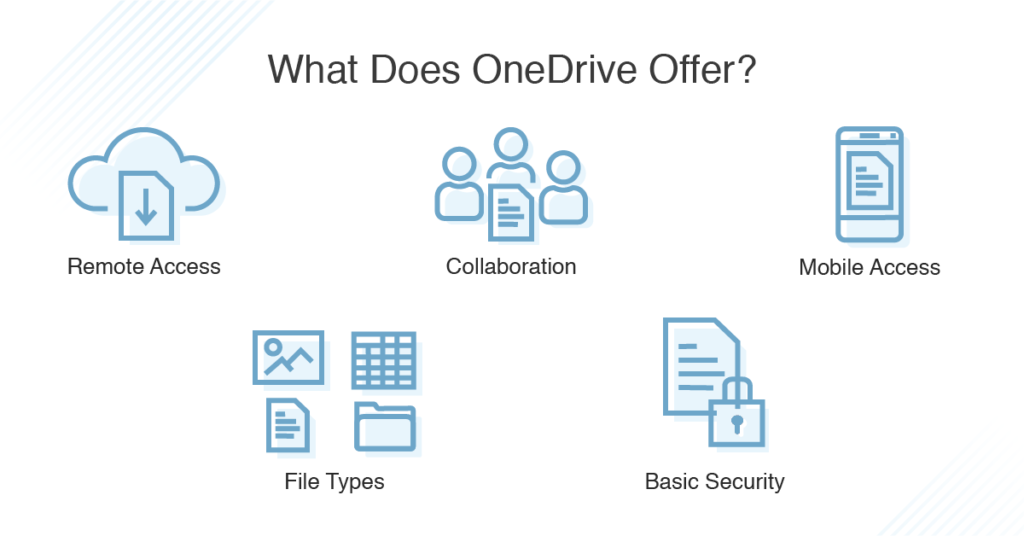
Another integral part of Office 365 is the cloud-based storage. OneDrive and OneDrive for Business provide a secure cloud-based storage where you can store, share and sync your files. You can think of it as your hard drive in the cloud. One of the most useful aspects of OneDrive is that any data is accessible via the internet using a secure browser connection from any location. Data can also be accessed using many different devices such as desktop PCs or mobile phones. You can access OneDrive directly from the internet on any device using just a browser or by using the OneDrive app or natively within Windows 10 using File Explorer. Microsoft offers two versions of OneDrive. OneDrive for personal cloud storage such as bundled with Office 365 Personal plans or for outlook.com users. And OneDrive for Business which is an enterprise version which works alongside SharePoint Online. OneDrive is free for personal usage. Business use of the personal OneDrive space is not licensed. It's available if you have a Microsoft account, if you've enrolled into a Microsoft service such as Xbox Live, Outlook.com or Hotmail.com. With the free tier, you're granted five gigabytes of storage space but you can purchase more for a small monthly fee. The OneDrive sync client is pre-installed on Windows 10 devices which allows you to access files stored in the cloud via File Explorer. OneDrive for Business uses the same sync engine as the personal version of OneDrive but OneDrive for Business points to an entirely different data storage facility. Other differences include it's designed for businesses and uses SharePoint online as the storage platform. It's licensed for commercial use and includes one terabyte of storage per user. Both versions of OneDrive allows users to collaborate with Office Online documents where users can work with the Office documents even if they do not have an Office license. They can use this feature across the web from anywhere. OneDrive for Business uses SharePoint Online for cloud-based storage which is securely stored in the Microsoft data centers. It's worth noting that Microsoft have built sufficient protection and safeguards to meet the compliance standards with all of the leading industry standards including HIPAA and ISO 27001 plus many more.
Let's now take a look at accessing OneDrive and also OneDrive for Business. You can access OneDrive and OneDrive for Business in a number of ways. Both versions allow using the OneDrive App which is pre installed on a Windows10 PC or the OneDrive App for Android and iOS platforms, that you can download from the online store. You can also access OneDrive by your browser or by using the app launcher link from any office for the web app. Let's take a look how to access OneDrive via web browser. Open a web browser. And then enter OneDrive.live.com. And sign in using a personal Microsoft account. Here we can see, OneDrive in the web. Under OneDrive, we can see the files any files that We've recently worked on, photographs. Any files that we shared to us or by us. And also the recycle bin which takes into account any deletes from the web but also from any PC where I've used OneDrive using my personal account. In the bottom left-hand corner, we can see the amount of space used and also available within OneDrive account. We can also see an invitation to go premium. If we click this, here we can see the available OneDrive plans and possible upgrades. These include the Office 365 Home or Personal plan. On the right-hand side, we could also select OneDrive only. Where we pay for additional storage space in the cloud.
The majority of data within an organization will be private, and not for public consumptions. Businesses need to ensure that corporate data is not made available to unauthorized people. With OneDrive for Business, you can control how your users will share documents. Enterprise users can only share OneDrive for Business content if sharing has been allowed by an administrator. You can set three sharing options for your tenant. These are,
- Shareable: Anyone with the link
- Internal: Only people in your organization,
- Direct share: to specific people identified by email.
When you share a file from OneDrive, the user has several options. You can invite people to view or edit a document, and you can select specific people by typing their email addresses or names. OneDrive for Business should automatically resolve the people within your organization. You can also amend permissions from view to allow editing, and include a message for users receiving the email. You can also set an expiration date for the share. If you have an Office 365 or SharePoint online subscription, rather than just the OneDrive for Business standalone subscription, then you can use the sharing page in the OneDrive or SharePoint admin centers to manage your sharing settings. You can configure your tenant wide sharing permissions and have different setting for SharePoint files to files shared from OneDrive. The SharePoint settings applies to all sites, Office 365 groups, and OneDrive. For more information relating to SharePoint and OneDrive file sharing settings, take a look at the link.
As an administrator, you have access to the OneDrive for Business Admin Center. The console is available from the Microsoft 365 admin center or directly from the OneDrive web page by clicking OneDrive admin in the lower left corner, though this link is only visible to administrators. The benefit of using the OneDrive for Business Admin Center is that it allows you to easily manage your organization's OneDrive business settings in one place. Once you have signed in to the OneDrive Admin Center, you can access many tasks, including managing external sharing and sharing notifications, preventing users from installing the OneDrive sync client, allowing syncing on computers joined to specific domains, and blocking the ability to sync specific file types. You can also set the default storage space allowance for OneDrive users, preserve OneDrive files after a user leaves the organization, and control user access to OneDrive. You can also control access to features in the OneDrive mobile apps. As an administrator, you can also grant yourself access to a user's OneDrive for Business files and view the files and folders stored in OneDrive.
Let's take a look and see how we can share our files that are stored in OneDrive for Business. Log into Microsoft 365 admin center as an administrator. Click Show All on the left-hand side, and then click All admin centers, and then click OneDrive. The OneDrive admin center appears and on the left-hand side, select Sharing. And here you can see the global settings for sharing within tenant. By default, anyone can share a link to all files. We can restrict this to internal so only people within your organization can view shared links and also direct so we can specify the people we want to view the links. We can also configure the advanced settings for shareable links. Let's take a look. By default, all links do not expire. However, this is not very secure and I'd recommend that you set this to at least 90 days. In this way, all links will expire after 90 days. We can also configure what happens to files and folders with a link. Remember that these are global settings and therefore, if you want to allow your users some autonomy and be able to share files, you'll need to educate them so they can modify the behavior. You can also configure external sharing. Remember that SharePoint and OneDrive share the same storage location and therefore, the settings are displayed here. By default, external sharing allows the most permissive use and you may want to restrict this to new and external users where they have to sign in to access the files. If you want to lock down your internal corporate files to only people in your organization, then you'll use the least permissive options available. You can, however, have a mix and match between SharePoint and OneDrive. We can also review the advanced settings for external sharing, such as allow or block sharing on specific domains. Specify the domains to be allowed or blocked. We could also force the external users to use the same email account that the invitations were originally sent to and stop external users from sharing items that they do not own. You can also choose to display to owners the names of the people who have viewed their files. Let's now look at the storage settings. Here we can see, by default, each OneDrive for Business user gets one terabyte of storage, but you can reduce this. Some of the E3, E4, and E5 plans allow you to increase the default storage up to five terabytes. However, I find in my experience that reducing the default storage to something like 10 gigabytes is acceptable. And finally, you can set the number of days that you can preserve OneDrive files after a user leaves the organization and their account is marked for deletion. The default is set to 30 days, but you can increase this to a maximum of 3,650 days, or 10 years. Notifications are for both admins and users and helps monitor and control which external users have access to their files. Once enabled, which it is by default, owners of files and folders stored in OneDrive will be emailed when another user invites external users to your shared files, an external user accepts an invitation to access your files, or an anonymous access link is created or changed. As an administrator, you can also turn on auditing to monitor what content is being shared externally. However, this will be done in the Microsoft 365 Security and Compliance Center. Finally, if you need to access one of your user's OneDrive for Business files, you can. Bear in mind that this can be only performed by an administrator. Return to the Microsoft 365 admin center, select Users, Active users, and select the user. On user's properties page, click OneDrive, and here we can see an option to create a link to the files. So long as the user has previously accessed their OneDrive Account, you should see an option to create a link to the files. Let's select the link. After a few moments, Office 365 creates a special link which, when clicked, will open a new window, showing the user's OneDrive for Business files. Here we can see all of the files and folder that have been used by user and stored in OneDrive for Business location.
If your organization is using cloud storage such as OneDrive for Business, you can use a feature similar to folder redirection that provides the functionality to allow you to set up folder redirection to your cloud storage. This feature is known as redirecting your known folders to OneDrive for Business. Let's have a reminder about which Windows 10 folders are classed as known folders. These include the desktop, documents, pictures, screenshots, and camera roll folders. You can think of these folders as all the folders contained in a user's profile. You can use Group Policy to automatically move or redirect files and folders so that they're automatically saved in OneDrive for Business. There are several group policies that you can use to configure this feature. The first is to prompt users to move Windows known folders to OneDrive, and the second is to silently move Windows known folders to OneDrive, which silently enforces the redirection of files and folders to the cloud. Your users will still work with the same familiar folders. And as an advantage, their data will be backed up to OneDrive for Business. With the prompt users to move Group Policy setting, users will see a pop-up notification asking them to acknowledge the operation and click Start protection. This then moves their known folders to OneDrive for Business. If the prompt is dismissed, a reminder will appear in the Activity Center until the move is completed. Some end users may have already redirected their known folders to their personal OneDrive account, and in this scenario the pop-up will ask them to instead redirect to the organization's OneDrive for Business account. If you don't want users to have a choice when this action takes place, administrators can use the silently move Windows known folders to OneDrive Group Policy Object setting. With this Group Policy enabled, folders will be silently redirected to OneDrive for Business without any user interaction. This setting can be used with the Move setting so that if the silent redirection fails, then users will be prompted to manually move their folders. There are two additional group policies that you can use to prevent redirection. Prevent users from redirecting their Windows known folders to their PC. You can use this setting to force users to keep their known folders directed to OneDrive and also prevent users from moving their Windows known folders to OneDrive, which disables the feature. To use the redirect known folders to OneDrive for Business feature, you'll need to have a OneDrive for Business license. These are available as a standalone license or bundled with SharePoint Online, Office 365 subscriptions, and Microsoft 365 subscriptions. There are also some requirements for implementing known folder redirection to OneDrive for Business. These include you must ensure that you have the current OneDrive sync build on client devices, that you don't have any existing GPO settings for Windows folder redirection. And if any of the known folders include a OneNote notebook, then the whole folder will not be moved to OneDrive for Business, so you'll need to remove any OneNote notebooks from your known folders. You can check the version of your OneDrive sync engine by clicking the About tab in your OneDrive app.
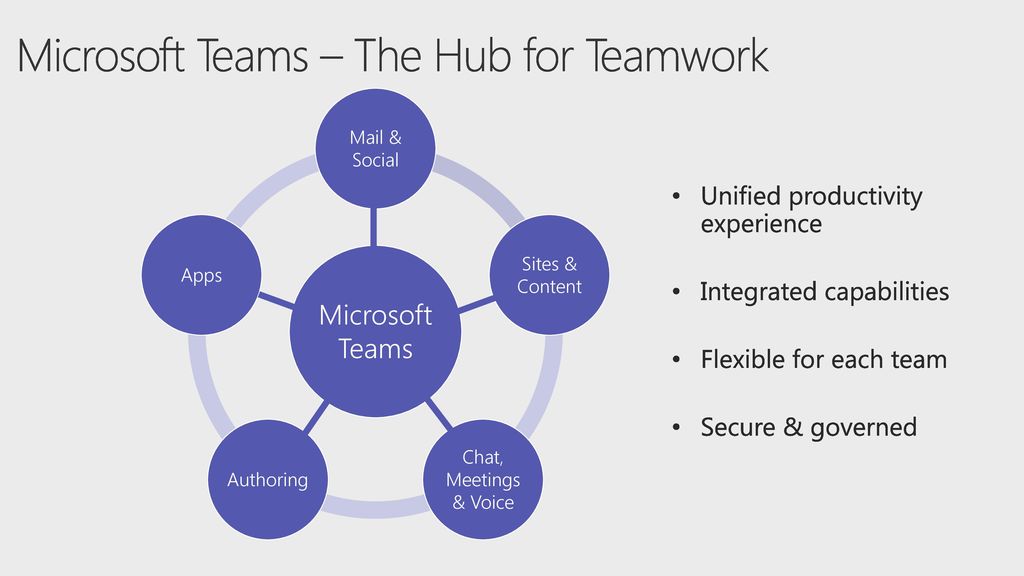
Microsoft Teams is a cloud app that's been designed as a hub for teamwork. It allows you to bring together a team and resources, communicate via chat and messaging, make calls and hold meetings and live events, and share and edit documents. Microsoft Teams is integrated with existing Microsoft products such as Office 365 apps, and uses SharePoint to store data and documents. Microsoft Teams is built on Office 365 groups, and it uses Microsoft Graph to link together the data and services.

You may be thinking that the features offered by Microsoft Teams sound very much like the features offered by Microsoft's other communication app, Skype. And yes, they do sound similar. However, Skype for Business will be fully retired on July 31st, 2021. And since September the 1st, 2019 Microsoft have been onboarding all new Office 365 customers directly to Microsoft Teams instead of Skype for all chat, meetings and calling. And to avoid confusion throughout this post, I'll use the words Microsoft Teams when referring to the app itself, and team or teams when referring to a collaboration space that's been created using the Microsoft Teams app.

With the Microsoft Teams app you can create a new team. This consists of people and contents, such as chat, files and tools. Team owners can invite members to come together and use the team as a space to communicate and work collaboratively. Teams can also be made public to anyone in an organization, or they can be private, accessible to only invited users. When you create a new team, then a number of components are automatically created. A new Office 365 group for the members of the team. A SharePoint Online team site and document library to store team files. An Exchange Online shared mailbox and calendar. A OneNote notebook. And also links to other services, such as Planner and Power BI.

Let's now review Microsoft Teams. Communication is at the heart of Microsoft Teams, and there are several communication tools available. These include channels, chats and apps. Let's review these key components. Teams are made up of channels. A channel is a dedicated section within a team for a specific topic, department or project. Channels are then used to share relevant messages, documents, apps and other resources to all members who have access to the channel. Each channel also has a different folder in the SharePoint Online team site. Chat is a popular feature that allows you to message other members of your group in real time. Each message is shown with a users name, the date and the time that the message was written. Public chats can be sent to all members of a team within a channel, or you can use them as a private text conversation between individual members. The key benefit to chat is that communications are much faster and more efficient when compared to email. You can also use apps within channels to find and share content. For example, you can share content on a tab in a specific format. For example, share an Excel or Word document. Use connectors to receive automatic updates directly into a channel from places such as Twitter and RSS feeds. You can add content from external services, perhaps the latest news, a weather report, or a video. And you can even chat with a service bot which provides help and assistance.
Microsoft Teams allows you to communicate by sharing files, external content and holding text-based chats with your colleagues. You can also use Microsoft Teams to make calls, hold meetings, and even run live events. The Microsoft Teams Calls function allows you to dial a telephone number or to dial into a meeting. Meetings in Teams include audio, video, and screen sharing for up to 300 people. Participants can attend meetings using a desktop PC, a mobile device or even a normal telephone. And anyone can attend a meeting, even people from outside of your organization who do not have a Microsoft Teams account. They just need the meeting link. When a meeting is recorded, the recording is stored automatically online so you can share it to participants. There are several different ways to join a Teams meeting. These include join using the link that's been sent to you, dial into a meeting using a phone number or dial out to somebody, join from a scheduled calendar invitation, join from within a channel where you'll be able to see the invitation to join. Join from within a chat. Any meeting that has started will be shown and use a traditional meeting room to link into a Microsoft Teams meeting. Another feature of Microsoft Teams is live events. Using this feature, you can schedule and then stream a live event to a large audience online. As live events often need security people to run them, you can use Microsoft Teams to manage the event planning and you can make events public or private. Events can be either created directly using the Microsoft Teams app where you invite attendees and presenters to participate using their own devices or you can create an event using professional external cameras and recorders and then viewers can access and view the event using Microsoft Teams via an invitation link.
Microsoft Teams is fully integrated with SharePoint Online, you can view, share, and edit documents from within the Microsoft Teams. Because Microsoft Teams is integrated into SharePoint Online, it's also integrated with OneDrive for Business. You can share documents with other Microsoft Teams users. For example, within the Chat Message screen, you can upload a file from either OneDrive for Business or from the local hard drive of your device. You can also add files to channels for other users to view them. You're also able to edit documents and work collaboratively with other users of Microsoft Teams. Whenever a link to a shared document stored within Teams, is clicked, you can edit the document directly within the Microsoft Teams environment. In this way, you and your colleagues can edit the display content in a real-time collaboration. You do not directly manage individual document-sharing settings for files stored in Microsoft Teams. This is because Microsoft Teams uses the Sharing settings that have been configured for SharePoint Online and OneDrive for Business.

Let's now see how to deploy Microsoft Teams. Microsoft Teams might be the first communications and collaboration app used by organization. Or you might be moving from Skype for Business Online to Microsoft Teams. Let's take a quick overview of how to implement Microsoft Teams as a new implementation. Because Microsoft Teams allows you to integrate many of the other Microsoft products, you should first set these up as part of your Microsoft Teams deployment. This can include Office 365, SharePoint Online, Exchange Online for email, OneNote and other services; such as Planner, Power BI and Azure Active Directory. Prepare your organization's network for Teams. This includes configuring your Microsoft 365 or Office 365 domain, SharePoint Online, Exchange Online, and OneDrive for Business.
Even if you're already using some of these services, you may still need to review and amend the settings so they can be configured to work with Microsoft Teams. Let's take a look at a high level overview of what needs to be done to deploy Teams. Get Teams licenses for everybody. Check out Teams plans and Microsoft Teams service description.

You'll start by ensuring that all associated services are ready to be integrated with Microsoft Teams. You'll need to assess any current setup and implement any necessary changes. Or, if you're starting from scratch, then you'll need to complete the setup for each product or service. You'll then need to configure your organizational-wide settings for Microsoft Teams. These settings allow you to manage how Microsoft Teams works and includes settings for notifications, email, feeds, files and devices. The next step is to manage settings specific to the features of Microsoft Teams. For example, you should create policies to control how features can be used within your organization or control who can record live events or whether you allow third party apps to be used. The client app then needs to be deployed. You can do this by pushing out your devices or by informing your end users how to install the Microsoft Teams client app themselves. You then need to create an initial team and associated channels. This is usually a company-wide welcome to Microsoft Teams team. Of course, you can allow end users to create their own teams and channels, but it's best practice for an administrator to create several initial teams as part of the deployment process. Administrators will then need to manage the permissions for users and perhaps create user groups in Office 365 if they don't already exist. Invitations will need to be sent out for end users, inviting them to use the existing teams, and you need to ensure that training, both for IT staff and end users, is made available and completed. Finally, once all of these deployments steps have been completed, users can use Teams. They can then create their own teams, set up channels, add apps, files and feeds, and being to communicate and collaborate with their colleagues.It's important to know how users are using Teams and what their experience is with Teams. Usage reports can help you better understand usage patterns, and along with user feedback, give you insights to inform your wider rollout and where to prioritize training and communication efforts.
For businesses that are upgrading from Skype for Business Online to Microsoft Teams, there are some additional considerations. Skype for Business Online reaches end of support on July 31st, 2021, and Skype for Business Online users will need to upgrade to Microsoft Teams. Microsoft provide an upgrade framework to help you with the process of upgrading to Microsoft Teams. The framework covers every step from planning through to Microsoft Teams being ready to use. It's very likely that you'll need to have both Skype for Business Online and Microsoft Teams running at the same time, at least for a period of time during your upgrade. There are several supported scenarios that you can use.
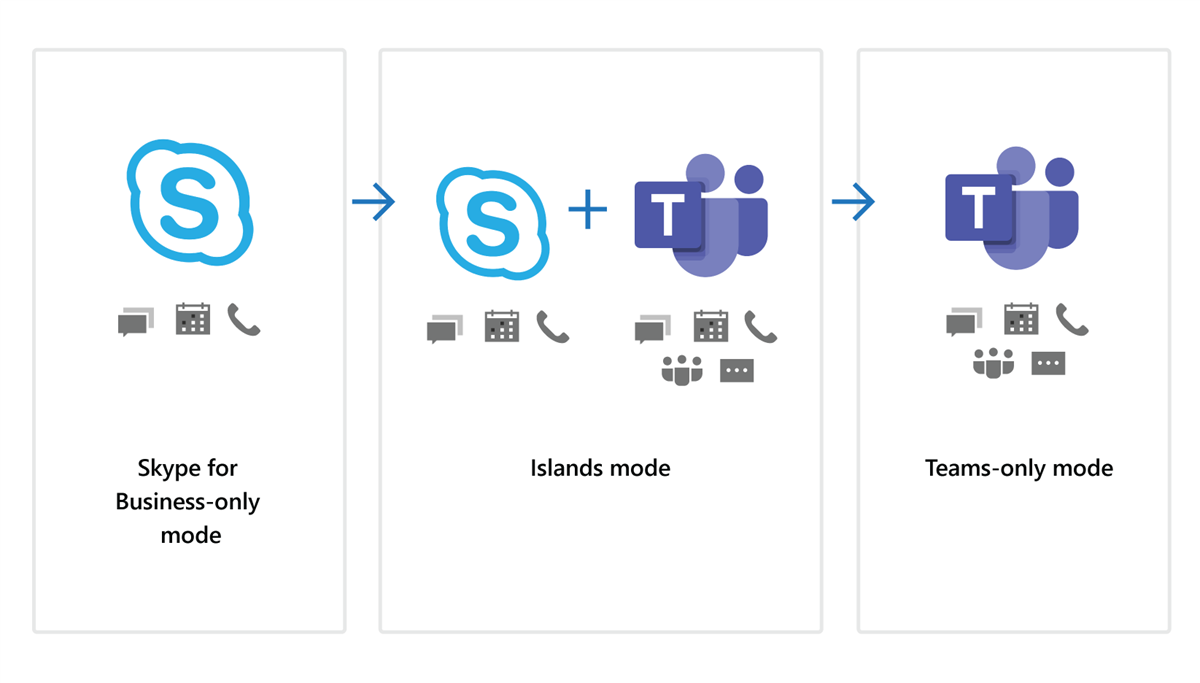
These are called Islands mode, Skype for Business Online only, Microsoft Teams only, Skype for Business Online with Microsoft Teams. Islands mode is where the two services run separately alongside each other. Skype for Business Online only is where Microsoft Teams is implemented in the background, and then a switchover is made. Microsoft Teams only is where users are upgraded in deployment rings. Once upgraded they no longer have access to Skype, except to join meetings with non-upgraded users. And finally Skype for Business Online with Microsoft Teams collaboration is where Skype usage is unchanged, but you add in Microsoft Teams functionality, such as teams, channels, and access to files. In preparation for upgrading to Microsoft Teams, you'll need to evaluate your current Skype for Business Online setup. You'll need to review your network capabilities to ensure that it will curb the additional features such as file sharing as well as calls and meetings, and check your setup of Office 365, such as directory synchronization, and if you're using a multi-tenant or dedicated tenant. And because Microsoft Teams also uses OneDrive for Business, SharePoint Online, Exchange Online, OneNote, and Azure Active Directory, you'll need to ensure that these services are all configured correctly to work with Microsoft Teams.
Once the technical setup has been completed and Microsoft Teams is ready to use, administrators can then implement Microsoft Teams features.

Microsoft recommend a phased feature-by-feature rollout as shown in the diagram on the screen starting with Teams and channels. Administrators will first create a new team and then add extra owners for the team who will manage it. Then roll out the Microsoft Teams client app to users. Invite people to join the team. These are normally the early adopters. And set up channels for the newly-created team. They will also need to manage the settings for teams such as allowing end users to create new channels. The next step is to create policies that control how the Chats feature can be used. You'll also manage settings such as allow people to delete sent messages or to use URL previews and allow voice messaging. You can also add custom tabs to chat so that users can easily find things. Administrators can also add apps to channels such as the OneNote app or a direct feed from your corporate Twitter account or an external webpage. You can also add new tabs with links within the channel to organize things and to make items easier for your users to find. When a new team channel is created, the conversation, files, and Wiki tabs are created by default.
Meeting and live events both have policy settings that need to be managed. For meetings, these include settings to allow Outlook to be used, whether anonymous users can join meetings, the formatting on email invitations, and your network settings. And for events, you need to manage who can view an event and who can record an event.
Finally, if you have a call planned then you need to set up Microsoft Teams to be used for voice calls. This includes setting up call queue messages for when people are waiting for calls to be answered, menu systems, also called auto-attenders. For example, "Press one for sales." And create call park policies, which are used when people are on hold as part of being diverted to another operator. Block callers using caller ID policies and create calling policies to manage settings to control which call features can be used.
Of course you'll also need to ensure that your IT staff members are trained to manage and support Microsoft Teams. Your end users will need to be informed about the upgrade and then trained to use Microsoft Teams and know how to find support and help. Your users can then start to create their own channels, add apps and files, and collaborate with others.
Let's take a look at the policy settings we can configure. Lets Sign into the Microsoft 365 admin center. And on the left-hand side, click show all. And then select the teams item. Here we can see through Microsoft Teams admin center has launched. And if you want to create a new policy to manage settings for the chat feature. So on the left-hand side, select messaging policies. Here we can see the global organizational-wide default policy, which we can review. To create a policy click add, provide a policy name and description, and then review the various settings. Lets say we're happy with owners and users to delete sent messages so therefore let's first set these two settings to on. We don't want anyone to be able to edit sent messages so therefore I'll disable this setting. And we want to turn on read receipts for everyone. I'll confirm that chat is enabled and we can work our way down the list selecting required options. If we require more information on a particular option we can click on the small I where available. If required, we can also see help using support to office.com. Once we've selected our policy settings at the bottom we can click on the save button and the policy will be created and displayed on your list as a custom policy. We now need to assign this policy to a user or group. And so in the left-hand menu click on users and here you can see all users. Using the tickboxes on the left-hand side select the users that you want to apply this policy to. And then click edit settings. And here we can see the various policies that we can apply. Under messaging policy on the dropdown, select the messaging policy that we recently configured and then click apply. And we can see that the policy has been assigned to the users.
You could administer Microsoft Teams by using the Microsoft Teams Admin Center. You can access the Microsoft Teams Admin Center from the Microsoft 365 Admin Center. Select admin centers and then click Teams. And here we can see the Microsoft Teams Admin Center. In order to spread the workload, larger organizations will need to have more than one administrator to manage Microsoft Teams. There are currently four roles available. These include Teams Service Administrator who can manage the service and create and manage Office 365 groups, the Teams Communications Administrator who can manage call and meeting features, the Teams Communication Support Engineer, who can troubleshoot communications issues using an advanced set of tools and the Teams Communication Support Specialist, who is able to troubleshoot communication using a basic set of tools. Administrators will need to manage settings, including organization-wide settings for external access, guest access, and Microsoft Team settings, such as mail integration, files, devices, and feeds. They'll also need to manage the settings for apps that will be used within Microsoft Teams. You can also configure policies, which will be created to control how features can be used. You can create policies for Teams, meetings, live events, apps, and calls. And finally, you'll need to monitor your Microsoft Teams deployment. This will include, during the initial pilot deployment stage, that you ensure that settings have been correctly implemented before you then roll out Microsoft Teams to the rest of your organization. Later on, you'll gain insights into how your end users are using Microsoft Teams so you can optimize the settings. Let's use the Microsoft Teams Admin Center to view the organizational-wide settings. On the left hand side menu, select org-wide settings. And here we can see the various options available to us.

Select external access, and here we can configure the integration options for Skype for Business and Skype external users and we can also add or block domains in this area. If we want to communicate to an external company, we should add their domain. Lets enter a domain and click done and click save, and the settings are saved. On the left hand side, select guest access and here, we can grant access to guests in Teams. If we set this permission to be on and this exposes the various areas where we can allow guest access. You should view all of the settings and carefully consider which areas you would like guest access. Within Team settings, we have settings for notifications and feeds, email integration. Within files, we can configure cloud file storage options. Manage the organizational view, devices, and also search. Within Teams upgrade, we're in the middle of upgrading from Skype for Business online to Microsoft Teams. Therefore, I'll select the islands mode.

I'll notify my users that an upgrade to Teams is available. I'll click save.
If you click holidays, and here, we can add in holidays for days when our company will be closed. For example, Christmas day. Click add holiday, provide a name, select the date, and then click save. These holidays will be then populated across all calendars within our organization.
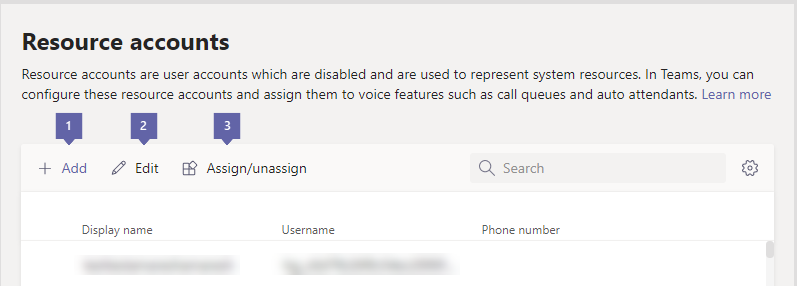
I don't need to provide any resource accounts within my tenant.
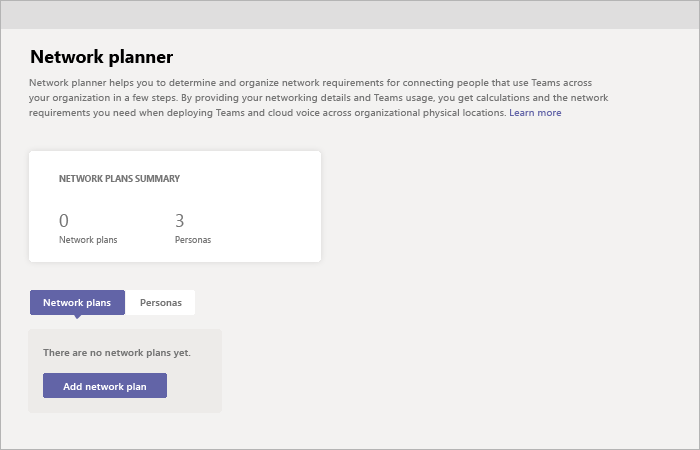
The network planner can be useful when trying to work out the network requirements for connecting various physical locations together.