API tooling has been integrated into the Eclipse SDK and lives in the PDE project. This guide shows developers how to set up and use API tooling features in daily development scenarios.
API tooling provides a builder that reports API usage and binary compatibility errors in the workspace. You must configure bundles/projects that you want API tooling to report errors on and you must define an API baseline to compare against workspace projects (to report compatibility errors, missing @since tags, incorrect version numbers, etc.).
An API baseline defines the state you want to compare your development workspace bundles against for the purposes of binary compatibility, bundle version numbers, and @since tags. For example, if you are developing bundles for Eclipse 3.4, you will use Eclipse 3.3 as your baseline.
API baselines are managed on the Plug-in Development > API Baselines preference page. Here you can create, edit, and delete API baselines. You can select one baseline as the 'default' - this is the baseline that the workspace will be compared against.
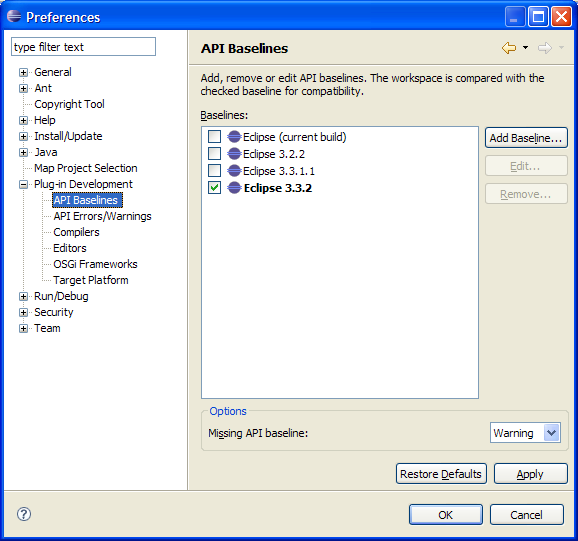
Use the Add Baseline... button to open a wizard to define a baseline. Any Eclipse SDK can be used as a baseline simply by giving it a name and specifying the root location of the plug-ins.
Note: Currently, Eclipse builds do not contain API description metadata that assists API tooling. This information will be added to builds sometime during the 3.4 development cycle. An SDK can be used as a baseline without the metadata, although some problems may not be detected when this information is missing. For example, if you are implementing an interface that originates from a binary required plug-in, API tooling cannot verify that the interface is allowed to implemented unless the API description metadata is present.
API tooling provides a builder that analyzes bundles and reports API errors. You need to configure existing projects to use the builder (this effectively adds the "API Tooling" nature to your project). As well, you need to describe the API of your bundle. Special API Javadoc tags can be placed on classes, interfaces, and methods to describe their API (@noimplement, @noinstantiate, @noextend). You can use content assist to insert tags with appropriate comments.
Note: API tooling can insert Javadoc tags into source code based on existing component.xml files.
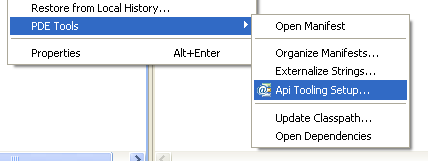
Using the PDE Tools > API Tooling Setup... action to configure your projects.
A dialog appears allowing you to select projects you want to setup for API tooling.
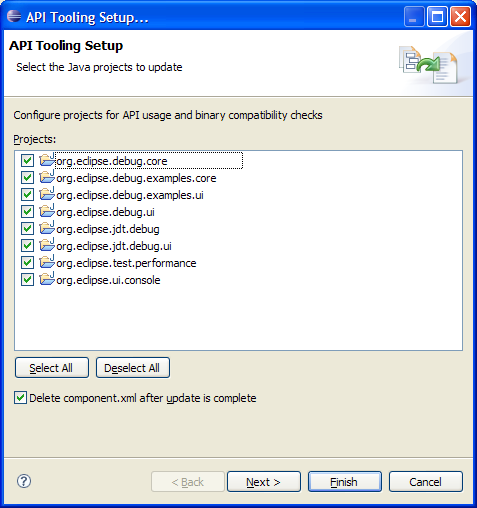
Note: By default, component.xml files are deleted from your workspace after corresponding Javadoc tags are inserted into source code. There is a checkbox to disable this option. You can also preview the text changes that will be made, by clicking 'next'.
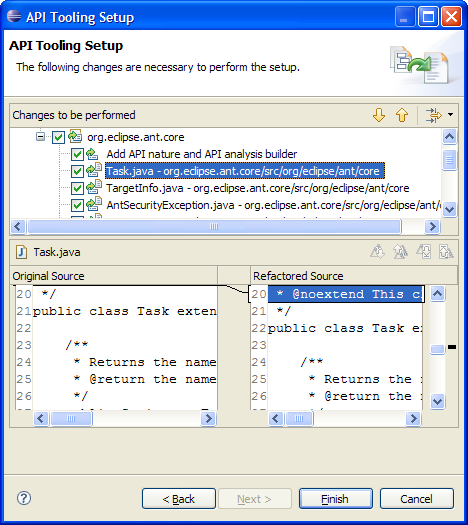
After pressing finish, Javadoc tags will be inserted and the API Tooling nature (and builder) will be added to your projects. API problems will now appear in the workspace where appropriate. You should manually examine your source code after tags have been inserted to ensure correctness.
Once your projects have been configured for API tooling and an API baseline has been selected, API problems will be created during project builds (auto and full builds).
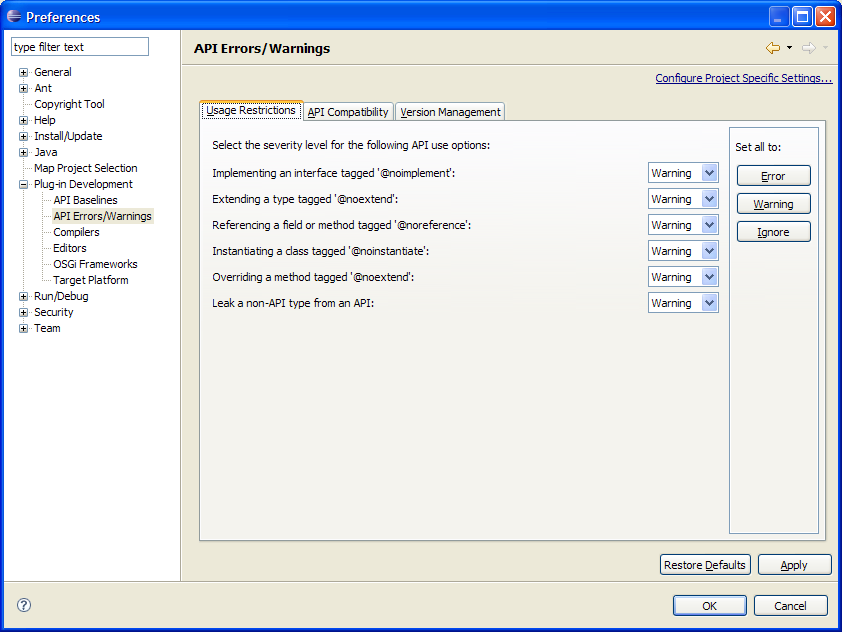
The tooling breaks down the types of problems reported into one of three categories:
- Usage Problems - restricted code is being called by unauthorized plugins
- Binary Incompatibilities - changes between versions are not binary compatible
- Version Problems - plugin versions or code versions (@since tags) not correct
Similar to the way you can set compiler problem severities (error vs. warning vs. ignore), API tooling provides an API Errors/Warnings preference page that allows you to configure API problem severities. You can configure the problem severities on a per project basis as well, by using the API Errors/Warnings property page for a project, available from the Properties... action.
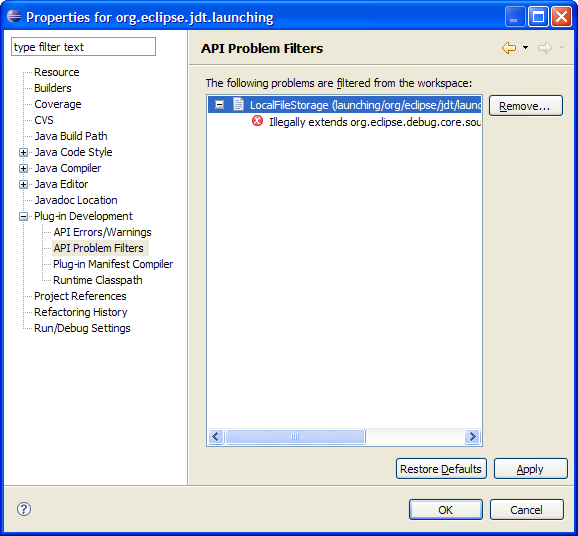
Sometimes you will have API problems that are "known problems" or are "approved" API breakages. API tooling has support to allow you to filter these problems from your workspace.
You can add a filter for a specific api problem using the Eclipse 'quickfix' mechanism on any api problem marker.
Once a filter has been added you can edit / remove it from the 'Api Problem Filters' project property page.
API Tools provides a number of ant tasks to integrate the tooling into your build process.
- 1 Articles
- 2 Examples
There are currently no articles.
There are a few things that should be noted prior to getting started with the examples.
-
Whenever we refer to a "pattern" we are referring to a Java regular expression as defined here. Take note of escaping, etc, that is used when formulating your regular expression. If a invalid regular expression is given, the use scanner will report it back to you and abort.
-
When using the Ant tasks from the command line you should always make sure the
eclipse.install.dirproperty points to the most recent Eclipse build available. This way you get all the latest and greatest versions of the tasks. The other reason to do this is that the build file (api-tasks.xml) uses the API tools core jar from that directory on the Ant classpath. -
Any Ant tasks used from the command line must be called by their name as specified in the
ant-tasks.propertiesfile. This can cause some confusion for users who try out the Ant tasks in Eclipse and notice that the tasks are qualified withapitoolingbut they are not qualified in theant-tasks.propertiesfile. Consider the following example:
Will work just fine when run within Eclipse, but will fail with a build exception about the name apitooling.apiuse_reportconversion being unknown.
If the qualification is removed like the following it will work just fine:
<project name="convert" basedir="." default="run">
<target name="run" depends="init">
	<apiuse_reportconversion
	    xmlfiles="${report.loc}"
	    htmlfiles="${html.loc}"
	    debug="true"
	/>
    </target>
</project>
In the IDE API use scans can be run from the External tools dialog. The benefits of providing the scanning as an external tool are many, the foremost being: 1. you can create as many different configurations as you want for scanning different distributions of your products and 2. each configuration can have its own persisted settings.
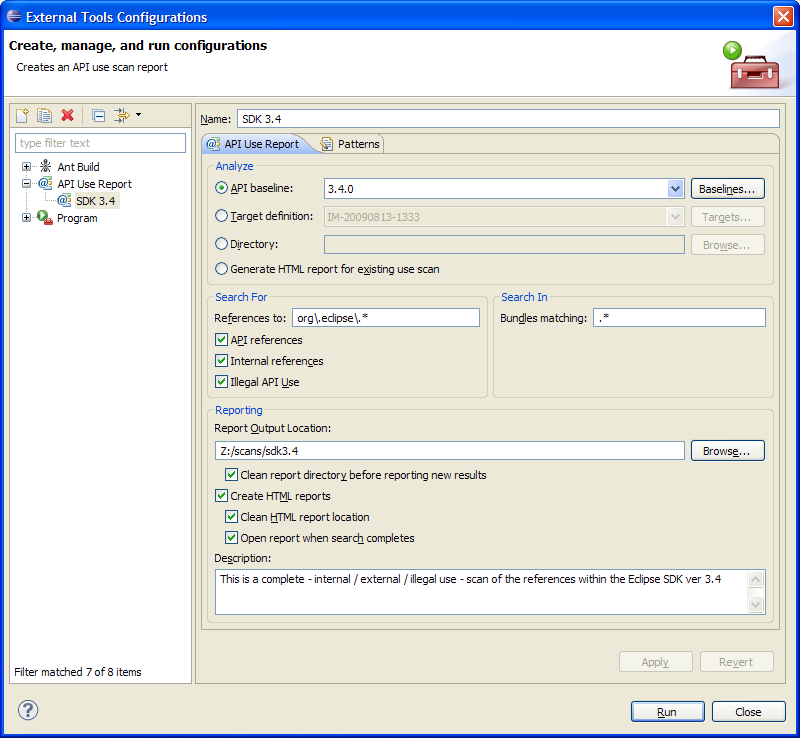
To create a new use scan configuration simply double-click the API Use Report configuration type.
There are a few items that are required for a use scan to run:
- You must select what you want to analyze, which can be either an API baseline, target definition or a directory of bundles. You can also select to only generate HTML for an existing report. You can only select one option, with each option allowing you to configure it. I.e. you can go to the API baselines preference page to edit existing baselines if you select analyzing an API baseline.
- You must specify where the scan results will be outputted. The UI allows you to browse for a desired location or you can enter it in manually. If the given report location does not exist it will be created for you.
There are more options that can be configured but are not required for a scan to complete, they include:
-
Search for > References to - this field allows you to specify the name (or matching RegEx) of the bundle that you want to see references to. Consider the following example:
org\.eclipse.*In this example we are saying that we want to see all references to any bundle that starts with the name
org.eclipse.. -
Search for > API references - this option allows you to scan for API references.
-
Search for > Internal references - this option allows you to scan for internal references.
-
Seatch for > Illegal API Use - this options allows you to scan for illegal API usage i.e. usage of restricted API members.
-
Search in > Bundles matching - this field allows you to specify the name (or matching RegEx) of the bundle(s) that you want to scan for references from i.e. a search scope. Consider the following example:
.*In this example we are saying that we want to search in all bundles whose name matches any character sequence. The same effect can be achieved leaving the field blank. Consider another example:
com\.test.*In this example only bundles whose name starts with
com.testwill be scanned for references. -
Reporting > Clean report directory before reporting new results - this option allows you to clear out an existing report location prior to the scan reporting any results. It should be noted that this option will completely remove the specified report directory if it exists, with all child directories being recursively removed as well.
-
Reporting > Create HTML reports - this option will convert all of the XML output into formatted HTML and place it in
<report location>\\html -
Reporting > Clean HTML report location - this option allows you to clear out an existing HTML location prior to creating new reports. It should be noted that this option will completely remove the specified HTML directory if it exists, with all child directories being recursively removed as well.
-
Reporting > Open report when search completes - opens the HTML report when searching has completed.
-
Reporting > Description - allows you to enter a human-readable description for the report
Before you can begin running any of the Ant tasks provided by API Tools you have to get a version of the org.eclipse.pde.api.tools bundle that provides the task(s) you want to run.
In this example - to run the updated version of the use task - you will need to get a version from any build after August 24, 2009.
Next you will want to extract the api-tasks.properties file from org.eclipse.pde.api.tools jar found in the /scripts folder.
Lastly, you will want to extract the api-tasks.xml file, also located in the org.eclipse.pde.api.tools jar in the /scripts folder.
The build file - api-tasks.xml - is fairly simple and has a plethora of comments to help you out.
It performs 3 main tasks: 1. it builds the Ant classpath based on an Eclipse install 2. it extracts the apitooling-ant.jar from the org.eclipse.pde.api.tools jar 3. it runs whichever task you specify in the 'run' target
The three most import properties in the build file describe the base set up locations to be able to run any of the Ant tasks. They include:
-
The Eclipse install location - this location is required so that the build can find all of the dependents of API tools and load them on the Ant classpath.
<property name="eclipse.install.dir" value=""/> -
The location to extract the
apitooling-antjar file to - this location is where the build will place the API tools jar required to run any of the Ant tasks.<property name="eclipse.lib.dir" value=""/> -
The location of the
ant-tasks.propertiesfile - this location is needed so that Ant can map task names back to the classes that implement them.<property name="task.props" value=""/>
Of the three tasks defined in the build file, only the run task need be modified. This task is the one that will actually run whichever API tools task you specify in it. For example if we want to run a use scan (which we do) the run task would look like the following:
<target name="run" depends="init">
    <apiuse
        location="${scope.loc}"
        report="${report.loc}"
        referencepattern="org\.eclipse.*"
        scopepattern=".*"
        considerinternal="true"
        debug="true"
    />
</target>
Where the properties used in the example are defined as:
<property name="report.loc" value="/eclipse/reports/xml"/>
<property name="scope.loc" value="/eclipse/product1/plugins"/>
Now lets have a look at an entire build file that could be used to scan for internal reference to any bundle that starts with the name org.eclipse from a product named TestProduct.
The example build file also includes HTML report generation.
<project name="apitask" basedir="." default="run">
    <property name="eclipse.install.dir" value="/eclipse/eclipse/plugins"/>
    <property name="eclipse.lib.dir" value="/eclipse/lib"/>
    <property name="task.props" value="/eclipse/lib/api-tasks.properties"/>
    <property name="report.loc" value="/eclipse/reports/xml"/>
    <property name="html.loc" value="/eclipse/reports/html"/>
    <property name="scope.loc" value="/TestProduct/plugins"/>

    <target name="init" depends="extract-apitoolingjar">
	<taskdef file="${task.props}">
	    <classpath>
	    <fileset dir="${eclipse.install.dir}">
	        <include name="*.jar"/>
	    </fileset>
	    <fileset dir="${eclipse.lib.dir}">
	        <include name="*.jar"/>
	    </fileset>
	    </classpath>
	</taskdef>
    </target>
    <target name="extract-apitoolingjar">
	<unjar overwrite="true" dest="${eclipse.lib.dir}">
	    <fileset dir="${eclipse.install.dir}">
	        <include name="org.eclipse.pde.api.tools_*.jar"/>
	    </fileset>
	    <patternset>
	        <include name="**/*.jar"/>
	    </patternset>
	</unjar>
	<move file="${eclipse.lib.dir}/lib/apitooling-ant.jar"
              overwrite="true" todir="${eclipse.lib.dir}"/>
	<delete dir="${eclipse.lib.dir}/lib/" includeemptydirs="true"/>
    </target>
    <target name="run" depends="init">
	<apiuse
    	    location="${scope.loc}"
	    report="${report.loc}"
	    referencepattern="org\.eclipse.*"
	    scopepattern=".*"
	    considerinternal="true"
	    debug="true"
	/>
	<apiuse_reportconversion
	    xmlfiles="${report.loc}"
	    htmlfiles="${html.loc}"
	    debug="true"
	/>
    </target>
</project>
To actually run the build file you must have Ant available on the command line and then enter the following:
root%>ant -buildfile <build file name>
The support of the Javadoc tags in source to help document your codes' usage is fantastic. That being said it might happen that you would like to generate the documentation for your bundle and have it include such tag information. By default this does not work, since the standard Javadoc doclet knows nothing about the API tools Javadoc tags. The following sections describe generating Javadoc for your bundle using the Generate Javadoc wizard within the Eclipse IDE and from the commandline.
Eclipse contains a very nice wizard for generating Javadoc for your bundles. It can be found by using the Generate Javadoc command located in the Project main menu item.
Once the wizard starts you will have to locate the Javadoc executable (if not already specified) and select the bundles you wish to generate Javadoc for.
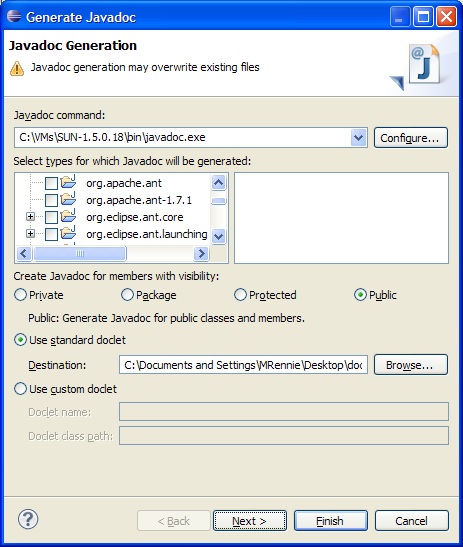
On the next page, you can configure additional options.
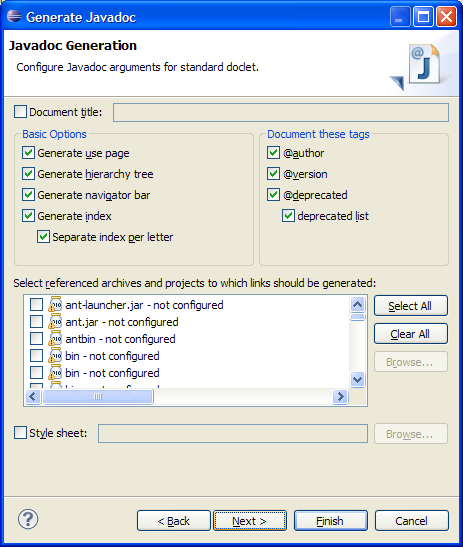
On the last page is where we need to tell the wizard about the custom API tools tags.
In the Extra Javadoc options area you will want to enter the following tag definitions:
-tag 'noimplement:a:No Implement:'
-tag 'noextend:a:No Extend:'
-tag 'noreference:a:No Reference:'
-tag 'noinstantiate:a:No Instantiate:'
-tag 'nooverride:a:No Override:'
-tag 'category:a:Category:'
The wizard will then look like the following:

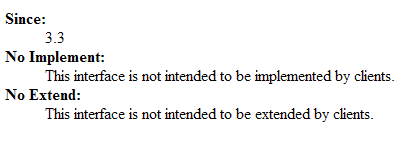
Once you press finish and the Javadoc tool completes you should see API tools tag restrictions appearing in your documentation like the following example:
As mentioned above you must tell Javadoc about the custom API tools tags.
To do so in this case, it would be easiest to place the tag definitions in a argfile and pass that to the javadoc command.
root%>javadoc @apitags
Where the apitags file would contain the following:
-tag 'noimplement:a:No Implement:'
-tag 'noextend:a:No Extend:'
-tag 'noreference:a:No Reference:'
-tag 'noinstantiate:a:No Instantiate:'
-tag 'nooverride:a:No Override:'
-tag 'category:a:Category:'
You will also have to specify where the source is and any extra parameter for javadoc to be able to complete.
For a description of these and further information on using javadoc see the Sun Javadoc guide
In the previous examples we saw how to tell the Javadoc tool about the API tools custom tags. Since we have to explicitly tell the tools about the tags you are afforded some flexibility in how the tags appear in the final documentation. Consider the example given thus far:
-tag 'noimplement:a:No Implement:'
-tag 'noextend:a:No Extend:'
-tag 'noreference:a:No Reference:'
-tag 'noinstantiate:a:No Instantiate:'
-tag 'nooverride:a:No Override:'
-tag 'category:a:Category:'
If for whatever reason you do not want your documentation to say 'No Implement', you can further customize the tag definition(s) like the following:
-tag 'noimplement:a:Implementation Not Allowed:'
-tag 'noextend:a:Extensions Prohibited:'
etc...
API Tools provides a number of ant tasks to integrate the tooling into your build process.
- 1 Introduction
- 1.1 Binary Compatibility Reporting (Batch Mode)
- 1.2 Binary Compatibility Reporting (IDE Mode)
- 1.3 API Usage Reporting (Batch Mode)
- 1.4 API Usage Reporting (IDE Mode)
- 1.5 API Usage Searching (IDE Mode)
- 1.6 Version Management
- 1.7 Building API Components & Baselines
- 1.8 Javadoc Tags, API Visibilities & Restrictions
API Tools has been designed to aid developers maintaining good APIs, version numbers, mitigating internal usage across bundles and eliminating internal code leaks to API. The following are the original use cases discussed while designing the tooling.
Two versions of the same API profile are compared for binary compatibility. An XML file is produced summarizing any incompatibilities. The comparison tool can be invoked from the command line as a stand alone Java application specifying the profiles to compare and which parts of the profiles to consider (for example, only compare portions of the profile that are deemed to be API).
The report includes errors regarding component version identifiers that have not been incremented properly.
As well, if source code is available for the "newer" API profile, the report includes missing @since Javadoc tags.
An exclude list should be added to filter out the cases where the binary incompatibility is "under control", i.e. approved by the PMC. The best way to maintain the exclude list would be to have a Javadoc tag in the source code that mentions why this is a breakage. Something like:
@breakage-addition ......
@breakage-remove Type#member .....
The removals would be located on the parent of the removed member.
Updating the source code improves the traceability of a breakage and allows readers of the source code to get a better picture without the need to check another document.
Workspace projects are compared to a baseline API profile for binary compatibility. Incompatibilities are flagged in source files using markers (that also appear in the Problems view). The user configures the severity of errors produced. A set of external API profiles are managed in the workspace and one is specified as the baseline against which workspace projects are compared. The user defines the workspace API profile as combination of workspace projects and external API components.
Compatibility errors are updated incrementally or in full depending on the build setting in the workspace (i.e. auto-build vs. manual/full build).
Error markers are also produced for components with incorrect version numbers and missing @since Javadoc tags.
Quick fixes are available to address the problems.
An exclude list should be added to filter out the cases where the binary incompatibility is "under control", i.e. approved by the PMC. The best way to maintain the exclude list would be to have a Javadoc tag in the source code that mentions why this is a breakage. Something like:
@breakage-addition ......
@breakage-remove Type#member .....
The removals would be located on the parent of the removed member.
Updating the source code improves the traceability of a breakage and allows readers of the source code to get a better picture without the need to check another document.
The most common API usage report locates illegal use of APIs among components in a single API profile - i.e. access to non-API types, methods, and fields; and illegal extension, implementing, or instantiating. The API usage scanner can be invoked as a stand alone Java application to examine all or specific portions of an API profile for illegal API use. An XML file is produced as output.
The API scanner should also support scanning for use of a specific component. For example, rather than scanning component X to determine what use it makes of other APIs, scan a profile to find all uses of the API in X.
Another interesting scan would be to report what parts of a profile or component would be broken when migrating to another version of a required component. For example, the internals of a component often change or can be removed in a newer release of the component.
The Eclipse SDK already provides compiler warnings for discouraged accesses between bundles - which is the same as referencing non-API code. Rather than duplicate this effort, the integrated tooling could just report illegal implementing, sub-classing, and instantiation. Problem markers would be created incrementally, similar to the support for binary compatibility.
Similar to the extensive search facility provided by JDT for searching projects in the workspace, API tooling could support searching of API profiles. This would allow to search for all uses of a component, type, method, etc., from an API profile or component.
In addition to reporting missing @since tags and incorrect bundle version numbers (based on the Eclipse bundle versioning scheme), the tooling will provide quick fixes to correct these problems.
As well, the tooling will assist developers on determining compatible version ranges of required bundles (plug-ins). Developers often increment the lower bound of version ranges of required bundles in each major release. Usually this makes sense (for example, the debug platform's UI bundle usually requires the latest debug core bundle). However, sometimes this is unnecessary, and a bundle may run perfectly fine with an older version of a required bundle. Given a range of versions of a required bundle, API tooling will be able to determine which versions of the bundle satisfy API (and non-API) accesses.
Provide a mechanism to export API components. This could be used in a build process or from the IDE.
The platform provides a default set of Javadoc tags. The tags and the Java members they apply to are:
@noreference- Indicates that other bundles must not reference this member by name. I.e., the member is internal. This tag is intended to be used very rarely when a public class wants to restrict access to one of its members, but is not intended for general usage. This tag is ignored on all other members except for method declarations and non-final field declarations.@noimplement- Indicates that other bundles must not implement this interface. This tag is ignored for all types except for interfaces.@noextend- Indicates that other bundles must not extend the class or interface it appears on. This tag is ignored for all members that are not interfaces or classes.@noinstantiate- Indicates that other bundles must not create instances of this class. This tag is ignored for all other types that are not classes.@nooverride- Indicates that other bundles must not extend (re-implement with a call to the overridden parent) or re-implement (with no call to the overridden parent) this method. This tag is ignored for all other members except method declarations.
Community
Contribute