JFace Data Binding is a multi-threaded set of abstractions that allow for automated validation and synchronization of values between objects. This is commonly used for, but not limited to, the binding of user interface components to model attributes. The core concepts behind the project are Observables and Bindings. We provide IObservable implementations for SWT, JFace, and JavaBeans but the core is void of references to these in anticipation of implementations for other projects (e.g. EMF, Swing, etc.).
- 1 Introduction
- 2 Getting started
- 3 Snippets
- 4 Observable
- 5 Binding
- 6 Data Binding Context
- 7 Converter
- 8 Validators
- 9 Realm
- 10 TrackedGetter
- 11 Master Detail
- 12 Runtime Dependencies
- 13 Conformance Tests
Developing line of business applications as Eclipse Rich Client Platform applications presents a number of unique challenges.
-
How does one validate data entry when the number of possible interactions between validation rules rises proportional to the square of the number of data entry fields on an input form?
-
How does one avoid coding repetitive, dull, tedious, and error-prone SWT event handlers?
-
How can one improve reuse of data-driven user interfaces?
All of these concerns are improved upon by using JFace Data Binding.
Traditionally, database-driven line of business applications are organized into tiers:
- a database tier
- a business or domain model tier
- a presentation tier
The communication paths between these tiers are organized along the routes that data flows within and among these tiers.
Recently, Hibernate, EJB3, and Rails technologies have emerged as a means of automating the data flow between the business tier and the database tier.
By analogy, just as Hibernate helps automate the data flow between the business tier and the database tier, JFace Data Binding helps automate the data flow between the business tier and the presentation tier. It does this via a simple update to the model-view-controller pattern that enables us to create a set of completely generic and reusable controllers between the business model objects and the view (or presentation) tier.
Traditional object-oriented architectures use the model-view-controller pattern to persist changes in a user interface to a model. This architecture can be visualized as follows:
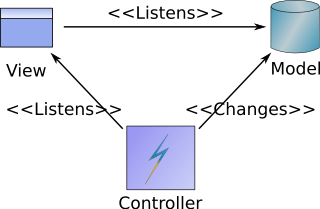
This works the following way:
- The view observes (listens to) the model for changes and redraws itself when it detects a change.
- The controller observes (listens to) the view for change events.
- When the controller detects an event that needs to cause a change, it is responsible for mutating the model, which implicitly refreshes the view because the view is listening to the model for changes.
There are a few problems with this pattern:
- The view has to understand the model.
- The controller has to understand both the view and the model.
Data binding is a recognition that most of the time, Text widgets are bound to single properties of objects, a radio group has a java.util.List or a java.util.Set of choices and its selection is bound to a single property of an object, and so on. Since we know that the data type in the business model tier has to match the data type in the GUI widget, we can build a generic mapping layer between POJOs and GUIs similar to the way Hibernate is a generic mapping layer between POJOs and databases.
In general, the architecture then looks like:

The implementation is simple. The generic controller represents data binding. It listens to changes on both the model and on the GUI view. When a change in a property occurs in the model, it is automatically copied to the GUI. Similarly, when the user changes a value in the GUI, the change is automatically copied back to the model.
To make this concrete, let's look at an example:
Suppose the model object is an Integer property of an Employee object called "numberOfYearsWithFirm". This property is to be bound to an SWT Text control. Then:
- The data type of the model object is "int".
- The data type of the UI is "String" (the data type of the text property of the Text).
The controller simply listens to the model for changes in the "numberOfYearsWithFirm" property. Similarly, it listens to the SWT Text object for changes the user makes in the UI.
If the user changes the UI or the underlying model object changes, that change is copied to the other side, automatically applying any validation and/or data type conversion rules that are necessary to make the whole thing work.
For example, if the user changes the SWT Text object, the new String value is validated that it can be converted to an "int", the value is then converted to an "int", and the new integer value is then set in the model object.
This page shows you how to create a simple example application using data binding that you can play with.
- Download and install the Eclipse 3.3 SDK.
- Start the Eclipse SDK and select a new workspace directory. Close the Welcome view - the Package Explorer should now be showing but empty.
- Create a new plug-in project: Hit Ctrl+3, enter 'npip' (just the letters, not the quotes), hit Return.
- Enter a project name, for example 'GettingStarted'.
- Keep the default options (Target: Eclipse 3.3, plug-in will make contributions to UI, no RCP application) and click the Finish button.
- In the plug-in manifest editor, switch to the 'Dependencies' tab.
- Under 'Required Plug-ins', click 'Add...'.
- In the dialog, type '*databinding'. (Note the leading wildcard character.)
- Multi-select org.eclipse.core.databinding, org.eclipse.core.databinding.beans, org.eclipse.core.databinding.property, org.eclipse.jface.databinding, and com.ibm.icu, and click 'OK'.
- Save and then close the plug-in manifest editor.
- Create a new Java package (File > New > Package) and pick a name for it, e.g. 'starting'.
- Create a new Java class (File > New > Class) in that package, called 'GettingStarted'.
Copy the following example code - consisting of three parts - into the new class. Use 'Source > Organize Imports' to get the appropriate import statements (make sure to select the SWT types for Text, Button, and Label, and to select org.eclipse.core.databinding.observable.Realm).
Save the file and then select 'Run > Run As > Java Application'. Enter a numeric value in the text field and observe how the label is updated automatically. Click on the button to double the amount. You can also try entering a non-numeric value.
public class GettingStarted {

static Model model = new Model();

static void init(Shell shell) {
	Text text = new Text(shell, SWT.BORDER);
	Label label = new Label(shell, SWT.NONE);

	Button button = new Button(shell, SWT.PUSH);
	button.setText("Double!");
	button.addSelectionListener(new SelectionAdapter() {
		public void widgetSelected(SelectionEvent e) {
			model.setAmount(model.getAmount() * 2);
		}
	});

	DataBindingContext dbc = new DataBindingContext();

	IObservableValue modelObservable = BeansObservables.observeValue(model, "amount");

	dbc.bindValue(SWTObservables.observeText(text, SWT.Modify), modelObservable, null, null);
	dbc.bindValue(SWTObservables.observeText(label), modelObservable, null, null);

	GridLayoutFactory.swtDefaults().generateLayout(shell);
}
The above code assumes that a SWT Shell has already been created, and that there is a model object with an 'amount' property. Both will be implemented in the remaining two code pieces.
A text widget, a label, and a button are created within the shell. When the button is clicked, the model's amount will be doubled, using the getter and setter methods supported by the model object.
A data binding context is created. This is an object that will hold on to the bindings that you create. Bindings can be created between observable objects. In our example, we create one observable for our model object's property, and two observables on the UI side, one for the text, and another one for the label. The two 'null' arguments are for configuring validators or converters; by passing null, we will get default validators and converters. Note that the model property is of a numeric type while the text widget holds strings. Clearly, some kind of conversion is needed here.
static class Model {
	private PropertyChangeSupport changeSupport = new PropertyChangeSupport(this);
	public void addPropertyChangeListener(String propertyName,
			PropertyChangeListener listener) {
		changeSupport.addPropertyChangeListener(propertyName, listener);
	}
	public void removePropertyChangeListener(String propertyName,
			PropertyChangeListener listener) {
		changeSupport.removePropertyChangeListener(propertyName, listener);
	}
	private int amount = 0;
	public void setAmount(int newAmount) {
		int oldAmount = this.amount;
		this.amount = newAmount;
		changeSupport.firePropertyChange("amount", oldAmount, newAmount);
	}
	public int getAmount() {
		return amount;
	}
}
This is a pretty basic model class that conforms to the JavaBeans specification by delegating listener management to a PropertyChangeSupport object. For convenience, it is implemented as a static inner class. You can easily add more properties to the model class, but don't forget to implement public getters and setters for them, and to make appropriate calls to changeSupport.firePropertyChange() from all setters.
public static void main(String\[\] args) {
	final Display display = new Display();
	Realm.runWithDefault(SWTObservables.getRealm(display), new Runnable() {
		public void run() {
			Shell shell = new Shell(display);
			init(shell);
			shell.pack();
			shell.open();
			while (!shell.isDisposed()) {
				if (!display.readAndDispatch())
					display.sleep();
			}
		}
	});
	display.dispose();
}
}
This is the standard SWT event loop with one complication - a SWT Realm is created and made the default realm for our application. Think of a Realm as an abstraction of SWT's UI thread. If everything in your application happens in the UI thread, you don't have to deal with Realms in your binding code. For more details on this, see the FAQ or the section that explains in detail what a Realm is. If you are writing a plug-in for the Eclipse Platform, or a RCP application, you don't have to do this setup yourself - as of Eclipse 3.3, it is already part of the initialization code in PlatformUI.createAndRunWorkbench().
To see the results of the default validation, add the following to the GettingStarted class.
Label errorLabel = new Label(shell, SWT.NONE);
dbc.bindValue(SWTObservables.observeText(errorLabel),
		new AggregateValidationStatus(dbc.getBindings(),
				AggregateValidationStatus.MAX_SEVERITY), null, null);
This code adds another label for the validation message and binds it to an aggregated status obtained from all the bindings in the data binding context. You can also look at validation results for individual bindings if you keep a reference to the binding object returned from bindValue:
// updated line follows:
Binding b = dbc.bindValue(SWTObservables.observeText(text, SWT.Modify), modelObservable, null, null);

Label individualErrorLabel = new Label(shell, SWT.NONE);
dbc.bindValue(SWTObservables.observeText(individualErrorLabel), b.getValidationStatus(), null, null);
Note that b.getValidationStatus() returns an IObservableValue, not an IStatus object. It is a live value which can be observed; in this example, we are using it directly in another call to bindValue().
To configure your own converters and/or validators instead of the default ones, you would pass an instance of UpdateValueStrategy for each direction (UI>Model, Model>UI) instead of the null arguments to bindValue():
// this is just an example of configuring an existing validator and converter:
dbc.bindValue(SWTObservables.observeText(text, SWT.Modify), modelObservable,
	// UI to model:
	new UpdateValueStrategy().setAfterConvertValidator(anIntValidator),
	// model to UI:
	new UpdateValueStrategy().setConverter(anIntToStringConverter));
Snippets show how common use cases can be implemented using the JFace Data Binding framework. They are typically a single self-contained Java class with a main method. See the bottom of this page for additional instructions on how to get and run the snippets.
- Create an Eclipse plug-in project and in the Manifest editor go to the Dependencies tab
- Add dependencies to the following bundles: org.eclipse.core.databinding, org.eclipse.core.databinding.beans, org.eclipse.core.databinding.property, org.eclipse.jface.databinding, org.eclipse.swt, and org.eclipse.core.runtime
- Click on any snippet in this list
- Copy (CTRL+C) the source to your clipboard
- Go to the src folder of your project and paste (CTRL+V). This will automatically create the correct package and source file.
- Right click on the new source file and select "Run as / Java Application"
- Hello World - the most basic of bindings
- Wizard Dialog - Shows how to use data binding in a wizard dialog so that validation results are displayed in the dialog's title area
- Spreadsheet - fills a Table updating cells upon change
- Name Formatter - observable value that updates when the first or last name changes
- Master detail - display the detail of the selection of a ListViewer in a Text widget
- Nested Selection With ComboViewer
- Model to TableViewer binding - basic binding to a TableViewer
- TableViewer binding with colors - label provider that provides Colors and auto updates the viewer
- TableViewer inline editing - TableViewer editing with the Eclipse 3.3 JFace viewer APIs. (requires Eclipse 3.3)
- ComputedList and Combo - Filter the elements in one viewer based on the selection in another
- ComboViewer and Java enum - Demonstrates binding the list of a ComboViewer to the values of an enum and the selected value to a simple model property.
A great way to learn is to look at concrete examples that you can run and experiment with.
You can clone the eclipse.platform.ui git repository which contains the "org.eclipse.jface.examples.databinding" project with the JFace Databinding examples. For cloning a git repository you can use the EGit tooling of Eclipse.
Use the following URL to clone the repository via File -> Import -> Git repository
After you cloned the project the clone wizard will allow you to import the included projects. For the databinding examples you only have to import the "org.eclipse.jface.examples.databinding" project. For an introduction into EGit please see EGit
Most of the examples provide a main method, you can run it as a Java Application to see what happens.
You can also copy any of the snippets (see below) into a scratch project within Eclipse. If you are copying single snippets into a scratch project, make sure that it is set up with the correct dependencies. You will need org.eclipse.core.databinding, org.eclipse.core.databinding.beans, and org.eclipse.jface.databinding.
Observables are one of the key abstractions provided by JFace Data Binding and are an implementation of the Observer pattern. They provide a common abstraction for observing changes in objects.
- IObservable - super-interface of all observables, allows to listen for generic change events
- IObservableValue - has getValue(), setValue(), and allows to listen for value change events
- IVetoableValue - inherits from IObservableValue, and allows to listen for before-change events
- IObservableCollection - extends java.util.Collection and IObservable
- IObservableList - extends java.util.List and IObservableCollection, and allows to listen for incremental list change events
- IObservableSet - extends java.util.Set and IObservableCollection, and allows to listen for incremental set change events
- IObservableMap - extends java.util.Map and IObservable, and allows to listen for incremental map change events
- An observable must remove listeners on the observed when disposed. For example if you registered selection listeners on a widget when the observable was constructed it must remove these on dispose of the observable.
- An observable should fire change events when the value changes if at all possible. This means when the value changes in the object being observed or when the value is set on the observable. One thing to look out for is firing multiple change events when this occurs. A use case where this arises is a widget that fires change events when the value is set programmatically (e.g. Text.setText(...)). In these use cases an 'updating' flag is normally employed.
- Not all observables fire change events when the state of its underlying object changes, but they do fire a change event if the change goes through the observable's setter. An example of this is Control.setEnabled(...) in SWT. If the object being observed doesn't fire change events when the value is set programmatically the observable cannot observe programmatic changes in the observed object. In these use cases it still pays to have the abstraction for get/set value but when coding against such observables it's good to be aware of this behavior. Because of this it's good to always set the value on the observable to ensure that change events are fired.
- In an observable when retrieving the value always retrieve it from the observed object. Don't cache the value in the observable if possible. Caching can cause issues if there's potential for this state to get out of sync like in the Control.setEnabled(...) use case mentioned above.
- If the observable is an
IObservableValueand the type of the attribute is a primitive use the primitive class (e.g. Boolean.TYPE or boolean.class) rather than the boxed type (e.g. Boolean.class) even though when get/setValue(...) is invoked the boxed type will be returned. By using the primitive the observable will be able to convey that the value cannot be null. This allows for better control in the validation and conversion phases of binding.
Realm for how observables can be accessed in a multi-threaded environment.
Bindings synchronize the values of 2 observables in JFace Data Binding. The synchronization process is comprised of phases of validation and conversion. The specific phases available are dependant upon the type of binding.
A value binding binds two IObservableValue instances. The order of phases are:
Validation of the value before conversion. This phase can be used to ensure that conversion will succeed.
Converts the value to the expected type.
Validates the converted value.
Validates before setting the value. The only difference between 'before set' and 'after convert' is a conceptual one. Before set can be used to perform expensive validation that should be deferred until the value is copied to the model. This comes in handy in a dialog setting where validation should occur before the changes are committed.
The value is set on the opposite observable. This stage is exposed in UpdateValueStrategy to allow the consumer to persist changes when the value is set.
A list binding binds two IObservableList instances. The order of phases are:
Convert the value to the expected type.
Update the opposite observable with the change.
A data binding context manages a list of Bindings, and potentially other sources of validation results (such as model-side validators). Think of it as the context in which a number of bindings are created, and in which validation is performed. DataBindingContext offers methods for triggering re-validation, and (in the case of bindings that do not copy values to the model automatically) for triggering an update of the model.
Using an AggregateValidationStatus object, you can compute an aggregate validation status for the data binding context. The class WizardPageSupport can be used to connect the validation results of a data binding context to the title area in a wizard.
In JFace Data Binding converters are used to convert from one value type to another.
Converters, implementations of org.eclipse.core.databinding.conversion.IConverter, are a basic yet core part of the binding pipeline. They allow for the conversion between data types. This conversion can be as basic as converting from a primitive (e.g. boolean.class) to a boxed type (e.g. Boolean.class) or as complex as converting a String to an int.
To convert a value within a data binding, create an UpdateValueStrategy and set your converter to it. Then use that update strategy in the data binding.
- It's best for the converter to be immutable. This will allow for greater reuse of the instance especially across threads.
- Synchronize during convert(...) if necessary. A good example of this is using
com.ibm.icu.text.NumberFormatin a converter. NumberFormat expects to be externally synchronized as the state of NumberFormat changes during formatting and parsing. In order to be used across threads access to the internal NumberFormat must be synchronized. - If the converter is converting to a primitive from an object ensure null is handled.
Validators are used to validate values in various stages of the binding pipeline (before conversion, after conversion, and just before setting the value). A validator is an implementation of the IValidator interface which for a given value produces a validation status of type IStatus. Bindings use two validators, one for each direction (model to target and target to model). It is recommended (but not required) that you use the static methods on ValidationStatus to create status objects returned from IValidator.validate().
Currently, there is no public API for standard validators because simple validators are trivial to write, and more complex ones tend to be highly application-specific. We do however recommend that in your projects, you build your own library of validators for application-internal reuse.
Validation in the context of bindings can only look at one value at a time. For cross-field validation involving more than one value, you can use the helper class MultiValidator.
Realm ("Kingdom" is the core concept of JFace Data Binding in regards to synchronization. A realm can be thought of as a special thread, or a lock, that serializes access to a set of observables in that realm. Each observable belongs to a Realm. It can only be accessed from that realm, and it will always fire change events on that realm. One important example of a realm is the SWT UI thread. Like for the SWT UI thread, you can execute code within a realm by using Realm.asyncExec(); in fact, the SWT realm implementation just delegates to Display.asyncExec(). This means that while the data binding framework can be used in a multi-threaded environment, each observable is essentially single-threaded. Java bean observables implement this contract on the observable side, but don't require it on the Java beans side: Even if a bean fires a PropertyChangeEvent on a different thread, the change events originating from the observable will happen within its realm. To bridge between observables in different realms, use a data binding context - you can bind two observables even if they belong to different realms and the bindings take care of this for you by using Realm.asyncExec() where necessary.
When writing unit tests for observables or bindings it is difficult to set the default Realm without wrapping the test code in a Runnable and invoking Realm.runWithDefault(Realm realm, Runnable runnable). The following implementation can be used as a stub Realm for unit testing purposes and fits into the setUp() and tearDown() testing paradigm.
/**
 * Simple realm implementation that will set itself as default when constructed. Invoke
 * {@link #dispose()} to remove the realm from being the default. Does not support asyncExec(...).
 */
public class DefaultRealm extends Realm {
    private Realm previousRealm;

    public DefaultRealm() {
        previousRealm = super.setDefault(this);
    }

    /**
     * @return always returns true
     */
    public boolean isCurrent() {
        return true;
    }

    protected void syncExec(Runnable runnable) {
        runnable.run();
    }

    /**
     * @throws UnsupportedOperationException
     */
    public void asyncExec(Runnable runnable) {
        throw new UnsupportedOperationException("asyncExec is unsupported");
    }

    /**
     * Removes the realm from being the current and sets the previous realm to the default.
     */
    public void dispose() {
        if (getDefault() == this) {
            setDefault(previousRealm);
        }
    }
}


public class SampleTestCase extends TestCase {
    private DefaultRealm realm;

    /**
     * Creates a new default realm for every test.
     */
    protected void setUp() throws Exception {
        super.setUp();
        realm = new DefaultRealm();
    }

    /**
     * Removes the default realm.
     */
    protected void tearDown() throws Exception {
        super.tearDown();
        realm.dispose();
    }
}
Every getter on an observable object must make a call to ObservableTracker.getterCalled(). Why?
This enables abstractions like ComputedValue or ComputedList: All you have to write is a piece of code that computes a value, or a list. As long as this code only accesses other observables, the framework will manager listeners for you automatically.
For example, assume that your UI has text fields for the first name and the last name of a person, but you want to display a formatted version of the full name elsewhere in the UI. This is what you can write (see Snippet008 for a complete example):
final IObservableValue firstName = SWTObservables.observeText(firstNameField, SWT.Modify);
final IObservableValue lastName = SWTObservables.observeText(lastNameField, SWT.Modify);
IObservableValue formattedName = new ComputedValue() {
  protected Object calculate() {
    return lastName.getValue() + firstName.getValue();
  }
};
Note that without having to register any listeners from client code, the 'formattedName' observable will always change whenever one of the observables referenced in its calculate() method changes. We didn't even have to pass a list of observables to the framework - just by calling lastName.getValue(), or firstName.getValue(), it will figure out that it has to listen for changes to lastName and firstName for you.
The data binding framework has internal classes that work similar to ComputedValue and ComputedList, but instead of producing a value or a list, they update widgets. For example, look for ControlUpdater, TableUpdater. These classes are not API yet because we haven't received enough feedback from early adopters yet. If you would like to see this as API, please push for it by filing enhancement requests in bugzilla.
Some UIs allow you to select an object from a list, table, or tree and then, based on the selection, allow you to edit details about the selected object. For example, the selected object could be a Person object, and the editable details could be the person's name and their phone number.
Usually, when creating a model-side observable, you call a method like BeansObservables.observeValue(person, "name"). This would create an observable that (behind the scenes) attaches a listener to the given person object so that it can generate standardized events when the name attribute changes.
When the selected person changes, you could dispose the observable (and the binding) for the previously selected person and create new ones for the newly selected person, but there is a better way. By creating a detail observable, you can keep the same observable and binding and what you would have done manually is done for you by the framework automatically.
To create a detail observable, first create an observable for the current selection (this is sometimes called the master observable), for example through ViewersObservables.observeSingleSelection(). Then, call BeansObservables.observeDetailValue(selectionObservable, "name", String.class) to create the detail observable for the currently selected person's name attibute.
For an example snippet, see the Master Detail snippet.
The core Data Binding bundle has the following dependencies:
- org.eclipse.equinox.common (about 150 KB). We are currently using Assert, IStatus, and ListenerList from equinox.common, but we might potentially use more classes or interfaces from equinox.common in the future, such as e.g. ISafeRunnable/SafeRunner, IProgressMonitor, and IAdaptable.
- Databinding in Eclipse versions earlier than 4.16 had a dependency on ICU4J. 4.16 and later can use ICU if it is available but does not depend on it. (ICU4J is about 4MB for the real thing, or 100KB for the replacement bundle com.ibm.icu.base which is available from the Eclipse Project download pages.)
The data binding framework will run without OSGi. There are optional dependencies on the packages org.osgi.framework, org.osgi.util.tracker, and org.eclipse.osgi.framework.log which allow us to log errors and warnings to the common log if OSGi is available. You can also inject a logger yourself by calling org.eclipse.core.databinding.util.Policy.setLog(), very similar to how this is solved in JFace.
There are parts of Data Binding that depend on SWT/JFace but these have been broken out into a separate plug-in, org.eclipse.jface.databinding.
For background and historical information, refer to bug 153630 comment 9 and bug 179305.
The JFace Data Binding Conformance Suite (TCK) is a suite of tests and other files that allow for asserting the conformance of implementations to the abstractions provided by the library. The conformance tests can be found in the org.eclipse.jface.tests.databinding.conformance project in the Eclipse CVS. The tests are available for public consumption but will not be released as 1.0 until the Eclipse 3.4 release.
The TCK provides tests for the assertion of conformance to the observable specifications. Tests are currently provided for implementations of:
- IObservable
- IObservableValue
- IObservableCollection
- IObservableList
- IObservableSet
Tests are broken up into mutable and immutable test cases (e.g. ObservableValueContractTest and MutableObservableValueContractTest). The reason for this is that not all implementations allow for a consumer to mutate the observable via its API. The TCK tests assert the following when appropriate:
- Change events and their diffs
- Realm checking
- ObservableTracker.getterCalled(IObservable) invocations
- Values and value types
The TCK tests don't assert the observed object state. Because the observed object can be of any type and the value can be in any form this isn't something that we feel we can reliably provide. It would be more straightforward for these to remain in your own tests.
In order to take advantage of the tests developers will need to create a contract delegate. The delegates allow for implementation specific details to be provided to the TCK. The IObservableContractDelegate is provided below as an example:
public interface IObservableContractDelegate {
	/**
	 * Notifies the delegate of the start of a test.
	 */
	public void setUp();

	/**
	 * Notifies the delegate of the end of a test.
	 */
	public void tearDown();

	/**
	 * Invokes an operation to set the stale state of the provided
	 * observable.
	 *
	 * @param observable
	 * @param stale
	 */
	public void setStale(IObservable observable, boolean stale);

	/**
	 * Creates a new observable.
	 *
	 * @param realm realm of the observable
	 * @return observable
	 */
	public IObservable createObservable(Realm realm);

	/**
	 * Invokes a change operation on the observable resulting in a change event
	 * being fired from the observable.
	 *
	 * @param observable
	 */
	public void change(IObservable observable);
}
The delegate API follows the standard JUnit conventions of setUp() and tearDown(). The other methods will be invoked when necessary by the tests.
The delegates provided are:
- org.eclipse.jface.databinding.conformance.delegate.IObservableContractDelegate
- org.eclipse.jface.databinding.conformance.delegate.IObservableValueContractDelegate
- org.eclipse.jface.databinding.conformance.delegate.IObservableCollectionContractDelegate
Your observable implementation will determine which delegate to construct. Abstract implementations are provided to simplify implementing a delegate.
Since the tests are JUnit3 tests you can integrate them into your tests in standard ways. The two most common ways are by subclassing or creating a suite.
public class ButtonObservableValueTest extends SWTObservableValueContractTest {
	public ButtonObservableValueTest() {
		super(new Delegate());
	}

	/* package */ static class Delegate extends AbstractObservableValueContractDelegate {
		private Shell shell;
		private Button button;

		public void setUp() {
			shell = new Shell();
			button = new Button(shell, SWT.CHECK);
		}

		public void tearDown() {
			shell.dispose();
		}

		public IObservableValue createObservableValue(Realm realm) {
			return new ButtonObservableValue(realm, button);
		}

		public void change(IObservable observable) {
			boolean value = button.getSelection();
			button.setSelection(!value);
			button.notifyListeners(SWT.Selection, null);
		}

		public Object createValue(IObservableValue observable) {
			return (Boolean.TRUE.equals(observable.getValue()) ? Boolean.FALSE : Boolean.TRUE);
		}

		public Object getValueType(IObservableValue observable) {
			return Boolean.TYPE;
		}
	}
}
When subclassing, because of single inheritance, you will will have to create multiple implementations to test the mutable and immutable use cases (e.g. there would need to be a ButtonMutableObservableValueTest as well to test the mutable cases). The rest of the implementation should be straightforward. The only thing we ask is that you don't depend upon API other than the constructors. Tests are public because JUnit requires them to be, not because we want to commit to them as API. Over time we would like to have the opportunity to rename, add, remove, or optimize the test methods to ensure that we're getting the best coverage as possible. Because of the issues outlined above the preferred method is creating a JUnit suite.
public class ButtonObservableValueTest extends TestCase {
	public static Test suite() {
		TestSuite suite = new TestSuite(ButtonObservableValueTest.class.getName());
		suite.addTestSuite(ButtonObservableValueTest.class);
		suite.addTest(SWTMutableObservableValueContractTest.suite(new Delegate());
		return suite;
	}

	/* package */ static class Delegate extends AbstractObservableValueContractDelegate {
		private Shell shell;
		private Button button;

		public void setUp() {
			shell = new Shell();
			button = new Button(shell, SWT.CHECK);
		}

		public void tearDown() {
			shell.dispose();
		}

		public IObservableValue createObservableValue(Realm realm) {
			return new ButtonObservableValue(realm, button);
		}

		public void change(IObservable observable) {
			boolean value = button.getSelection();
			button.setSelection(!value);
			button.notifyListeners(SWT.Selection, null);
		}

		public Object createValue(IObservableValue observable) {
			return (Boolean.TRUE.equals(observable.getValue()) ? Boolean.FALSE : Boolean.TRUE);
		}

		public Object getValueType(IObservableValue observable) {
			return Boolean.TYPE;
		}
	}
}
By creating a suite() method you can create a custom suite of tests to run.
This will allow you to run multiple TestCases from a single test eliminating the need to create multiple implementations for the mutable and immutable cases.
The SuiteBuilder implementation allows for a straightforward way to build these suites.
The downside to building tests in this fashion is that when ran they don't contain the context of a parent class.
In the JUnit view in Eclipse they are children of a junit.framework.TestSuite rather than a named test.
As a way around this the failure message contains information about the context of the failure (e.g. Test class name and delegate name).