Problem Button Reset #3672
Comments
|
@TheChapu there is a known issue with restarting right after serial flashing. You have to press the reset button manually at least once after a serial flash in order to assure correct restart. After that, ESP.restart() should work as intended. |
|
@devyte I tell you a little bit about what I am developing, in case you can give me other ideas. I have a Nodemcu, Sensor DHT11, Sensor HCSR04, Sensor ds18b20, a button and a double relay. The code is for monitoring a hydroponic system, the DHT11 sensor is for measuring Humidity and Ambient Temperature, the HCSR04 sensor is for measuring water tank capacity, the ds18b20 sensor is for measuring water temperature and the relay for activating the pump and LED panel. I am using the WIFI-MANAGER library to enter the ON/OFF switch-off times of the Pump/LIGHT, the wifi network and password to send the data to a display platform and finally the button is to "reset" the ON/OFF time values of the pump and the light, after that the Microcontroller is restarted to reload the variables. Do you understand me? I am attentive to your answer. |
|
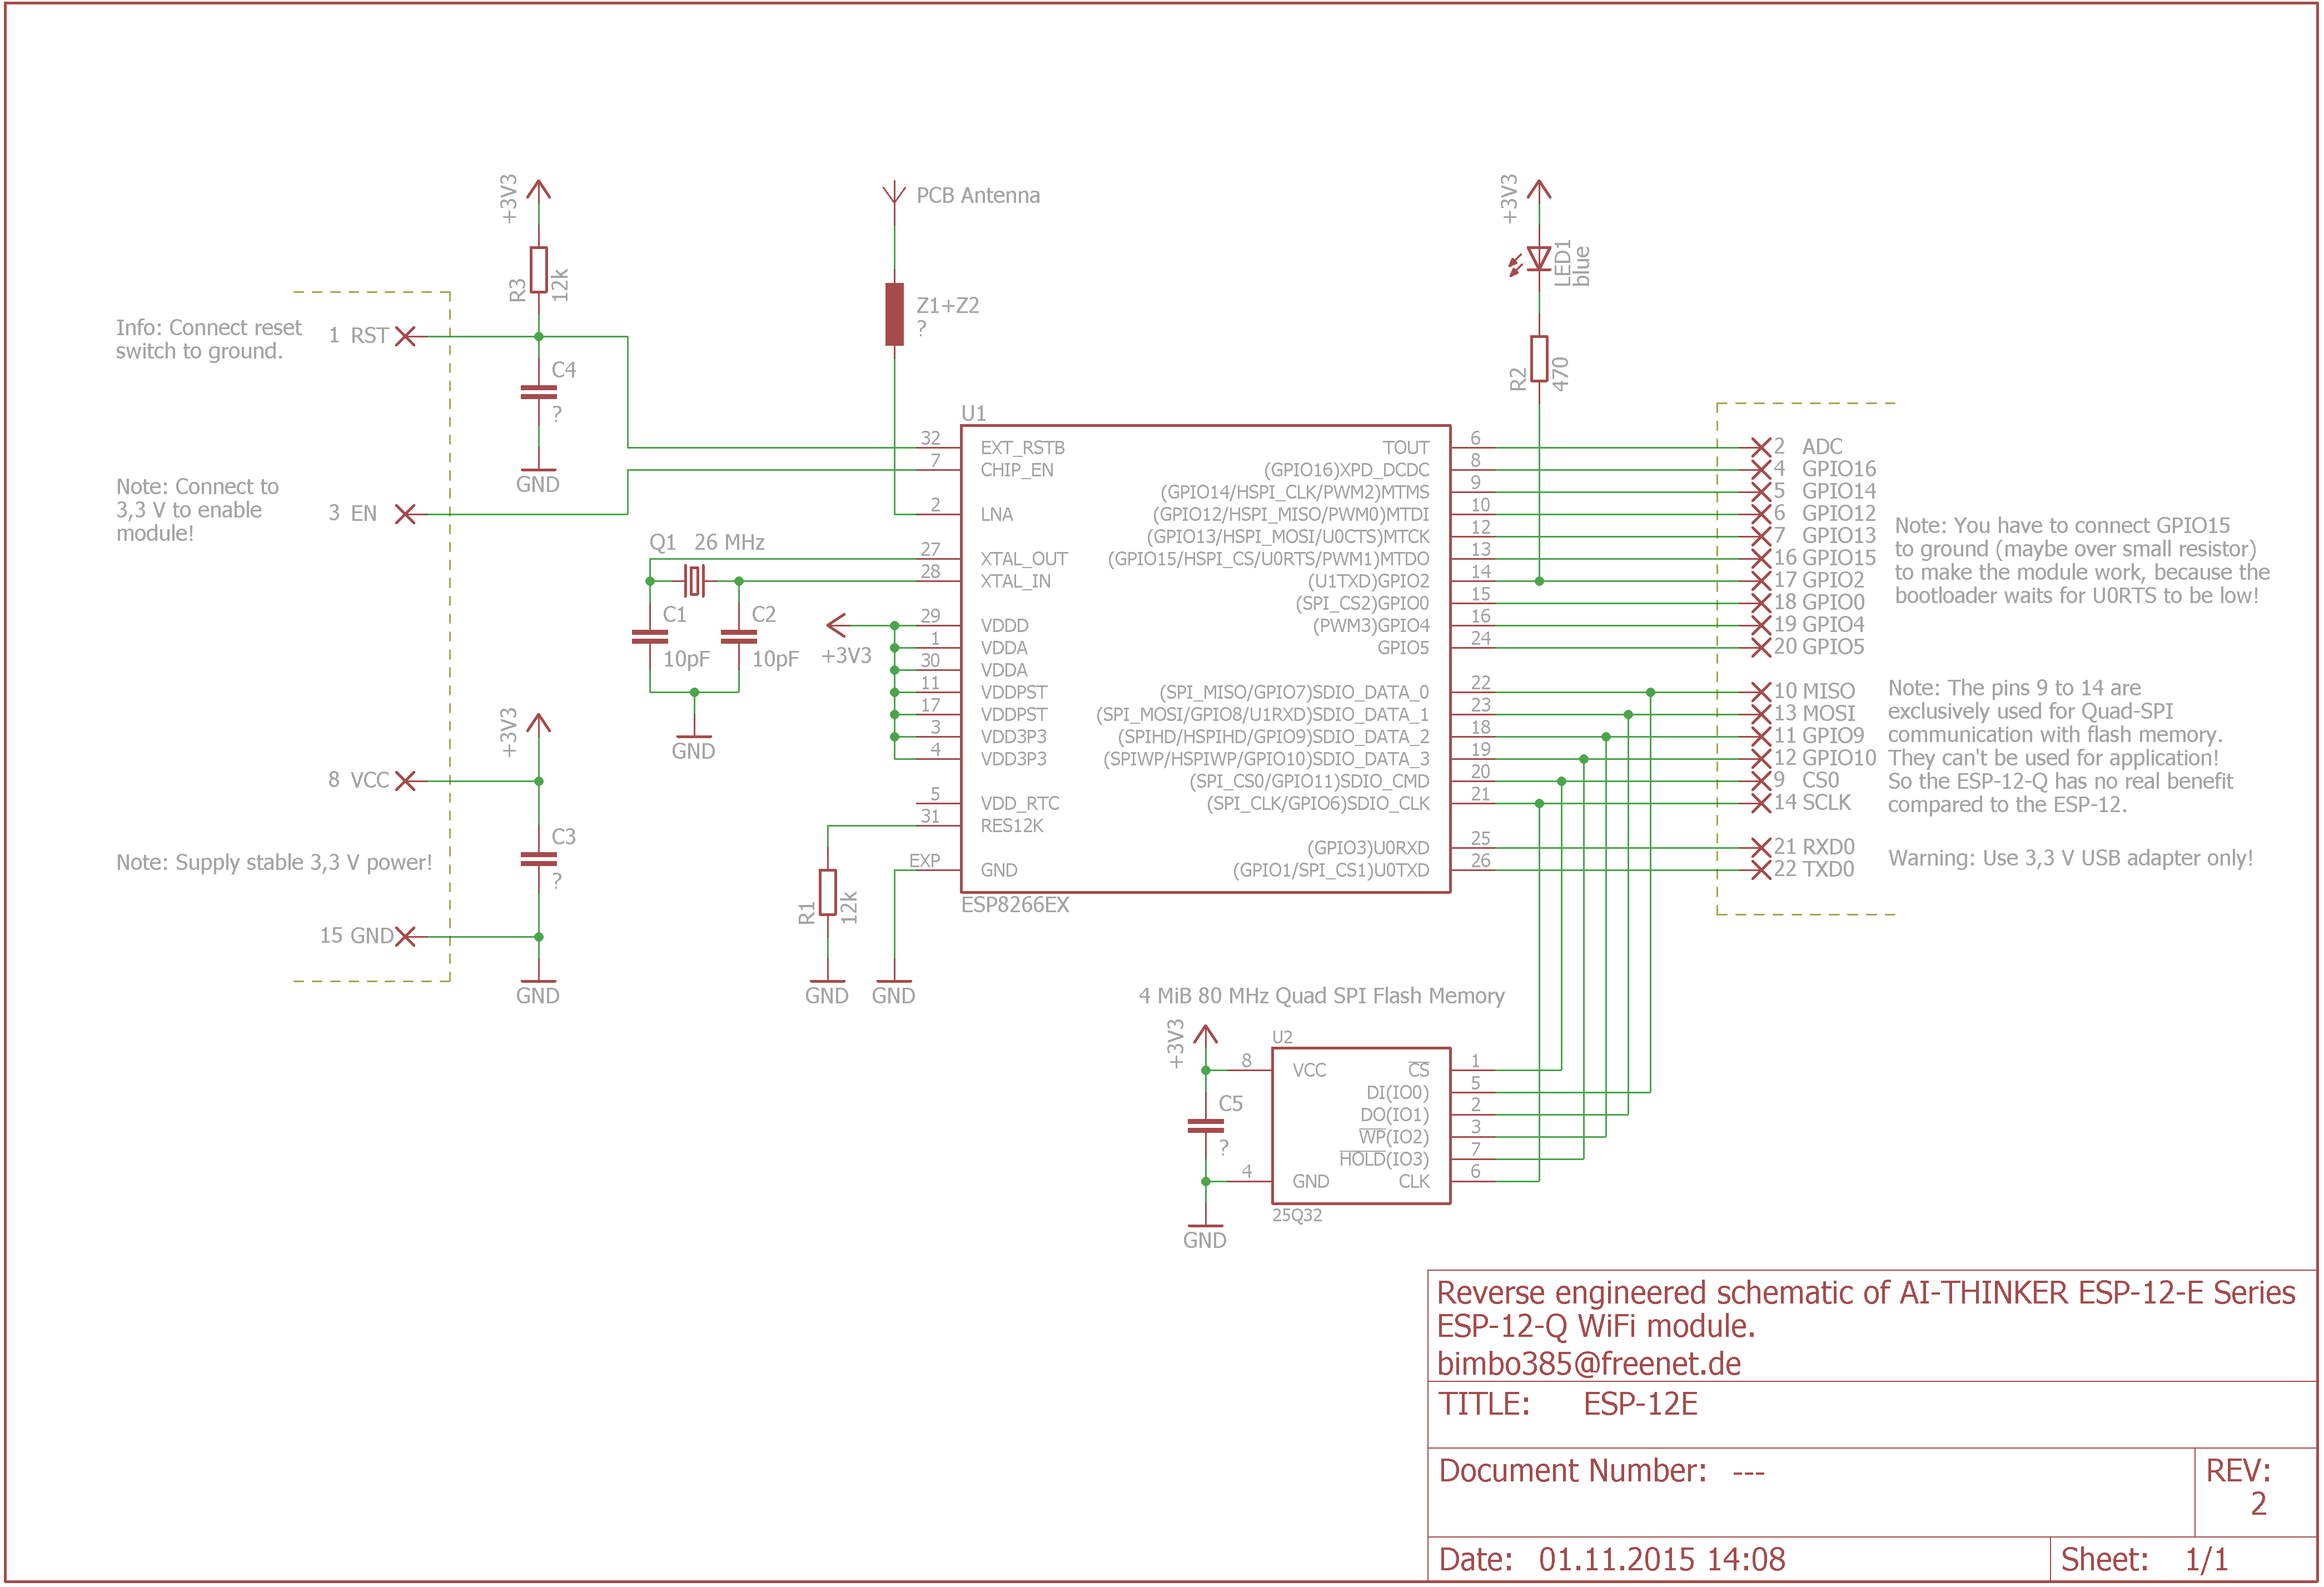
@devyte @TheChapu http://www.esp8266.com/wiki/lib/exe/fetch.php?media=schematic_esp-12e.png https://www.letscontrolit.com/forum/viewtopic.php?t=1462 http://smarpl.com/content/esp8266-esp-201-module-freeing-gpio9-and-gpio10 The problem is trying to use hardware that is not available for use. This is not a ESP8266-Arduino code problem. Please close the issue. |
|
@RudyFiero Thanks, the markup is kind of messed up and I missed that! |
|
Thank you very much @RudyFiero for the clarification and @devyte for to information I was able to read all the links. In conclusion I can only use GPIO 1,3,12,14,15? I am attentive to your response |
|
You can also use 4 and 5. You can use 16 but it does not have a pull up resistor. It is pull down when enabled. |
Basic Infos
Hardware
Hardware: ESP-12E
Core Version:? 2.1.0-rc2?
Description Description
I'm writing a code that receives data from 3 sensors (DHT11-HCRS-04-DS18B20) to send to a visualization platform.
I also have a Reset Button. The button has a 10kOhms resistance.
Problem description
When loading the code and pressing the button is "reset"but does not restart the NodeMCU module, I must press the RST button on the board once, and now if I can restart the module with my Button.
Settings in IDE
Module: NodeMCU 1.0 (ESP12-E Module)
Flash Size: 4MB
CPU Frequency: 80Mhz
Flash Mode:??
Flash frequency:??
Upload Using: SERIAL?
Reset Method: nodemcu?
Sketch
###Debug Messages
{ "data":[{ "channel":"3","value": 7.00,"mac":"5ccf7f85e8c0cf91" }, { "channel":"11","value": 22.13,"mac":"5ccf7f85e8c0c0cf91" }, { "channel":"1","value": 19.00
OK. OK.
{ "data":[{ "channel":"3","value": 7.00,"mac":"5ccf7f85e8c0cf91" }, { "channel":"11","value": 22.13,"mac":"5ccf7f85e8c0c0cf91" }, { "channel":"1","value": 19.00
OK. OK.
{ "data":[{ "channel":"3","value": 7.00,"mac":"5ccf7f85e8c0cf91" }, { "channel":"11","value": 22.13,"mac":"5ccf7f85e8c0c0cf91" }, { "channel":"1","value": 19.00
OK. OK.
{ "data":[{ "channel":"3","value": 7.00,"mac":"5ccf7f85e8c0cf91" }, { "channel":"11","value": 22.13,"mac":"5ccf7f85e8c0c0cf91" }, { "channel":"1","value": 19.00
OK. OK.
{ "data":[{ "channel":"3","value": 7.00,"mac":"5ccf7f85e8c0cf91" }, { "channel":"11","value": 22.13,"mac":"5ccf7f85e8c0c0cf91" }, { "channel":"1","value": 19.00
OK. OK.
{ "data":[{ "channel":"3","value": 7.00,"mac":"5ccf7f85e8c0cf91" }, { "channel":"11","value": 22.19,"mac":"5ccf7f85e8c0c0cf91" }, { "channel":"1","value": 19.00
OK.
{ "data":[{ "channel":"3","value": 7.00,"mac":"5ccf7f85e8c0cf91" }, { "channel":"11","value": 22.13,"mac":"5ccf7f85e8c0c0cf91" }, { "channel":"1","value": 19.00
We must Reboot....
ets Jan 8 2013, rst cause: 2, boot mode: (1,6)
wdt
###(RESET by pressing the button on the plate)
{ "data":[{ "channel":"3","value": 7.00,"mac":"5ccf7f85e8c0cf91" }, { "channel":"11","value": 22.19,"mac":"5ccf7f85e8c0c0cf91" }, { "channel":"1","value": nan,".
Checksum error
{ "data":[{ "channel":"3","value": 7.00,"mac":"5ccf7f85e8c0cf91" }, { "channel":"11","value": 22.19,"mac":"5ccf7f85e8c0c0cf91" }, { "channel":"1","value": nan,".
Checksum error
{ "data":[{ "channel":"3","value": 7.00,"mac":"5ccf7f85e8c0cf91" }, { "channel":"11","value": 22.19,"mac":"5ccf7f85e8c0c0cf91" }, { "channel":"1","value": nan,".
OK. OK.
{ "data":[{ "channel":"3","value": 7.00,"mac":"5ccf7f85e8c0cf91" }, { "channel":"11","value": 22.19,"mac":"5ccf7f85e8c0c0cf91" }, { "channel":"1","value": 19.00
OK. OK.
{ "data":[{ "channel":"3","value": 7.00,"mac":"5ccf7f85e8c0cf91" }, { "channel":"11","value": 22.19,"mac":"5ccf7f85e8c0c0cf91" }, { "channel":"1","value": 19.00
OK. OK.
{ "data":[{ "channel":"3","value": 7.00,"mac":"5ccf7f85e8c0cf91" }, { "channel":"11","value": 22.19,"mac":"5ccf7f85e8c0c0cf91" }, { "channel":"1","value": 19.00
We must Reboot....
":[{" channel ":" 3 "," value ": 7.00," mac ":" 5ccf7f85e8c0cf91 "}, {" channel ":" 11 "," value ": 22.19," mac ":" 5ccf7f85e8c0c0cf91 "}, {" channel ":" 1 "," value ": 19.00," mac
We must Reboot....
ets Jan 8 2013, rst cause: 2, boot mode: (3,4)
###PHYSICAL BUTTON RESET
load 0x4010f000, len 1384, room 16
tail 8
chksum 0x2d
csum 0x2d
v09f0c112
~ld
Checksum error
{ "data":[{ "channel":"3","value": 7.00,"mac":"5ccf7f85e8c0cf91" }, { "channel":"11","value": 22.19,"mac":"5ccf7f85e8c0c0cf91" }, { "channel":"1","value": nan,".
Checksum error
{ "data":[{ "channel":"3","value": 7.00,"mac":"5ccf7f85e8c0cf91" }, { "channel":"11","value": 22.19,"mac":"5ccf7f85e8c0c0cf91" }, { "channel":"1","value": nan,".
Checksum error
We must Reboot....
{"data":[{"channel":"3","value": 7.00,"mac":"5ccf7f85e8c0cf91"}, {"channel":"11","value": 22.19,"mac":"5ccf7f85e8c0c0cf91"}, {"channel":"1","valueWe Should Restart
ets Jan 8 2013, rst cause: 2, boot mode: (3,4)
###PHYSICAL BUTTON RESET
load 0x4010f000, len 1384, room 16
tail 8
chksum 0x2d
csum 0x2d
v09f0c112
~ld
Checksum error
{ "data":[{ "channel":"3","value": 7.00,"mac":"5ccf7f85e8c0cf91" }, { "channel":"11","value": 22.25,"mac":"5ccf7f85e8c0c0cf91" }, { "channel":"1","value": nan,".
Checksum error
{ "data":[{ "channel":"3","value": 7.00,"mac":"5ccf7f85e8c0cf91" }, { "channel":"11","value": 22.25,"mac":"5ccf7f85e8c0c0cf91" }, { "channel":"1","value": nan,".
Checksum error
{ "data":[{ "channel":"3","value": 7.00,"mac":"5ccf7f85e8c0cf91" }, { "channel":"11","value": 22.25,"mac":"5ccf7f85e8c0c0cf91" }, { "channel":"1","value": nan,".
OK. OK.
image modulo

The text was updated successfully, but these errors were encountered: