-
Notifications
You must be signed in to change notification settings - Fork 578
/
Requests.md
566 lines (392 loc) · 17.2 KB
/
Requests.md
1
2
3
4
5
6
7
8
9
10
11
12
13
14
15
16
17
18
19
20
21
22
23
24
25
26
27
28
29
30
31
32
33
34
35
36
37
38
39
40
41
42
43
44
45
46
47
48
49
50
51
52
53
54
55
56
57
58
59
60
61
62
63
64
65
66
67
68
69
70
71
72
73
74
75
76
77
78
79
80
81
82
83
84
85
86
87
88
89
90
91
92
93
94
95
96
97
98
99
100
101
102
103
104
105
106
107
108
109
110
111
112
113
114
115
116
117
118
119
120
121
122
123
124
125
126
127
128
129
130
131
132
133
134
135
136
137
138
139
140
141
142
143
144
145
146
147
148
149
150
151
152
153
154
155
156
157
158
159
160
161
162
163
164
165
166
167
168
169
170
171
172
173
174
175
176
177
178
179
180
181
182
183
184
185
186
187
188
189
190
191
192
193
194
195
196
197
198
199
200
201
202
203
204
205
206
207
208
209
210
211
212
213
214
215
216
217
218
219
220
221
222
223
224
225
226
227
228
229
230
231
232
233
234
235
236
237
238
239
240
241
242
243
244
245
246
247
248
249
250
251
252
253
254
255
256
257
258
259
260
261
262
263
264
265
266
267
268
269
270
271
272
273
274
275
276
277
278
279
280
281
282
283
284
285
286
287
288
289
290
291
292
293
294
295
296
297
298
299
300
301
302
303
304
305
306
307
308
309
310
311
312
313
314
315
316
317
318
319
320
321
322
323
324
325
326
327
328
329
330
331
332
333
334
335
336
337
338
339
340
341
342
343
344
345
346
347
348
349
350
351
352
353
354
355
356
357
358
359
360
361
362
363
364
365
366
367
368
369
370
371
372
373
374
375
376
377
378
379
380
381
382
383
384
385
386
387
388
389
390
391
392
393
394
395
396
397
398
399
400
401
402
403
404
405
406
407
408
409
410
411
412
413
414
415
416
417
418
419
420
421
422
423
424
425
426
427
428
429
430
431
432
433
434
435
436
437
438
439
440
441
442
443
444
445
446
447
448
449
450
451
452
453
454
455
456
457
458
459
460
461
462
463
464
465
466
467
468
469
470
471
472
473
474
475
476
477
478
479
480
481
482
483
484
485
486
487
488
489
490
491
492
493
494
495
496
497
498
499
500
501
502
503
504
505
506
507
508
509
510
511
512
513
514
515
516
517
518
519
520
521
522
523
524
525
526
527
528
529
530
531
532
533
534
535
536
537
538
539
540
541
542
543
544
545
546
547
548
549
550
551
552
553
554
555
556
557
558
559
560
561
562
563
564
# Requests 库的使用
Python 的标准库 urllib 提供了大部分 HTTP 功能,但使用起来较繁琐。通常,我们会使用另外一个优秀的第三方库:[Requests](https://github.com/kennethreitz/requests),它的标语是:**Requests: HTTP for Humans**。
Requests 提供了很多功能特性,几乎涵盖了当今 Web 服务的需求,比如:
- 浏览器式的 SSL 验证
- 身份认证
- Keep-Alive & 连接池
- 带持久 Cookie 的会话
- 流下载
- 文件分块上传
下面,我们将从以下几个方面介绍 Requests 库:
- HTTP 请求
- HTTP 响应
- cookie
- 会话对象
- 代理
- 身份认证
# HTTP 请求
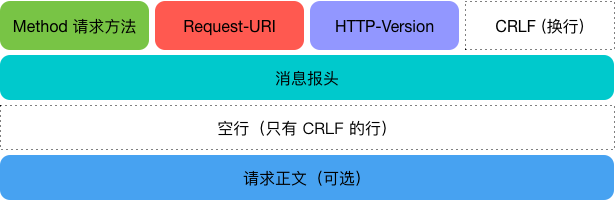
我们知道,一个 HTTP 请求由三部分构成:
- **请求行**:包含请求方法(比如 GET, POST)、请求地址和 HTTP 协议版本
- **请求头**:包含一系列的键值对
- **请求正文(可选)**
如图所示:
Requests 提供了几乎所有 HTTP 动词的功能:GET、OPTIONS、HEAD、POST、PUT、PATCH、DELETE,另外,它提供了 `headers` 参数让我们根据需求定制请求头。
使用 Requests 发送一个请求很方便,比如:
```
import requests
r = requests.get("http://httpbin.org/get")
r = requests.post("http://httpbin.org/post")
r = requests.put("http://httpbin.org/put")
r = requests.delete("http://httpbin.org/delete")
r = requests.head("http://httpbin.org/get")
r = requests.options("http://httpbin.org/get")
```
下面,我们重点讲一下 GET 请求,POST 请求和定制请求头。
## GET 请求
使用 Requests 发送 GET 请求非常简单,如下:
```python
import requests
r = requests.get("http://httpbin.org/get")
```
在有些情况下,URL 会带参数,比如 `https://segmentfault.com/blogs?page=2`,这个 URL 有一个参数 page,值为 2。Requests 提供了 `params` 关键字参数,允许我们以一个字典来提供这些参数,比如:
```python
import requests
payload = {'page': '1', 'per_page': '10'}
r = requests.get("http://httpbin.org/get", params=payload)
```
通过打印该 URL,我们可以看到 URL 已被正确编码:
```python
>>> print r.url
http://httpbin.org/get?per_page=10&page=1
```
需要注意的是字典里值为 None 的键不会被添加到 URL 的查询字符串中。
## POST 请求
使用 Requests 发送 POST 请求也很简单,如下:
```python
import requests
r = requests.post("http://httpbin.org/post")
```
通常,我们在发送 POST 请求时还会附上数据,比如发送编码为表单形式的数据或编码为 JSON 形式的数据,这时,我们可以使用 Requests 提供的 `data` 参数。
- 发送编码为表单形式的数据
通过给 `data` 参数传递一个 `dict`,我们的数据字典在发出请求时会被自动编码为表单形式,比如:
```python
import requests
payload = {'page': 1, 'per_page': 10}
r = requests.post("http://httpbin.org/post", data=payload)
```
看看返回的内容(省略了部分数据):
```python
>>> print r.text
{
...
"form": {
"page": "1",
"per_page": "10"
},
...
}
```
- 发送编码为 JSON 形式的数据
如果给 `data` 参数传递一个 `string`,我们的数据会被直接发布出去,比如:
```python
import json
import requests
payload = {'page': 1, 'per_page': 10}
r = requests.post("http://httpbin.org/post", data=json.dumps(payload))
```
看看返回:
```python
>>> print r.text
{
"args": {},
"data": "{\"per_page\": 10, \"page\": 1}",
"files": {},
"form": {},
"headers": {
"Accept": "*/*",
"Accept-Encoding": "gzip, deflate",
"Content-Length": "27",
"Host": "httpbin.org",
"User-Agent": "python-requests/2.9.1"
},
"json": {
"page": 1,
"per_page": 10
},
"origin": "13.75.42.240",
"url": "http://httpbin.org/post"
}
```
在上面,我们自行对 `dict` 进行了编码,这种方式等价于使用 `json` 参数,而给它传递 `dict`,如下:
```python
import requests
payload = {'page': 1, 'per_page': 10}
r = requests.post("http://httpbin.org/post", json=payload)
```
这种做法跟上面的做法是等价的,数据在发出时会被自动编码。
## 请求头
有时,我们需要为请求添加 HTTP 头部,我们可以**通过传递一个 `dict` 给 `headers` 参数来实现**。比如:
```python
import requests
url = 'http://httpbin.org/post'
payload = {'page': 1, 'per_page': 10}
headers = {'User-Agent': 'Mozilla/4.0 (compatible; MSIE 5.5; Windows NT)'}
r = requests.post("http://httpbin.org/post", json=payload, headers=headers)
```
发送到服务器的请求的头部可以通过 `r.request.headers` 访问:
```
>>> print r.request.headers
{'Content-Length': '27', 'Accept-Encoding': 'gzip, deflate', 'Accept': '*/*', 'User-Agent': 'Mozilla/4.0 (compatible; MSIE 5.5; Windows NT)', 'Connection': 'keep-alive', 'Content-Type': 'application/json'}
```
服务器返回给我们的响应头部信息可以通过 `r.headers` 访问:
```
>>> print r.headers
{'Content-Length': '462', 'Server': 'nginx', 'Connection': 'close', 'Access-Control-Allow-Credentials': 'true', 'Date': 'Mon, 05 Dec 2016 15:41:05 GMT', 'Access-Control-Allow-Origin': '*', 'Content-Type': 'application/json'}
```
# HTTP 响应
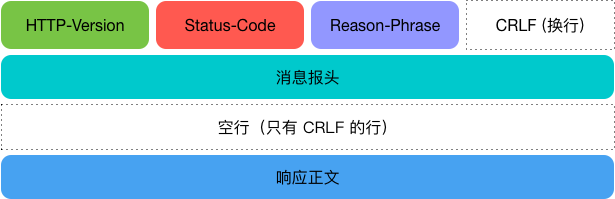
HTTP 响应与 HTTP 请求相似,由三部分组成:
- **状态行**:包含 HTTP 协议版本、状态码和状态描述,以空格分隔
- **响应头**:包含一系列的键值对
- **响应正文**
如图所示:
当我们使用 `requests.*` 发送请求时,Requests 做了两件事:
- 构建一个 Request 对象,该对象会根据请求方法或相关参数发起 HTTP 请求
- 一旦服务器返回响应,就会产生一个 Response 对象,该响应对象包含服务器返回的所有信息,也包含你原来创建的 Request 对象
对于响应状态码,我们可以访问响应对象的 `status_code` 属性:
```python
import requests
r = requests.get("http://httpbin.org/get")
print r.status_code
# 输出
200
```
对于响应正文,我们可以通过多种方式读取,比如:
- 普通响应,使用 `r.text` 获取
- JSON 响应,使用 `r.json()` 获取
- 二进制响应,使用 `r.content` 获取
- 原始响应,使用 `r.raw` 获取
## 普通响应
我们可以使用 `r.text` 来读取 unicode 形式的响应,看看例子:
```python
import requests
r = requests.get("https://github.com/timeline.json")
print r.text
print r.encoding
# 输出
{"message":"Hello there, wayfaring stranger. If you’re reading this then you probably didn’t see our blog post a couple of years back announcing that this API would go away: http://git.io/17AROg Fear not, you should be able to get what you need from the shiny new Events API instead.","documentation_url":"https://developer.github.com/v3/activity/events/#list-public-events"}
utf-8
```
Requests 会自动解码来自服务器的内容,大多数 unicode 字符集都能被正确解码。
## JSON 响应
对于 JSON 响应的内容,我们可以使用 `json()` 方法把返回的数据解析成 Python 对象。
看看例子:
```python
import requests
r = requests.get("https://github.com/timeline.json")
if r.status_code == 200:
print r.headers.get('content-type')
print r.json()
# 输出
application/json; charset=utf-8
{u'documentation_url': u'https://developer.github.com/v3/activity/events/#list-public-events', u'message': u'Hello there, wayfaring stranger. If you\u2019re reading this then you probably didn\u2019t see our blog post a couple of years back announcing that this API would go away: http://git.io/17AROg Fear not, you should be able to get what you need from the shiny new Events API instead.'}
```
如果 JSON 解码失败,`r.json()` 就会抛出异常,比如:
```python
import requests
r = requests.get("https://www.baidu.com")
if r.status_code == 200:
print r.headers.get('content-type')
print r.json()
# 输出
text/html
---------------------------------------------------------------------------
ValueError Traceback (most recent call last)
<ipython-input-3-9216431f0e2d> in <module>()
1 if r.status_code == 200:
2 print r.headers.get('content-type')
----> 3 print r.json()
4
....
....
ValueError: No JSON object could be decoded
```
## 二进制响应
我们也可以以字节的方式访问响应正文,访问 `content` 属性可以获取二进制数据,比如用返回的二进制数据创建一张图片:
```python
import requests
url = 'https://github.com/reactjs/redux/blob/master/logo/logo.png?raw=true'
r = requests.get(url)
image_data = r.content # 获取二进制数据
with open('/Users/Ethan/Downloads/redux.png', 'wb') as fout:
fout.write(image_data)
```
## 原始响应
在少数情况下,我们可能想获取来自服务器的原始套接字响应,这可以通过访问响应对象的 `raw` 属性来实现,但要确保在初始请求中设置了 `stream=True`,比如:
```python
import requests
url = 'https://github.com/reactjs/redux/blob/master/logo/logo.png?raw=true'
r = requests.get(url, stream=True)
print r.raw
r.raw.read(10)
# 输出
<requests.packages.urllib3.response.HTTPResponse object at 0x1113b0a90>
'\x89PNG\r\n\x1a\n\x00\x00'
```
# 重定向
默认情况下,除了 HEAD,Requests 会自动处理所有重定向。我们可以使用响应对象的 `history` 属性来追踪重定向,**Response.history** 是一个 Response 对象的列表,这个对象列表按照从最老到最近的请求进行排序。
比如,点击某些网站的链接,它会将页面重定向到其他网站:
```python
>>> import requests
>>> headers = {'User-Agent': 'Mozilla/4.0 (compatible; MSIE 5.5; Windows NT)'}
>>> r = requests.get('https://toutiao.io/k/c32y51', headers=headers)
>>> r.status_code
200
>>> r.url # 发生了重定向,响应对象的 url,跟请求对象不一样
u'http://www.jianshu.com/p/490441391db6?hmsr=toutiao.io&utm_medium=toutiao.io&utm_source=toutiao.io'
>>> r.history
[<Response [302]>]
>>> r.history[0].text
u'<html><body>You are being <a href="http://www.jianshu.com/p/490441391db6?hmsr=toutiao.io&utm_medium=toutiao.io&utm_source=toutiao.io">redirected</a>.</body></html>'
```
可以看到,我们访问网址 `https://toutiao.io/k/c32y51` 被重定向到了下面的链接:
```python
http://www.jianshu.com/p/490441391db6?hmsr=toutiao.io&utm_medium=toutiao.io&utm_source=toutiao.io'
```
我们还看到 `r.history` 包含了一个 Response 对象列表,我们可以用它来追踪重定向。
如果请求方法是 GET、POST、PUT、OPTIONS、PATCH 或 DELETE,我们可以通过 `all_redirects` 参数禁止重定向:
```python
>>> import requests
>>> headers = {'User-Agent': 'Mozilla/4.0 (compatible; MSIE 5.5; Windows NT)'}
>>> r = requests.get('https://toutiao.io/k/c32y51', headers=headers, allow_redirects=False)
>>> r.url # 禁止重定向,响应对象的 url 跟请求对象一致
u'https://toutiao.io/k/c32y51'
>>> r.history
[]
>>> r.text
u'<html><body>You are being <a href="http://www.jianshu.com/p/490441391db6?hmsr=toutiao.io&utm_medium=toutiao.io&utm_source=toutiao.io">redirected</a>.</body></html>'
```
# Cookie
- 如果某个响应包含一些 cookie,我们可以直接访问它们,比如:
```python
>>> import requests
>>> url = 'http://exmaple.com/some/cookie/setting/url'
>>> r = requests.get(url)
>>> r.cookies['some_key']
'some_value'
```
- 发送 cookies 到服务器,可以使用 `cookies` 参数:
```python
>>> import requests
>>> url = 'http://httpbin.org/cookies'
>>> cookies = dict(key1='value1')
>>> r = requests.get(url, cookies=cookies)
>>> r.text
u'{\n "cookies": {\n "key1": "value1"\n }\n}\n'
>>> print r.text
{
"cookies": {
"key1": "value1"
}
}
```
# 会话对象
我们知道,HTTP 协议是无状态的,这意味着每个请求都是独立的,如果后续的处理需要用到前面的信息,则数据需要重传,为了解决这个问题,我们可以使用 Cookie 或 Session 来存储某些特定的信息,比如用户名、密码等,这样,当用户在不同 Web 页面跳转或再次登录网站时,就不用重新输入用户名和密码(当然,如果 Cookie 被删除和 Session 过期则需要重新输入)。
Requests 提供了会话对象让我们能够跨请求保持某些参数,也可以在同一个 Session 实例发出的所有请求之间保持 Cookie。
下面,我们看看会话对象的使用。
下面是一个跨请求保持 Cookie 的例子:
```python
>>> import requests
>>> s = requests.Session()
>>> s.get('http://httpbin.org/cookies/set/sessioncookie/123456789')
<Response [200]>
>>> r = s.get("http://httpbin.org/cookies")
>>> print r.text
{
"cookies": {
"sessioncookie": "123456789"
}
}
```
会话还可用来为请求方法提供缺省数据,通过设置会话对象的属性来实现:
```python
import requests
s = requests.Session()
s.auth = ('user', 'pass')
s.headers.update({'x-test': 'true'})
# x-test 和 x-test2 都会被发送
s.get('http://httpbin.org/headers', headers={'x-test2': 'true'})
```
# 代理
Requests 支持基本的 HTTP 代理 和 SOCKS 代理(2.10.0 新增功能)。
## HTTP 代理
如果需要使用 HTTP 代理,我们可以为任意请求方法提供 `proxies` 参数,如下:
```python
import requests
proxies = {
"http": "http://10.10.1.10:3128",
"https": "http://10.10.1.10:1080",
}
requests.get("http://example.org", proxies=proxies)
```
我们也可以通过设置环境变量 `HTTP_PROXY` 和 `HTTPS_PROXY` 来配置代理:
```python
$ export HTTP_PROXY="http://10.10.1.10:3128"
$ export HTTPS_PROXY="http://10.10.1.10:1080"
$ python
>>> import requests
>>> requests.get("http://example.org")
```
## SOCKS 代理
Requests 自 2.10.0 版起,开始支持 SOCKS 协议的代理,如果要使用,我们还需安装一个第三方库:
```
$ pip install requests[socks]
```
SOCKS 代理的使用和 HTTP 代理类似:
```python
import requests
proxies = {
"http": "socks5://user:pass@host:port",
"https": "socks5://user:pass@host:port",
}
requests.get("http://example.org", proxies=proxies)
```
# 身份认证
大部分 Web 服务都需要身份认证,并且有多种不同的认证类型,比如:
- 基本身份认证
- 摘要式身份认证
- OAuth 认证
下面介绍一下基本身份认证和 OAuth 认证。
## 基本身份认证
基本身份认证(HTTP Basic Auth)是最简单的一种身份认证,一般需要身份认证的 Web 服务也都接受 HTTP Basic Auth,Requests 提供了非常简单的形式让我们使用 HTTP Basic Auth:
```python
>>> from requests.auth import HTTPBasicAuth
>>> requests.get('https://api.github.com/user', auth=HTTPBasicAuth('user', 'pass'))
```
由于 HTTP Basic Auth 非常常见,Requests 提供了一种简写的形式:
```python
requests.get('https://api.github.com/user', auth=('user', 'pass'))
```
## OAuth 2 认证
OAuth 是一种常见的 Web API 认证方式,目前的版本是 2.0。Requests 并不直接支持 OAuth 认证,而是要配合另外一个库一起使用,该库是 [requests-oauthlib](https://github.com/requests/requests-oauthlib)。
下面以 GitHub 为例,介绍一下 OAuth 2 认证。
```python
>>> # Credentials you get from registering a new application
>>> client_id = '<the id you get from github>'
>>> client_secret = '<the secret you get from github>'
>>> # OAuth endpoints given in the GitHub API documentation
>>> authorization_base_url = 'https://github.com/login/oauth/authorize'
>>> token_url = 'https://github.com/login/oauth/access_token'
>>> from requests_oauthlib import OAuth2Session
>>> github = OAuth2Session(client_id)
>>> # Redirect user to GitHub for authorization
>>> authorization_url, state = github.authorization_url(authorization_base_url)
>>> print 'Please go here and authorize,', authorization_url
>>> # Get the authorization verifier code from the callback url
>>> redirect_response = raw_input('Paste the full redirect URL here:')
>>> # Fetch the access token
>>> github.fetch_token(token_url, client_secret=client_secret,
>>> authorization_response=redirect_response)
>>> # Fetch a protected resource, i.e. user profile
>>> r = github.get('https://api.github.com/user')
>>> print r.content
```
更多关于 OAuth 工作流程的信息,可以参考 [OAuth 官方网站](https://oauth.net/),关于 `requests-oauthlib` 库的使用,可以参考[官方文档](https://requests-oauthlib.readthedocs.io/en/latest/#)。
# 小结
- 任何时候调用 requests.*() 你都在做两件主要的事情。其一,你在构建一个 Request 对象, 该对象将被发送到某个服务器请求或查询一些资源。其二,一旦 requests 得到一个从 服务器返回的响应就会产生一个 Response 对象。该响应对象包含服务器返回的所有信息,也包含你原来创建的 Request 对象。
# 参考资料
- [Requests: Requests 2.10.0 文档](http://docs.python-requests.org/zh_CN/latest/)
- [如何理解HTTP协议的 “无连接,无状态” 特点?](http://blog.csdn.net/tennysonsky/article/details/44562435)
- [理解OAuth 2.0 - 阮一峰的网络日志](http://www.ruanyifeng.com/blog/2014/05/oauth_2_0.html)
- [作为客户端与HTTP服务交互 — python3-cookbook 2.0.0 文档](http://python3-cookbook.readthedocs.io/zh_CN/latest/c11/p01_interact_with_http_services_as_client.html)