[ASE] The colors of the edge pixels are darker than the center pixels. How can I rectify this problem? #99
Comments
|
This problem makes it difficult to produce a good result for the Novel View Synthesis task on this dataset. In the rightmost column, the existing Gaussian Splatting methods may easily produce strange dark borders on this dataset.
|

|
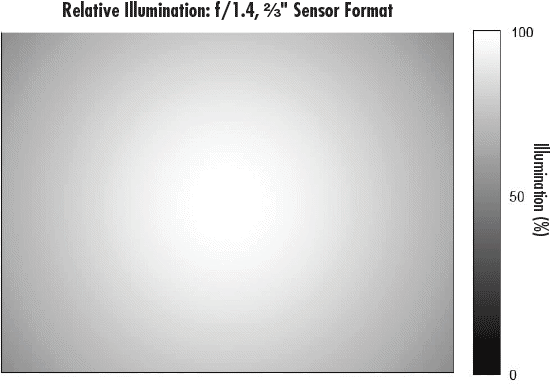
Hello! ASE is designed to produce accurate simulations of Aria output. The RGB camera has a very small fisheye lens on it. This means that we also simulate the Vignette of the Cameras. As you might be aware, most fisheye lenses produce a pronounced variation of brightness, more information can be found Here: (non affiliated link!) The good news is that the variance in brightness is static. It could be reduced by creating a gradient (by inverting an image similar to this and multiplying it with the ASE image. I hope that helps! |
|
Thanks for your reply! However, I still do not know how to compute this gradient in ASE data accurately. |
|
|
let me see if I can generate a gradient, standby! |
|
Hi! Do you have any clue about relative illumination computation? |
|
We calculate the distortion and then apply a Vignette, so the relative illumination is a function of combining a "normal" but distorted image with a vignette image. This should re-flatten the lens based roll off. The top right of the image is "up" so depending on how its applied you might need to rotate it to line it up. |

|
Thanks for your help. I previously wrote the code about preprocessing ASE fisheye data including undistort and rotation. I beg your help. Which line code should I revise to change the relative illumination? |
|
multiply it together with the that should flatten it out. (again, i'm not sure of the rotation, so you might need to rotate the anit-vignette image left by 90 degrees for it to line up properly. ) You might end up with a white border instead of a black border, but that shouldn't be too hard to remove if needed (you can either crop or change the anti-vignette image I provided.) |
|
Many thanks! |
Hi! it seems that this anti-vignette is normalized(min value is 0 and max value is 255 with data type np.uint8). I use it to change RGB images but the color overflows. Could you tell me how to reverse it to a true value?
|


|
Hi! @captain-sysadmin It seems that the given anti-vignette is normalized(min value is 0 and max value is 255 with data type np.uint8). If I use this anti-vignette to multiply RGB image, the RGB image will overflow (the value exceeds the data range of [0, 255]). Do you know how to resolve it? |
|
Hi! Sorry to bother you again. Do you have any clue about this problem? It means a lot to me. |
|
Hello! As you can see, because we are multiplying white(or very near white) with another colour other than black, we quickly overflow and clip. You can try using cv2.addWeighted instead of multiply. So: becomes changing the alpha and beta would allow you to alter the mix between the two images, and gamma should allow you to control clipping |
|
Thanks for your reply! But I still have a question. It seems the given code above will re-weight all three channels (RGB) with the anti-vignette image. So the image looks too bright. I tried to re-weight the image in HSV space and revise only the
|


Off the top of my head you might be able to lower the V of vignette before adding it to the RGB image? |
|
Each channel of anti_vignette is equal (R=G=B). So V=max(R, G, B) of vignette is vignette[:, :, 0]. The result is still a little white.
|

Your dataset is really good! I'm trying to use ASE as my training data for the novel view synthesis task.
But I found a problem:
In the circle, the colors of the edge pixels (I'm not saying about the black border) are much darker than the center pixels(I have undistorted the images). So the corresponding pixels in the edges are not fully view-consistent between neighbor views.
Do you know how to rectify this inconsistent brightness problem?
The text was updated successfully, but these errors were encountered: