基于 Vue 的 E2E test 环境搭建 #204
Comments
录屏尝试在 yarn add -D puppeteer-screen-recorder实现代码: import * as _ from 'lodash';
const { PuppeteerScreenRecorder } = require('puppeteer-screen-recorder');
const timeout = 10000;
let page;
let recorder;
beforeAll(async () => {
page = await global.__BROWSER__.newPage();
recorder = new PuppeteerScreenRecorder(page);
await page.setViewport({width: 1920, height: 1080});
await recorder.start(`${global.videosPath}/ceshi.mp4`);
// await page.goto(`${global.Host}/tlink/login`);
await page.goto(`http://www.baidu.com`);
});
afterAll(async () => {
await page.close();
});
describe( 'Login to THC', () => {
it('should load error when type invalid username', async () => {
await page.waitForSelector('input');
await page.focus("#kw");
await page.waitForTimeout(300);
await page.keyboard.type('合肥九义软件公司', {delay: 300});
await page.click('#su', {delay: 300});
await recorder.stop();
expect(1).toBe(1);
}, timeout);
}
);结论:单个是成功的,但是对于整个项目是失败的,并且我们的项目中也没这个需求,因此,这个 feature 暂时不再深入研究下去 |
尝试让鼠标动起来yarn add -D ghost-cursor代码实现: import { createCursor } from "ghost-cursor"
// .........
const cursor = createCursor(page)
await cursor.click(selector)但效果不理想,鼠标没动起来,同时频繁引起 |
邮件通知实现方法:使用 jest reporters 中的自定义 安装 yarn add -D emailjs
    [`${path.resolve(__dirname, '../test/e2e/config')}/email-report.js`, {
      Smtp: {
        user: '491766244@qq.com',
        password: '1111111',
        host: 'smtp.qq.com',
        ssl: true,
      },
      To: {
        to: 'zfcao@thomasho.cn',
        cc: 'czf2008700@163.com, 491766244@qq.com',
      },
      ReportUrl: 'http://localhost:8081/',
      date,
    }]
const fs = require('fs');
const _ = require('lodash');
const path = require('path');
const dayjs = require("dayjs");
const email = require('emailjs');

class EmailReport {
  constructor(globalConfig, options) {
    this._globalConfig = globalConfig;
    this._options = options;
  }
  onRunStart() {
    const { publicPath, filename } = this._globalConfig.reporters[1][1]
    const reportFile = path.resolve(publicPath, filename);
    try {
      if (fs.existsSync(reportFile)) {
        fs.unlinkSync(reportFile)
      }
    } catch(err) {
      console.error(err)
    }
  }
  onRunComplete(contexts, results) {
    this.sendEmail(results);
  }

  sendEmail(results) {
    const reportFile = path.resolve(__dirname, './template.html');
    let html = fs.readFileSync(reportFile, 'utf8');
    const client = new email.SMTPClient(this._options.Smtp);
    results.moreUrl = `${this._options.ReportUrl}${this._options.date}`;
    results.report_time = dayjs().format('MM/DD/YYYY HH:mm:ss');
    results.failedTestPer = (results.numFailedTests / results.numTotalTests * 100).toFixed(2);
    results.failedTestSuitesPer = (results.numFailedTestSuites / results.numTotalTestSuites * 100).toFixed(2);
    const arr = html.match(/{[\d_\w]+}/gm);

    _.forEach(arr, item => {
      const key = _.trim(item, '{}');
      html = _.replace(html, item, results[key]);
    })

    client.send(
      {
        from: this._options.Smtp.user,
        ...this._options.To,
        subject: `End to End test --- ${results.report_time}`,
        attachment: [
          {data: html, alternative: true }
        ]
      },
      (err, message) => {
        console.log(err || message);
      }
    );
  }
}

module.exports = EmailReport;
一开始用的时 sendmail({
from: 'no-reply@yourdomain.com',
to: 'zfcao@thomasho.cn, czf2008700@163.com',
subject: `E2E test Reporters ------ ${dayjs().format('MM/DD/YYYY HH:mm:ss')}`,
html: content,
}, function(err, reply) {
console.log('err:-------------:', err && err.stack);
console.dir('reply:-------------:', reply);
}); |
Sign up for free
to join this conversation on GitHub.
Already have an account?
Sign in to comment
本文是基于一个2年前的
Vue脚手架项目搭建E2E环境,实现思路是利用Headless Chrome来模拟用户的一切行为。一、Headless Chrome
简单的在 window 系统中玩一下
Headless Chrome二、安装依赖及 scripts 脚本
主要依赖
jest,puppeteer,babel, 在package.json中如下.babelrc, 配置babel{ "presets": [ ["env", { "modules": false, "targets": { "browsers": ["> 1%", "last 2 versions", "not ie <= 8"] } }], ["babel-preset-env", {"targets": {"node": "current"}}], "stage-2" ], "plugins": [ "transform-vue-jsx", "transform-runtime" ] }注意,这里的依赖是踩了坑后可以完整运行的。
坑1:按照 jest 官方的 babel 教程 配置我当前项目会有错误,故单独安装,并将
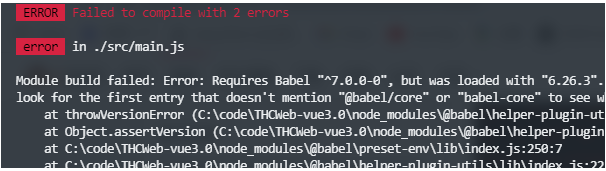
babel-jest版本调到23.6.0坑2:
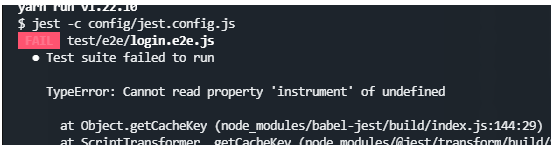
jest调整到26.0.2三、E2E test 配置
参考jest config我在
package.json中"test": "jest --runInBand -c config/jest.config.js"指定了 配置文件的位置/config/jest.config.js/config/jest/setup.js/config/jest/teardown.js/config/jest/puppeteer_environment.js四、指定文件顺序
只有先登录了,才能进行完整的
E2E test, 按照 stackoverflow 这里的介绍是实现不了的, 本文另辟捷径,在配置 maxConcurrency: 1 的情况下, 指定E2E test文件的执行顺序,从而达到目的。即在
jest.config.js中配置testSequencer: path.resolve(__dirname, '../test/e2e/config/sequencer.js'),/test/e2e/config/sequencer.js/test/e2e/config/orders.js五、 Example
以百度为例,
/test/e2e/example/baidu.search.e2e.js上面的代码中, page.keyboard.type 是模拟键盘输入.
六、生产测试 report
配置
jest.config.jsReference
至此,一个完整的
E2E Test环境就搭建起来了。The text was updated successfully, but these errors were encountered: