Skip to content
New issue

Have a question about this project? Sign up for a free GitHub account to open an issue and contact its maintainers and the community.

By clicking “Sign up for GitHub”, you agree to our terms of service and privacy statement. We’ll occasionally send you account related emails.

Already on GitHub? Sign in to your account

一文搞定 React 路由 #24

Open
fengshi123 opened this issue Jan 19, 2021 · 0 comments
Open

一文搞定 React 路由 #24

fengshi123 opened this issue Jan 19, 2021 · 0 comments

Comments

@fengshi123
Copy link
Owner

React Router 中的组件主要分为三类:

  • 路由器,例如 BrowserRouter 和 HashRouter
  • 路由匹配器,例如 Route 和 Switch
  • 导航,例如 Link,NavLink 和 Redirect

在 Web 应用程序中使用的所有组件建议都从 react-router-dom 导入

辛苦整理良久,还望手动点赞鼓励~

博客 github地址为:github.com/fengshi123/… ,汇总了作者的所有博客,欢迎关注及 star ~

1、安装路由包

npm i react-router-dom --save

2、路由组件

路由组件分为两种:BrowserRouter(history 模式) 和 HashRouter(hash 模式),用法一样,但是 url 展示不一样,其中 hash 模式带有 # 号符,如下所示:

2.1、BrowserRouter

class App extends React.Component {
  render () {
    return (
      <BrowserRouter>
        <Route path="/page1" exact component={Page1}></Route>
        <Route path="/page2" exact component={Page2}></Route>
        <Route path="/page3/:id" exact component={Page3}></Route>
      </BrowserRouter>
    );
  }
}

2.2、HashRouter

class App extends React.Component {
  render () {
    return (
      <HashRouter>
        <Route path="/page1" exact component={Page1}></Route>
        <Route path="/page2" exact component={Page2}></Route>
        <Route path="/page3/:id" exact component={Page3}></Route>
      </HashRouter>
    );
  }
}

3、Route 参数

3.1、path

string 类型,用来指定路由跳转路径,如下所示,根据 path 和 url 匹配到对应的页面

// 路由配置
<Route path="/page1" exact component={Page1}></Route>

// 页面访问
http://localhost:3000/page1

3.2、exact

boolean 类型,用来精确匹配路由,如果为 true 则精确匹配,否则为正常匹配;如下所示

// exact = true 时
// 路由配置
<Route path="/page1" exact component={Page1}></Route>
// 浏览器通过以下 url 访问不到 page1 页面
http://localhost:3000/page1/one


// exact = fasle 时
// 路由配置
<Route path="/page1" exact={false} component={Page1}></Route>
// 浏览器通过以下 url 可以访问到 page1 页面
http://localhost:3000/page1/one

3.3、sensitive

boolean 类型,用来设置是否区分路由大小写,如果为 true 则区分大小写,否则不区分;如下所示

// sensitive = true 时
// 路由配置
<Route path="/page1" sensitive component={Page1}></Route>
// 浏览器通过以下 url 访问不到 page1 页面
http://localhost:3000/PAGE1


// sensitive = fasle 时
// 路由配置
<Route path="/page1" sensitive={false} component={Page1}></Route>
// 浏览器通过以下 url 可以访问到 page1 页面
http://localhost:3000/PAGE1

3.4、strict

boolean 类型,对路径末尾斜杠的匹配。如果为 true,path 为 '/page1/' 将不能匹配 '/page1' 但可以匹配 '/page1/one'。;如下所示

// 路由配置
// strict = true 时
<Route path="/page1/" strict component={Page1}></Route>
// 浏览器通过以下 url 访问不到 page1 页面
http://localhost:3000/page1
// 浏览器通过以下 url 可以访问到 page1 页面
http://localhost:3000/page1/one


// strict = fasle 时
// 路由配置
<Route path="/page1/" strict={false} component={Page1}></Route>
// 浏览器通过以下 url 可以访问到 page1 页面
http://localhost:3000/page1
http://localhost:3000/page1/one

3.5、component

设置路由对应渲染的组件,如下所示

<Route path="/page1/" exact component={Page1}></Route>

3.6、render

(1)通过写 render 函数返回具体的 dom,如下所示

<Route path="/page1/" exact render={() => (<div>this is page</div>)}></Route>

(2) 也可以通过写 render 函数返回组件,如下所示

<Route path="/page1/" exact render={() => (<Page1/>)}></Route>

这样写的好处是,不仅可以通过 render 方法传递 props 属性,并且可以传递自定义属性:

<Route path='/about' exact render={(props) => {
    return <Page1 {...props} name={'name1'} />
}}></Route>

然后,就可在 Page1 组件中获取 props 和 name 属性:

componentDidMount() {
    console.log(this.props) 
}


// this.props:
// history: {length: 9, action: "POP", location: {…}, createHref: ƒ, push: ƒ, …}
// location: {pathname: "/home", search: "", hash: "", state: undefined, key: "ad7bco"}
// match: {path: "/home", url: "/home", isExact: true, params: {…}}
// name: "name1"

4、Switch

如果路由 Route 外部包裹 Switch 时,路由匹配到对应的组件后,就不会继续渲染其他组件了。但是如果外部不包裹 Switch 时,所有路由组件会先渲染一遍,然后选择所有匹配的路由进行显示。
(1)当没有使用 Switch 时,如下所示

// 路由配置
<BrowserRouter>
  <Route path="/page1" component={Page1}></Route>
  <Route path="/" component={Page2}></Route>
  <Route path="/page3/:id" exact component={Page3}></Route>
</BrowserRouter>

// 当面访问以下 url 时,浏览器会同时显示 page1 和 page2 页面的内容 
http://localhost:3000/page1

(2)当使用 Switch 时,如下所示

// 路由配置
<BrowserRouter>
  <Switch>
    <Route path="/page1" component={Page1}></Route>
    <Route path="/" component={Page2}></Route>
    <Route path="/page3/:id" exact component={Page3}></Route>
  </Switch>
</BrowserRouter>

// 当面访问以下 url 时,浏览器只会显示 page1 页面的内容 
http://localhost:3000/page1

5、Link 和 NavLink

Link 和 NavLink 都可以用来指定路由跳转,NavLink 的可选参数更多。

5.1、Link

(1)通过字符串执行路由跳转

<Link to='/page2'>
  <span>跳转到 page2</span>
</Link>  

(2)通过对象指定路由跳转

  • pathname: 表示跳转的页面路由 path
  • search: 表示查询参数的字符串形式,即等同于 location 中的 search
  • hash: 放入网址的 hash,即等同于 location 中的 hash
  • state: 可以通过这个属性,向新的页面隐式传参,如下所示,page2 中可以通过 this.props.location.state 可以拿到 age: 11;
<Link to={{
    pathname: '/page2',
    search: '?name=name1',
    hash: '#someHash',
    state: { age: 11 }
  }}>
  <span>跳转到 page2</span>
</Link>

**(3) replace **
如果设置 replace 为 true 时,表示路由重定向,即新地址替换掉上一次访问的地址;

5.2、NavLink

这是 的特殊版,顾名思义这就是为页面导航准备的。因为导航需要有 “激活状态”。
1)activeClassName: string
导航选中激活时候应用的样式名,默认样式名为 active

<NavLink
  to="/page2"
  activeClassName="selected"
>跳转到 page2</NavLink>

(2)activeStyle: object
如果不想使用样式名就直接写 style,如下所示

<NavLink
  to="/page2"
  activeStyle={{ color: 'green', fontWeight: 'bold' }}
>跳转到 page2</NavLink>

(3)exact: bool
若为 true,只有当访问地址严格匹配时激活样式才会应用,跟 3.2 的 exact 一个道理;
(4)strict: bool
若为 true,只有当访问地址后缀斜杠严格匹配(有或无)时激活样式才会应用,跟 3.4 的 exact 一个道理;
(5)isActive: func
决定导航是否激活,或者在导航激活时候做点别的事情。不管怎样,它不能决定对应页面是否可以渲染。

6、Redirect

将导航到一个新的地址,即重定向;如下所示,当页面访问到 /page3 时,页面会直接重定向到 page3.

<BrowserRouter>
  <Switch>
    <Route path="/page1" exact component={Page1}></Route>
    <Route path="/page2" exact component={Page2}></Route>
    <Route path="/page3" exact component={Page3}></Route>
  </Switch>
</BrowserRouter>

当然,也可以使用对象的形式,如下所示

<Redirect
  to={{
    pathname: "/page3",
    search: "?name=tom",
    state: { age: 11 }
  }}
/>

7、History 对象 - 编程式导航

支持字符串作为参数跳转,如下所示

this.props.history.push('/page2');

同样支持对象作为参数进行路由跳转,如下所示

this.props.history.push({
  pathname: '/page2',
  state: {
    name:'tom'
  }
});

跳转到对应的页面,我们打印出对应 history 对象,可以看到有以下属性
image.png
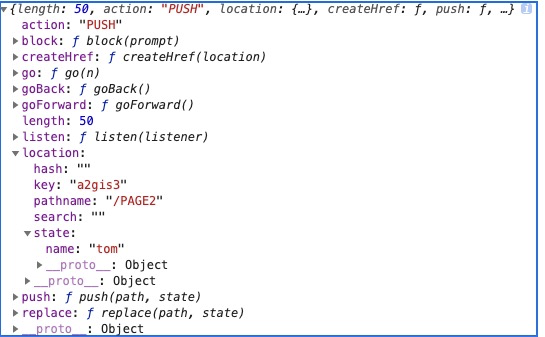
以上 history 对象的属性和方法解释如下:

  • length - (number 类型) history 堆栈的条目数
  • action - (string 类型) 当前的操作(PUSH, REPLACE, POP)
  • location - (object 类型) 当前的位置描述,location 会具有以下属性:
    • pathname - (string 类型) URL 路径
    • search - (string 类型) URL 中的查询字符串
    • hash - (string 类型) URL 的哈希片段
    • state - (object 类型) 提供给例如使用 push(path, state) 操作将 location 放入堆栈时的特定 location 状态。只在浏览器和内存历史中可用。
  • push(path, [state]) - (function 类型) 在 history 堆栈添加一个新条目
  • replace(path, [state]) - (function 类型) 替换在 history 堆栈中的当前条目
  • go(n) - (function 类型) 将 history 堆栈中的指针调整 n
  • goBack() - (function 类型) 等同于 go(-1)
  • goForward() - (function 类型) 等同于 go(1)
  • block(prompt) - (function 类型) 阻止跳转

8、withRouter

withRouter 可以将一个非路由组件包裹为路由组件,使这个非路由组件也能访问到当前路由的 match, location, history对象。使用场景:即如果想在路由页面的子组件中,进行路由的跳转,需要使用 withRouter 进行包裹,否则子组件是访问不到路由对象的。
(1)没有使用 withRouter 的场景
如下代码所示,我们没有使用 withRouter 对 Component1 组件进行包裹,当我们在 Component1 中调用 history 时会报错 TypeError: Cannot read property 'push' of undefined

class Component1 extends React.Component<any> {
  handleClick () {
    this.props.history.push('/page2');
  }
  render () {
    return <div onClick={() => this.handleClick()}>this is component1</div>;
  }
}

export default Component1;

(2)使用 withRouter 的场景
如下代码所示,我们使用 withRouter 对 Component1 组件进行包裹,当我们在 Component1 中调用 history 时能正常进行路由页面跳转

class Component1 extends React.Component<any> {
  handleClick () {
    this.props.history.push('/page2');
  }
  render () {
    return <div onClick={() => this.handleClick()}>this is component1</div>;
  }
}

export default withRouter(Component1);

9、参数传递

9.1、params 传参

路由配置如下

<Route path="/page2/:id" exact component={Page2}></Route>

路由跳转代码如下

this.props.history.push('/page2/1000');

参数获取代码如下

this.props.match.params;  // {id: "1000"}

9.2、query 传参

query 方式可以传递任意类型的值,但是页面的 url 也是由 query 的值拼接的,url 很长且是明文传输。
路由传参如下

//数据定义
const data = {id:3,name:sam,age:36};
const path = {
    pathname: '/user',
    query: data,
}
this.props.history.push(path);

页面获取路由传过来的参数如下

//页面取值
const data = this.props.location.query;

9.3、隐式传参

路由跳转传参如下

this.props.history.push({
  pathname: '/page2',
  state: {
    name:'tom'
  }
});

参数获取代码如下

this.props.history.location.state  // name: tom

10、路由的综合应用

通过前面几节,介绍了路由的基本使用 api,本小节我们介绍下在正式项目中如何使用 react 路由。

(1)路由配置文件

我们一般在项目目录底下会新建路由配置文件 /router/index.ts,进行项目路由的相关配置

const routes = [
  {
    path: '/page1',
    component: Page1,
    routes: []
  },
  {
    path: '/page2',
    component: Page2,
    sensitive: false,
    routes: [
      {
        path: '/page2/page21',
        component: Page21
      }
    ]
  },
  {
    path: '/page2',
    component: Page3
  },
  {
    path: '/',
    component: Page1
  }
];

export default routes;

(2)react 入口代码中配置路由

我们通常会在 App.tsx 中进行项目的路由配置,相关代码如下

import routes from './router/index';
class App extends React.Component {
  render () {
    return (
        <BrowserRouter>
          <Switch>
            {routes.map((route) => (
              <Route
                path={route.path}
                key={route.path}
                sensitive={route.sensitive}
                render={(props: any) => (
                  <route.component {...props} routes={route.routes} />
                )}
              />
            ))}
          </Switch>
        </BrowserRouter>
    );
  }
}

(3)嵌套路由

如果你的项目中有嵌套路由,则还需要在对应的页面中进行嵌套子路由的配置,如下所示

  render () {
    const routes = this.props.routes || [];

    return (
      <div>
        <div onClick={() => this.handleClick()}>this is page2</div>
        <Switch>
          {routes.map((route) => (
            <Route
              path={route.path}
              key={route.path}
              render={(props: any) => (
                <route.component {...props} />
              )}
            />
          ))}
        </Switch>
      </div>
    );
  }

通过以上配置后,我们就完成整个 react 项目的路由配置,后续我们在功能需求迭代中,只需要尽情地编写业务代码以及使用 Link/NavLink 或者 this.props.history 进行路由的跳转即可。

11、路由原理

前端三大框架 Angular、React、Vue ,它们的路由解决方案 angular/router、react-router、vue-router 都是基于前端路由原理进行封装实现的 ,具体可以查看笔者之前写的一篇文章《深度剖析:前端路由原理》,这里不再赘述。

辛苦整理良久,还望手动点赞鼓励~

博客 github地址为:github.com/fengshi123/… ,汇总了作者的所有博客,欢迎关注及 star ~

Sign up for free to join this conversation on GitHub. Already have an account? Sign in to comment
Labels
None yet
Projects
None yet
Development

No branches or pull requests

1 participant