- Combine에서는, publisher를 통해 오는 값을 제어하는 활동을 하는 method들을 operator 라고 합니다.
- 각각의 Combine operator는 실제로 publisher를 반환합니다. 일반적으로 publisher는 upstream의 값을 받고 잘 조작한 데이터를 downstream으로 보냅니다.
- 개념적인 것보다는 operator의 사용법과 operator가 어떤 출력을 내는지에 대해 배울 것입니다. operator의 목적이 error 처리가 아니라면 일반적으로 upstream에서 error를 수신했을 때 해당 error를 downstream에 그대로 전달합니다.
Note: 여기서는 transforming operator 중점으로 확인할 것이기 때문에 error 처리는 각 예제 코드에서 다루지 않습니다. 에러 처리는 Ch.16 Error Handling 에서 확인할 수 있습니다.
- publisher들은 단일 또는 collection 형태의 값을을 방출합니다. 아마 대부분은 collection을 이용하여 작업하고 싶을거예요.
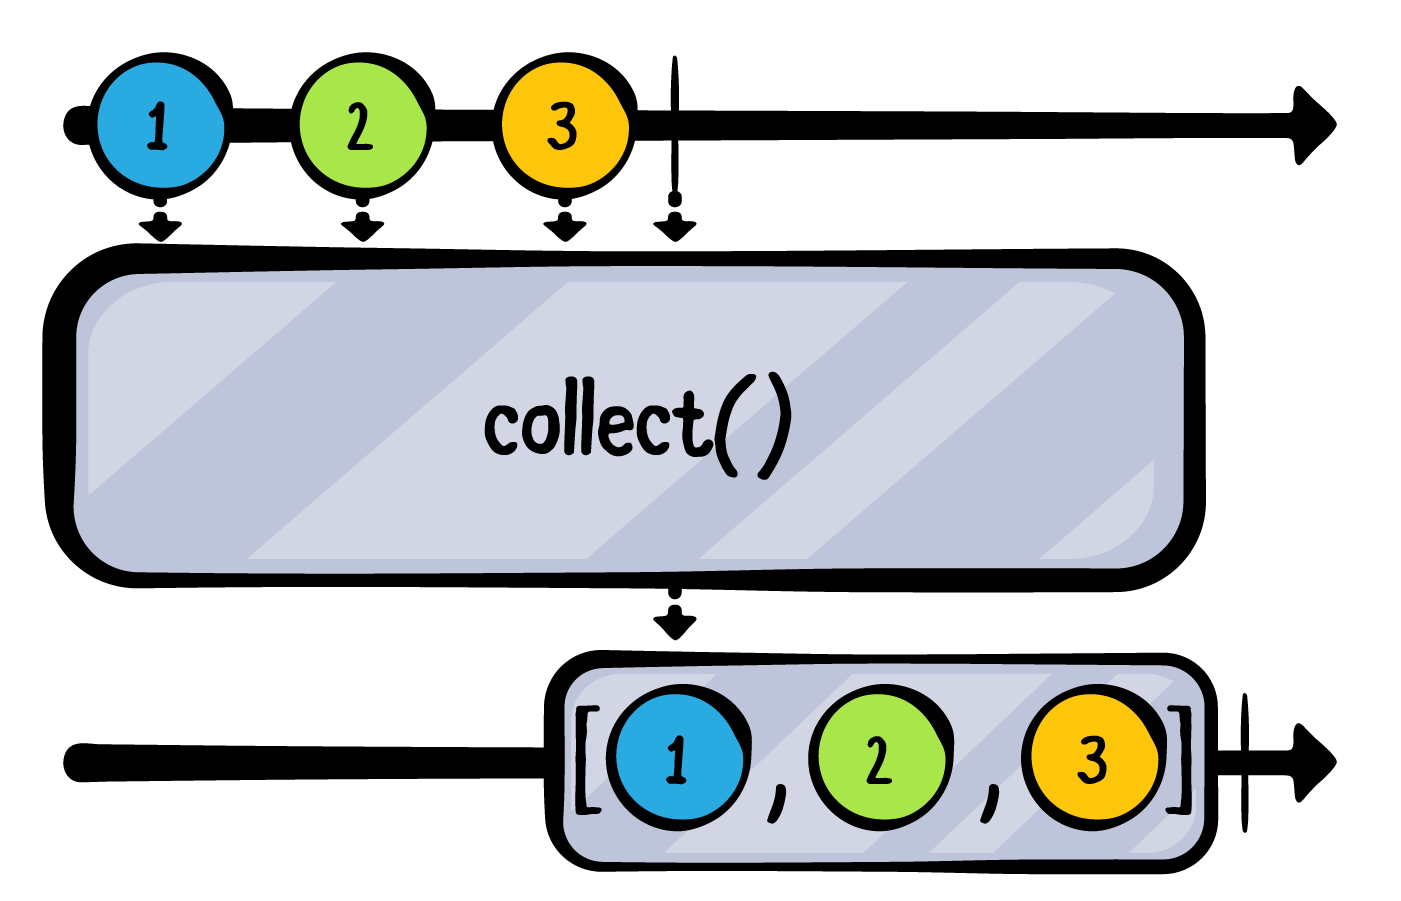
collect()operator는 publisher에서 방출하는 개별 값 stream을 array로 변환합니다.
-
위 마블 다이어그램을 보면
collect는 각 개별 값들을 버퍼로 갖고 있다가 upstream publisher가 완료되면 downstream에 array 형태로 방출합니다. -
다음 예제를 봅시다.
 example(of: "collect") {
   ["A", "B", "C", "D", "E"].publisher
     .sink(receiveCompletion: { print($0) },
           receiveValue: { print($0) })
     .store(in: &subscriptions)
 }
- 아직
collectoperator를 사용하지는 않았습니다. 이 상태로 실행시켜보면 개별 값이 다음과 같이 방출되는 것을 볼 수 있습니다.——— Example of: collect ——— A B C D E finished
- 아직
-
이제
collect를sink전에 삽입합니다. 다음과 같은 모습이 되겠죠.["A", "B", "C", "D", "E"].publisher .collect() .sink(receiveCompletion: { print($0) }, receiveValue: { print($0) }) .store(in: &subscriptions)
- 실행시켜보면 이제 다음과 같은 배열 형태로 값을 받은 후 완료 이벤트가 찍히는 것을 확인할 수 있습니다.
 ——— Example of: collect ———
 ["A", "B", "C", "D", "E"]
 finished
- 실행시켜보면 이제 다음과 같은 배열 형태로 값을 받은 후 완료 이벤트가 찍히는 것을 확인할 수 있습니다.
Note:
⚠️ 개수 제한이 없는collect()처럼 buffer를 가지는 operator를 사용할 때는 주의하세요. 수신된 값을 저장하기 위해 무한한 양의 메모리를 사용합니다.
-
collectionoperator는 몇 가지의 변형된 형태로도 제공됩니다. 예를 들어 특정 개수만큼 묶어서 array로 만들고 싶을 때는 다음과 같이 입력하면 됩니다..collect(2)
- 이렇게 하고 실행하면 콘솔에는 다음과 같이 표현됩니다.
——— Example of: collect ——— ["A", "B"] ["C", "D"] ["E"] finished - 마지막 값은
E만 가지는 array로 나왔습니다. 왜냐하면collect가 예정된 buffer를 다 채우기 전에 upstream publisher가 종료되었기 때문입니다. 하지만 그 개수를 채우지 못하더라도 남은 값은 array형태로 배출해주게 됩니다.
- 이렇게 하고 실행하면 콘솔에는 다음과 같이 표현됩니다.
- 방출하는 값이 publisher 형태라는 것만 제외하면 Combine의
map과 Swift의 기본map은 동일합니다. 아래의 마블 다이어그램을 보면map이 각 값에 2를 곱하는 closure를 갖는 것을 볼 수 있습니다.

-
다음 예제를 함께 봅시다.
 example(of: "map") {
   // 1
   let formatter = NumberFormatter()
   formatter.numberStyle = .spellOut

   // 2
   [123, 4, 56].publisher
     // 3
     .map {
       formatter.string(for: NSNumber(integerLiteral: $0)) ?? ""
     }
     .sink(receiveValue: { print($0) })
     .store(in: &subscriptions)
 }
-
1: 각 숫자를 표시할 number formatter를 생성합니다.
-
2: 정수 publisher를 생성합니다.
-
3:
map을 이용하여 upstream 값을 받아 formatter가 문자열로 반환할 수 있도록 합니다. -
playground를 실행했을 때 결과는 다음과 같습니다.
 ——— Example of: map ———
 one hundred twenty-three
 four
 fifty-six
-
-
map계열 operator에는 key path를 사용하여 값의 3개 property에 매핑할 수 있는 버전이 있습니다.map<T>(_:)map<T0, T1>(_:_:)map<T0, T1, T2>(_:_:_:)
-
다음 예제를 통해
Coordinate타입을 사용하고 제공한 Sources/SupportCode.swift 파일 내의quadrantOf(x:y:)method를 이용해볼 것입니다.Coordinate는x와y두 개의 property를 가집니다.quadrantOf(x:y:)는 이 두 값을 parameter로 받아 사분면을 나타내는 문자열로 반환해줍니다. 아래 예제에서는map(_:_:)을 사용하고 있네요.example(of: "map key paths") { // 1 let publisher = PassthroughSubject<Coordinate, Never>() // 2 publisher // 3 .map(\.x, \.y) .sink(receiveValue: { x, y in // 4 print( "The coordinate at (\(x), \(y)) is in quadrant", quadrantOf(x: x, y: y) ) }) .store(in: &subscriptions) // 5 publisher.send(Coordinate(x: 10, y: -8)) publisher.send(Coordinate(x: 0, y: 5)) }
-
1: 에러를 절대 발생하지 않는
Coordinatespublisher를 생성합니다. -
2: publisher에 subscription을 시작합니다.
-
3:
Coordinate의x,yproperty를map의 key path를 이용해서 넣어줍니다. (신기한 문법..) -
4: 받은
x,y값을 print 해줍니다. -
- publisher를 통해 받은
Coordinate들을 전송합니다.
- publisher를 통해 받은
-
콘솔에는 다음과 같이 표시됩니다.
 ——— Example of: map key paths ———
 The coordinate at (10, -8) is in quadrant 4
 The coordinate at (0, 5) is in quadrant boundary
-
-
map을 포함한 여러 operator들은 error를 던져주는 closure를 가지는try라는 명칭을 앞에 붙인 operator들을 제공합니다. 만약 여러분이 error를 받았다면 이 놈들은 이 error를 downstream으로 방출할 것입니다. 다음 예제 코드를 봅시다.example(of: "tryMap") { // 1 Just("Directory name that does not exist") // 2 .tryMap { try FileManager.default.contentsOfDirectory(atPath: $0) } // 3 .sink(receiveCompletion: { print($0) }, receiveValue: { print($0) }) .store(in: &subscriptions) }
-
1:
"‘Directory name that does not exist"이라는 문자를 publisher를 생성합니다. -
2:
tryMap을 사용하여 존재하지 않는 dictionary를 받도록 합니다. -
3: 나오는 값이나 완료 이벤트를 print 하도록 합니다.
-
throw method를 호출할 때 여전히
try키워드를 사용해야 함을 알 수 있습니다. 콘솔의 결과는 다음과 같습니다.——— Example of: tryMap ——— failure(..."The folder “Directory name that does not exist” doesn't exist."...)
-
-
flatMapoperator는 여러 개의 upstream publisher들을 하나의 downstream publisher로 병합할 수 있습니다. -
flatMap을 통해 반환되는 publisher는 대체로 upstream publisher와는 다른 타입을 가집니다.flatMap이 어떻게 여러 개의 publisher input들을 병합하는지 살펴보기 전에flatMap의 output들에 대해 살펴보겠습니다. -
Combine에서 제공하는
flatMap의 일반적인 용례는 publisher들을 값으로 방출하는 publisher를 subscribe 할 때 입니다. -
코드를 통해 확인해봅시다. 예제로 제공한 Sources/SupportCode.swift 에는 두 개의 property를 갖는
Chatter라는 struct가 작성되어 있습니다.name은 String 타입입니다.message는CurrentValueSubject로message문자열을 통해 초기화 됩니다.
 public struct Chatter {
   public let name: String
   public let message: CurrentValueSubject<String, Never>

   public init(name: String, message: String) {
     self.name = name
     self.message = CurrentValueSubject(message)
   }
 }
-
원래 playground 예제로 돌아가서 다음 코드를 작성해봅시다.
 example(of: "flatMap") {
   // 1
   let charlotte = Chatter(name: "Charlotte", message: "Hi, I'm Charlotte!")
   let james = Chatter(name: "James", message: "Hi, I'm James!")

   // 2
   let chat = CurrentValueSubject<Chatter, Never>(charlotte)

   // 3
   chat
     .sink(receiveValue: { print($0.message.value) })
     .store(in: &subscriptions)
 }
-
1:
Chatter: charlotte,james라는 두 개의 객체를 생성합니다. -
2:
charlotte를 초기값으로 갖는chatpublisher를 생성합니다. -
3:
chat을 subscribe 하고Chatterstruct로부터 받는 메시지를 print 하게 합니다. -
playground를 실행시키면 다음과 같이 표시됩니다.
 ——— Example of: flatMap ———
 Charlotte wrote: Hi, I'm Charlotte!
-
-
그럼, 아래에 다음 코드를 추가해봅시다.
 // 4
 charlotte.message.value = "Charlotte: How's it going?"

 // 5
 chat.value = james
-
1: Charlotte의 메시지를 변경합니다.
-
2:
chatpublisher의 현재 값을james로 변경합니다. -
다시 코드를 실행하면 다음과 같이 표시될 거예요.
Charlotte wrote: Hi, I'm Charlotte! James wrote: Hi, I'm James! -
보시면 Charlotte의 새 메시지는 볼 수 없는데, James의 최초 메시지는 확인할 수 있습니다. 왜냐하면 우리는
Chatterpublisher인chat을 subscribe 했기 때문입니다.Chatter를 방출하는messagepublisher를 subscribe 하지 않고요. 만약 모든 chat의message를 subscribe 하고 싶다면 어떻게 해야할까요? 바로flatMap을 사용하면 됩니다.
-
-
위 코드 중 아래 부분을
 chat
   .sink(receiveValue: { print($0.message.value) })
   .store(in: &subscriptions)
-
다음 코드로 변경해줍니다.
 chat
   // 6
   .flatMap { $0.message }
   // 7
   .sink(receiveValue: { print($0) })
   .store(in: &subscriptions)
-
6:
Chatterstruct의messagepublisher를 flatMap에 넣어줍니다. -
7:
Chatter객체가 아닌 문자열로 반환될 값을 print 할 수 있도록 합니다. -
코드를 실행시키면 이제 Charlotte의 새 메시지가 출력되는 것을 볼 수 있습니다.
 Hi, I'm Charlotte!
 Charlotte: How's it going?
 Hi, I'm James!
-
-
이제 다음 코드를 추가해 봅시다.
 james.message.value = "James: Doing great. You?"
 charlotte.message.value = "Charlotte: I'm doing fine thanks.
- 콘솔 결과는 다음과 같습니다.
James: Doing great. You? Charlotte: I'm doing fine thanks. james의chat값이 바뀌었는데도 Charlotte의 새 메시지는 잘 찍히는 것을 볼 수 있습니다. 야호👏
- 콘솔 결과는 다음과 같습니다.
-
앞서 언급했던
flatMap의 정의를 다시 상기시켜보면,flatMap은 수신한 모든 publisher output들을 하나의 publisher로 병합합니다. downstream에서 발행하는 단일 publisher를 업데이트 하려면 전송하는 publisher 수를 버퍼로 갖고 있어야 하기 때문에 메모리 문제가 발생합니다. -
flatMap의 메모리 사용을 관리하기 위해 우리는 선택적으로 몇 개의 publisher를flatMap이 받고 버퍼로 둘지maxPublisherparameter를 이용할 수 있습니다. -
위 예제에서 아래 코드를
.flatMap { $0.message }
-
다음 코드로 변경해줍니다.
.flatMap(maxPublishers: .max(2)) { $0.message }
- 이로써
flatMap이 최대 두 개의 upstream publisher를 받는다고 명시해주었습니다. 즉 2개 이상의 publisher는 무시할 것입니다. 만약maxPublishers를 명시해주지 않으면 기본 값은.unlimited가 됩니다.
- 이로써
-
이제 마블 다이어그램을 통해 좀 더 이해해봅시다.

-
다이어그램에서
flatMap은P1,P2,P33개의 publisher를 받습니다. 각 publisher들은valueproperty를 갖고 있고 이들 역시 publisher 입니다.flatMap은P1,P2의valuepublisher를 방출하지만P3는 무시합니다. 왜냐하면maxPublisher를2로 설정해주었기 때문입니다. -
flatMap의maxPublisher를 두 개로 설정해주었던 기존 예제로 돌아가서 다음 코드를 추가합시다.// 8 let morgan = Chatter(name: "Morgan", message: "Hey guys, what are you up to?") // 9 chat.value = morgan // 10 charlotte.message.value = "Did you hear something?
-
8:
Chatter객체를 생성합니다. -
9:
Chatter를chatpublisher에 추가합니다. -
10: Charlotte의 메시지를 변경합니다.
-
어떻게 print되서 나올까요? 한번 실행해봅시다.
——— Example of: flatMap ——— Hi, I'm Charlotte! Charlotte: How's it going? Hi, I'm James! James: Doing great. You? Charlotte: I'm doing fine thanks. Did you hear something? -
Morgan의 메시지는 찍히지 않습니다. 왜냐하면
flatMap은 두 개의 publisher만 받으니까요.
-
- 앞선
map예제에서Foundation의Formatter.string(for:)method로 작업했습니다. 이 method는 옵셔널 문자열을 만들어내기 때문에??operator를 통해nil값을nil이 아닌 값으로 변환해주었는데요 Combine도 언제나 값을 전달해주는 operator들을 가지고 있습니다.
- 다음 마블 다이어그램을 봅시다.
replaceNil이 옵셔널 값을 받고 있고nil값인 경우에는 정의한 값대로 변환해주고 있습니다.

-
다음 예제 코드를 새로 작성해보겠습니다.
 example(of: "replaceNil") {
   // 1
   ["A", nil, "C"].publisher
     .replaceNil(with: "-") // 2
     .sink(receiveValue: { print($0) }) // 3
     .store(in: &subscriptions)
 }
-
1: 옵셔널 문자 베열 publisher를 생성합니다.
-
2:
replaceNil(with:)를 이용하여 upstream publisher로부터 받은nil값을 새롭게nil이 아닌 값으로 바꿔줍니다. -
3: 값을 print 합니다.
-
콘솔에 나오는 결과는 다음과 같습니다.
——— Example of: replaceNil ——— Optional("A") Optional("-") Optional("C") -
옵셔널 값은 옵셔널이 아닌 값으로 바뀌지 않았습니다. 이름 처럼
replaceNil(with:)는nil값을nil이 아닌 값으로 전환할 뿐입니다.replaceNil을 옵셔널이 아닌 값으로 바꿀 수 있는 방법은 다음 코드처럼map을 이용하여 강제 래핑 해제 하는 것이겠죠.["A", nil, "C"].publisher .replaceNil(with: "-") .map { $0! } .sink(receiveValue: { print($0) }) .store(in: &subscriptions)
-
-
??를 사용하는 것과replaceNil을 사용하는 것에는 미묘하지만 중요한 차이점이 있습니다.??operator는 다른 optional값을 반환할 수 있지만replaceNil은 그럴 수 없습니다.replaceNil의 용도를 다음과 같이 변경해봅시다. 그럼 optional은 반드시 래핑 해제되어야 한다는 error가 표시될 것입니다..replaceNil(with: "-" as String?)
- publisher가 값 방출 없이 완료되었을 때
replaceEmpty(with:)operator를 이용하여 이를 값으로 전환하거나 값 자체를 삽입해줄 수 있습니다. - 다음 그림을 봅시다. pubisher가 방출 없이 완료되었고 이 때
replaceEmpty(with:)operator가 값을 넣어준 뒤 downstream으로 보내주고 있습니다.
![]()
-
새 예제 코드를 봅시다.
 example(of: "replaceEmpty(with:)") {
   // 1
   let empty = Empty<Int, Never>()

   // 2
   empty
     .sink(receiveCompletion: { print($0) },
           receiveValue: { print($0) })
     .store(in: &subscriptions)
 }
- 1: 즉시 완료 이벤트를 방출하는 빈 publisher를 생성합니다.
- 2: 이를 구독하고 받은 이벤트를 print 합니다.
-
Emptypublisher 타입은 즉시.finished완료 이벤트를 방출하는 publisher를 생성하는데 씁니다. 또한completeImmediatelyparameter에false를 전달하여 아무 것도 방출하지 않도록 할 수 있습니다. (completeImmediately의 기본값은true) 이 publisher는 데모나 테스트 목적으로 사용하거나 subscriber에게 완료 이벤트만 전달하고 싶을 때 유용합니다. -
아무튼 위 코드를 돌려보면
finished라고 찍히겠죠. 이제sink위에 아래 코드를 삽입해봅시다..replaceEmpty(with: 1)
- 이제 완료 전에
1이 찍히는 것을 확인할 수 있습니다.1 finished
- 이제 완료 전에
scan은 transforming 카테고리에서도 아주 유용한 operator 입니다. 이 놈은 upstream publisher의 현재 값을 해당 closure에 의해 반환된 마지막 값과 함께 제공합니다. (무슨 말?)- 다음 마블 다이어그램을 보면
scan은 시작값으로 저장된0으로 시작합니다. publisher로부터 각 값을 받으면 이 전에 저장된 값에 더한 다음 결과를 저장히고 출력합니다.

-
scan사용법 이해를 위해 다음 코드를 살펴봅시다.example(of: "scan") { // 1 var dailyGainLoss: Int { .random(in: -10...10) } // 2 let august2019 = (0..<22) .map { _ in dailyGainLoss } .publisher // 3 august2019 .scan(50) { latest, current in max(0, latest + current) } .sink(receiveValue: { _ in }) .store(in: &subscriptions) }
-
1:
-10부터10사이의 정수를 랜덤으로 생성하는 property를 생성합니다. -
2: 이 놈을 이용해서 한 달동안 가상의 일일 주가 변동을 나타내는 임의의 정수 array publisher를 생성합니다.
-
3: 시작 값으로
50을 가지는scan을 사용하여 매일 변경 사항을 주가에 추가합니다.max를 사용하면 가격은 음이 아닌 값을 유지하게 됩니다. -
이번에는 print 없이 그냥 playground를 돌려볼게요. 대신 우측 결과 사이드바의 Show Result 상자를 눌러볼까요?

-
-
scan에도 error 처리를 위한tryScanoperator가 있습니다. 만약 closure가 error를 던진다면tryScan은 error를 같이 전달해줄거예요.

- publisher의 output을 통해 작업을 수행하는 method를 operator라고 합니다.
- operator도 publisher입니다.
- transforming operator는 upstream publisher의 input을 downstream이 사용하기에 적합한 output 형태로 변환합니다.
- 마블 다이어그램은 각 operator들의 작동 방식을 시각화하는 좋은 방법입니다.
- 메모리 문제를 피하려면
collect,flatMap과 같이 값을 버퍼로 두는 operator를 사용할 때 주의하세요. - Swift의 기존 라이브러리에서 적용되던 지식을 Combine에 그대로 적용하면 안됩니다. 비슷한 이름의 Combine operator는 비슷하게 동작할 수 있지만 그 외 operator는 완전히 다르게 작동합니다.
- 하나의 subscription에 여러 operator를 함께 연결할 수 있습니다.