GPIO access and interrupt detection with Node.js on Linux boards like the Raspberry Pi, C.H.I.P. or BeagleBone.
onoff supports Node.js versions 4, 6, 8 and 10.
- News & Updates
- Installation
- Usage
- API
- How Does onoff Work?
- Configuring Pullup and Pulldown Resistors
- Benchmarks
- Related Packages
- Additional Information
onoff v3.2.0 adds an new boolean option called reconfigureDirection to the Gpio constructor. This option can be used to retain the value of a GPIO output when an application is stopped and restarted.
onoff v3.1.0 adds two new features.
- The new static property Gpio.accessible can be used to determine whether or not GPIO access is possible.
- The new static properties Gpio.HIGH and Gpio.LOW can be used in place of the numeric constants 1 and 0.
Prior to v3.0.0 onoff had inadequate and undocumented support for debouncing GPIO inputs. onoff v3.0.0 comes with a very effective debouncing implementation based on lodash.debounce. It's important to know that the new implementation in v3.0.0 is not compatible with the old undocumented implementation as the semantics of the debounceTimeout option which can be specified when invoking the Gpio Constructor have changed. An example of the usage of the debounceTimeout can be found at Debouncing Buttons.
npm install onoff
Assume that there's an LED connected to GPIO17 and a momentary push button connected to GPIO4.
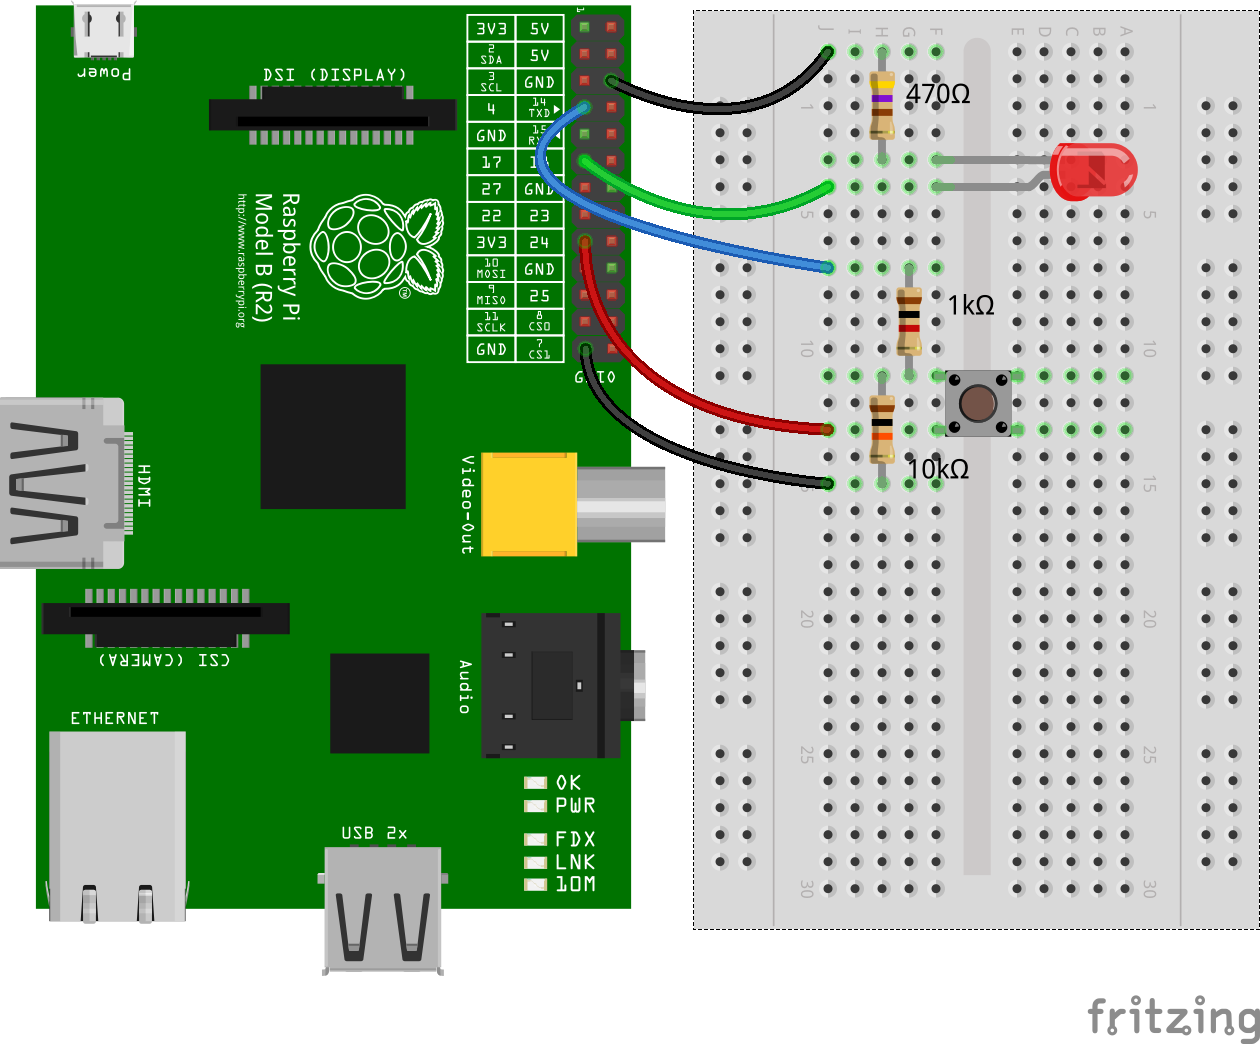
When the button is pressed the LED should turn on, when it's released the LED should turn off. This can be achieved with the following code:
const Gpio = require('onoff').Gpio;
const led = new Gpio(17, 'out');
const button = new Gpio(4, 'in', 'both');

button.watch((err, value) => {
  led.writeSync(value);
});
Here two Gpio objects are being created. One called led for the LED connected to GPIO17 which is an output, and one called button for the momentary push button connected to GPIO4 which is an input. In addition to specifying that the button is an input, the constructors optional third argument is used to specify that 'both' rising and falling interrupt edges should be configured for the button GPIO as both button presses and releases should be handled.
After everything has been setup correctly, the buttons watch method is used to specify a callback function to execute every time the button is pressed or released. The value argument passed to the callback function represents the state of the button which will be 1 for pressed and 0 for released. This value is used by the callback to turn the LED on or off using its writeSync method.
When the above program is running it can be terminated with ctrl-c. However, it doesn't free its resources. It also ignores the err argument passed to the callback. Here's a slightly modified variant of the program that handles ctrl-c gracefully and bails out on error. The resources used by the led and button Gpio objects are released by invoking their unexport method.
const Gpio = require('onoff').Gpio;
const led = new Gpio(17, 'out');
const button = new Gpio(4, 'in', 'both');

button.watch((err, value) => {
  if (err) {
    throw err;
  }

  led.writeSync(value);
});

process.on('SIGINT', () => {
  led.unexport();
  button.unexport();
});When working with buttons there will often be button bounce issues which result in the hardware thinking that a button was pressed several times although it was only pressed once. onoff provides a software debouncing solution for resolving bounce issues.
Assume again that there's an LED connected to GPIO17 and a momentary push button connected to GPIO4.
When the button is pressed the LED should toggle its state. This is a typical example of a situation where there will be button bounce issues. The issue can be resolved by using the debounceTimeout option when creating the Gpio object for the button. In the below program the debounceTimeout is set to 10 milliseconds. This delays invoking the watch callback for the button while the button is bouncing. The watch callback will not be invoked until the button stops bouncing and has been in a stable state for 10 milliseconds.
const Gpio = require('onoff').Gpio;
const led = new Gpio(17, 'out');
const button = new Gpio(4, 'in', 'rising', {debounceTimeout: 10});

button.watch((err, value) => {
  if (err) {
    throw err;
  }

  led.writeSync(led.readSync() ^ 1);
});

process.on('SIGINT', () => {
  led.unexport();
  button.unexport();
});Sometimes it may be necessary to determine if the current system supports
GPIOs programmatically and mock functionality if it doesn't. Gpio.accessible
can be used to achieve this.
const Gpio = require('onoff').Gpio;

const useLed = (led, value) => {
  led.writeSync(value);
}

let led;

if (Gpio.accessible) {
  led = new Gpio(17, 'out');
  // more real code here
} else {
  led = {
    writeSync: (value) => {
      console.log('virtual led now uses value: ' + value);
    }
  };
}

useLed(led, 1);- Gpio(gpio, direction [, edge] [, options]) - Constructor
- read([callback]) - Read GPIO value asynchronously
- readSync() - Read GPIO value synchronously
- write(value[, callback]) - Write GPIO value asynchronously
- writeSync(value) - Write GPIO value synchronously
- watch(callback) - Watch for hardware interrupts on the GPIO
- unwatch([callback]) - Stop watching for hardware interrupts on the GPIO
- unwatchAll() - Remove all watchers for the GPIO
- direction() - Get GPIO direction
- setDirection(direction) - Set GPIO direction
- edge() - Get GPIO interrupt generating edge
- setEdge(edge) - Set GPIO interrupt generating edge
- activeLow() - Get GPIO activeLow setting
- setActiveLow(invert) - Set GPIO activeLow setting
- unexport() - Reverse the effect of exporting the GPIO to userspace
- static accessible - Determine whether or not GPIO access is possible
- HIGH / LOW - Constants used when reading or writing a GPIO value
- gpio - An unsigned integer specifying the GPIO number.
- direction - A string specifying whether the GPIO should be configured as an input or output. The valid values are: 'in', 'out', 'high', and 'low'. If 'out' is specified the GPIO will be configured as an output and the value of the GPIO will be set to 0. 'high' and 'low' are variants of 'out' that configure the GPIO as an output with an initial level of 1 or 0 respectively.
- [edge] - An optional string specifying the interrupt generating edge or edges for an input GPIO. The valid values are: 'none', 'rising', 'falling' or 'both'. The default value is 'none' indicating that the GPIO will not generate interrupts. Whether or not interrupts are supported by an input GPIO is GPIO specific. If interrupts are not supported by a GPIO the edge argument should not be specified. The edge argument is ignored for output GPIOs.
- [options] - An optional options object.
Configures the GPIO based on the passed arguments and returns a new Gpio object that can be used to access the GPIO.
The following options are supported:
- debounceTimeout - An unsigned integer specifying a millisecond delay. Delays invoking the watch callback for an interrupt generating input GPIO while the input is bouncing. The watch callback will not be invoked until the input stops bouncing and has been in a stable state for debounceTimeout milliseconds. Optional, if unspecified the input GPIO will not be debounced.
- activeLow - A boolean value specifying whether the values read from or written to the GPIO should be inverted. The interrupt generating edge for the GPIO also follow this this setting. The valid values for activeLow are true and false. Setting activeLow to true inverts. Optional, the default value is false.
- reconfigureDirection - A boolean value specifying whether the direction for the GPIO should be reconfigured even though the direction is already configured correctly. When an application starts, the direction of a GPIO used by that application may already be configured correctly, for example, from a previous run of the application. Reconfiguring the direction of that GPIO can result in unwanted side effects. For example, if a GPIO is already configured as an output and it is reconfigured as an output by passing 'out' to the constructor, the value of that output will be set to 0. In some applications this is not desirable and the value of the output should not be modified. The reconfigureDirection can help here. If reconfigureDirection is set to false the direction of a GPIO that is already correctly configured will not be reconfigured. Optional, the default value is true.
GPIOs on Linux are identified by unsigned integers. These are the numbers that should be passed to the onoff Gpio constructor when exporting GPIOs to userspace. For example, pin 11 on the Raspberry Pi expansion header corresponds to GPIO17 in Raspbian Linux. 17 is therefore the number to pass to the onoff Gpio constructor when using pin 11 on the expansion header.
- [callback] - An optional completion callback that gets two arguments (err, value), where err is reserved for an error object and value is the number 0 or 1 and represents the state of the GPIO.
Read GPIO value asynchronously.
Note that most systems support readback of GPIOs configured as outputs. The read method can therefore be invoked for any GPIO, irrespective of whether it was configured as an input or an output. The Raspberry Pi and BeagleBone are examples of such systems.
Read GPIO value synchronously. Returns the number 0 or 1 to represent the state of the GPIO.
Note that most systems support readback of GPIOs configured as outputs. The readSync method can therefore be invoked for any GPIO, irrespective of whether it was configured as an input or an output. The Raspberry Pi and BeagleBone are examples of such systems.
- value - The number 0 or 1.
- [callback] - An optional completion callback that gets one argument (err), where err is reserved for an error object.
Write GPIO value asynchronously.
- value - The number 0 or 1.
Write GPIO value synchronously.
- callback - A callback that gets two arguments (err, value), where err is reserved for an error object and value is the number 0 or 1 and represents the state of the GPIO. The value can also be used to determine whether the interrupt occurred on a rising or falling edge. A value of 0 implies a falling edge interrupt and a value of 1 implies a rising edge interrupt.
Watch for hardware interrupts on the GPIO. The edge argument that was passed to the constructor determines which hardware interrupts to watch for.
- [callback] - The callback to remove.
Stop watching for hardware interrupts on the GPIO. If callback is specified, only that particular callback is removed. Otherwise all callbacks are removed.
Remove all hardware interrupt watchers for the GPIO.
Returns the string 'in' or 'out' indicating whether the GPIO is an input or output.
- direction - A string specifying whether the GPIO should be configured as an input or output. The valid values are 'in' and 'out'.
Set GPIO direction.
Returns the string 'none', 'falling', 'rising', or 'both' indicating the interrupt generating edge or edges for the GPIO. Whether or not interrupts are supported by an input GPIO is GPIO specific. If interrupts are not supported the edge method should not be used. Interrupts are not supported by output GPIOs.
- edge - A string specifying the interrupt generating edge or edges for an input GPIO. The valid values are: 'none', 'rising', 'falling' or 'both'. Whether or not interrupts are supported by an input GPIO is GPIO specific. If interrupts are not supported the setEdge method should not be used. Interrupts are not supported by output GPIOs.
Set GPIO interrupt generating edge.
Returns true or false indicating whether or not the values read from or written to the GPIO are inverted.
- invert - A boolean value specifying whether the values read from or written to the GPIO should be inverted. The interrupt generating edge for the GPIO also follow this this setting. The valid values for invert are true and false. Setting activeLow to true inverts. Optional, the default value is false.
Set GPIO activeLow setting.
Reverse the effect of exporting the GPIO to userspace. A Gpio object should not be used after invoking its unexport method.
Determine whether or not GPIO access is possible. true if the current process has the permissions required to export GPIOs to userspace. false otherwise. Loosely speaking, if this property is true it should be possible for the current process to create Gpio objects.
It is notable that while this property may be false indicating that the current process does not have the permissions required to export GPIOs to userspace, existing exported GPIOs may still be accessible.
This property is useful for mocking functionality on computers used for development that do not provide access to GPIOs.
This is a static property and should be accessed as Gpio.accessible.
Constants used when reading or writing a GPIO value. Gpio.HIGH and Gpio.LOW can be used in place of the numeric constants 1 and 0.
Blink the LED connected to GPIO17 for 5 seconds:
const Gpio = require('onoff').Gpio; // Gpio class
const led = new Gpio(17, 'out');    // Export GPIO17 as an output

// Toggle the state of the LED connected to GPIO17 every 200ms.
// Here synchronous methods are used. Asynchronous methods are also available.
const iv = setInterval(() => {
  led.writeSync(led.readSync() ^ 1); // 1 = on, 0 = off :)
}, 200);

// Stop blinking the LED and turn it off after 5 seconds
setTimeout(() => {
  clearInterval(iv); // Stop blinking
  led.writeSync(0);  // Turn LED off
  led.unexport();    // Unexport GPIO and free resources
}, 5000);Blink the LED connected to GPIO17 for 5 seconds:
const Gpio = require('onoff').Gpio; // Gpio class
const led = new Gpio(17, 'out');    // Export GPIO17 as an output

// Toggle the state of the LED connected to GPIO17 every 200ms 'count' times.
// Here asynchronous methods are used. Synchronous methods are also available.
const blinkLed = (count) => {
  if (count <= 0) {
    return led.unexport();
  }

  led.read((err, value) => { // Asynchronous read
    if (err) {
      throw err;
    }

    led.write(value ^ 1, (err) => { // Asynchronous write
      if (err) {
        throw err;
      }
    });
  });

  setTimeout(() => {
    blinkLed(count - 1);
  }, 200);
};

blinkLed(25);Internally onoff uses sysfs files located at /sys/class/gpio to access GPIOs and the epoll package to detect hardware interrupts. The Linux GPIO sysfs interface for userspace is documented here. It's a relatively simple interface which can be used to ask the Linux kernel to export control of a GPIO to userspace. After control of a GPIO has been exported to userspace, the GPIO can be configured as an input or output. Thereafter, the state of an input can be read, and the state of an output can be written. Some systems will also allow the state of a output to be read. The GPIO sysfs interface can also be used for interrupt detection. onoff can detect several thousand interrupts per second on both the BeagleBone and the Raspberry Pi.
Note that the epoll package is currently only supported on Linux. Attempting to use onoff on non-Linux systems will result in runtime errors similar to:
Error: Module did not self-register.
As mentioned in section How Does onoff Work the sysfs interface is used to access GPIOs. The sysfs interface doesn't offer support for configuring pullup and pulldown resistors on GPIOs.
There are however many platform specific mechanisms for configuring pullup and pulldown resistors that are compatible with onoff. onoff itself doesn't use these mechanisms as one of the goals of onoff is to be platform independent.
Here we'll take a look at two mechanisms available on the Raspberry Pi for configuring pullup and pulldown resistors.
The first point to be aware of is that most GPIOs on a Raspberry Pi have either their pullup or pulldown resistor activated by default. The defaults can be seen in Table 6-31 on pages 102 and 103 of the BCM2835 ARM Peripherals documentation.
On Raspbian 2018-04-18 or later the gpio configuration command can be used
in /boot/config.txt to configure pullup and pulldown resistors. Further
information is available at
New "gpio" config command.
Device tree overlays can also be used to configure pullup and pulldown resistors. The Wiki page Enabling Pullup and Pulldown Resistors on The Raspberry Pi describes this mechanism in more detail.
Three of the onoff tests are used to monitor performance:
- performance-async.js - determine max. no. of write ops per seconds
- performance-sync.js - determine max. no. of writeSync ops per second
- performance-interrupt.js - determine max. no. of interrupts per second
The average of ten runs of these tests using various versions of Node.js and onoff are shown in the following tables.
Raspberry Pi 3, 1.2Ghz, Raspbian:
| node | onoff | kernel | write / sec | writeSync / sec | interrupts / sec |
|---|---|---|---|---|---|
| v8.2.1 | v1.1.4 | 4.9.35-v7+ | 27345 | 318771 | 20094 |
| v6.11.1 | v1.1.4 | 4.9.35-v7+ | 26010 | 280180 | 19050 |
| v4.8.4 | v1.1.4 | 4.9.35-v7+ | 27674 | 328949 | 18326 |
Raspberry Pi 2, 900Mhz, Raspbian:
| node | onoff | kernel | write / sec | writeSync / sec | interrupts / sec |
|---|---|---|---|---|---|
| v8.2.1 | v1.1.4 | 4.9.35-v7+ | 12792 | 181829 | 9691 |
| v6.11.1 | v1.1.4 | 4.9.35-v7+ | 12348 | 167106 | 9215 |
| v4.8.4 | v1.1.4 | 4.9.35-v7+ | 13643 | 167248 | 8667 |
Raspberry Pi 1, 700Mhz, Raspbian:
| node | onoff | kernel | write / sec | writeSync / sec | interrupts / sec |
|---|---|---|---|---|---|
| v8.2.1 | v1.1.4 | 4.9.35+ | 2738 | 53589 | 2353 |
| v6.11.1 | v1.1.4 | 4.9.35+ | 2565 | 23111 | 1709 |
| v4.8.4 | v1.1.4 | 4.9.35+ | 2806 | 33847 | 1590 |
BeagleBone Black, 1GHz, Debian 9.2:
| node | onoff | kernel | write / sec | writeSync / sec | interrupts / sec |
|---|---|---|---|---|---|
| v9.2.0 | v1.1.8 | 4.4.91-ti-r133 | 7584 | 105198 | 6820 |
| v8.2.1 | v1.1.8 | 4.4.91-ti-r133 | 7908 | 113476 | 6544 |
| v6.11.4 | v1.1.8 | 4.4.91-ti-r133 | 7784 | 100586 | 6079 |
| v4.8.4 | v1.1.8 | 4.4.91-ti-r133 | 8236 | 113988 | 5216 |
BeagleBone, 720MHz, Debian 9.2:
| node | onoff | kernel | write / sec | writeSync / sec | interrupts / sec |
|---|---|---|---|---|---|
| v9.2.0 | v1.1.8 | 4.4.91-ti-r133 | 5348 | 74305 | 4870 |
| v8.2.1 | v1.1.8 | 4.4.91-ti-r133 | 5703 | 82007 | 4871 |
| v6.11.4 | v1.1.8 | 4.4.91-ti-r133 | 5534 | 72223 | 4247 |
| v4.8.4 | v1.1.8 | 4.4.91-ti-r133 | 6020 | 81516 | 3786 |
Here are a few links to other hardware specific Node.js packages that may be of interest.
- pigpio - Fast GPIO, PWM, servo control, state change notification and interrupt handling on the Raspberry Pi
- i2c-bus - I2C serial bus access
- spi-device - SPI serial bus access
- mcp-spi-adc - Analog to digital conversion with the MCP3002/4/8, MCP3202/4/8 and MCP3304
onoff was tested on the following platforms:
- Raspberry Pi 1, 2 and 3
- Raspbian
- C.H.I.P.
- Debian
- BeagleBone, BeagleBone Black and PocketBeagle
- Debian
The suitability of onoff for a particular Linux board is highly dependent on how GPIO interfaces are made available on that board. The GPIO interfaces documentation describes GPIO access conventions rather than standards that must be followed so GPIO can vary from platform to platform. For example, onoff relies on sysfs files located at /sys/classes/gpio being available. However, these sysfs files for userspace GPIO are optional and may not be available on a particular platform.