| Contributors: | |
|---|---|
| Francesco Cassini | cassini.785771@studenti.uniroma1.it |
| Lorenzo Leschiera | ginesi.1832198@studenti.uniroma1.it |
| Matteo Ginesi | leschiera.1325697@studenti.uniroma1.it |
private telemetry og boiler smart city certification of flue (every year in Italy we spend 70 euro to do this check) scientific scope because the pollution from flue are the 60% of the total pollution.
- Medium: with all descriptions of the story
- Hackster: with other resource files
- Youtube playlist: a list of walkthrough config videos
- ArmBed: repository codes for ArmMbed cpu
- Slideshare: slides of the presentation
- AMI 2019: we have showed a paper at this conference in October 2019
This README contains a little guide to process of setup of the several implied devices. Anyway we invite you to read the complete story on Medium or Hackster and get here only the codes.
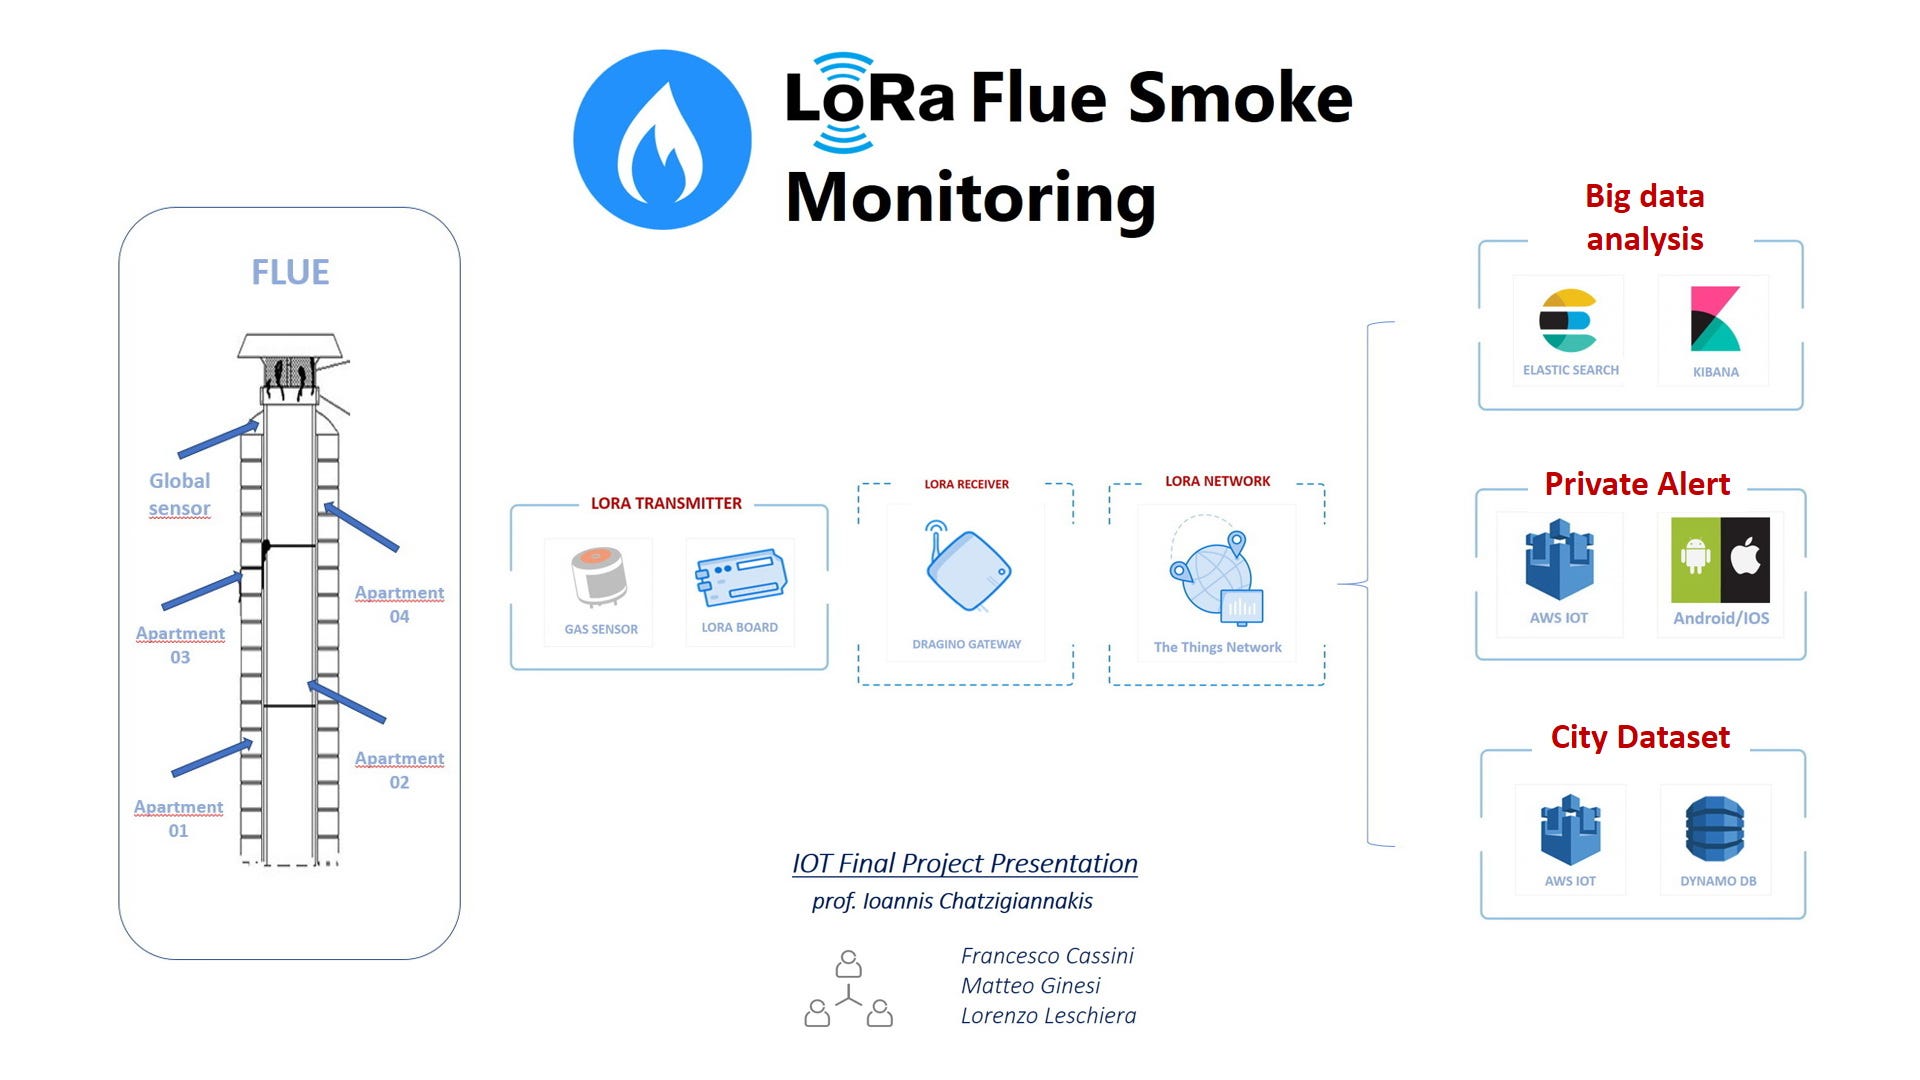
The workflow of LoRa Flue network is the following:
At beginning of this you find instructions to connect Dragino with Internet and setup it to be an IOT gateway for every near sensors
Put the code on the LoRa transmitter device to use the gas sensor and execute a sequence of measures and transmissions.
On The Things Network you will need a decoder code for the entrance data
AWS IOT chapter
Android code application
If pre-existent data are present, please reset dragino:
- Press toggle button while dragino is running for about 30 seconds.
Connect to dragino access point with any device (pc suggested).
Open on your browser at link: 10.130.1.1 or via url: dragino-<same code of WiFi Access Point>
| Login | |
|---|---|
| user: | root |
| pass: | dragino |
- Network > Internet Access
- Select WiFi connection
- Set WiFi password and SSID
- Set a page for ping test (like www.google.it)
- Save
- Network > Access Point
- Disable WiFi AP
- Save
- Unsaved changes
- Save & Apply
- Wait for about 2 minutes and reboot.
- Network > Internet Access
- Select WLAN connection
- Unsaved changes
- Save & Apply
- Wait for about 2 minutes and reboot.
- Open TheThingsNetwork and go to Gateways settings.
- Register a new Gateway with legacy packed forwarder
- Copy the address on the back of the dragino and add a number like between (00 00) and (FF FF).
- Add a description.
- Set Frequency Plan
- Register your gateway.
Open on your browser dragino IP (based on your network).
- Sensor > LoraWAN
- Server address: (example) router.eu.thethings.network
- Save & Apply
- Sensor > IOT Server
- IoT Server: LoRaWAN
- Save & Apply
All the comunication system is based on LoRaWAN stack protocol managed by STM32 microcontroller board DISCO-L072CZ, programmed by Mbed (www.mbed.com). Firmware uses Mbed OS 5 to provide drivers and pre-built code for:
- LoRaWAN radio module: SX1276
- Analog Input/Output
- Digital GPIOs
- Debug and tracing
- RS232 over USB stack
Code is divided in two main blocks:
- System initialization:
main.cpp - mbed-os configuration (LoRaWAN login):
mbed_app.json
In the main.cpp file, there are all the functions/declarations needed to deploy the send data function.
The user has to change the ID constant in the file, as a hexadecimal value of 16 bit (uint16_t):
...
    #define ID              0xAAFF
...
Sensor, for the board used in the project, is addressed on pin analog 1 (A1). Change it in case of need. Pin A0 can't be used.
...
    AnalogIn sensor(A1);
...
In the send_data() function the user can set any kind of encoding of transmitted data, writing the correct message into the tx_buffer and settings the correct dimension value of it, into packet_len variable.
    static void send_message()
    {
        uint16_t packet_len;
        int16_t retcode;

        /*
            Reading sensor data (unsigned int 16 bit)
            Writing ID and sensor data into transmission buffer
            Sending data to Gateway by LoRaWAN stack
        */
        uint16_t data = sensor.read_u16();
        packet_len = sprintf(
            (char *) tx_buffer, "%4X%u", ID, data);

        printf("\r\ndata sent: %s\r\n", tx_buffer);
}In the mbed_app.json file, each user NEED TO CONFIGURE their own TheTingsNetwork credential to their proper application.
Note:
This code works only for
APBprotocol. TheOOTAway isn't verificated yet. For all information about TheTingsNetwork procedures, please refer to www.thethingsnetwork.com.
In order to change radio module, set the proper value in:
...
    "config": {
        "lora-radio": {
            "help": "Which radio to use (options: SX1272,SX1276)",
            "value": "SX1276"
        },
For TheThingsNetwork credentials, change:
...
    "target_overrides": {
        "*": {

            "lora.appskey": "{C-STYLE HEX App Session Key}",
            "lora.nwkskey": "{C-STYLE HEX Network Session Key}",
"lora.device-address": "0x<HEX DATA OF device address>"When data shipped by Dragino arrived on The Things Network, there is necessity to decode them. The Things Network make this through a Payload function that get a sequence of bytes and assign them to several variables you have chosen in the payload function. In this way it's possible recombine data and send successivily to another external service.
In our test we have trnasmitted data of:
- gas value
- latitude position
- longitude position
In the case of latitude and longitude, the string char is recognized immediately from any external service (for example Elastic Search) as a float number. Because we have problem with gas value (Elastic Search get this value as string and this cause a problem in the visualization of numerical data), we have convert the gas value in a float through the payload function. We have used parseFloat function
decoded.gas = parseFloat (gasvalue)
In this way Elastic Search interpret this value as number and use in tha graph.
function Decoder(bytes, port) {
  // Decode an uplink message from a buffer
  // (array) of bytes to an object of fields.
  var decoded = {};
  var gasvalue = '';

  decoded.gas = '';
  decoded.id = '';
  for(var i = 0 ; i<bytes.length ; i++){
    decoded.lat = 41.891253;
    decoded.lng = 12.503410;
    if(i<4)
      decoded.id += String.fromCharCode(bytes[i]);
    else
      gasvalue += String.fromCharCode(bytes[i]);
  }

  decoded.gas = parseFloat (gasvalue)
  console.log(bytes);

  return decoded;
}
For the Python script you just need to use AWS CLI, you will have to configure it with your data by entering the command
aws configure
You will be asked to enter AWS Access Key ID, AWS Secret Access Key, Default region name and Default output format. For more details: https://docs.aws.amazon.com/cli/latest/userguide/cli-chap-configure.html
Then you can start the service.
In the .NET enviroment you have to insert your keys in the web.configuration, then you can start the service.
-
Import the project into Android Studio.
- From the Welcome screen, click on "Import project".
- Browse to the AndroidPubSub directory and press OK.
- Accept the messages about adding Gradle to the project.
- If the SDK reports some missing Android SDK packages (like Build Tools or the Android API package), follow the instructions to install them.
-
Import the libraries :
- Gradle will take care of downloading these dependencies automatically for you.
-
This sample will create a certificate and key, save it in the local java key store and upload the certificate to the AWS IoT platform. To upload the certificate, it requires a Cognito Identity with access to AWS IoT to upload the device certificate. Use Amazon Cognito to create a new identity pool ( or you can reuse an identity pool that you previously created):
-
In the Amazon Cognito Console, press the Manage Identity Pools button and on the resulting page press the Create new identity pool button.
-
Give your identity pool a name and ensure that Enable access to unauthenticated identities under the Unauthenticated identities section is checked. This allows the sample application to assume the unauthenticated role associated with this identity pool. Press the Create Pool button to create your identity pool
- As part of creating the identity pool, Cognito will setup two roles in Identity and Access Management (IAM). These will be named something similar to: Cognito_<>Auth_Role and Cognito_<>Unauth_Role. You can view them by pressing the View Details button on the console. Now press the Allow button to create the roles.
-
Note the Identity pool ID value that shows up in red in the "Getting started with Amazon Cognito" page. It should look similar to: `us-east-1:xxxxxxxx-xxxx-xxxx-xxxx-xxxxxxxxxxxx". Also, note the region that is being used. These will be used in the application code later.
-
Next, we will attach a policy to the unauthenticated role to setup permissions to access the required AWS IoT APIs. This is done by first creating the IAM Policy shown below in the IAM Console and then attaching it to the unauthenticated role. In the IAM console, Search for the pool name that you created and click on the link for the unauth role. Click on the "Add inline policy" button and add the following policy using the JSON tab. Click on "Review Policy", give the policy a descriptive name and then click on "Create Policy". This policy allows the sample app to create a new certificate (including private key) and attach a policy to the certificate.
-
{
  "Version": "2012-10-17",
  "Statement": [
    {
      "Effect": "Allow",
      "Action": [
        "iot:AttachPrincipalPolicy",
        "iot:CreateKeysAndCertificate"
      ],
      "Resource": [
        "*"
      ]
    }
  ]
}
The configuration we have setup up to this point will enable the Sample App to connect to the AWS IoT platform using Cognito and upload certificates and policies. Next, we will need to create a policy, that we will attach to the Device Certificate that will authorize the certificate to connect to the AWS IoT message broker and perform publish, subscribe and receive operations. To create the policy in AWS IoT,
Navigate to the AWS IoT Console and press the Get Started button. On the resulting page click on Secure on the side panel and the click on Policies.
Click on Create
Give the policy a name. Note this name as you will use it in the application when making the attach policy API call.
Click on Advanced Mode and replace the default policy with the following text and then click the Create button.
{
  "Version": "2012-10-17",
  "Statement": [
    {
      "Effect": "Allow",
      "Action": "iot:Connect",
      "Resource": "*"
    },
    {
      "Effect": "Allow",
      "Action": [
        "iot:Publish",
        "iot:Subscribe",
        "iot:Receive"
      ],
      "Resource": "*"
    }
  ]
}
Note: To keep things simple, This policy allows access to all the topics under your AWS IoT account. This can be used for getting started and prototypes. In product, you should scope this policy down to specific topics, specify them explicitly as ARNs in the resource section: "Resource": "arn:aws:iot:::topic/<<mytopic/mysubtopic>>".
Open the project.
Open AWSIoT.java and update the following constants:
MY_REGION = Regions.US_EAST_1;
This would be the name of the IoT region that you noted down previously.
CUSTOMER_SPECIFIC_ENDPOINT = "<CHANGE_ME>";
The customer specific endpoint can be found on the IoT console settings page. Navigate to the AWS IoT Console and press the Settings button.
AWS_IOT_POLICY_NAME = "CHANGE_ME";
This would be the name of the AWS IoT policy that you created previously.
KEYSTORE_NAME = "iot_keystore";
KEYSTORE_PASSWORD = "password";
CERTIFICATE_ID = "default";
For these parameters, the default values will work for the sample application. The keystore name is the name used when writing the keystore file to the application's file directory. The password is the password given to protect the keystore when written. Certificate ID is the alias in the keystore for the certificate and private key entry.
Note: If you end up creating a keystore off of the device you will need to update this to match the alias given when importing the certificate into the keystore.
Open res/raw/awsconfiguration.json and update the values for PoolId with the ID of the Cognito Identity Pool created above and Region with the region of the Cognito Identity Pool created above (for example us-east-1):
"PoolId": "REPLACE_ME",
"Region": "REPLACE_ME"
Build and run the sample app.