In This doc you will be seeing how we can create a Multi Node Kubernetes cluster on AWS. You need to launch the instances on AWS. Here i have launched t2.micro which is under free tier so it will not charge. Now as you can see in the below images that i have launched 1 isntance as Master Node and other as Salve Node.

Now as the instances are launched then we can now configure the kubernetes setup in both of the instances. we will go one at a time. first let's ready the master with
Now we need to install docker first. As i am using Amazon Linux 2 ami so you can install dokcker using yum install docker. After installing docker you can check the status and make the docker enable. So, every time when we start the OS it will be already in the started state.

Now we can proceed with installing kubelet and kubeadm.
Link for the Kubeadm Installation Guide: https://kubernetes.io/docs/setup/production-environment/tools/kubeadm/install-kubeadm/
- Kubelet: The kubelet is the primary "node agent" that runs on each node. It can register the node with the apiserver using one of: the hostname; a flag to override the hostname; or specific logic for a cloud provider.
- Kubeadm: Kubeadm is a tool built to provide kubeadm init and kubeadm join as best-practice "fast paths" for creating Kubernetes clusters. kubeadm performs the actions necessary to get a minimum viable cluster up and running.
Make sure that the br_netfilter module is loaded. This can be done by running lsmod | grep br_netfilter. To load it explicitly call sudo modprobe br_netfilter. And run the below command.
cat <<EOF | sudo tee /etc/modules-load.d/k8s.conf
br_netfilter
EOF

cat <<EOF | sudo tee /etc/sysctl.d/k8s.conf
net.bridge.bridge-nf-call-ip6tables = 1
net.bridge.bridge-nf-call-iptables = 1
EOF
sudo sysctl --system
After that we need to create a repository of kubernetes vi /etc/yum.repos.d/kubernetes.repo and write the command in that file.
cat <<EOF | sudo tee /etc/yum.repos.d/kubernetes.repo
[kubernetes]
name=Kubernetes
baseurl=https://packages.cloud.google.com/yum/repos/kubernetes-el7-\$basearch
enabled=1
gpgcheck=1
repo_gpgcheck=1
gpgkey=https://packages.cloud.google.com/yum/doc/yum-key.gpg https://packages.cloud.google.com/yum/doc/rpm-package-key.gpg
exclude=kubelet kubeadm kubectl
EOF
Set SELinux in permissive mode (effectively disabling it)
sudo setenforce 0
sudo sed -i 's/^SELINUX=enforcing$/SELINUX=permissive/' /etc/selinux/config
Now you can install kubelet and kubectl by installing kubeadm using yum install -y kubelet kubeadm kubectl --disableexcludes=kubernetes. You can find the installation process in the below image.

After installing kubeadm you can now also enable that. So if you restart the OS then by default the kubelet will be enabled.You can enable kubelet using systemctl enable kubelet

As you can see in the above figure, the kubelet is trying to start but gets failed.
Now we have to pull the image of different types of resources using kubeadm. This will pull the required images and let the respective containers to start.
you can pull the images using kubeadm config images pull
Now if you see by running the above command you will be having several images in your system if use type docker ps. This will show you all the images in your desired system.
 Kuberenets has to run differmt process behind the scene. So, to install these resources it uses containers and in the containers we will be having the required resources eg.
- kube-apiserver:v1.20.2
- kube-controller-manager:v1.20.2
- kube-scheduler:v1.20.2
- kube-proxy:v1.20.2
- pause:3.2
- etcd:3.4.13-0
- coredns:1.7.0
Now we need to change the driver in the docker. By default docker uses cgroupfs driver. So we need to change to systemd driver. To change the driver go into /etc/docker/
and create a file with daemon.jason and write { "exec-opts": ["native.cgroupdriver=systemd"] } the daemon.json.

After changing the driver you can now restart the docker using systemctl restart docker so that what we have done changes in the daemon.json file that should be loaded.
Now after restarting if you check the driver docker info | grep Driver then you will find that the driver is now updated from cgroupfs to systemd.

Now we can procceed further with installing yum install iproute-tc this will require to set the routing path.

Now we need to set the bridge routing to 1 using echo "1" > /proc/sys/net/bridge/bridge-nf-call-iptables
After that we are set toinitialize the the master with respective pod-network-cidr. You can initialize using kubeadm init --pod-network-cidr=10.240.0.0/16 --ignore-preflight-errors=NumCPU --ignore-preflight-errors=Mem
- --pod-network-cidr=10.240.0.0/16: containers will be launched within this range of network
- --ignore-preflight-errors=NumCPU: As we are using t2.micro i.e 1GB ram and 1 CPU so to ignore the errors of CPU we using this command
- --ignore-preflight-errors=Mem: We have only 1Gb Ram so to ignore errors on mem we using this command
 After intializing maser it will give you command to run. Below are the commads tha you need to run in the nodes(os) you wanted to make them salves.
- mkdir -p $HOME/.kube
- sudo cp -i /etc/kubernetes/admin.conf $HOME/.kube/config
- sudo chown
$(id -u):$ (id -g) $HOME/.kube/config
After running this it kubetnetes creates a .kube from the above fiirst commad and inside that we need to create a config file (configuration file) i.e from command second. Now to chnage the owner permission we are usig chown so that will chmage the owner permission of config file inside .kube.
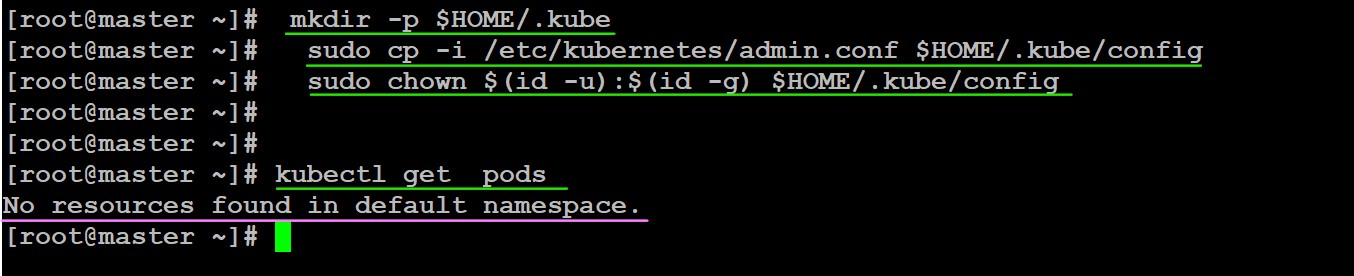
Now if you run kubectl get pods you will find that you dont have any resources in the default namesapce. Also your Node will be in the ready state. Now if you wnated to connect the slave then you connect. Here i am conecting slave to master.
The same process you need to while creating slave1. So first we need to install docker. yum install docker

after installing docker we need to make docker enable. systemctl enable docker --now

After enabling docker service, Make sure that the br_netfilter module is loaded. This can be done by running lsmod | grep br_netfilter. To load it explicitly call sudo modprobe br_netfilter. So run it.
cat <<EOF | sudo tee /etc/modules-load.d/k8s.conf
br_netfilter
EOF

cat <<EOF | sudo tee /etc/sysctl.d/k8s.conf
net.bridge.bridge-nf-call-ip6tables = 1
net.bridge.bridge-nf-call-iptables = 1
EOF
sudo sysctl --system
After that we need to create a repository of kubernetes vi /etc/yum.repos.d/kubernetes.repo and write the command in that file
cat <<EOF | sudo tee /etc/yum.repos.d/kubernetes.repo
[kubernetes]
name=Kubernetes
baseurl=https://packages.cloud.google.com/yum/repos/kubernetes-el7-\$basearch
enabled=1
gpgcheck=1
repo_gpgcheck=1
gpgkey=https://packages.cloud.google.com/yum/doc/yum-key.gpg https://packages.cloud.google.com/yum/doc/rpm-package-key.gpg
exclude=kubelet kubeadm kubectl
EOF
After saving this you can check the kubernetes repository is configured or not using yum repolist

Set SELinux in permissive mode (effectively disabling it)
sudo setenforce 0
sudo sed -i 's/^SELINUX=enforcing$/SELINUX=permissive/' /etc/selinux/config
Now we can proceed to install kubeadm. ensure kubeadm will install kubectl and kubelet also so now need to worry while installing kubectl and kubelet.
you can install kubecadm using yum install -y kubelet kubeadm kubectl --disableexcludes=kubernetes.

Now after that you need to enable the kubelet using systemctl enable kubelet So that when you start kuberenetes after restarting OS it will be in the start mode already.

Now we need to pull the images using kubeadm kubeadm config images pull

As you can see the images pulled by kubeadm.
- kube-apiserver:v1.20.2
- kube-controller-manager:v1.20.2
- kube-scheduler:v1.20.2
- kube-proxy:v1.20.2
- pause:3.2
- etcd:3.4.13-0
- coredns:1.7.0
Now we need to configure the driver of docker. This can be done inside /etc/docker you need to create a file daemon.json and inside that we need to write te below code so that the driver should be change from cgroupfs to systemd.

after that you need to restart docker so make the chnages successful. systemctl restart docker
After that we need to install iproute-tc software. this software is responsible to make the routings inside the master salve setup. To install yum install iproute-tc.

Now we need to change the iptable using this command echo "1" > /proc/sys/net/bridge/bridge-nf-call-iptables
 Now you can proceed with joining the slave with master. You can use the token given while initializing master. This tokens is given at one time m=by the master but you can create new token if you forget to save this tokens.
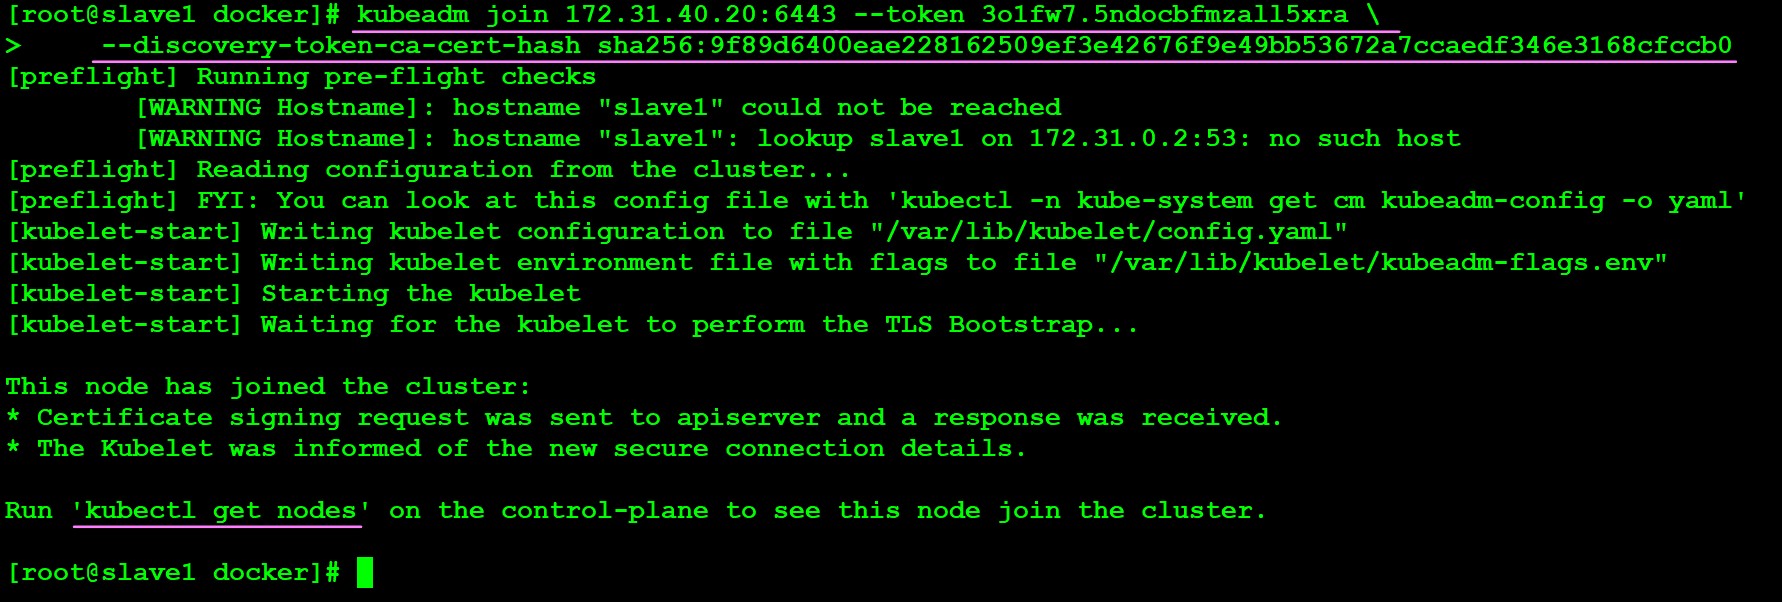
Now go to master and then run kubectl get nodes then you will find that slave is now connected to master.

As you can see we have master and slave node as well. To make this ready we need to make the overlay connection between master and slave. we need to use flannel plugin.
flannel is a plugin that gives a facility of overlay network.
kubectl apply -f https://raw.githubusercontent.com/coreos/flannel/master/Documentation/kube-flannel.yml
 Now if you see that the master and slaves are both in the ready states. Now we can deploy the page in the slave1. If you have many slave nodes then the pod will launched in any of the nodes using schedular program provided by kubernetes.
So let's lauch a pod in the nodes. Here i am cretaing deployment just for testing. kubectl create deployments myd --image=vimal13/apache-webserver-php this image has preconfigured with apache webserver.
 As you can see that the deployment's pods is launched inside the
 slave1 node and its working fine. So now lets check the application running inside the pods by exposing the respective pod. you can expose deployments using kubectl expose deployments myd --type=NodePort --port=80. Now the deployment's pods will be exposed.
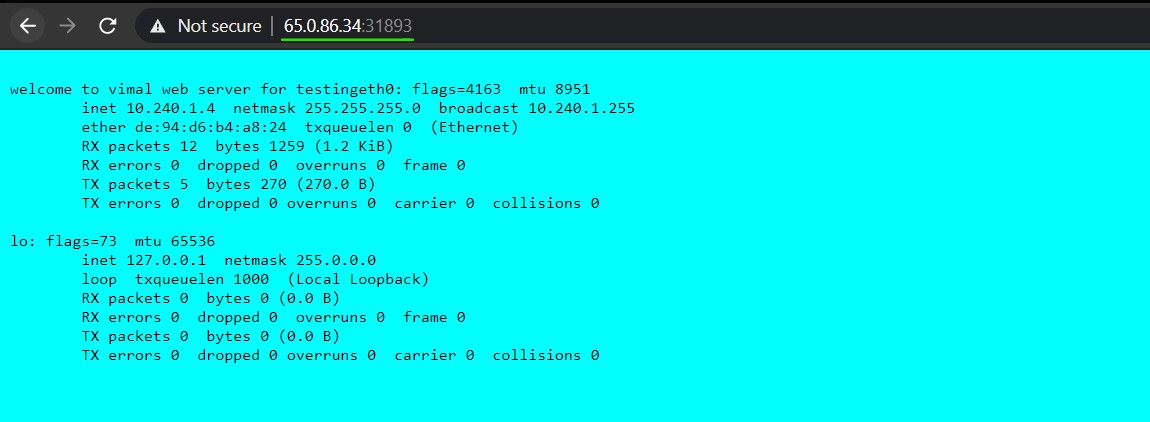
 As you can see the deployment's pods is now exposed on the port
 31893. So using the public ip address of the slave1 node with port 31893 you see the application running on node slave1.