笔者最近在研究 TLS 1.3 协议,所以想要实践一下,博客必须先部署 TLS 1.3 。另外它的 0-RTT 对博客速度的也是一种提升。需要注意目前 Chrome 68 和 Firefox 支持的是 TLS 1.3 draft 28,暂时不要用在生产环境。
关于 TLS 1.3 的更多细节,会在之后的文章里面分析。
先来看看依赖项的一些情况。
Nginx 1.13.0 开始 正式支持 ssl_protocols 的 TLSv1.3 的选项. 在此之前 TLSv1.2 选项会自动使用 TLSv1.3.
OpenSSL 目前有 draft-18 分支, pre2 版本的 draft-23 以及 pre7+ 的 draft-28 通过 tls1.h (include/openssl/tls1.h 第35行) 可以查看目前的 Draft。
从 Chrome 65 开始会默认开启并使用 TLSv1.3 Draft 23, 从 Chrome 68 开始支持 Draft 28 (Firefox Nightly 应该也支持).
我的 ECS 系统是 centOS 7.0,如果你使用其它发行版,与包管理有关的命令请自行调整。
目前 nginx 最新是 Nginx 1.15.3,OpenSSL 最新是 1.1.1-pre9,笔者这次都安装最新版。
首先安装依赖库和编译要用到的工具:
$ sudo yum groupinstall -y "Development Tools"
$ sudo yum install -y git wget zlib zlib-devel pcre-devel google-perftools google-perftools-devel lua-devel GeoIP-devel
$ sudo yum install -y git gcc gcc-c clang automake make autoconf libtool zlib-devel libatomic_ops-devel pcre-devel openssl-devel libxml2-devel libxslt-devel gd-devel GeoIP-devel gperftools-devel perl-devel perl-ExtUtils-Embed#下载 Nginx 1.15.3
$ wget https://nginx.org/download/nginx-1.15.3.tar.gz
$ tar zxf nginx-1.15.3.tar.gz安装原版的 Nginx 1.15.3,少了一些好用的功能,还好有 patch,笔者在这里打了 5 个 patch,也推荐大家使用。
- 恢复对 SPDY 协议的支持
- 支持 HTTP/2 HPACK 加密
- 支持 Dynamic TLS Record (这个强烈推荐)
- 支持 SSL_OP_PRIORITIZE_CHACHA (这个强烈推荐)
- Fix Http2 Push Error 补丁 (推荐)
这些补丁不一定适用于最新的 Nginx 已测试通过的版本请查看https://github.com/kn007/patch
# 打 SPDY, HTTP2 HPACK, Dynamic TLS Record, PRIORITIZE_CHACHA, Fix Http2 Push Error 补丁

$ cd nginx-1.15.3
$ wget https://raw.githubusercontent.com/kn007/patch/45f1417c450fc82cd470cb73a32e23085c4ba3d5/nginx.patch
$ wget https://raw.githubusercontent.com/kn007/patch/c59592bc1269ba666b3bb471243c5212b50fd608/nginx_auto_using_PRIORITIZE_CHACHA.patch
$ patch -p1 < nginx.patch
$ patch -p1 < nginx_auto_using_PRIORITIZE_CHACHA.patch
$ cd ..
更新:
支持 TLS 1.3 0-RTT 的 Nginx 最好使用 1.15.4+,笔者这里直接更新到最新版本 1.15.8
#下载 Nginx 1.15.8
$ wget https://nginx.org/download/nginx-1.15.8.tar.gz
$ tar zxf nginx-1.15.8.tar.gz
Nginx 1.15.8 对应的补丁有变化:
# SPDY, HTTP2 HPACK, Dynamic TLS Record, Fix Http2 Push Error Patch
# 此补丁不一定适用于最新的 Nginx 已测试通过的版本请查看 https://github.com/kn007/patch
$ cd nginx-1.15.8
$ curl https://raw.githubusercontent.com/kn007/patch/d6bd9f7e345a0afc88e050a4dd991a57b7fb39be/nginx.patch | patch -p1
$ cd ..
下面这个是 Strict-SNI Patch 的补丁,可选安装,笔者没有安装:
# Strict-SNI Patch
# Strict SNI requires at least two ssl server (fake) settings (server { listen 443 ssl }).
#It does not matter what kind of certificate or duplicate.

$ cd nginx-1.15.8
$ curl https://raw.githubusercontent.com/hakasenyang/openssl-patch/master/nginx_strict-sni.patch | patch -p1
$ cd ..# 下载 OpenSSL 1.1.1-pre9
$ wget https://www.openssl.org/source/openssl-1.1.1-pre9.tar.gz
$ tar zxf openssl-1.1.1-pre9.tar.gz由于不同版本的 chrome 支持的 TLS 不同,所以我们最好能支持所有主流版本的 TLS 1.3 。这里再打上同时支持 draft 23,26,28 的补丁。
# 打 TLS1.3 Draft 23,26,28 补丁
# 根据 OpenSSL 版本决定, 具体见 https://github.com/hakasenyang/openssl-patch
$ cd openssl-1.1.1-pre9
$ wget https://raw.githubusercontent.com/hakasenyang/openssl-patch/master/openssl-equal-pre9.patch
$ patch -p1 < openssl-equal-pre9.patch
$ cd ..
更新:
支持 TLS 1.3 0-RTT 的 OpenSSL 必须使用 1.1.1+,笔者这里直接更新到最新版本 1.1.1a
# 安装 OpenSSL 1.1.1a (LTS)
$ wget https://www.openssl.org/source/openssl-1.1.1a.tar.gz
$ tar zxf openssl-1.1.1a.tar.gz
同样,为了支持 Chrome 不同版本,所以需要支持 TLS 1.3 的几个主要草案版本,Draft 23, 26, 28, Final 这几个版本都需要支持,打补丁!
# 打 TLS1.3 Draft 23, 26, 28, Final Patch 的补丁
#根据 OpenSSL 版本决定, 具体见 https://github.com/hakasenyang/openssl-patch
$ cd openssl-1.1.1a
$ curl https://raw.githubusercontent.com/hakasenyang/openssl-patch/master/openssl-equal-1.1.1a_ciphers.patch | patch -p1
$ cd ..
为了给 OpenSSL 增加下面 2 个功能:
- 使 OpenSSL 能支持 BoringSSL 等效加密算法组的功能。
- 在 TLS 1.1 以后的版本中,3DES 不能使用 ECDHE 密钥套件,提高安全性。
需要打补丁。
# 打 CHACHA20-POLY1305-OLD Patch 补丁
$ cd openssl-1.1.1a
$ curl https://raw.githubusercontent.com/hakasenyang/openssl-patch/master/openssl-1.1.1a-chacha_draft.patch | patch -p1
$ cd ..本站支持 Google 开发的 Brotli 压缩格式,它通过内置分析大量网页得出的字典,实现了更高的压缩比率,同时几乎不影响压缩 / 解压速度。
# 安装 ngx_brotli
$ git clone https://github.com/eustas/ngx_brotli.git
pushd ngx_brotli
$ git submodule update --init
$ cd ..这个插件也是可选安装,笔者没有安装。
$ git clone https://github.com/jemalloc/jemalloc.git
$ cd jemalloc
$ ./autogen.sh
$ make -j$(nproc --all)
$ touch doc/jemalloc.html
$ touch doc/jemalloc.3
$ sudo make install
$ echo '/usr/local/lib' | sudo tee /etc/ld.so.conf.d/local.conf
$ sudo ldconfig
zlib 是 Cloudflare 推荐安装的,笔者暂时也没有安装。主要是编译参数有点问题,编译出来报错了。有时间还需要研究一下。
$ git clone https://github.com/cloudflare/zlib.git
$ cd zlib
$ ./configure
$ cd ..这个插件也是可选安装,笔者没有安装。同样也是因为编译参数的问题。
$ git clone https://github.com/ivmai/libatomic_ops.git
$ cd libatomic_ops
$ ./autogen.sh
$ ./configure
$ make -j$(nproc --all)
$ make install
$ sudo ldconfig
$ cd ..这个插件也是可选安装,笔者没有安装。同样也是因为编译参数的问题。
$ wget https://ftp.pcre.org/pub/pcre/pcre-8.42.zip
$ unzip pcre-8.42.zip&&rm pcre-8.42.zip
$ mv pcre-8.42 pcre
$ cd pcre
$ ./configure
$ cd ..使用 --with\-openssl=../openssl\-1.1.1\-pre9 来指定 OpenSSL 路径。
HTTP2 HPACK 需要加入 --with-http_v2_hpack_enc
SPDY 需要加入 --with-http_spdy_module
TLS 1.3 需要加入 --with-openssl-opt='enable-tls1_3'
所有的编译参数合起来如下:
$ auto/configure --prefix=/etc/nginx --sbin-path=/usr/sbin/nginx --modules-path=/usr/lib64/nginx/modules --conf-path=/etc/nginx/nginx.conf --error-log-path=/var/log/nginx/error.log --http-log-path=/var/log/nginx/access.log --pid-path=/var/run/nginx.pid --lock-path=/var/run/nginx.lock --http-client-body-temp-path=/var/cache/nginx/client_temp --http-proxy-temp-path=/var/cache/nginx/proxy_temp --http-fastcgi-temp-path=/var/cache/nginx/fastcgi_temp --http-uwsgi-temp-path=/var/cache/nginx/uwsgi_temp --http-scgi-temp-path=/var/cache/nginx/scgi_temp --user=nginx --group=nginx --with-compat --with-file-aio --with-threads --with-http_addition_module --with-http_auth_request_module --with-http_dav_module --with-http_flv_module --with-http_gunzip_module --with-http_gzip_static_module --with-http_mp4_module --with-http_random_index_module --with-openssl=/tmp/openssl-OpenSSL_1_1_1-pre9 --with-openssl-opt='enable-tls1_3' --with-http_realip_module --with-http_secure_link_module --with-http_slice_module --with-http_ssl_module --with-http_stub_status_module --with-http_sub_module --with-http_v2_module --with-mail --with-mail_ssl_module --with-stream --with-stream_realip_module --with-stream_ssl_module --with-stream_ssl_preread_module --with-cc-opt='-O2 -g -pipe -Wall -Wp,-D_FORTIFY_SOURCE=2 -fexceptions -fstack-protector-strong --param=ssp-buffer-size=4 -grecord-gcc-switches -m64 -mtune=generic -fPIC' --with-ld-opt='-Wl,-z,relro -Wl,-z,now -pie' --with-http_spdy_module --with-http_v2_hpack_enc --add-module=/tmp/ngx_brotli如果读者安装了上面笔者推荐的所有补丁,那么再往下编译可能会出现问题。需要把编译参数 --with-cc-opt 里面的 -O2 去掉即可。
笔者的最终编译参数如下,仅供参考:
$ auto/configure --prefix=/etc/nginx --sbin-path=/usr/sbin/nginx --modules-path=/usr/lib64/nginx/modules --conf-path=/etc/nginx/nginx.conf --error-log-path=/var/log/nginx/error.log --http-log-path=/var/log/nginx/access.log --pid-path=/var/run/nginx.pid --lock-path=/var/run/nginx.lock --http-client-body-temp-path=/var/cache/nginx/client_temp --http-proxy-temp-path=/var/cache/nginx/proxy_temp --http-fastcgi-temp-path=/var/cache/nginx/fastcgi_temp --http-uwsgi-temp-path=/var/cache/nginx/uwsgi_temp --http-scgi-temp-path=/var/cache/nginx/scgi_temp --user=nginx --group=nginx --with-compat --with-file-aio --with-threads --with-http_addition_module --with-http_auth_request_module --with-http_dav_module --with-http_flv_module --with-http_gunzip_module --with-http_gzip_static_module --with-http_mp4_module --with-http_random_index_module --with-openssl=/tmp/openssl-OpenSSL_1_1_1-pre9 --with-openssl-opt='enable-tls1_3' --with-http_realip_module --with-http_secure_link_module --with-http_slice_module --with-http_ssl_module --with-http_stub_status_module --with-http_sub_module --with-http_v2_module --with-mail --with-mail_ssl_module --with-stream --with-stream_realip_module --with-stream_ssl_module --with-stream_ssl_preread_module --with-cc-opt='-g -pipe -Wall -Wp,-D_FORTIFY_SOURCE=2 -fexceptions -fstack-protector-strong --param=ssp-buffer-size=4 -grecord-gcc-switches -m64 -mtune=generic -fPIC' --with-ld-opt='-Wl,-z,relro -Wl,-z,now -pie' --with-http_spdy_module --with-http_v2_hpack_enc --add-module=/tmp/ngx_brotli修改好编译参数以后就可以开始 make 了:
$ make如果编译过程中还遇到了 pthread_atfork 的错误:
threads_pthread.c:(.text+0x16): undefined reference to `pthread_atfork'
collect2: error: ld returned 1 exit status
make[1]: *** [objs/nginx] Error 1
要修改 nginx 目录下的 objs 内的 Makefile:
$ vim ./objs/Makefile找到下面这一行:
-Wl,-z,relro -Wl,-z,now -pie -ldl -lpthread -lpthread -lcrypt -lpcre /tmp/openssl-master/.openssl/lib/libssl.a /tmp/openssl-master/.openssl/lib/libcrypto.a -ldl -lz \修改为:
-Wl,-z,relro -Wl,-z,now -pie -ldl -lcrypt -lpcre /tmp/openssl-master/.openssl/lib/libssl.a /tmp/openssl-master/.openssl/lib/libcrypto.a -ldl -lz -lpthread \编译完成以后,验证一下:
$ nginx -V

nginx version: nginx/1.15.3
built by gcc 4.8.5 20150623 (Red Hat 4.8.5-28) (GCC)
built with OpenSSL 1.1.1-pre9 (beta) 21 Aug 2018
TLS SNI support enabled
configure arguments: --prefix=/etc/nginx --sbin-path=/usr/sbin/nginx --modules-path=/usr/lib64/nginx/modules --conf-path=/etc/nginx/nginx.conf --error-log-path=/var/log/nginx/error.log --http-log-path=/var/log/nginx/access.log --pid-path=/var/run/nginx.pid --lock-path=/var/run/nginx.lock --http-client-body-temp-path=/var/cache/nginx/client_temp --http-proxy-temp-path=/var/cache/nginx/proxy_temp --http-fastcgi-temp-path=/var/cache/nginx/fastcgi_temp --http-uwsgi-temp-path=/var/cache/nginx/uwsgi_temp --http-scgi-temp-path=/var/cache/nginx/scgi_temp --user=nginx --group=nginx --with-compat --with-file-aio --with-threads --with-http_addition_module --with-http_auth_request_module --with-http_dav_module --with-http_flv_module --with-http_gunzip_module --with-http_gzip_static_module --with-http_mp4_module --with-http_random_index_module --with-openssl=/tmp/openssl-OpenSSL_1_1_1-pre9 --with-openssl-opt=enable-tls1_3 --with-http_realip_module --with-http_secure_link_module --with-http_slice_module --with-http_ssl_module --with-http_stub_status_module --with-http_sub_module --with-http_v2_module --with-mail --with-mail_ssl_module --with-stream --with-stream_realip_module --with-stream_ssl_module --with-stream_ssl_preread_module --with-cc-opt='-g -pipe -Wall -Wp,-D_FORTIFY_SOURCE=2 -fexceptions -fstack-protector-strong --param=ssp-buffer-size=4 -grecord-gcc-switches -m64 -mtune=generic -fPIC' --with-ld-opt='-Wl,-z,relro -Wl,-z,now -pie' --with-http_spdy_module --with-http_v2_hpack_enc --add-module=/tmp/ngx_brotli
更新:
由于 Nginx 和 OpenSSL 都支持到了 TLS 1.3 0-RTT,所以编译参数也更新了:
$ cd nginx-1.15.8
$ ./configure --prefix=/etc/nginx --sbin-path=/usr/sbin/nginx --modules-path=/usr/lib64/nginx/modules --conf-path=/etc/nginx/nginx.conf --error-log-path=/var/log/nginx/error.log --http-log-path=/var/log/nginx/access.log --pid-path=/var/run/nginx.pid --lock-path=/var/run/nginx.lock --http-client-body-temp-path=/var/cache/nginx/client_temp --http-proxy-temp-path=/var/cache/nginx/proxy_temp --http-fastcgi-temp-path=/var/cache/nginx/fastcgi_temp --http-uwsgi-temp-path=/var/cache/nginx/uwsgi_temp --http-scgi-temp-path=/var/cache/nginx/scgi_temp --user=nginx --group=nginx --with-compat --with-file-aio --with-threads --with-http_addition_module --with-http_auth_request_module --with-http_dav_module --with-http_flv_module --with-http_gunzip_module --with-http_gzip_static_module --with-http_mp4_module --with-http_random_index_module --with-libatomic --with-openssl=/tmp/openssl-1.1.1a --with-openssl-opt='zlib -march=native -ljemalloc -Wl,-flto' --with-http_realip_module --with-http_secure_link_module --with-http_slice_module --with-http_ssl_module --with-http_stub_status_module --with-http_sub_module --with-http_v2_module --with-mail --with-mail_ssl_module --with-stream --with-stream_realip_module --with-stream_ssl_module --with-stream_ssl_preread_module --with-pcre-jit --with-http_geoip_module --with-http_degradation_module --with-cc-opt='-g -pipe -Wall -Wp,-D_FORTIFY_SOURCE=2 -fexceptions -fstack-protector-strong --param=ssp-buffer-size=4 -grecord-gcc-switches -m64 -mtune=generic -fPIC' --with-ld-opt='-Wl,-z,relro -Wl,-z,now -pie' --with-http_spdy_module --with-http_v2_hpack_enc --add-module=/tmp/ngx_brotli
编译命令:
$ make -j$(nproc --all)
$ sudo make install
编译完成以后,验证一下:
$ nginx -t

nginx: the configuration file /etc/nginx/nginx.conf syntax is ok
nginx: configuration file /etc/nginx/nginx.conf test is successful

$ nginx -V

nginx version: nginx/1.15.8
built by gcc 4.8.5 20150623 (Red Hat 4.8.5-28) (GCC)
built with OpenSSL 1.1.1a  20 Nov 2018
TLS SNI support enabled
configure arguments: --prefix=/etc/nginx --sbin-path=/usr/sbin/nginx --modules-path=/usr/lib64/nginx/modules --conf-path=/etc/nginx/nginx.conf --error-log-path=/var/log/nginx/error.log --http-log-path=/var/log/nginx/access.log --pid-path=/var/run/nginx.pid --lock-path=/var/run/nginx.lock --http-client-body-temp-path=/var/cache/nginx/client_temp --http-proxy-temp-path=/var/cache/nginx/proxy_temp --http-fastcgi-temp-path=/var/cache/nginx/fastcgi_temp --http-uwsgi-temp-path=/var/cache/nginx/uwsgi_temp --http-scgi-temp-path=/var/cache/nginx/scgi_temp --user=nginx --group=nginx --with-compat --with-file-aio --with-threads --with-http_addition_module --with-http_auth_request_module --with-http_dav_module --with-http_flv_module --with-http_gunzip_module --with-http_gzip_static_module --with-http_mp4_module --with-http_random_index_module --with-libatomic --with-openssl=/tmp/openssl-1.1.1a --with-openssl-opt='zlib -march=native -ljemalloc -Wl,-flto' --with-http_realip_module --with-http_secure_link_module --with-http_slice_module --with-http_ssl_module --with-http_stub_status_module --with-http_sub_module --with-http_v2_module --with-mail --with-mail_ssl_module --with-stream --with-stream_realip_module --with-stream_ssl_module --with-stream_ssl_preread_module --with-pcre-jit --with-http_geoip_module --with-http_degradation_module --with-cc-opt='-g -pipe -Wall -Wp,-D_FORTIFY_SOURCE=2 -fexceptions -fstack-protector-strong --param=ssp-buffer-size=4 -grecord-gcc-switches -m64 -mtune=generic -fPIC' --with-ld-opt='-Wl,-z,relro -Wl,-z,now -pie' --with-http_spdy_module --with-http_v2_hpack_enc --add-module=/tmp/ngx_brotli$ cd /usr/sbin
$ mv nginx nginx.1.13.8_old
$ cp /tmp/nginx-release-1.15.3/objs/nginx ./测试 nginx 是否能正常工作:
$ nginx -t配置 Brotli (Optional)
$ sudo vim /etc/nginx/nginx.conf

# 在 http{} 中加入
brotli             on;
brotli_static      on;
brotli_comp_level  6;
brotli_buffers     32 8k;
brotli_types       text/plain text/css application/json application/x-javascript text/xml application/xml application/xml+rss text/javascript application/javascript image/svg+xml;
配置 Web 站点
在 Nginx 的站点配置中,以下两个参数需要修改:
ssl_protocols              TLSv1 TLSv1.1 TLSv1.2 TLSv1.3; # 增加 TLSv1.3
ssl_ciphers                TLS13-AES-256-GCM-SHA384:TLS13-CHACHA20-POLY1305-SHA256:TLS13-AES-128-GCM-SHA256:TLS13-AES-128-CCM-8-SHA256:TLS13-AES-128-CCM-SHA256:EECDH+CHACHA20:EECDH+CHACHA20-draft:EECDH+ECDSA+AES128:EECDH+aRSA+AES128:RSA+AES128:EECDH+ECDSA+AES256:EECDH+aRSA+AES256:RSA+AES256:EECDH+ECDSA+3DES:EECDH+aRSA+3DES:RSA+3DES:!MD5;
包含 TLS13 是 TLS 1.3 新增的 Cipher Suite,加在最前面即可。
最后使用 nginx -t 测试一下,确认无问题。
重启 nginx 生效上面所有配置
$ systemctl restart nginx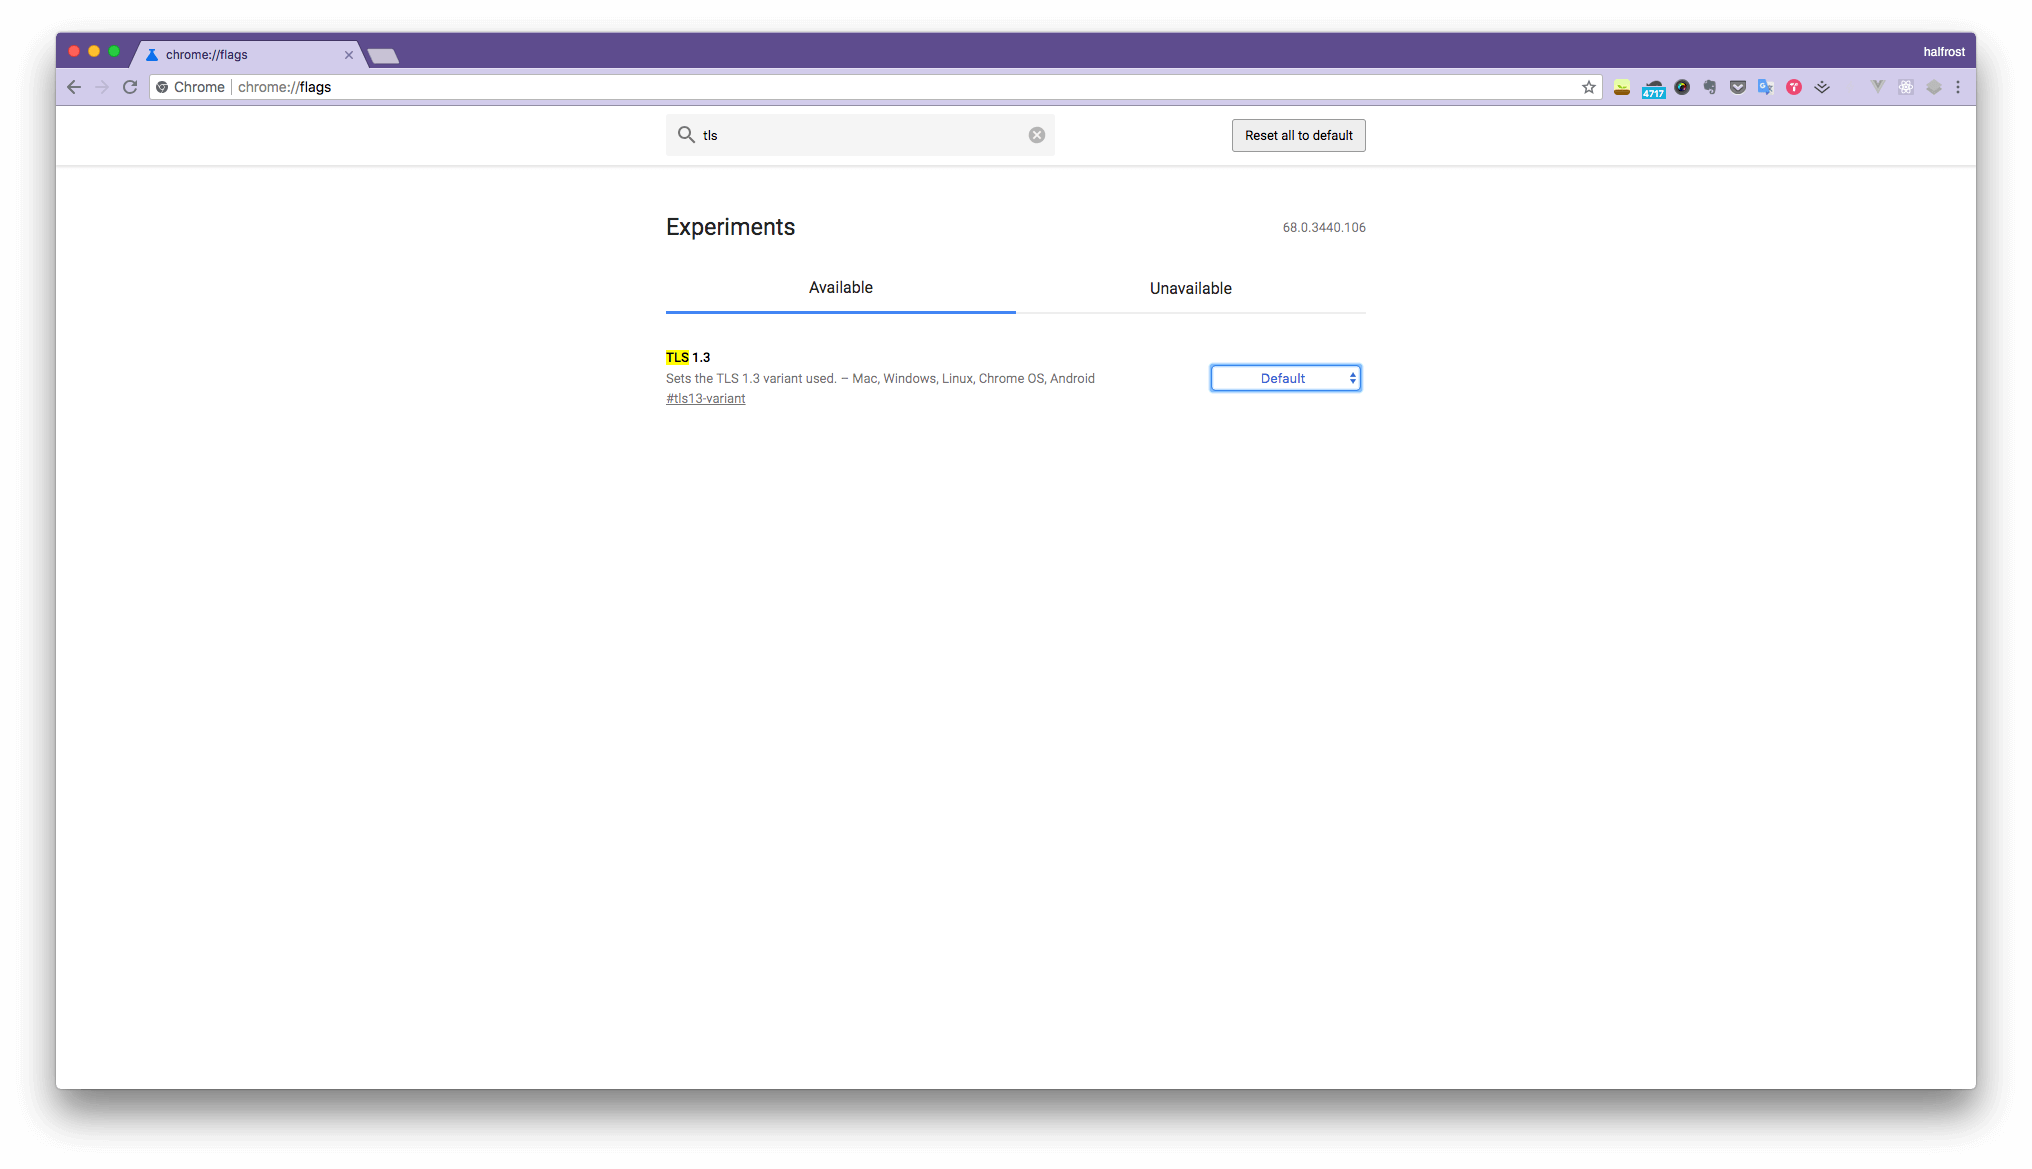
进入 chrome://flags 页面,找到 TLS 1.3,选择支持 draft-28。
然后访问博客主页,打开开发者工具,security 选项卡:
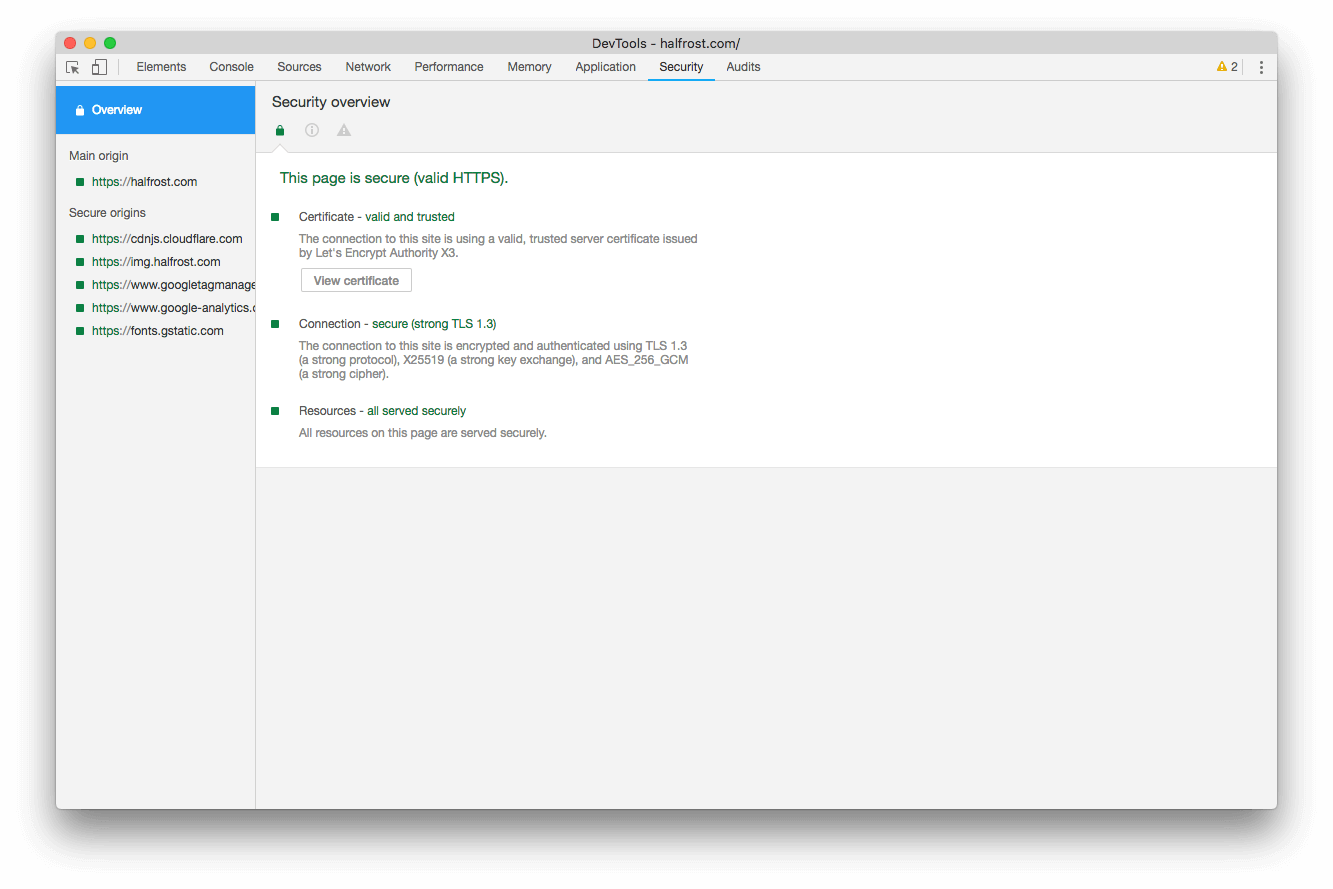
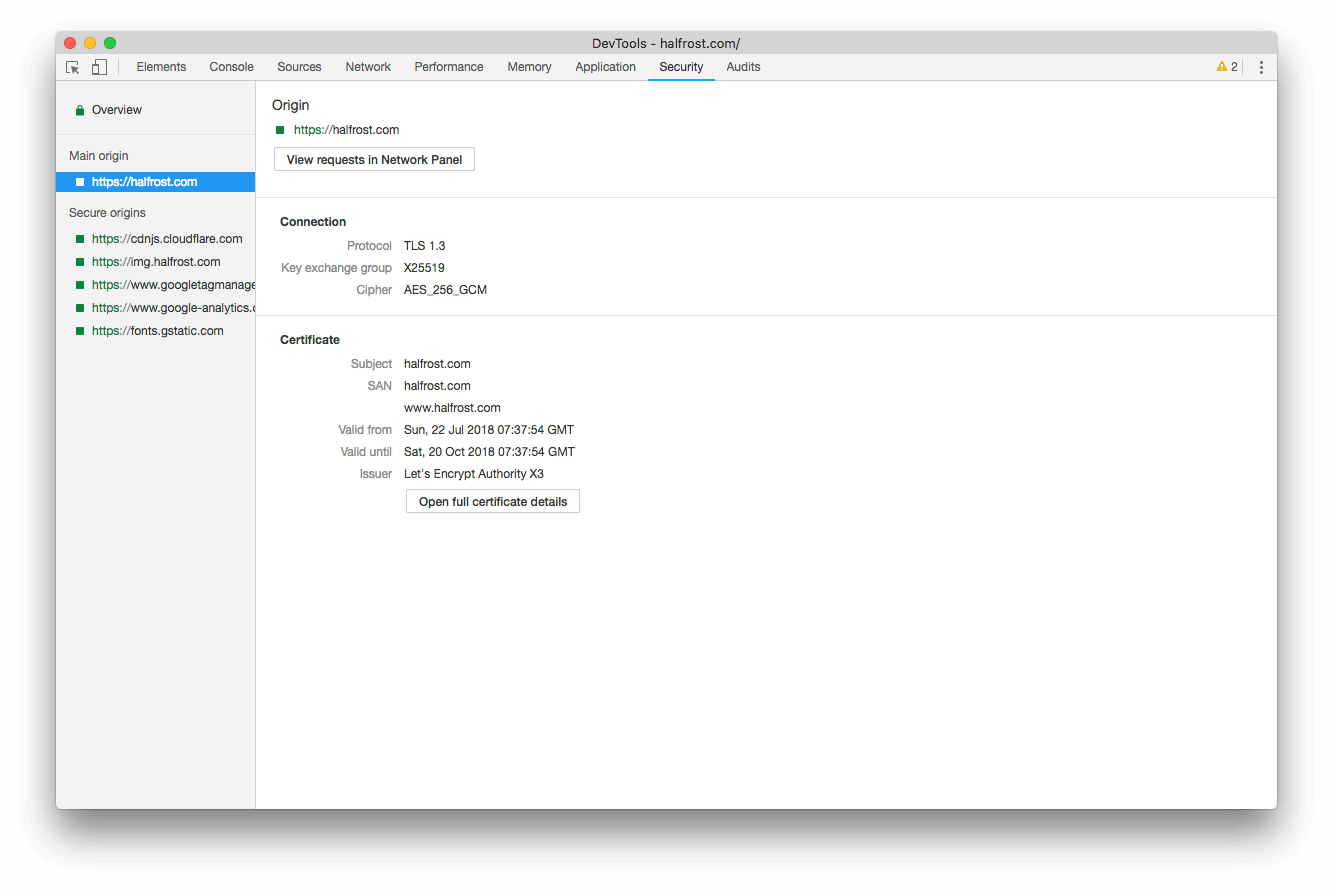
可以看到链接已经是 TLS 1.3 的了。
如果还不放心,可以通过抓包来验证是否开启了 TLS 1.3 。
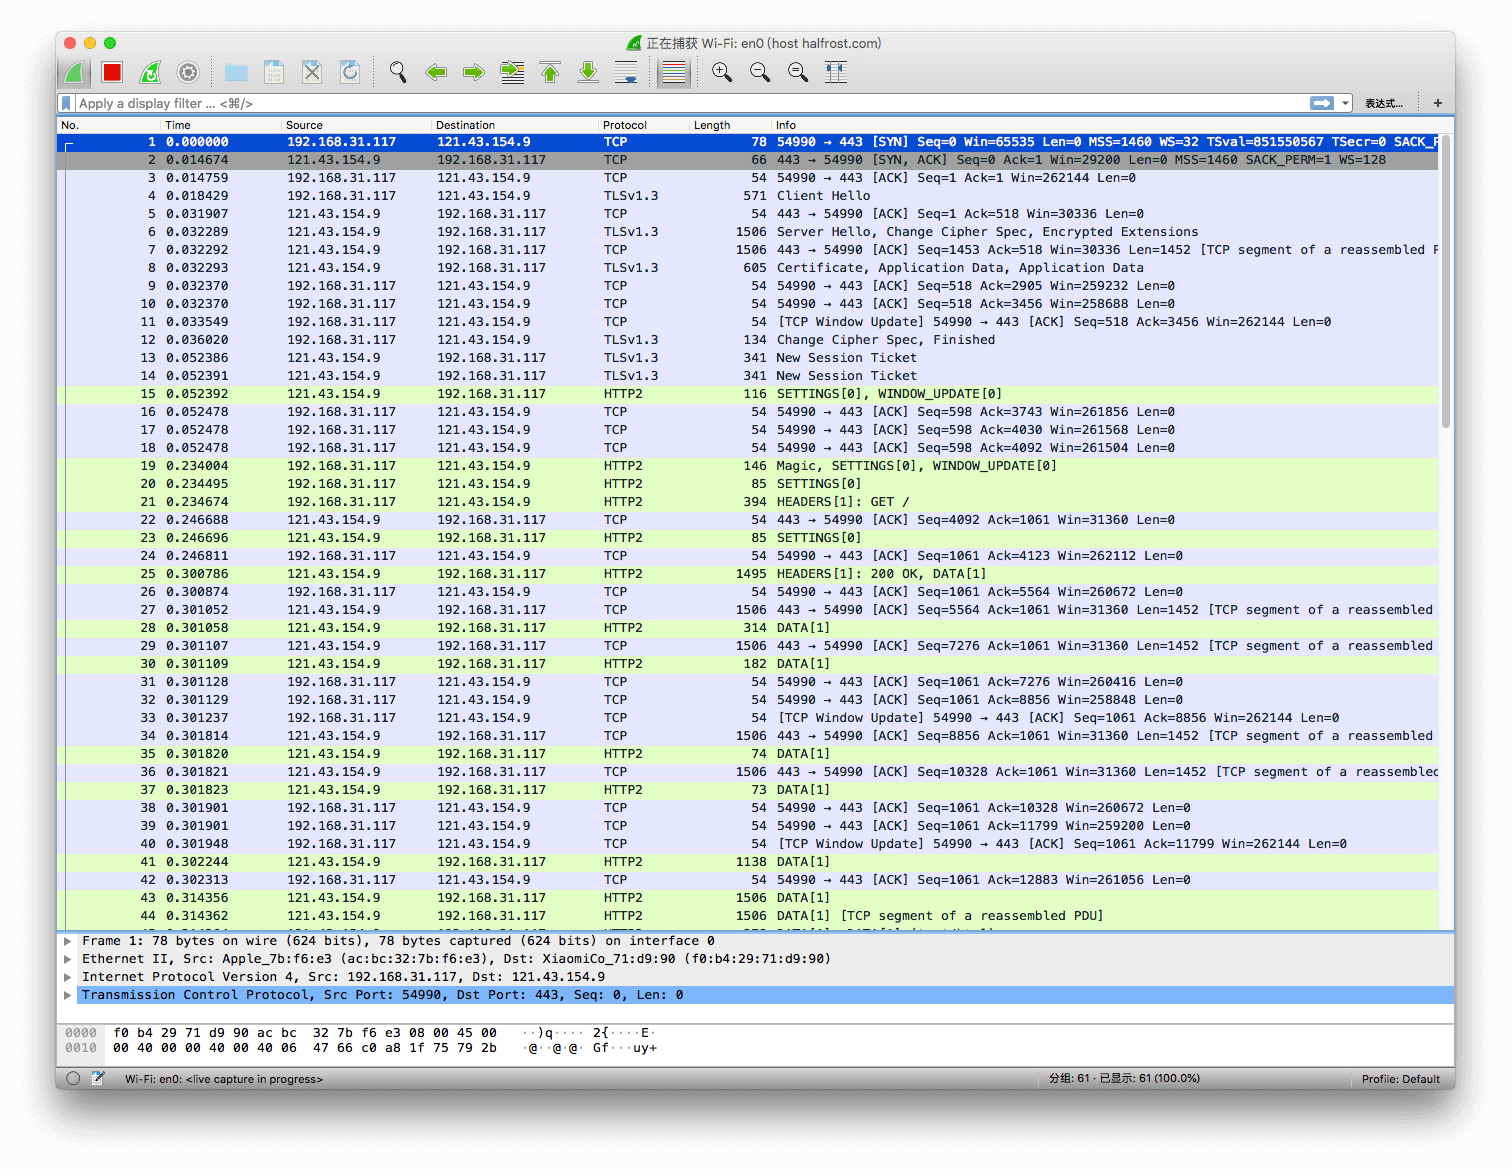
从报文上来看,握手阶段确实用的 TLS 1.3 。
可以通过https://www.ssllabs.com/检测自己的站点 TLS 支持情况。
可以通过https://myssl.com/检测自己的站点 TLS 支持情况。
在服务端安装 testssl 工具
$ git clone --depth 1 https://github.com/drwetter/testssl.sh.git
$ cd testssl.sh
$ ./testssl.sh --help
$ ./testssl.sh -p halfrost.com
Testing protocols via sockets except NPN+ALPN
SSLv2 not offered (OK)
SSLv3 not offered (OK)
TLS 1 offered
TLS 1.1 offered
TLS 1.2 offered (OK)
TLS 1.3 offered (OK): draft 28, draft 27, draft 26
NPN/SPDY h2, spdy/3.1, http/1.1 (advertised)
ALPN/HTTP2 h2, spdy/3.1, http/1.1 (offered)详细的情况可以用 -P
$ ./testssl.sh -P halfrost.com

 Testing server preferences

 Has server cipher order?     yes (OK)
 Negotiated protocol          TLSv1.3
 Negotiated cipher            TLS_AES_256_GCM_SHA384, 253 bit ECDH (X25519)
更加详细的报告这里就不贴了,感兴趣的同学可以用
$ ./testssl.sh halfrost.com
$ ./testssl.sh --full https://halfrost.com
自己测试。
更新:
在 nginx 的 conf 配置文件中添加:
ssl_early_data on;另外还建议添加 Early-Data 头告知后端, 防止重放攻击
proxy_set_header Early-Data $ssl_early_data;最后使用 sudo nginx -t 测试一下。
关于 TLS 1.3 的更多细节,会在之后的文章里面分析。Enjoy ~
GitHub Repo:Halfrost-Field
Follow: halfrost · GitHub