| title | date | tags | excerpt | ||
|---|---|---|---|---|---|
webpack的学习笔记 |
2022-05-26 05:42:26 -0700 |
|
webpack的学习笔记 |
#webpack #打包器
npm i webpack webpack-cli -g一般都在本地安装
npm i webpack webpack-cli --save-devwebpack --entry ./src/index.js --mode production发现每次都在命令行输入配置不方便,使用webpack.config.js
const path = require('path');
module.exports = {
    entry: './src/index.js',
    output: {
        filename: 'bundle.js',
        path: path.resolve(__dirname, './dist')
    },
    mode: 'none'
}
最简单的配置webpack
运行npx webpack 打包生成bundle.js
引入一个插件html-webpack-plugin,可以自动生成html入口文件和引用js文件的功能,通过配置html模板 、js标签位置、生成的html名称等等功能
const path = require('path');
const HtmlWebpackPlugin = require('html-webpack-plugin');
module.exports = {
    entry: './src/index.js',
    output: {
        filename: 'bundle.js',
        path: path.resolve(__dirname, './dist'),
        clean: true //每次生成后清理上一次的打包文件列表
    },
    mode: 'none',
    plugins: [
        new HtmlWebpackPlugin({
            template: './index.html',
            filename: 'app.html',
            inject: 'body'
        })
    ]
}配置文件中mode改为development
使用source map功能,可以精准定位代码
使用watch mode,可以监听代码的变化,但是还是要手动刷新浏览器
使用webpack-dev-server,不但能监听文件的文化从而重新编译,还可以自动帮我们刷新浏览器
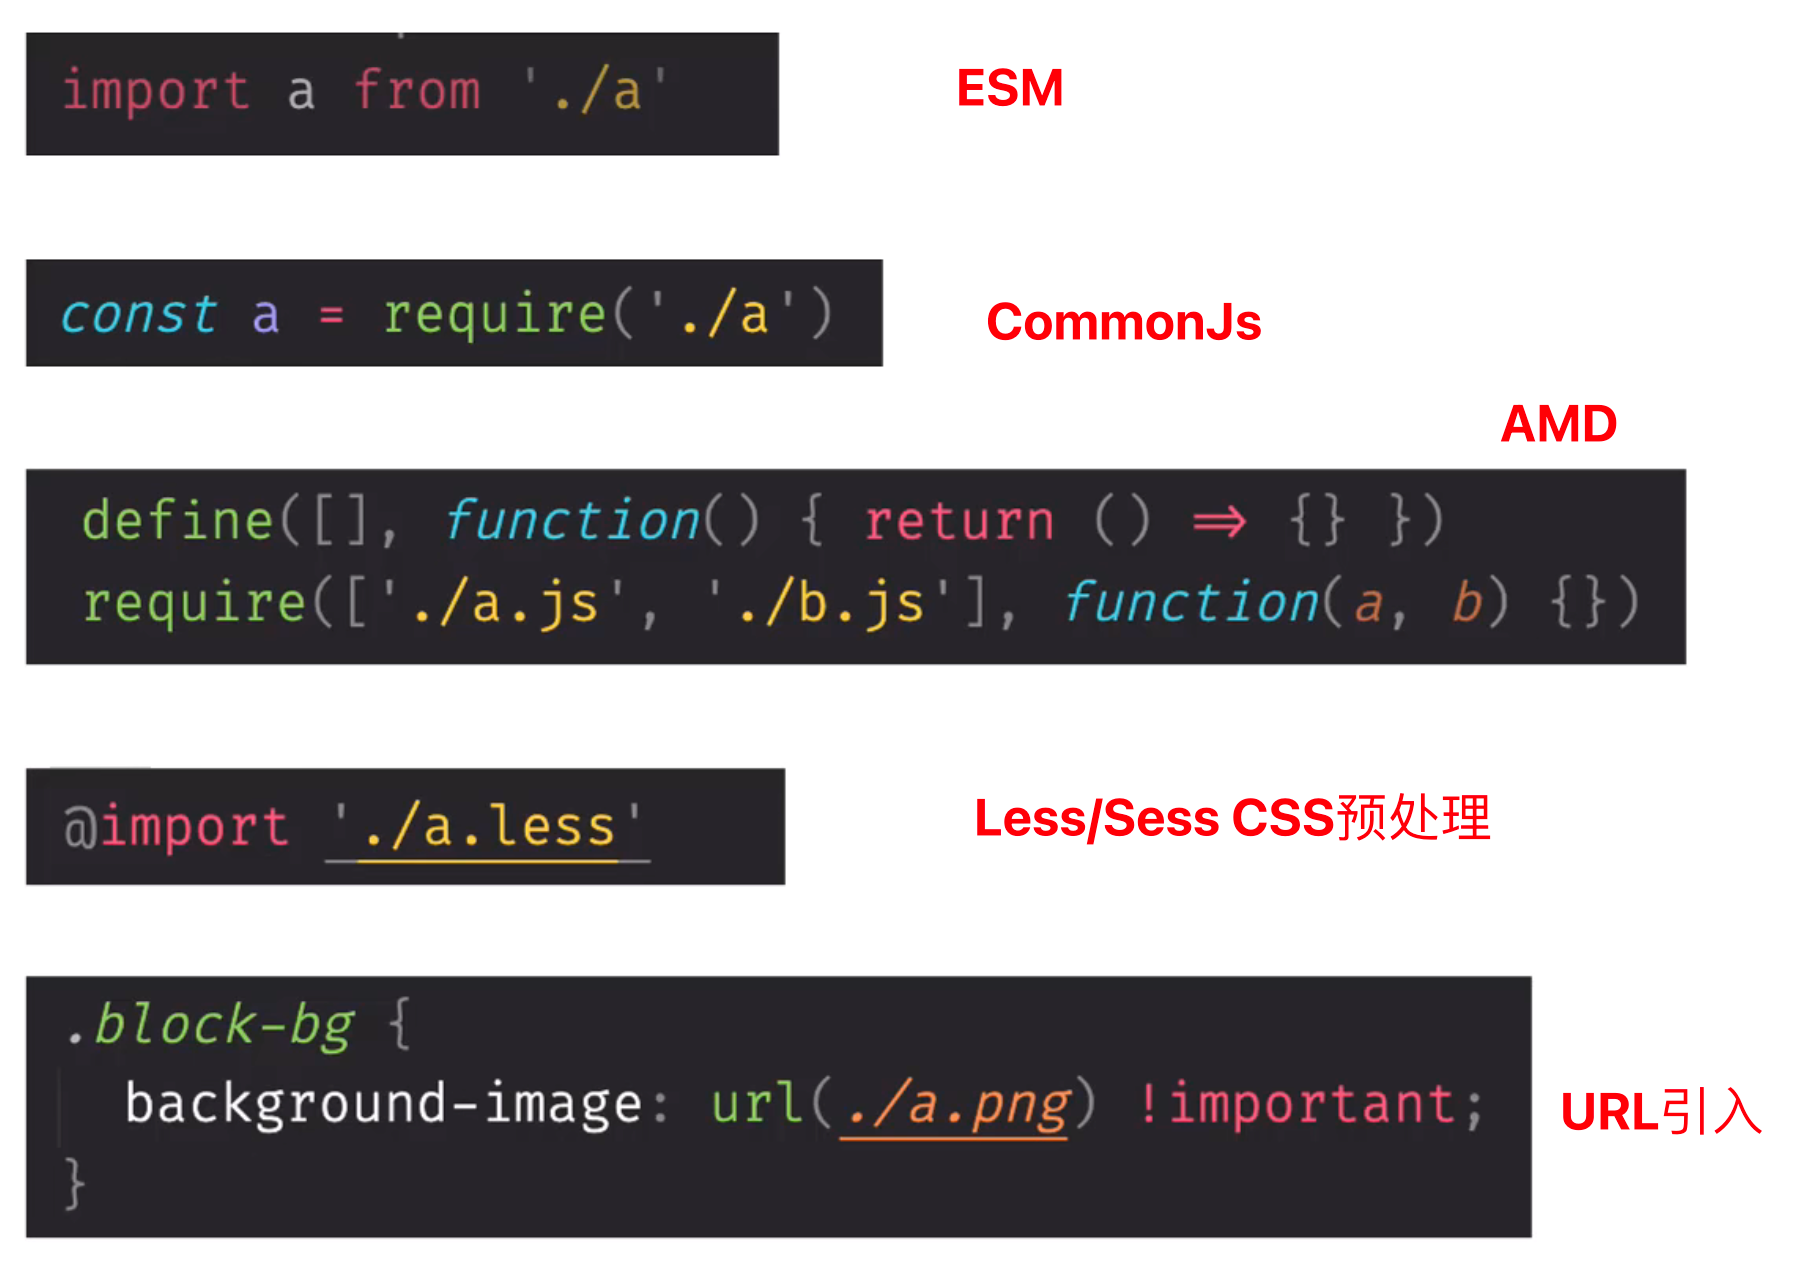
四种类型资源
- asset/resource 他会发送一个单独的文件并导出URL(文件地址URL)
- asset/inline 导出一个资源的Data URL(Base64)
- asset/source 导出资源的源代码 (copy的理解)
- asset 导出一个Data URL和发送一个单独文件之间进行选择
			{
                test: /\\.png$/,
                type: 'asset/resource',
                generator: {
                    filename: 'images/test.png'
                }
}, {
test: /\\.svg$/,
type: 'asset/inline'
}, {
test: /\\.txt$/,
type: 'asset/source'
}, {
test: /\\.jpg$/,
type: 'asset',
parser: {
dataUrlCondition: {
maxSize: 2 * 1024 * 1024
}
}
}有些background与icon的图像引进到CSS文件中,webpack5中,使用内置的资源模块(Asset Modules),可以轻松将这些内容混入我们的系统中,这个在[资源模块](# 资源模块(asset modules))中就介绍了。
.block-bg {
    background: url('./assets/inline.svg') !important;
}
const block = document.createElement('div')
block.classList.add('block-bg')
block.textContent = txtsrc
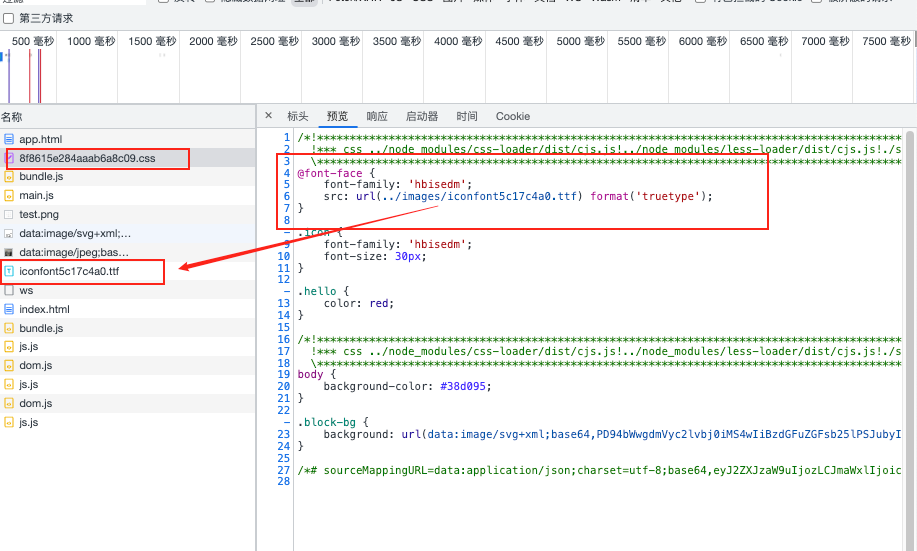
在css3后加入webfont字库,
资源模块可以帮助我们加载任何东西,包括字体,尝试用之前的资源模块去加载我们指定的字体文件
去阿里的字体库随意下载个图标字体代码,目的是为了引入个iconfont.ttf
// Webpack.config.js 中配置
            {
                test: /\.(woff|woff2|eot|ttf|otf)$/,
                type: 'asset/resource',
            }
// css中加入font-face 加载引用的字体文件,可以本地,可以在线 font-family 定义自定义字体的名称
// 后面的.icon类名使用自定义字体的名称去使用
@font-face {
font-family: 'hbisedm';
src: url('./assets/iconfont.ttf') format('truetype');
}
.icon {
font-family: 'hbisedm';
font-size: 30px;
}
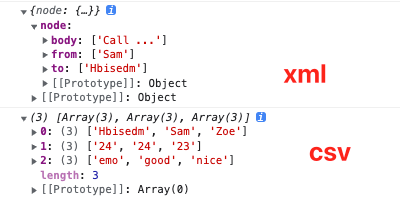
JSON、CSV、TSV、XML等等
安装对应依赖 npm install csv-loader xml-loader -D
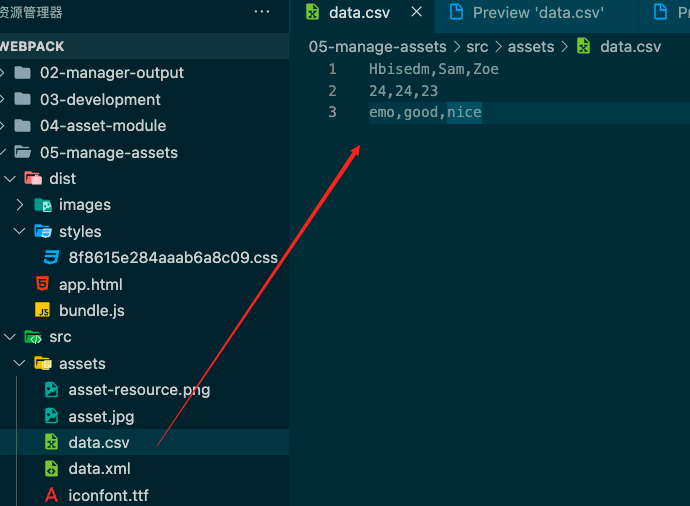
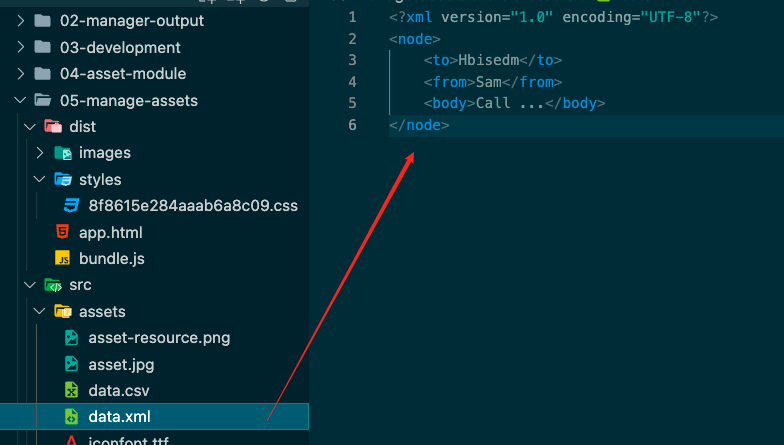
准备2个文件(xml、csv)
//webpack.config.js
						{
                test: /\.(csv|tsv)$/,
                use: 'csv-loader',
            },
            {
                test: /\.xml$/,
                use: 'xml-loader',
            }
// index.js
import Data from './assets/data.xml'
import Nodes from './assets/data.csv'
console.log(Data)
console.log(Nodes);运行webpack-dev-server,发现xml变成了对象,而csv变成了个数组
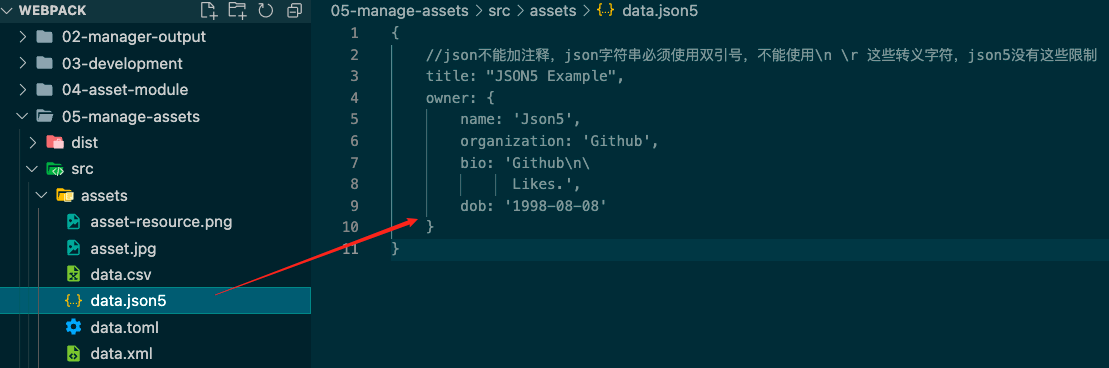
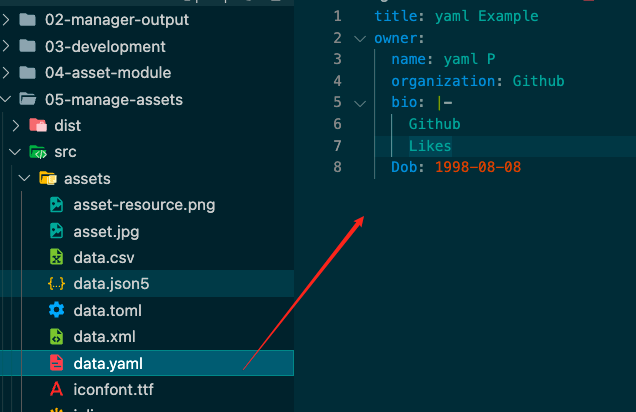
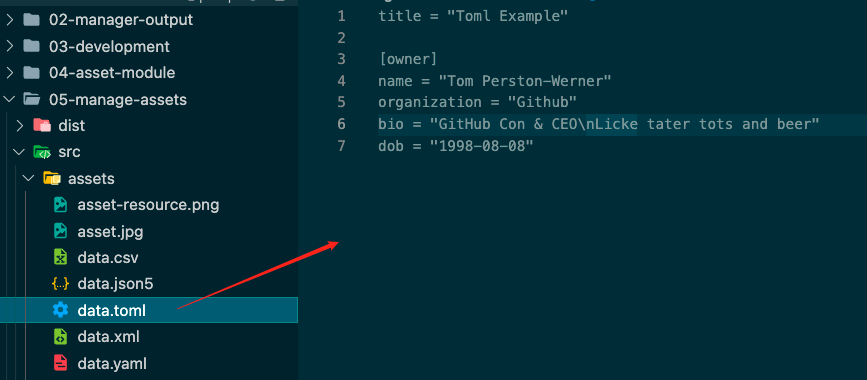
安装依赖 npm install toml yaml json5 -D
将类似json格式的文件转成json
// webpack.config.js
						{
                test: /\.toml$/,
                type: 'json',
                parser: {
                    parse: toml.parse
                }
            },
            {
                test: /\.yaml$/,
                type: 'json',
                parser: {
                    parse: yaml.parse
                }
            },
            {
                test: /\.json5$/,
                type: 'json',
                parser: {
                    parse: json5.parse
                }
            },
每种不同格式的文件内容如下图:
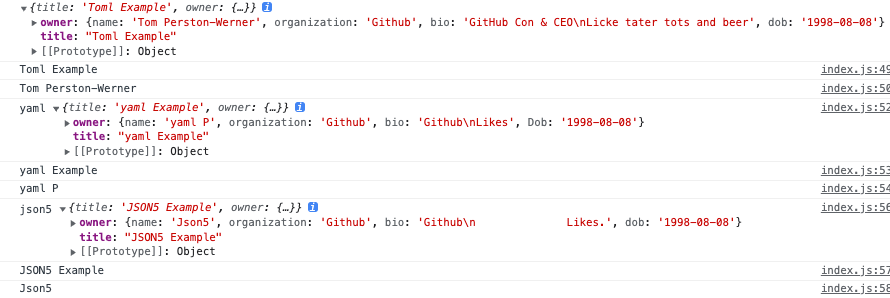
webpack配置文件配置loader后,我们就可以在js文件内引入这些文件了
// index.js

import toml from './assets/data.toml'
import yaml from './assets/data.yaml'
import json5 from './assets/data.json5'

console.log('toml', toml);
console.log(toml.title);
console.log(toml.owner.name);

console.log('yaml', yaml);
console.log(yaml.title);
console.log(yaml.owner.name);

console.log('json5', json5);
console.log(json5.title);
console.log(json5.owner.name);
获取的数据为JavaScript对象的格式
除了使用前面的[资源模块](# 资源模块(asset modules))可以去引用外部资源文件,我们还可以使用Loader这个配置属性去配置我们想要引入的外部资源文件。
如css文件,我们可以使用style-loader和css-loader去加载css外部资源文件,并将css代码放在了head标签内的style标签,接着使用sass-loader、less-loader去引入css预处理工具,接着使用 MiniCssExtractPlugin 插件可以将我们css代码和html文件进行分离css代码并自定义生成的css名称与路径;使用 CssMinimizerPlugin 插件可以将css代码进行压缩。 通过资源模块的配置去加载图片资源,在css中引入相应的图片资源。利用 asset/resource 去加载字体文件 从而使webpack可以打包iconfont。对于一些数据如csv、xml,JavaScript自然也是不会识别的,但是通过webpack这个加入相应的loader也是可以做到解析数据出来的。对一些json格式的同类文件如yaml、json5等等,加入对应的loader进行解析。
webpack只能解析js和json,其他文件类型的如css、ts、txt等等可以使用loader
安装css-loader帮助webpack可以识别项目中使用import、require css文件
安装style-loader帮助webpack可以讲css文件的内容放到到页面上
2个同时使用的时候,顺序如下,webpack的loader使用顺序是从右往左走的,先用css加载完成后,再将css代码加入到页面内
						{
                test: /\.css$/,
                use: ['style-loader', 'css-loader']
}npm install less-loader less -D 先进行预处理为css,再走css-loader, style-loader
            {
                test: /\.(css|less)$/,
                use: ['style-loader', 'css-loader', 'less-loader']
}安装webpack5中的插件mini-css-extract-plugin ,进行html与css代码的抽离
// Webpack.config.js

const MiniCssExtractPlugin = require('mini-css-extract-plugin');

plugins: [
        new HtmlWebpackPlugin({
            template: './index.html',
            filename: 'app.html',
            inject: 'body'
        }),
        new MiniCssExtractPlugin()
    ],

  // 最后的style-loader 改为 MiniCssExtractPlugin.loader
  					{
                test: /\.(css|less)$/,
                use: [MiniCssExtractPlugin.loader, 'css-loader', 'less-loader']
            }
使用npx webpack 运行后,
- 发现dist文件夹下多了个main.css
- app.html内也没有了style标签多了个link标签引入了这个main.css,也就是html与css分离了
配置MiniCssExtractPlugin
new MiniCssExtractPlugin({
  filename: 'styles/[contentHash].css'
})npm install css-minimizer-webpack-plugin -D 安装压缩插件(同样的这个也是在webpack5版本下才有的功能)
// webpack.config.js

// 引入插件常量
const CssMinimizerPlugin = require('css-minimizer-webpack-plugin');

//  mode为生产,生产环境才压缩代码嘛
 mode: 'production',

 // 加入优化选项
 optimization: {
        minimizer: [
            new CssMinimizerPlugin()
        ]
    }
webpack中使用babel-loader将es6语法降低以致于适配低版本的浏览器
npm install babel-loader @babel/core @babel/preset-env -D
babel-loader: 在webpack里应用babel解析ES6的桥梁@babel/core: babel核心模块@babel/preset-env: babel预设,一组babel插件的集合(babel我要配置好多东西,如果有预设,就一条代码就等于配置了很多东西)
//webpack.config.js
					 {
                test: /\.js$/,
                exclude: /node_modules/,
                use:{
                    loader: 'babel-loader',
                    options: {
                        presets: ['@babel/preset-env']
                    }
                }
}发现aysnc/await语法不起作用,少了个regeneratorRuntime
regeneratorRuntime 是 webpack 打包生成的全局辅助函数,由 babel 生成,用于兼容 async/await 等高级语法。
npm i @babel/runtime @babel/plugin-transform-runtime -D
webpack天生可以加载js模块化,但是只是个打包器,并不难转化js语法,这个时候就需要个babel
babel与webpack的结合就需要个babel-loader
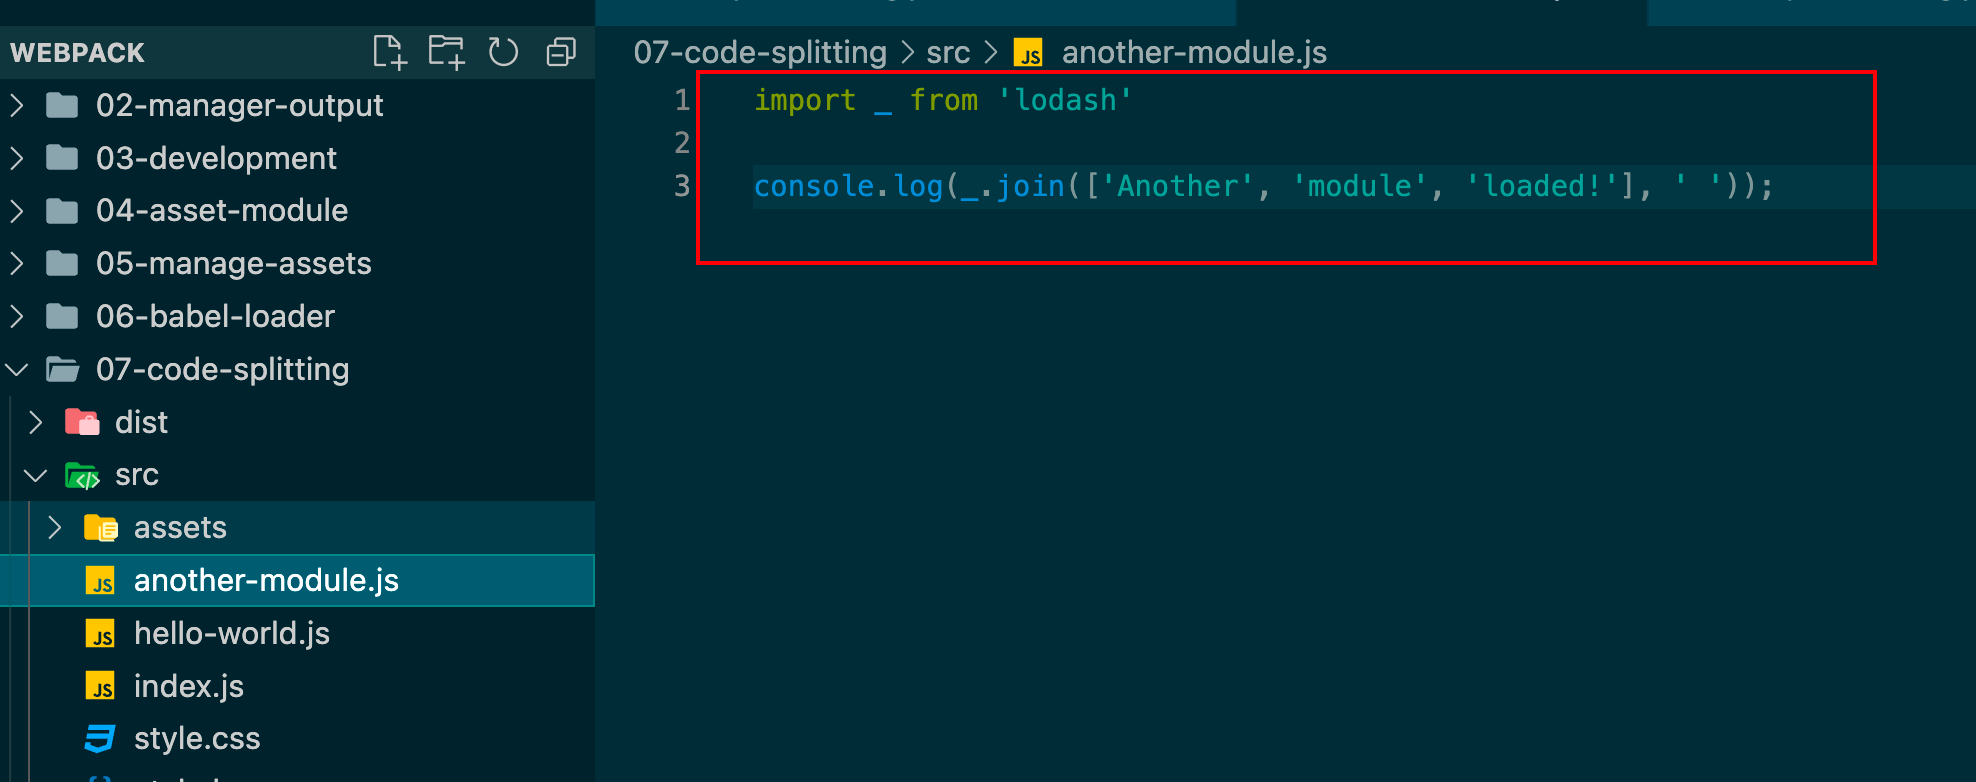
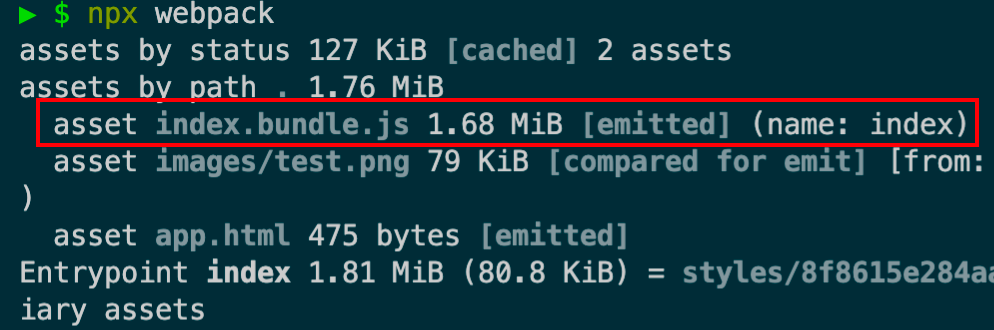
 	entry: {
        index: './src/index.js',
        another: './src/another-module.js'
    },

    output: {
        filename: '[name].bundle.js',
    }
分析下代码
- another中引入了lodash文件。
- index中使用了babel-loader,会把一些js代码打进去。
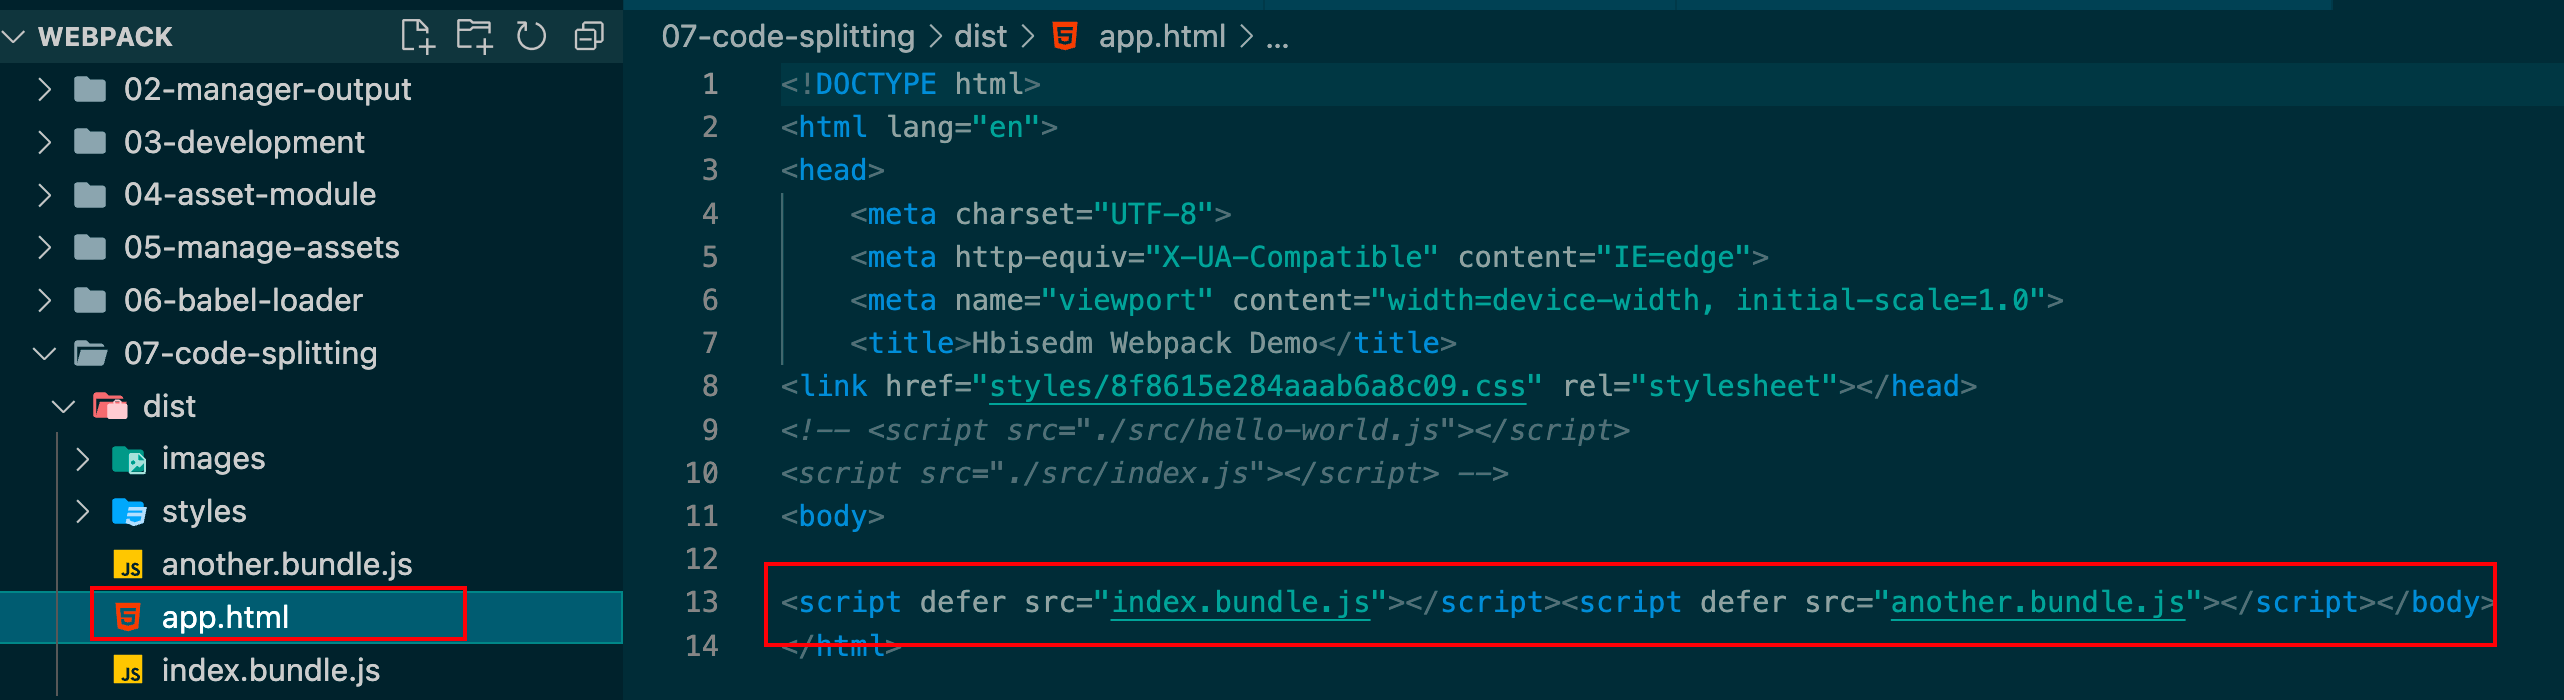
app.html 中加入了我们刚才entry入口配置的那2个bundle.js
我们在index中也使用lodash
//index.js

import _ from 'lodash'

console.log(_.join(['index', 'module', 'loaded']));
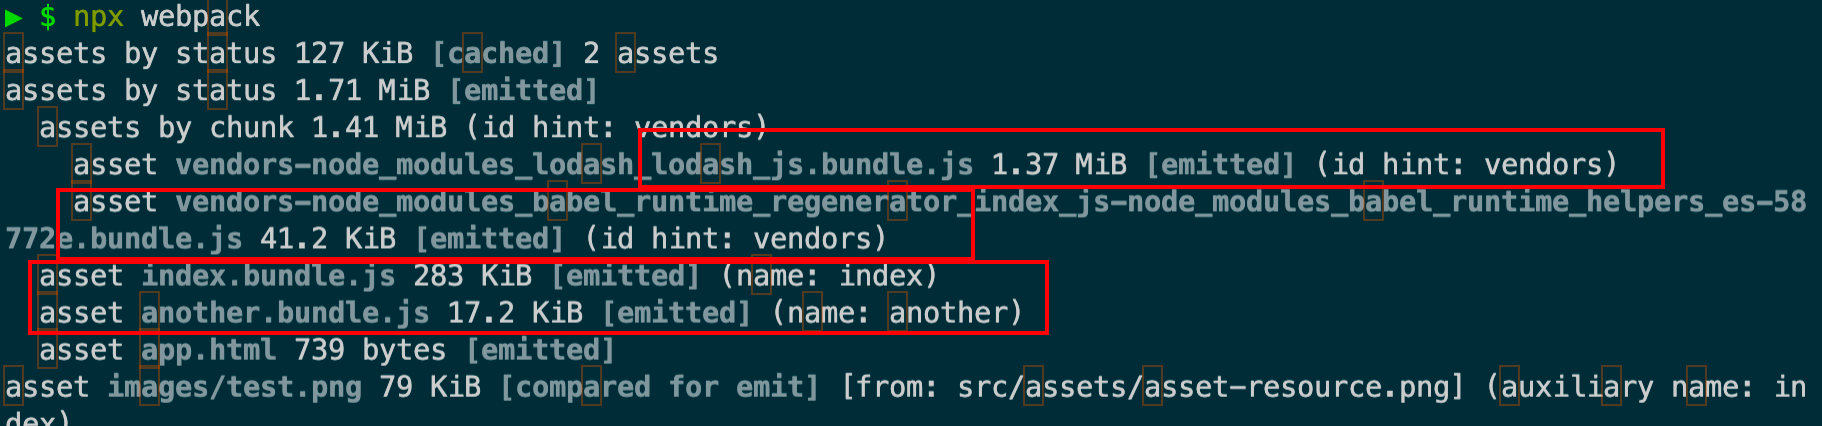
我们发现2个js文件,体积都变大了
本来lodash是一个共享的js文件,但是我们使用这种多入口文件打包方式,导致我们打包后的体积变大了。
导致问题:入口的chuck之间有共享代码,打包后的bundle文件导致体积大的
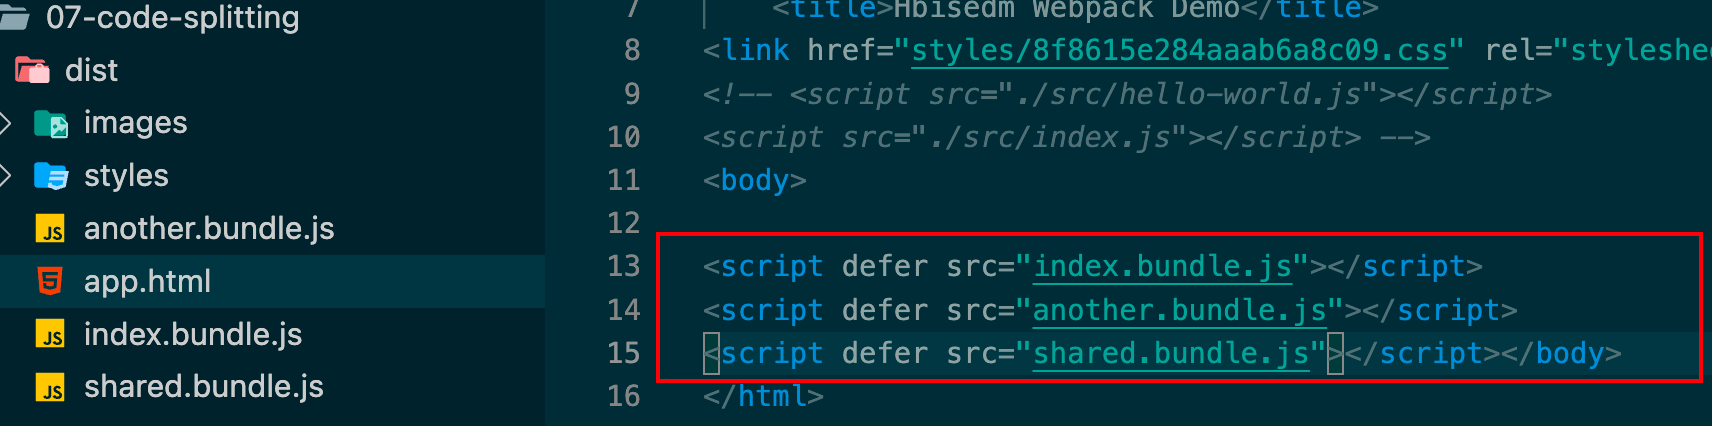
配置webpack.config.js的入口文件,加入个dependOn参数,这个参数又指向一个共享资源文件
		entry: {
        index: {
            import: './src/index.js',
            dependOn: 'shared'
        },
        another: {
            import: './src/another-module.js',
            dependOn: 'shared'
        },
        shared: 'lodash'
    },
意思就是说,当我们这2个模块(index、another)中,有lodash这个模块,就会把它抽离出来,并命名为shared的chunk

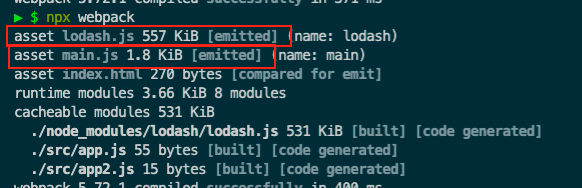
发现生成的文件变成3个js文件
使用webpack的插件
 		entry: {
        // index: {
        //     import: './src/index.js',
        //     dependOn: 'shared'
        // },
        // another: {
        //     import: './src/another-module.js',
        //     dependOn: 'shared'
        // },
        // shared: 'lodash'
        index: './src/index.js',
        another: './src/another-module.js',
    },

		optimization: {
        splitChunks: {
            chunks: 'all',
        }
    }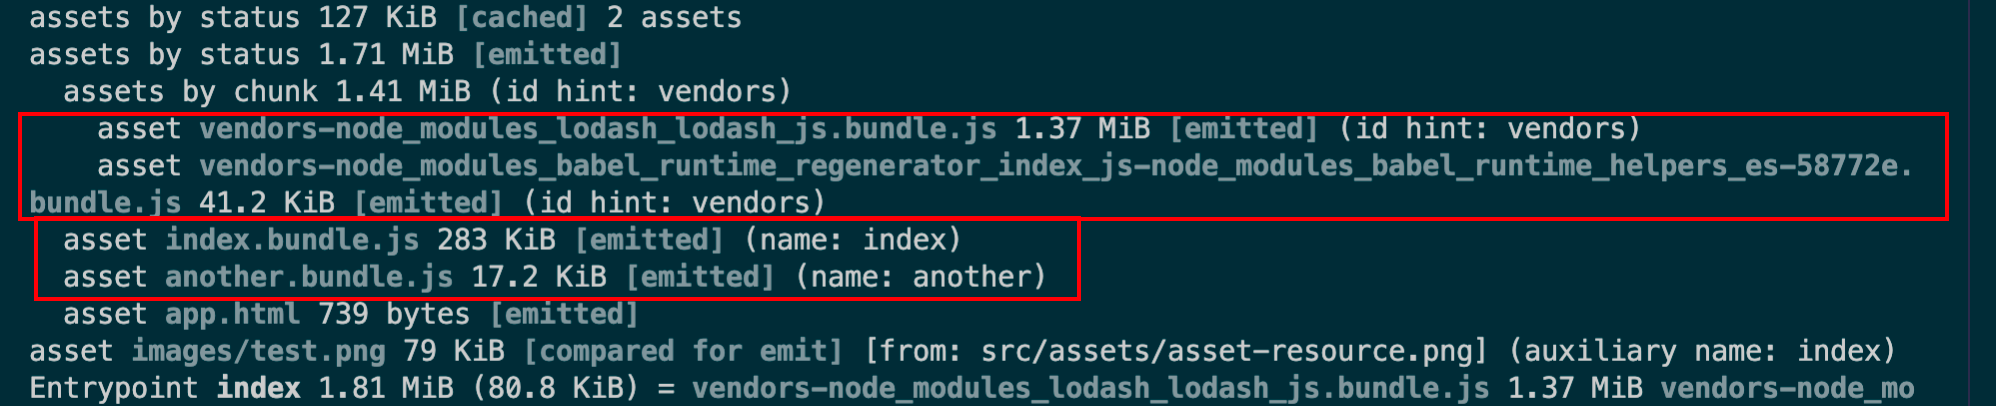
使用这种方式多了2个webpack生成的文件,
// async-module.js
function getComponent() {
    return import('lodash').then(({default: _})=> {
        const div = document.createElement('div');
        div.innerHTML = _.join(['Hello', 'webpack'], ' ');
        return div
    })
}

getComponent().then(component => {
    document.body.appendChild(component)
})

// index.js
import './async-module'
发现这种import写法,webpack可以帮我们分离引入的代码
一旦我们静态资源文件中也加入了lodash模块
//index.js

import _ from 'lodash'
console.log(_.join(['index', 'module', 'loaded']));运行npx webpack
发现我们打包的2个文件,变成了一个index.bundle.js,也就是说一旦静态资源引用了同一个模块,就没了webpack刚才帮我们自动打包的引入的文件,也就没了代码分离了。
//webpack.config.js
				splitChunks: {
            chunks: 'all',
        }
将这个配置打开后。又回到了代码分离的情况了~

这个时候,也就是我们所谓的动态导入与静态导入都可以代码分离出来
再将一开始的another文件入口也打开
		entry: {
        index: './src/index.js',
        another: './src/another-module.js',
        }
npx webpack运行
发现还是一样的情况,公共的模块抽离出来了!!!!!
当我们需要这个js文件的时候才去服务器拿
新建个math.js
export const add = (x, y) =>  x + y
export const min = (x, y) =>  x - y
在index.js中使用math的add方法(以动态引入的方式)
const button = document.createElement('button')
button.textContent = '点击执行加法运算'
button.addEventListener('click', () => {
    import('./math').then(({ add }) => {
        console.log(add)
        console.log(add(2, 3))
    })
 })
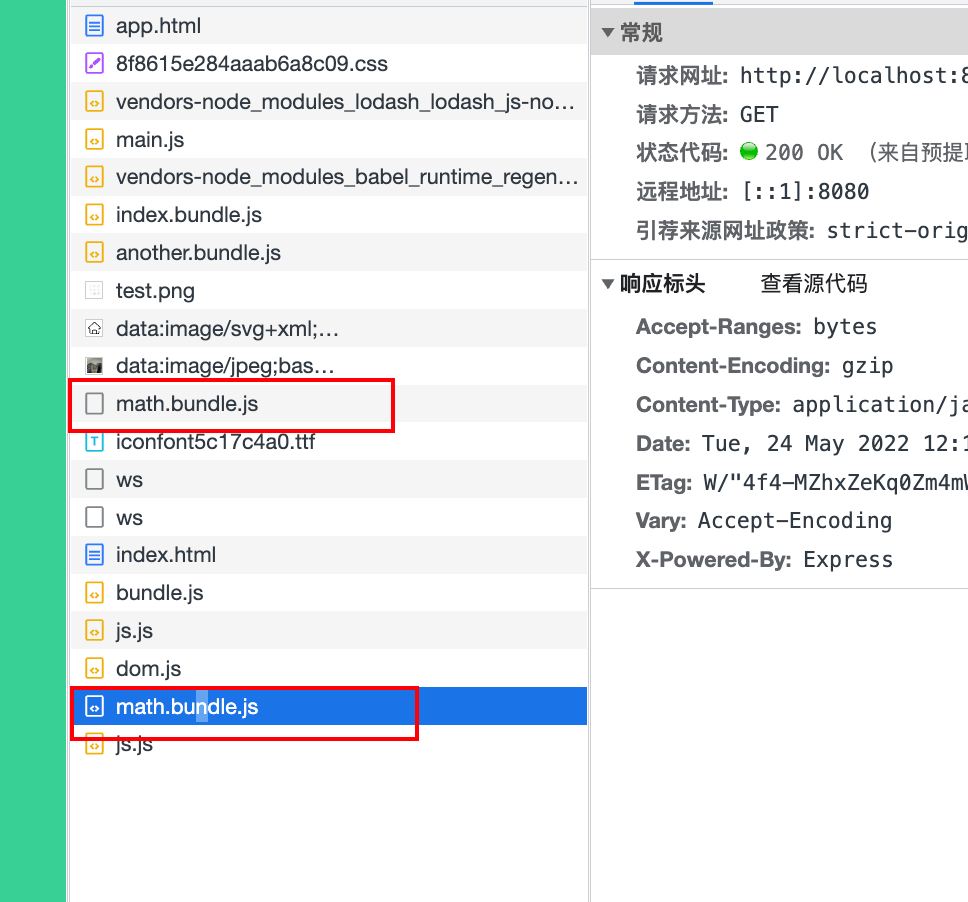
document.body.appendChild(button)webpack打包后生成了个src_math_js.bundle.js
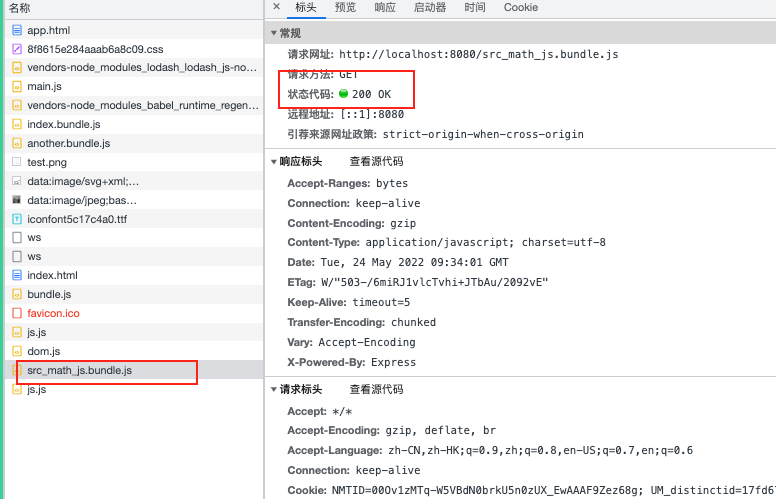
当点击按钮后,当前网页才会去加载这个JS文件,达到了按需加载与代码分离的情况
我们当然也可以自定义这个bundleJs的名字
// webpack的魔法注释
button.addEventListener('click', () => {
    import(/* webpackChunkName: 'math' */'./math').then(({ add }) => {
        console.log(add)
        console.log(add(2, 3))
    })
})打包后就变成了math.bundle.js
Webpack v4.6.0+ 增加了对预获取和预加载的支持。
在声明 import 时,使用下面这些内置指令,可以让 webpack输出 "resource hint(资源提示),来告知浏览器:
- prefetch(预获取):将来某些导航下可能需要的资源
- preload(预加载):当前导航下可能需要资源
button.addEventListener('click', () => {
    import(/* webpackChunkName: 'math', webpackPrefetch: true */'./math').then(({ add }) => {
        console.log(add)
        console.log(add(2, 3))
    })
 })
打包后,发现每次刷新网页都会去加载这个math.bundle.js
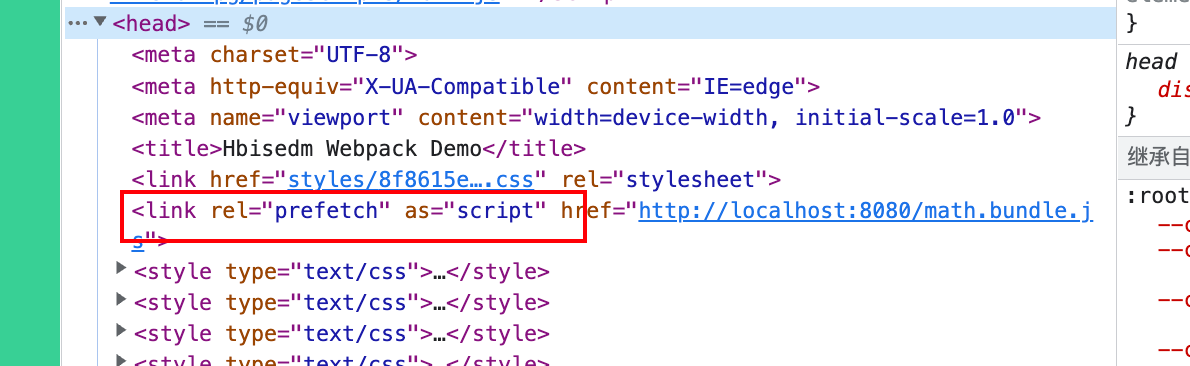
这个是浏览器的link的prefetch,当我们浏览器加载所有文件后,网络若空闲了,就会去加载prefetch的对应资源
当点击按钮后,再去加载我们的math.bundle.js,但此时这个文件其实已经下载好了。
button.addEventListener('click', () => {
    import(/* webpackChunkName: 'math', webpackPreload: true */'./math').then(({ add }) => {
        console.log(add)
        console.log(add(2, 3))
    })
 })
效果与懒加载类似
代码分离是webpack一个好用的地方,将主文件分离出来,减少主文件的大小,从而提高首屏的加载速度。
分离代码有三种方法
- 入口起点配置(配置多入口实现代码的分离)
- 防止重复(也是在入口起点配置,不过可以将一个共享资源文件抽离出来一个bundle,从而防止代码的重复打包)
- 动态导入|异步导入(使用ES6的导入模块的方法import来实现代码的分离)
- 懒加载(编译的时候把模块打包好,在浏览器中,需要的时候再去加载,达到按需加载)
- 预获取和预加载(编译的时候把模块打包好,浏览器网络空闲时,去下载,省去了将来模块加载的延迟速度;preload实现页面模块的并行加载)
output: {
filename: '[name].bundle.js',
path: path.resolve(__dirname, './dist'),
clean: true,
assetModuleFilename: 'images/[name][hash:8][ext]',
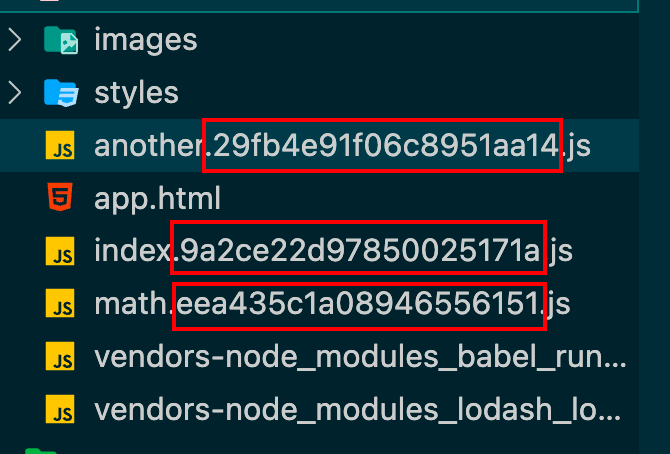
},第一次打包后生成的文件名叫做xxxx.bundle.js,如果第二次打包前,我们修改了某个文件内容,这时候打包后输出的文件名还是叫做xxxx.bundle.js,由于浏览器有缓存机制,它会认为我们的文件并没有修改,使用上一份xxxx.bundle.js
[name].bundle.js 中name这种称为substitution 可替换的模板字符串
output: {
        filename: '[name].[contenthash].js',
        path: path.resolve(__dirname, './dist'),
        clean: true,
        assetModuleFilename: 'images/[name][hash:8][ext]',
    },
这样就会根据文件内容生成不同的hash值,从而我们文件名会根据文件内容的修改,而生成不同的文件名。这样就不怕浏览器缓存了。
上面的操作是操作我们自己写的js文件,而大部分情况,项目需要引入第三方js文件。
将第三方库(ibrary)(例如 Lodash )提取到单独的 vendor chunk 文件中,是比较推荐的做法,这是因为,它们很少像本地的源代码那样频繁修改。因此通过实现以上步骤,利用 client 的长效缓存机制,命中缓存来消除请求,并减少向 server获取资源,同时还能保证 client 代码和 server 代码版本一致。我们在optimization.splitchunks 添加如下 cacheGroups 参数并构建:
				splitChunks: {
         chunks: 'all'
        }

// 改为下面

				splitChunks: {
            cacheGroups: { //缓存组
                vendor: {
                    test: /[\\/]node_modules[\\/]/, //将node_modules的缓存
                    name: 'vendors',
                    chunks: 'all'
                }
            }
        }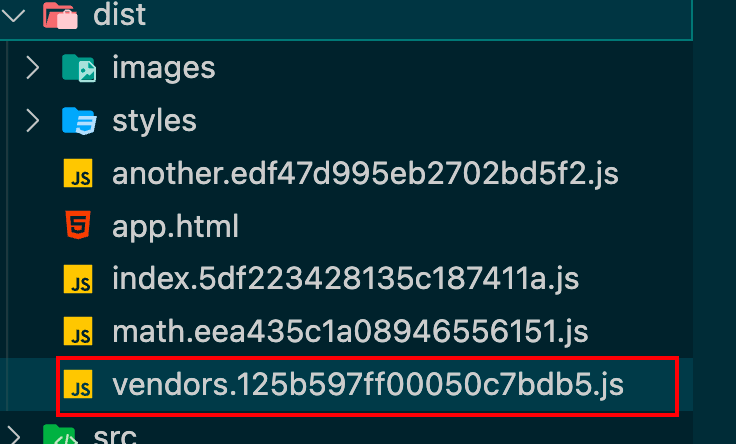

可以发现第三方的包都打到了一个vendors.[contenthash].js内
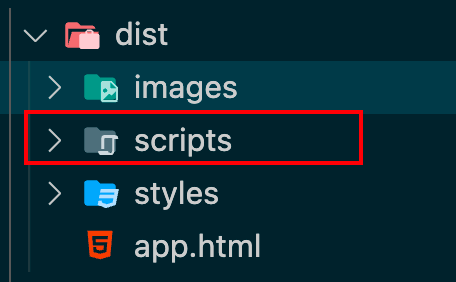
		output: {
        filename: 'scripts/[name].[contenthash].js', //加入`scripts/` 目录
        path: path.resolve(__dirname, './dist'),
        clean: true,
        assetModuleFilename: 'images/[name][hash:8][ext]',
    },
当我们打包好后的文件,自然要放到服务器上,浏览器访问服务器上的资源文件,会有个缓存机制!
这样呢,如果修改了业务代码,但是对应的js文件名不变的话,会使用浏览器本地缓存好的文件。这样就有错误!拿不到最新的内容
- 修改输出文件的文件名来解决这个问题 使用可替换模版字符串的方法来替换
- 缓存第三方库 通过修改
optimization.splitChunks这个属性来实现,使用cacheGroups缓存组,将我们使用第三方代码都打包到同一个文件内,在浏览器缓存,由于这个文件不频繁更新,所以可以提高首屏加载速度。 - 将所有js打包到同一个文件夹中,以致样式、脚本、文本、图片各个不同类型的资源文件放到不同的文件夹中。
现在的我,只会手工的修改mode来切换开发环境和生产环境
但是有些配置在生产环境和开发环境是不一样的,如dev环境不需要设置缓存,而生产环境需要设置公共路径等等情况。
使用publicPath来指定应用程序中所有资源的基础路径

我们可不可以使用cdn或者自定义服务器的路径去指定呢?
output: {
        filename: 'scripts/[name].[contenthash].js',
        path: path.resolve(__dirname, './dist'),
        clean: true,
        assetModuleFilename: 'images/[name][hash:8][ext]',
        publicPath: 'http://localhost:8080/' // 添加publicPath
    },
这个域名我们指定为cdn域名或者前端项目的域名
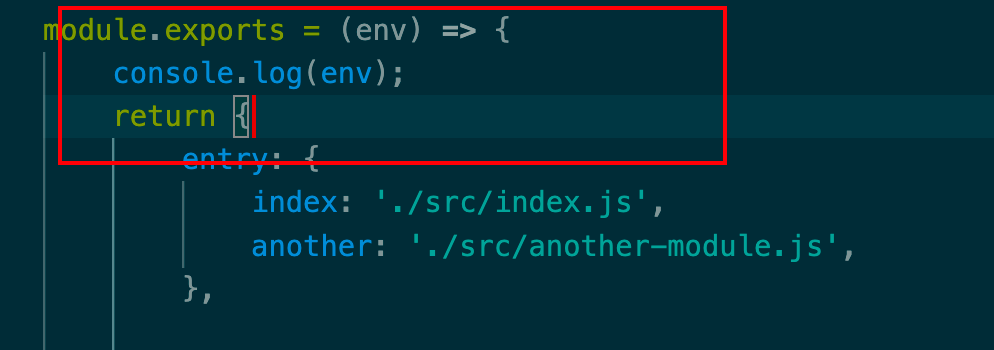
修改webpack.config.js为函数形式
npx webpack --env production --env devCoder=Hbisedm 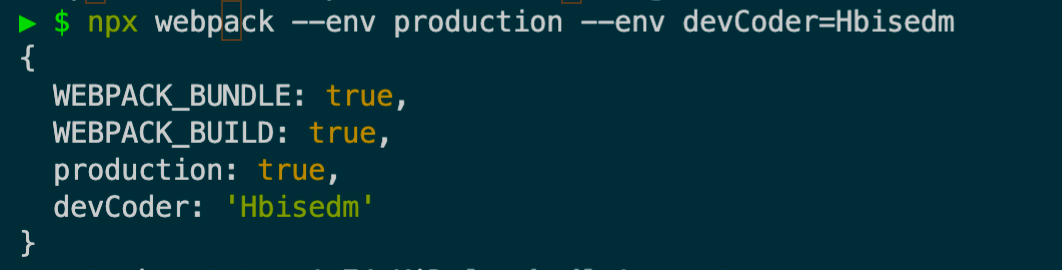
这样就可以拿到我们定好的环境变量
这样我们就可以灵活使用变量做一些事情了。
我们如何压缩打包好js代码,其实webpack自带了个开箱即用的terser的,那为什么现在代码还是没有压缩呢?
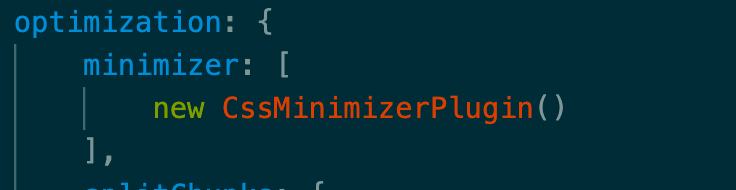
原因是我们webpack.config.js使用CSS压缩,这种情况terser就得我们自己去单独配置才可以生效
npm install terser-webpack-plugin -Dconst TerserPlugin = require('terser-webpack-plugin')
mode: env.production ? 'production' : 'development',
optimization: {
minimizer: [
new CssMinimizerPlugin(),
new TerserPlugin() //加入这个插件,达到js压缩(prod环境下)
],
}npx webpack --env production打包后的js代码压缩
npx webpack --env development打包后的js代码未压缩
这就是我们环境变量的意义
创建个conifg文件夹下创建个webpack.config.dev.js
./config/webpack.config.dev.js
const path = require('path');
const HtmlWebpackPlugin = require('html-webpack-plugin');
const MiniCssExtractPlugin = require('mini-css-extract-plugin');

// const CssMinimizerPlugin = require('css-minimizer-webpack-plugin');
// const TerserPlugin = require('terser-webpack-plugin')

const toml = require('toml')
const yaml =require('yaml')
const json5 = require('json5')

module.exports = {
        entry: {
            index: './src/index.js',
            another: './src/another-module.js',
        },

        output: {
            filename: 'scripts/[name].js', //删掉[contentHash]缓存文件名
            path: path.resolve(__dirname, './dist'),
            clean: true,
            assetModuleFilename: 'images/[name][hash:8][ext]',
            // publicPath: 'http://localhost:8080/' //dev环境 没必要
        },
        mode: 'development', //dev 肯定使用这个

        devtool: 'inline-source-map', //需要调试代码,这个是需要的

        plugins: [
            new HtmlWebpackPlugin({
                template: './index.html',
                filename: 'app.html',
                inject: 'body'
            }),
            new MiniCssExtractPlugin({
                filename: 'styles/[contenthash].css'
            })
        ],
        devServer: { // dev环境肯定需要这个
            static: './dist'
        },
        module: {
            rules: [
                {
                    test: /\.png$/,
                    type: 'asset/resource',
                    generator: {
                        filename: 'images/test.png'
                    }
                },
                {
                    test: /\.svg$/,
                    type: 'asset/inline'
                },
                {
                    test: /\.txt$/,
                    type: 'asset/source'
                },
                {
                    test: /\.jpg$/,
                    type: 'asset',
                    parser: {
                        dataUrlCondition: {
                            maxSize: 2 * 1024 * 1024
                        }
                    }
                },

                {
                    test: /\.(css|less)$/,
                    use: [MiniCssExtractPlugin.loader, 'css-loader', 'less-loader']
                },

                {
                    test: /\.(woff|woff2|eot|ttf|otf)$/,
                    type: 'asset/resource',
                },

                {
                    test: /\.(csv|tsv)$/,
                    use: 'csv-loader',
                },
                {
                    test: /\.xml$/,
                    use: 'xml-loader',
                },

                {
                    test: /\.toml$/,
                    type: 'json',
                    parser: {
                        parse: toml.parse
                    }
                },
                {
                    test: /\.yaml$/,
                    type: 'json',
                    parser: {
                        parse: yaml.parse
                    }
                },
                {
                    test: /\.json5$/,
                    type: 'json',
                    parser: {
                        parse: json5.parse
                    }
                },
                {
                    test: /\.js$/,
                    exclude: /node_modules/,
                    use:{
                        loader: 'babel-loader',
                        options: {
                            presets: ['@babel/preset-env'],
                            plugins: [
                                [
                                    '@babel/plugin-transform-runtime',
                                ]
                            ]
                        }
                    }
                }

            ]
        },

        optimization: {
            // dev环境不需要压缩
            // minimizer: [
            //     new CssMinimizerPlugin(),
            //     new TerserPlugin()
            // ],
            splitChunks: {
                cacheGroups: {
                    vendor: {
                        test: /[\\/]node_modules[\\/]/,
                        name: 'vendors',
                        chunks: 'all'
                    }
                }
            }
        }
    }
npx webpack --config ./config/webpack.config.dev.js
npx webpack -c ./config/webpack.config.dev.js //简写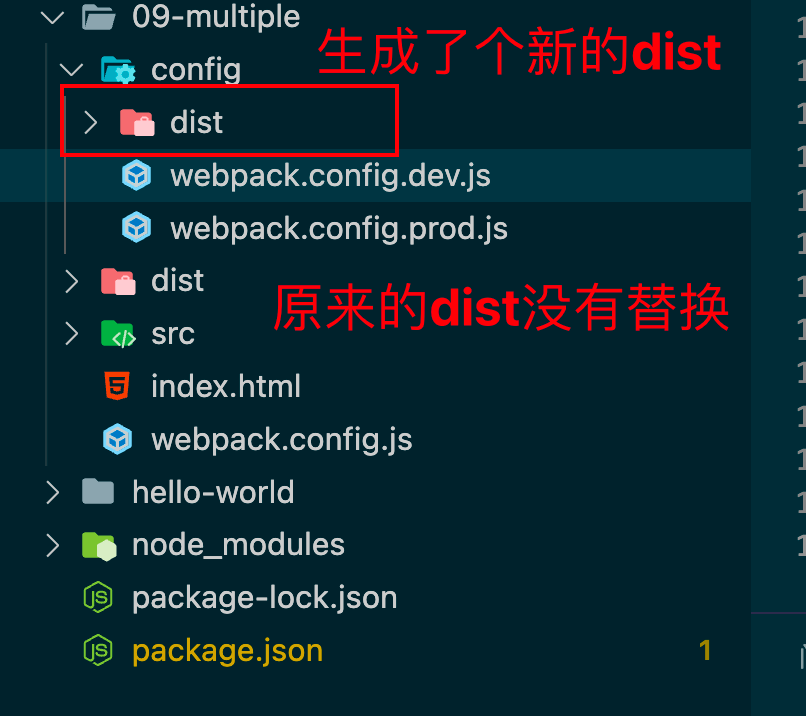
将output属性修改下
output: {
            filename: 'scripts/[name].js', //删掉[contentHash]缓存文件名
            path: path.resolve(__dirname, '../dist'), // './dist' => '../dist'
            clean: true,
            assetModuleFilename: 'images/[name][hash:8][ext]',
            // publicPath: 'http://localhost:8080/' //dev环境 没必要
        },
就达到替换了
配置下生产配置webpack.config.prod.js
const path = require("path");
const HtmlWebpackPlugin = require("html-webpack-plugin");
const MiniCssExtractPlugin = require("mini-css-extract-plugin");
const CssMinimizerPlugin = require("css-minimizer-webpack-plugin");
const TerserPlugin = require("terser-webpack-plugin");
const toml = require("toml");
const yaml = require("yaml");
const json5 = require("json5");

module.exports = {
  entry: {
    index: "./src/index.js",
    another: "./src/another-module.js",
  },

  output: {
    filename: "scripts/[name].[contenthash].js",
    path: path.resolve(__dirname, "../dist"), // ./dist => ../dist
    clean: true,
    assetModuleFilename: "images/[name][hash:8][ext]",
    publicPath: "http://localhost:8080/",
  },
  mode:  "production", // prod => production

  // devtool: "inline-source-map", // 生成环境不需要调试

  plugins: [
    new HtmlWebpackPlugin({
      template: "./index.html",
      filename: "app.html",
      inject: "body",
    }),
    new MiniCssExtractPlugin({
      filename: "styles/[contenthash].css",
    }),
  ],
  // prod 不需要devServer
//   devServer: {
//     static: "./dist",
//   },
  module: {
    rules: [
      {
        test: /\.png$/,
        type: "asset/resource",
        generator: {
          filename: "images/test.png",
        },
      },
      {
        test: /\.svg$/,
        type: "asset/inline",
      },
      {
        test: /\.txt$/,
        type: "asset/source",
      },
      {
        test: /\.jpg$/,
        type: "asset",
        parser: {
          dataUrlCondition: {
            maxSize: 2 * 1024 * 1024,
          },
        },
      },

      {
        test: /\.(css|less)$/,
        use: [MiniCssExtractPlugin.loader, "css-loader", "less-loader"],
      },

      {
        test: /\.(woff|woff2|eot|ttf|otf)$/,
        type: "asset/resource",
      },

      {
        test: /\.(csv|tsv)$/,
        use: "csv-loader",
      },
      {
        test: /\.xml$/,
        use: "xml-loader",
      },

      {
        test: /\.toml$/,
        type: "json",
        parser: {
          parse: toml.parse,
        },
      },
      {
        test: /\.yaml$/,
        type: "json",
        parser: {
          parse: yaml.parse,
        },
      },
      {
        test: /\.json5$/,
        type: "json",
        parser: {
          parse: json5.parse,
        },
      },
      {
        test: /\.js$/,
        exclude: /node_modules/,
        use: {
          loader: "babel-loader",
          options: {
            presets: ["@babel/preset-env"],
            plugins: [["@babel/plugin-transform-runtime"]],
          },
        },
      },
    ],
  },

  optimization: {
    minimizer: [new CssMinimizerPlugin(), new TerserPlugin()],
    splitChunks: {
      cacheGroups: {
        vendor: {
          test: /[\\/]node_modules[\\/]/,
          name: "vendors",
          chunks: "all",
        },
      },
    },
  },
};
npx webpack -c ./config/webpack.config.prod.js打包后的文件,代码压缩达到
npx webpack -c 目标配置文件通过上面2个文件达到了配置js文件的分离
当然我们也可以使用webpack的开发服务器指定相应的文件
npx webpack server -c 目标配置文件
// 相当于 npx webpack-dev-server在子目录中创建个package.json
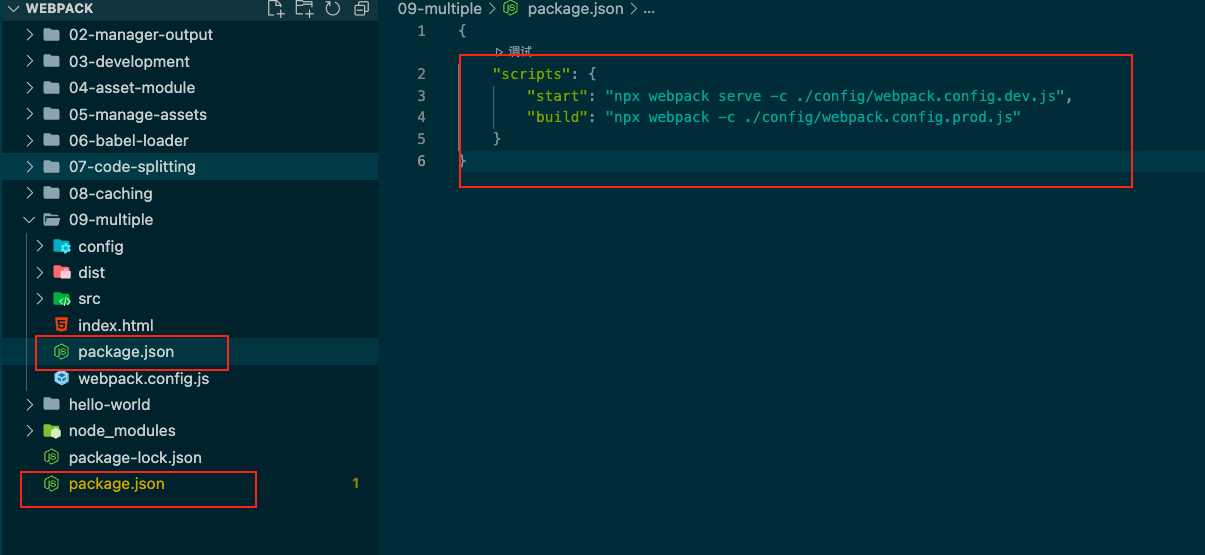
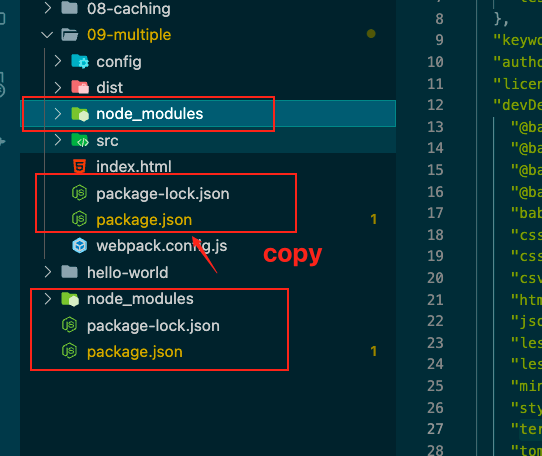
发现每次使用的还是最外层的node_modules的东西,且还要下载安装些依赖。不如要它们copy一份过来
再将package.json里面的scripts修改
 "scripts": {
    "start": "webpack server -c ./config/webpack.config.dev.js",
    "build": "webpack -c ./config/webpack.config.prod.js"
  },
为何不需要npx呢,原因是我们在package.json中写脚本,它会自动去往node_modules中找相应的脚本来执行。这样走的就是当前目录的东西了。不用下载依赖
在config文件夹内新建个webpack.config.common.js,将公共配置提取到这个js文件内
const path = require("path");
const HtmlWebpackPlugin = require("html-webpack-plugin");
const MiniCssExtractPlugin = require("mini-css-extract-plugin");
const toml = require("toml");
const yaml = require("yaml");
const json5 = require("json5");

module.exports = {
  entry: {
    index: "./src/index.js",
    another: "./src/another-module.js",
  },

  output: {
    // filename: "scripts/[name].[contenthash].js",
    path: path.resolve(__dirname, "../dist"),
    clean: true,
    assetModuleFilename: "images/[name][hash:8][ext]",
    // publicPath: "http://localhost:8080/",
  },
//   mode: env.production ? "production" : "development",
//   devtool: "inline-source-map",
  plugins: [
    new HtmlWebpackPlugin({
      template: "./index.html",
      filename: "app.html",
      inject: "body",
    }),
    new MiniCssExtractPlugin({
      filename: "styles/[contenthash].css",
    }),
  ],
//   devServer: {
//     static: "./dist",
//   },
  module: {
    rules: [
      {
        test: /\.png$/,
        type: "asset/resource",
        generator: {
          filename: "images/test.png",
        },
      },
      {
        test: /\.svg$/,
        type: "asset/inline",
      },
      {
        test: /\.txt$/,
        type: "asset/source",
      },
      {
        test: /\.jpg$/,
        type: "asset",
        parser: {
          dataUrlCondition: {
            maxSize: 2 * 1024 * 1024,
          },
        },
      },

      {
        test: /\.(css|less)$/,
        use: [MiniCssExtractPlugin.loader, "css-loader", "less-loader"],
      },

      {
        test: /\.(woff|woff2|eot|ttf|otf)$/,
        type: "asset/resource",
      },

      {
        test: /\.(csv|tsv)$/,
        use: "csv-loader",
      },
      {
        test: /\.xml$/,
        use: "xml-loader",
      },

      {
        test: /\.toml$/,
        type: "json",
        parser: {
          parse: toml.parse,
        },
      },
      {
        test: /\.yaml$/,
        type: "json",
        parser: {
          parse: yaml.parse,
        },
      },
      {
        test: /\.json5$/,
        type: "json",
        parser: {
          parse: json5.parse,
        },
      },
      {
        test: /\.js$/,
        exclude: /node_modules/,
        use: {
          loader: "babel-loader",
          options: {
            presets: ["@babel/preset-env"],
            plugins: [["@babel/plugin-transform-runtime"]],
          },
        },
      },
    ],
  },

  optimization: {
    // minimizer: [new CssMinimizerPlugin(), new TerserPlugin()],
    splitChunks: {
      cacheGroups: {
        vendor: {
          test: /[\\/]node_modules[\\/]/,
          name: "vendors",
          chunks: "all",
        },
      },
    },
  },
};
修改webpack.config.dev.js
module.exports = {
  output: {
    filename: "scripts/[name].js", //删掉[contentHash]缓存文件名
  },
  mode: "development", //dev 肯定使用这个

  devtool: "inline-source-map", //需要调试代码,这个是需要的

  devServer: {
    // dev环境肯定需要这个
    static: "./dist",
  },
};
修改webpack.config.prod.js
const CssMinimizerPlugin = require("css-minimizer-webpack-plugin");
const TerserPlugin = require("terser-webpack-plugin");

module.exports = {
  output: {
    filename: "scripts/[name].[contenthash].js",
    publicPath: "http://localhost:8080/",
  },
  mode:  "production", // prod => production

  optimization: {
    minimizer: [new CssMinimizerPlugin(), new TerserPlugin()],
  },

  performance: {
      hints: false
  }
};
使用webpack-merge 将通用配置和不同环境的配置合并
npm install webpack-merge -D在config文件夹下创建webpack.config.js
const { merge } = require("webpack-merge");

const commonConfig = require("./webpack.config.common");
const productionConfig = require("./webpack.config.prod");
const developmentConfig = require("./webpack.config.dev");

module.exports = (env) => {
  switch (true) {
    case env.development:
      return merge(commonConfig, developmentConfig);
    case env.production:
      return merge(commonConfig, productionConfig);
    default:
        return new Error(' No mating')
  }
};
再次修改下package.json的scripts脚本属性
"scripts": {
    "start": "webpack server -c ./config/webpack.config.js --env development",
    "build": "webpack -c ./config/webpack.config.js --env production"
},然后运行npm run start或者npm run build
达到了环境拆分、配置不同文件
- 一开始我们使用配置publicPath来配置公共路径,
- 接着在命令行中可以携带
--env xxxx可以传到webpack.config.js中去, - 拆分dev和prod环境的配置,分为2个不同的文件,每次执行的时候选择不同的文件去执行
- 使用package.json的scripts脚本可以配置我们每次运行的命令
- 将dev和prod的2个文件的共同部分抽离出来,再使用webpack-merge这个第三方依赖将通用配置和不同环境特有的配置合并后再运行webpack进行处理
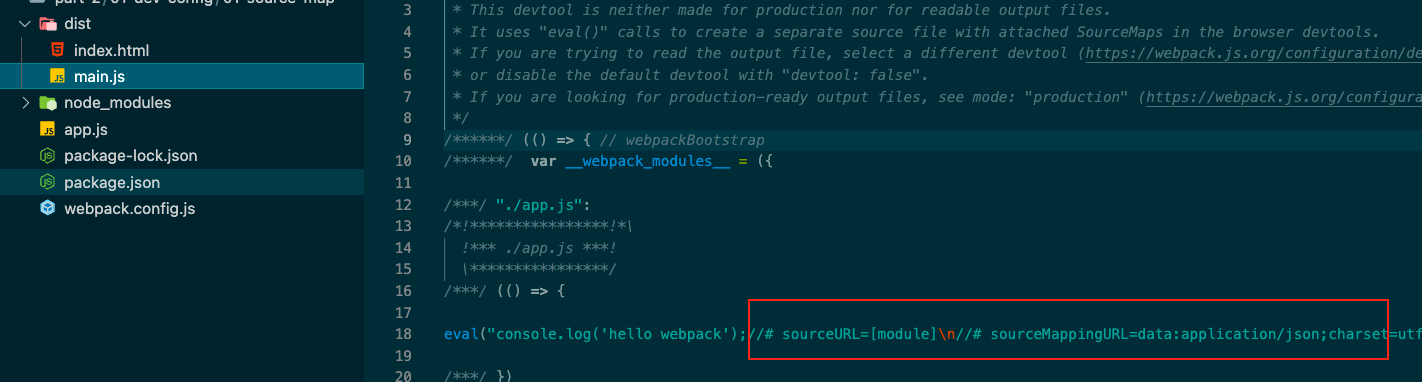
何为source-map,是我们打包后的bundle.js在浏览器若发生报错,我们可以快速定位到开发时的js文件的位置。
devtool属性的7个模式
| 模式 | 解释 |
|---|---|
| eval | 每个module会封装到 eval 里包裹起来执行,并且会在末尾追加注释 //@ sourceURL. |
| source-map | 生成一个SourceMap文件 |
| hidden-source-map | 和 source-map 一样,但不会在 bundle 末尾追加注释. |
| inline-source-map | 生成一个 DataUrl 形式的 SourceMap 文件. |
| eval-source-map | 每个module会通过eval()来执行,并且生成一个DataUr!形式的SourceMap. |
| cheap-source-map | 生成一个没有列信息(column-mappings)的SourceMaps文件,不包含loader的sourcemap(譬如 babel 的 sourcemap) |
| cheap-module-source-map | 生成一个没有列信息 (column-mappings) 的SourceMaps文件,同时 loader的sourcemap 也被简化为只包含对应行的。 |
要注意的是,生产环境我们一般不会开启sourcemap功能,主要有两点原因:
- 通过bundle和sourcemap文件,可以反编译出源码一一一一也就是说,线上产物有soucemap文件的话,就意味着有暴漏源码的风险。
- 我们可以观察到,sourcemap文件的体积相对比较巨大,这跟我们生产环境的追求不同(生产环境追求更小更轻量的bundle)。
webpack的devtool的默认模式
const HtmlWebpackPlugin = require('html-webpack-plugin')

module.exports = {
    mode: 'development',

    entry: './app.js',

    // devtool: false,

    plugins: [
        new HtmlWebpackPlugin()
    ]
}
不开启devtool默认走eval
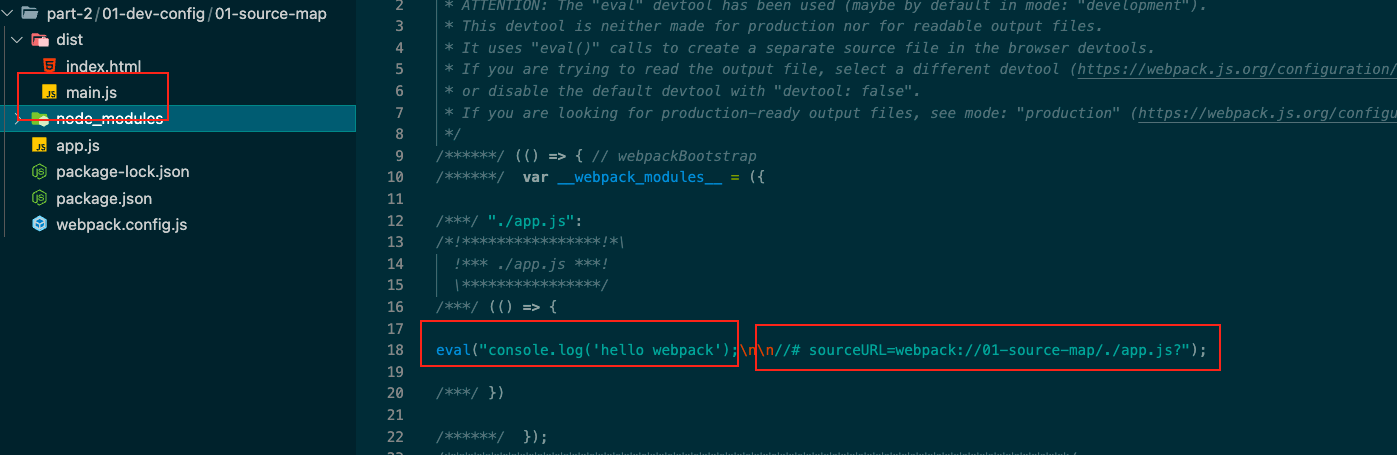
发现打包好的文件,走的是eval,启动devserver

发现文件定位在了 app.js可以帮助开发人员快速定位代码的位置
当吧devtool设置为false
const HtmlWebpackPlugin = require('html-webpack-plugin')

module.exports = {
    mode: 'development',

    entry: './app.js',

    devtool: false,

    plugins: [
        new HtmlWebpackPlugin()
    ]
}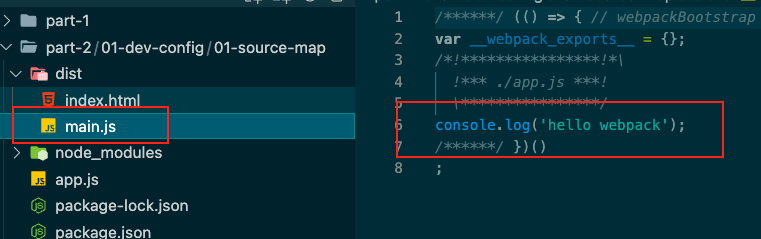
发现就直接讲app.js的代码挪到了打包好的main.js里面了,开启devserver

这样就没办法定位开发时的源码位置在哪了。
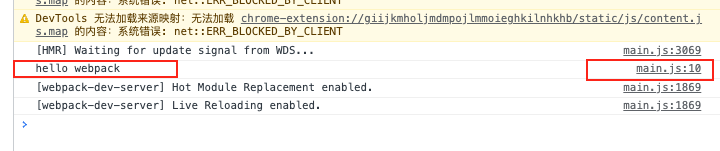
将devtool设置为source-map
运行npx webpack
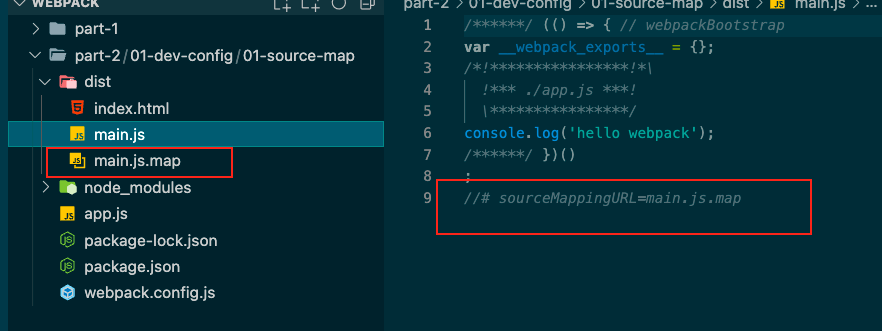
发现还是跟关闭devtool的时候一样,只是代码多了个注释,打包后多了个map文件
运行npx webpack server

发现我们还是可以定位代码的源头
hidden-source-map
将devtool设置为hidden-source-map
与source-map作类比,就是打包后的main.js文件中少了个map注释

运行npx webpack server
发现已经不可以定位业务代码的位置
说明使用hidden-source-map模式虽然也是会生产map文件,但是已经不会和我们的main.js作关联了。
devtool设置为inline-source-map
运行npx webpack
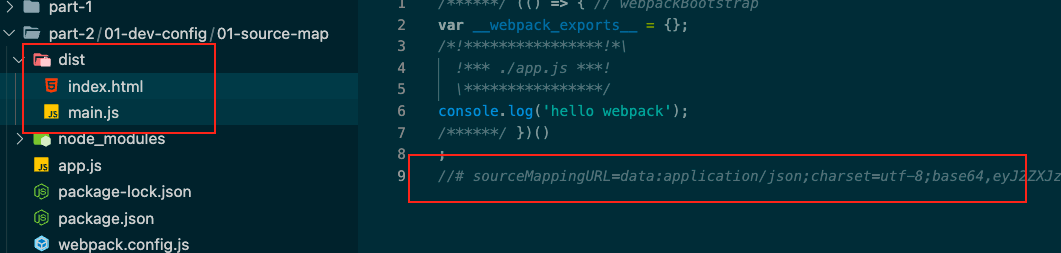
运行npx webpack server
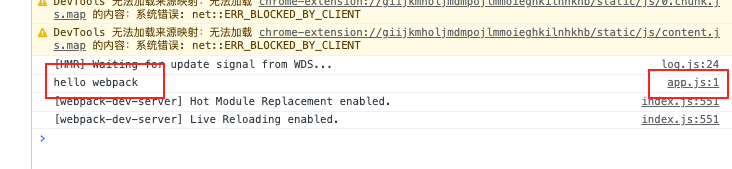
发现效果和source-map一样,可以定位源代码的位置。只是区别在于
-
少了source-map模式下会打包多个map文件
-
注释的东西不一样
devtool设置为eval-source-map
运行npx webpack
运行npx webpack server

发现效果和inline-source-map一样,可以定位源代码的位置。
-
一样少了source-map模式下会打包多个map文件
-
注释的东西不一样
-
eval后面的注释,应该是用Base64的形式生成的
会生成一个没有列信息的sourcemap
修改为cheap-source-map,运行npx webpack
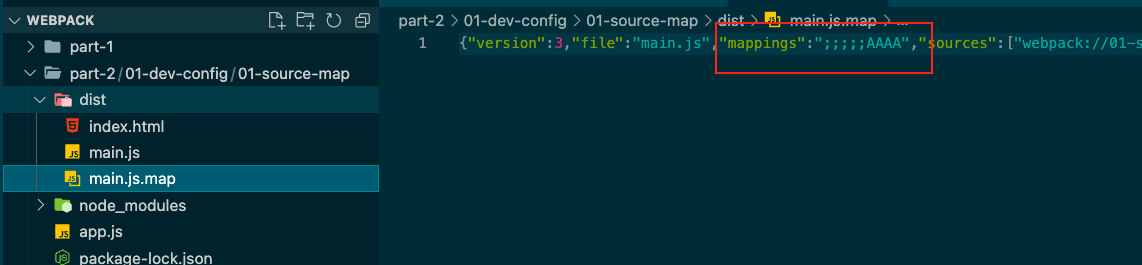
这个mappings是代码映射,里面的内容是代码的行数描述,没有列数。
若改为source-map,运行npx webpack
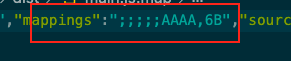
多了这个是列数,现在代码只有一行,但实际情况,代码有很多的,而且一般开发的时候,定到行数就行,没必要让这个文件那么大。
这个同样是可以定位到源代码的。
和上面的效果一样,但是这个模式还会加载一些第三方库。上面的cheap-source-map却不会。
在当前项目中安装babel
npm install babel-loader @babel/core @babel/preset-env -D使用ES6类写法,让babel可以进行转化
class A {
    constructor() {
        this.str = 'hello webpack'
    }

    sayHello() {
        console.log(this.str);
    }
}

const a = new A()

a.sayHello()运行npx webpack

运行npx webpack server

将devtool改为上一个cheap-source-map

没法定位到源代码了。原因是因为使用cheap-source-map这个不包含loader到mapsource
所以在开发环境里,推荐大家使用cheap-module-source-map不但可以帮助我们生成map文件,而且不记录列数,同时对第三方库混入进来也不会影响到source-map的生成后的代码识别问题。
const path = require('path')
const HtmlWebpackPlugin = require('html-webpack-plugin')

module.exports = {
    mode: 'development',
    entry: './app.js',
    devServer: {
        static: path.resolve(__dirname, './dist'),
        compress: true,  //配置压缩
    },

    plugins: [
        new HtmlWebpackPlugin()
    ],
}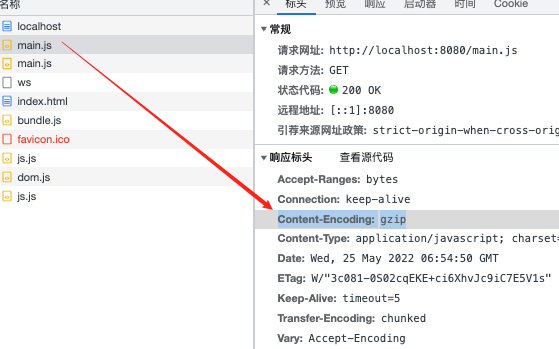
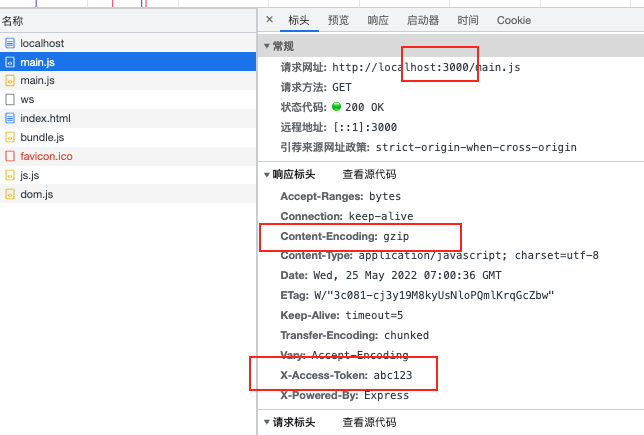
gzip可以减少网络带宽
module.exports = {
    mode: 'development',
    entry: './app.js',
    devServer: {
        static: path.resolve(__dirname, './dist'),
        compress: true,  //配置压缩
        port: 3000, //这个时候的本地开发服务器就是 localhost:3000
    },

    plugins: [
        new HtmlWebpackPlugin()
    ],
}
devServer: {
        static: path.resolve(__dirname, './dist'),
        compress: true,
        port: 3000, //这个时候的本地开发服务器就是 localhost:3000
        headers: {
            'X-Access-Token': 'abc123'
        }
    },
网页访问某些接口,可能会有跨域问题,如果不做代理处理,那么开发服务器访问不了接口。
模拟个服务器,使用node去写个简单接口服务 创建个server.js
const http = require('http')

const app = http.createServer((req, res) => {
    if(req.url === '/api/hello') {
        res.end('hello node')
    }
})

app.listen(9000, 'localhost', () => {
    console.log('localhost:9000');
})运行node server.js

开启个端口为9000的服务
修改app.js 去请求上面启动的服务的接口
fetch('http://localhost:9000/api/hello')
    .then(resp => resp.text())
    .then(res => {
        console.log(res);
    })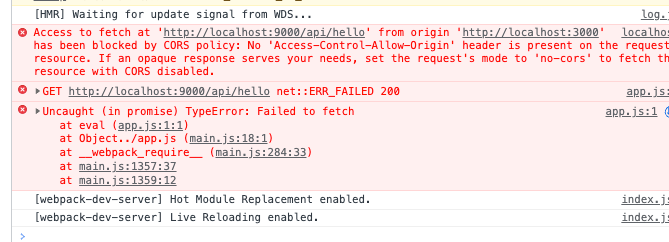
发生了跨域问题
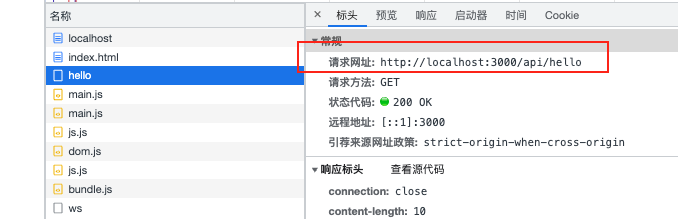
将上面代码改下
fetch('/api/hello')
    .then(resp => resp.text())
    .then(res => {
        console.log(res);
})devServer: {
static: path.resolve(__dirname, './dist'),
compress: true,
port: 3000, //这个时候的本地开发服务器就是 localhost:3000
headers: {
'X-Access-Token': 'abc123'
},
proxy: {
'/api': 'http://localhost:9000'
}
},
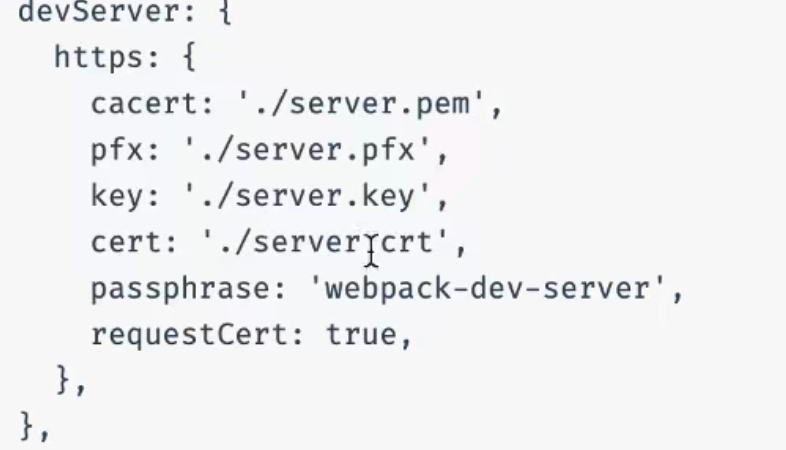
devServer: {
        static: path.resolve(__dirname, './dist'),
        compress: true,
        port: 3000, //这个时候的本地开发服务器就是 localhost:3000
        headers: {
            'X-Access-Token': 'abc123'
        },
        proxy: {
            '/api': 'http://localhost:9000'
        },
        https: true
    },
重新运行npx webpack server
此时http:// => https://
但是,由于默认配置使用的是自签名证书,所以浏览器会告诉你是不安全的,但我们依然可以访问它,当然我们在配置中,配置自己的证书就不会出现这个问题了。
和http是一样的操作。
devServer: {
        http2: true
},When using the HTML5 History API, the index.html page will likely have to be served in place of any 404 responses. Enable devServer.historyApiFallback by setting it to true
devServer: {
  host: '0.0.0.0',
}
配置后,其他人的电脑在同一个局域网就可以访问到当前这个开发服务器了。
-
模块热替换(HMR - hot module replacement)功能会在应用程序运行过程中,替换、添加或删除模块,而无需重新加载整个页面。
-
热加载(文件更新时,自动刷新我们的服务和页面)新版的webpack-dev-server默认已经开启了热加载的功能。它对应的参数是devServer.liveReload,默认为true。注意,如果想要关掉它,要将liveReload设置为false的同时,也要关掉hot
注意点:配置的loader,会自动进行热替换,若没有配置相应loader的话
如引入个js文件,使用这个js时,去修改js,会导致这个资源文件的变化
import './library.js'

if (module.hot) {
  module.hot.accept('./library.js', function () {
    // Do something with the updated library module...
  });
}安装依赖
npm i eslint -D使用eslint
npx eslint --init 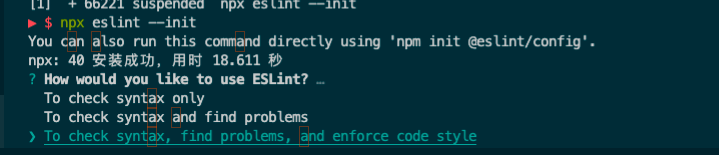
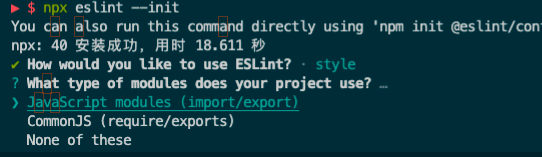

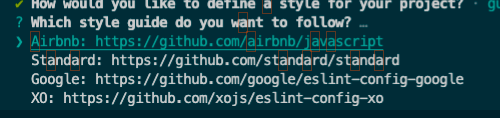
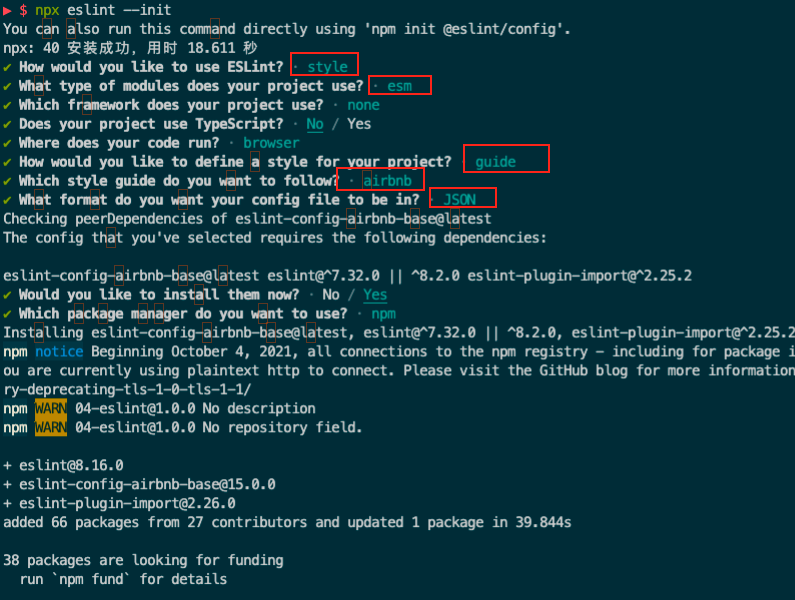
以JSON的格式生成eslint的配置文件,(可以选JavaScript、YAML这2个格式)
{
    "env": {
        "browser": true,
        "es2021": true
    },
    "extends": [
        "airbnb-base"
    ],
    "parserOptions": {
        "ecmaVersion": "latest",
        "sourceType": "module"
    },
    "rules": {
    }
}
创建个src/app.js
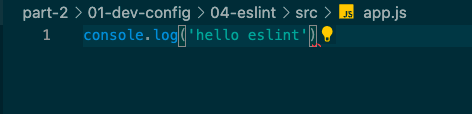
发现1警告、2错误
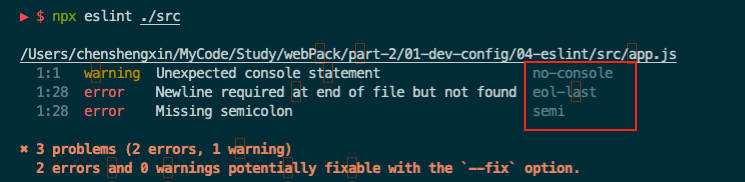
- 不可以使用console
- 代码末位需要换行
- 每行代码需要分号
可以修改eslint的配置去掉警告or错误
将上图红框内的no-console配置到eslint的json配置文件.eslintrc.json
{
    "env": {
        "browser": true,
        "es2021": true
    },
    "extends": [
        "airbnb-base"
    ],
    "parserOptions": {
        "ecmaVersion": "latest",
        "sourceType": "module"
    },
    "rules": {
        "no-console": 0, //加入后,就不会警告了
    },
    "globals": {

    }
}
检查错误2个方式
-
运行
npx eslint 目录 -
vscode安装eslint插件
eslint与webpack配合使用
首先安装依赖
npm install webpack webpack-cli webpack-dev-server html-webpack-plugin babel-loader eslint-webpack-plugin @babel/core -D 配置webpack.config.js
const HtmlWebpackPlugin = require('html-webpack-plugin');
const ESLintPlugin = require('eslint-webpack-plugin');

module.exports = {
  mode: 'development',
  entry: './src/app.js',
  module: {
    rules: [
      {
        test: /\.js$/,
        use: ['babel-loader'],
      },
    ],
  },
  plugins: [new HtmlWebpackPlugin(), new ESLintPlugin()],
};
当项目中js与eslint的配置不相符时,webpack就会直接报错
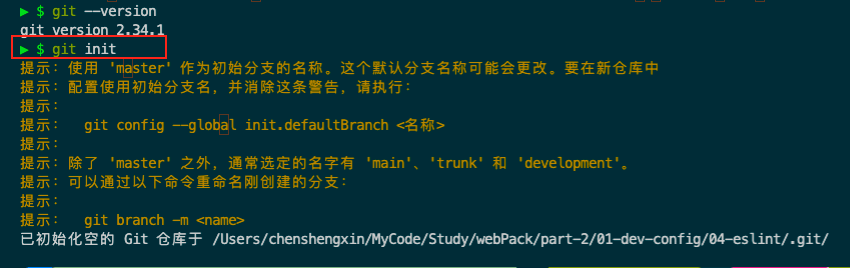
研究下git-hooks
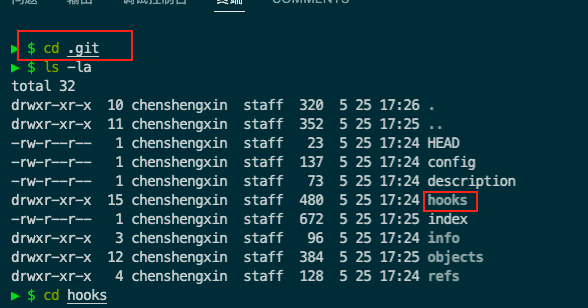
hooks下定义git默认的hook。【hook:触发git命令前后会触发这些命令,这些命令是自动执行的,只要我们配置好,git会帮我们自动运行】

需求:代码提交前检查我们当前代码有没有问题。
cat pre-commit.sample#!/bin/sh
#
# An example hook script to verify what is about to be committed.
# Called by "git commit" with no arguments. The hook should
# exit with non-zero status after issuing an appropriate message if
# it wants to stop the commit.
#
# To enable this hook, rename this file to "pre-commit".
if git rev-parse --verify HEAD >/dev/null 2>&1
then
against=HEAD
else
# Initial commit: diff against an empty tree object
against=$(git hash-object -t tree /dev/null)
fi
# If you want to allow non-ASCII filenames set this variable to true.
allownonascii=$(git config --type=bool hooks.allownonascii)
# Redirect output to stderr.
exec 1>&2
# Cross platform projects tend to avoid non-ASCII filenames; prevent
# them from being added to the repository. We exploit the fact that the
# printable range starts at the space character and ends with tilde.
if [ "$allownonascii" != "true" ] &&
# Note that the use of brackets around a tr range is ok here, (it's
# even required, for portability to Solaris 10's /usr/bin/tr), since
# the square bracket bytes happen to fall in the designated range.
test $(git diff --cached --name-only --diff-filter=A -z $against |
LC_ALL=C tr -d '[ -~]\0' | wc -c) != 0
then
cat <<\EOF
Error: Attempt to add a non-ASCII file name.
This can cause problems if you want to work with people on other platforms.
To be portable it is advisable to rename the file.
If you know what you are doing you can disable this check using:
git config hooks.allownonascii true
EOF
exit 1
fi
# If there are whitespace errors, print the offending file names and fail.
exec git diff-index --check --cached $against --
touch pre-commit
vim pre-commit
写个输出语句
echo pre-commit
在当前文件随便修改下,然后再尝试提交。

刚才那个pre-commit文件没有权限,提升下权限就行了
chmod +x ./pre-commit再次执行代码的提交

发现输出了pre-commit
这次我们修改下pre-commit的内容
vim .git/hooks/pre-commit
npx eslint ./src
改成我们在终端写的命令
然后我们将src/app.js修改为eslint不通过的版本,再接着试下提交代码
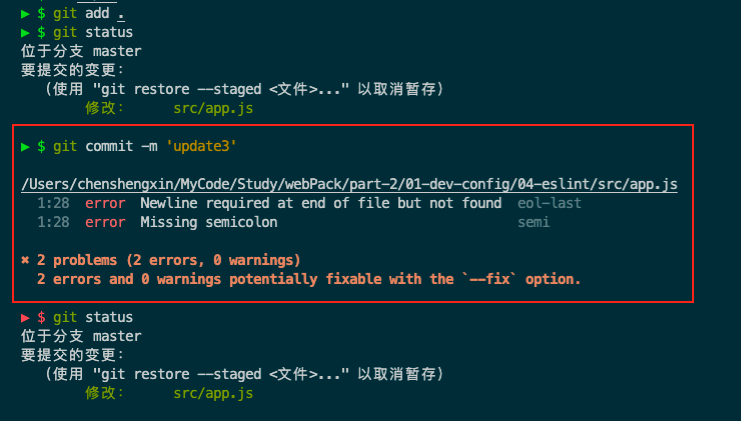
发现提交不了,原因是eslint不通过,
所以在团队开发时,定义一套eslint规范,当提交代码前,验证通不通过规范,保证团队代码的规范与整洁
每次都要开发人员自己去修改.git/hooks/xxxx文件太麻烦了
创建我们定义的文件
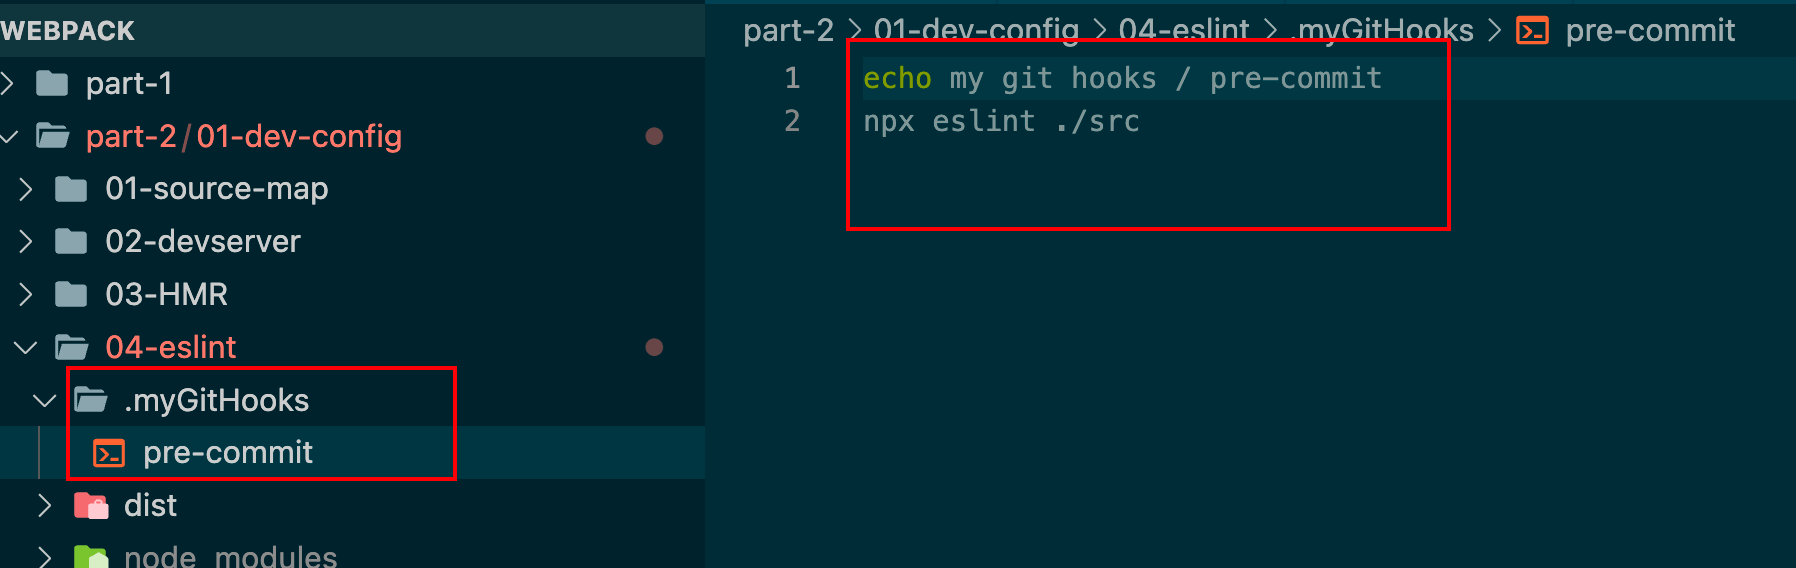
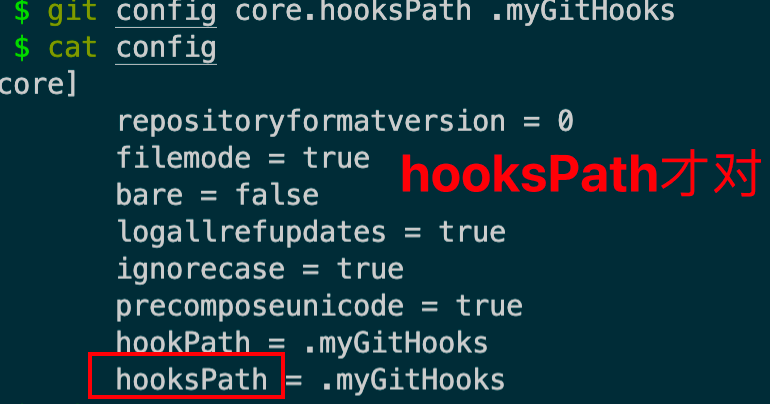
配置git的hooksPath为当前目录的.myGitHooks
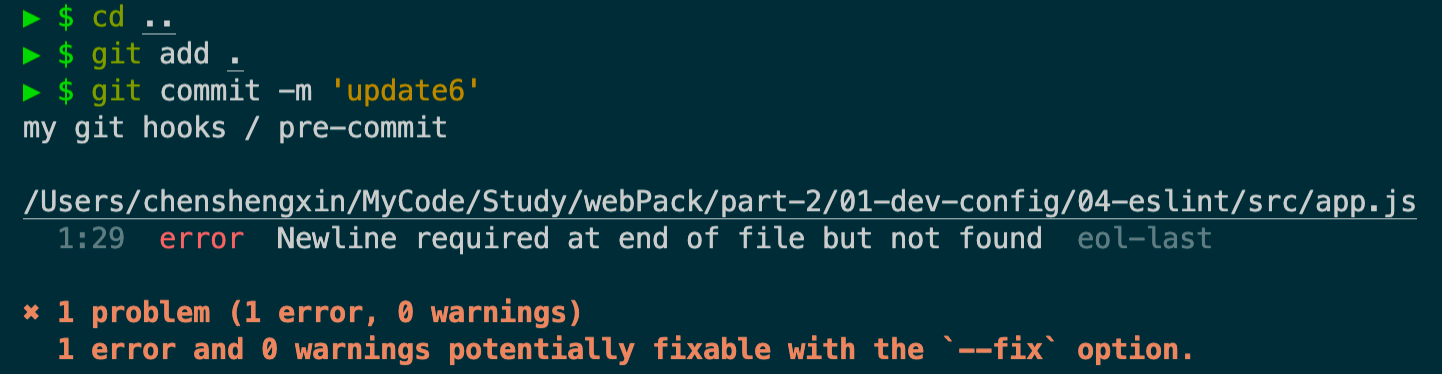
同样给我们创建的pre-commit提升权限,修改我们的app.js为不可以通过eslint的版本
上面的操作都是手工去操作的,太麻烦了,可以使用husky工具帮我们完成
先把上面自己自定义的hooksPath给删掉,vim .git/config编辑下删除
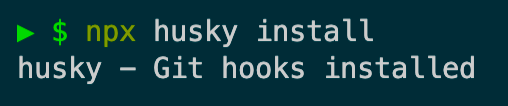
安装husky依赖 husky官网教程
npm i husky -D

npx husky install
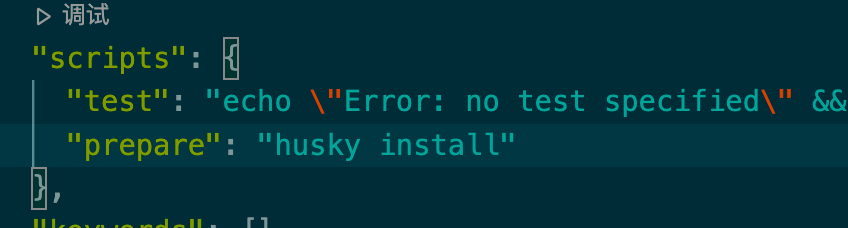
在package.json的scripts内创建husky install
在.husky文件夹下创建我们的hook
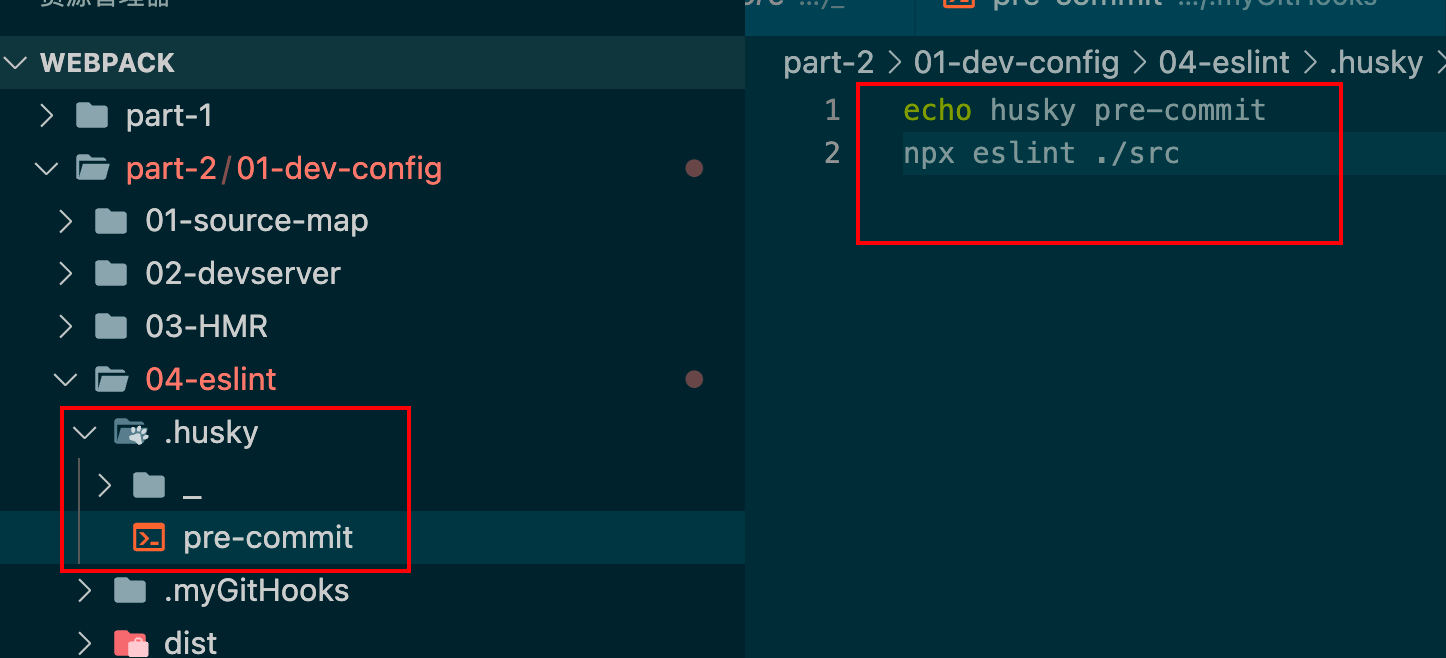
将app.js 修改为eslint通不过的版本
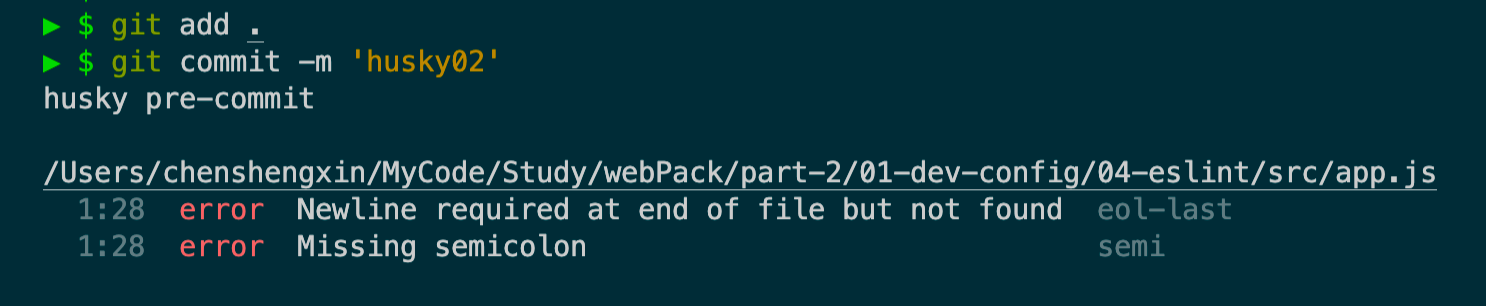
首先手工配置.git/hook/pre-commit文件做到提交前检查代码,接着优化成使用我们自己创建的文件.myGitHooks/pre-commit去完成提交前检查代,最后使用husky工具,帮助我们简化操作上面的操作方式。
- 安装husky开发依赖,
package.json加入prepare脚本,- 添加自定义文件
pre-commit, - 提升权限,
- 不用我们自己去配置hooksPath的指向目录。
这些都认为是webpack可以应用的模块(ECMAScript模块、CommonJS模块、AMD模块、Assets模块)
通过loader我们发现webpack可以处理多种语言和预处理的语法来变成模块,并且将这些相关依赖引入bundle中
原生支持的模块、和loader处理的模块 都认为是webpack的模块
使用webpack的externals属性将项目内一些模块名称可以作为外部拓展
const HtmlWebpackPlugin = require('html-webpack-plugin')
module.exports = {
mode: "development",
entry: './app.js',
plugins: [
new HtmlWebpackPlugin()
],
externals: {
jquery: 'jQuery'
}
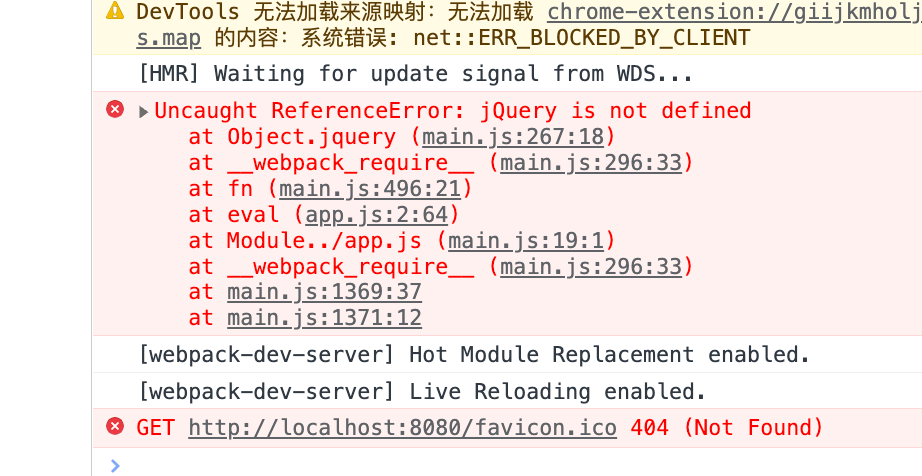
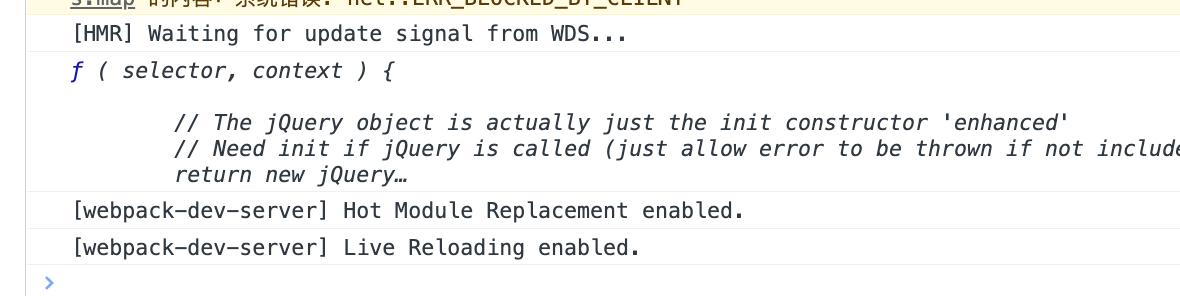
}创建app.js
import $ from 'jquery'

console.log($);
因为没有引入jQuery的cdn所以页面会报错
创建index.html,并且引入jQuery的cdn
<!DOCTYPE html>
<html lang="en">
<head>
    <meta charset="UTF-8">
    <meta http-equiv="X-UA-Compatible" content="IE=edge">
    <meta name="viewport" content="width=device-width, initial-scale=1.0">
    <title>Document</title>
    <script src="https://cdn.bootcdn.net/ajax/libs/jquery/3.6.0/jquery.js"></script>
</head>
<body>
</body>
</html>
再修改下webpack.config.js
plugins: [
        new HtmlWebpackPlugin({
            template: './index.html'
        })
],运行npx webpack server
成功引入了。
每次都要手动去引入外部的cdn链接,太麻烦,能不能让webpack自动去引入
操作:
- 删除index.html
- 删除HtmlWebpackPlugin内配置的template
- 修改externals

运行npx webpack server

这是因为上面引入的cdn,我们没有告诉webpack它要以什么形式这拿这个cdn资源
修改webpack.config.js
		externalsType: 'script',
    externals: {
        jquery: [
            'https://cdn.bootcdn.net/ajax/libs/jquery/3.6.0/jquery.js',
            '$'
        ]
}再次运行npx webpack server
成功引入!
达到了缩小打包体积大小,降低首屏加载时间!
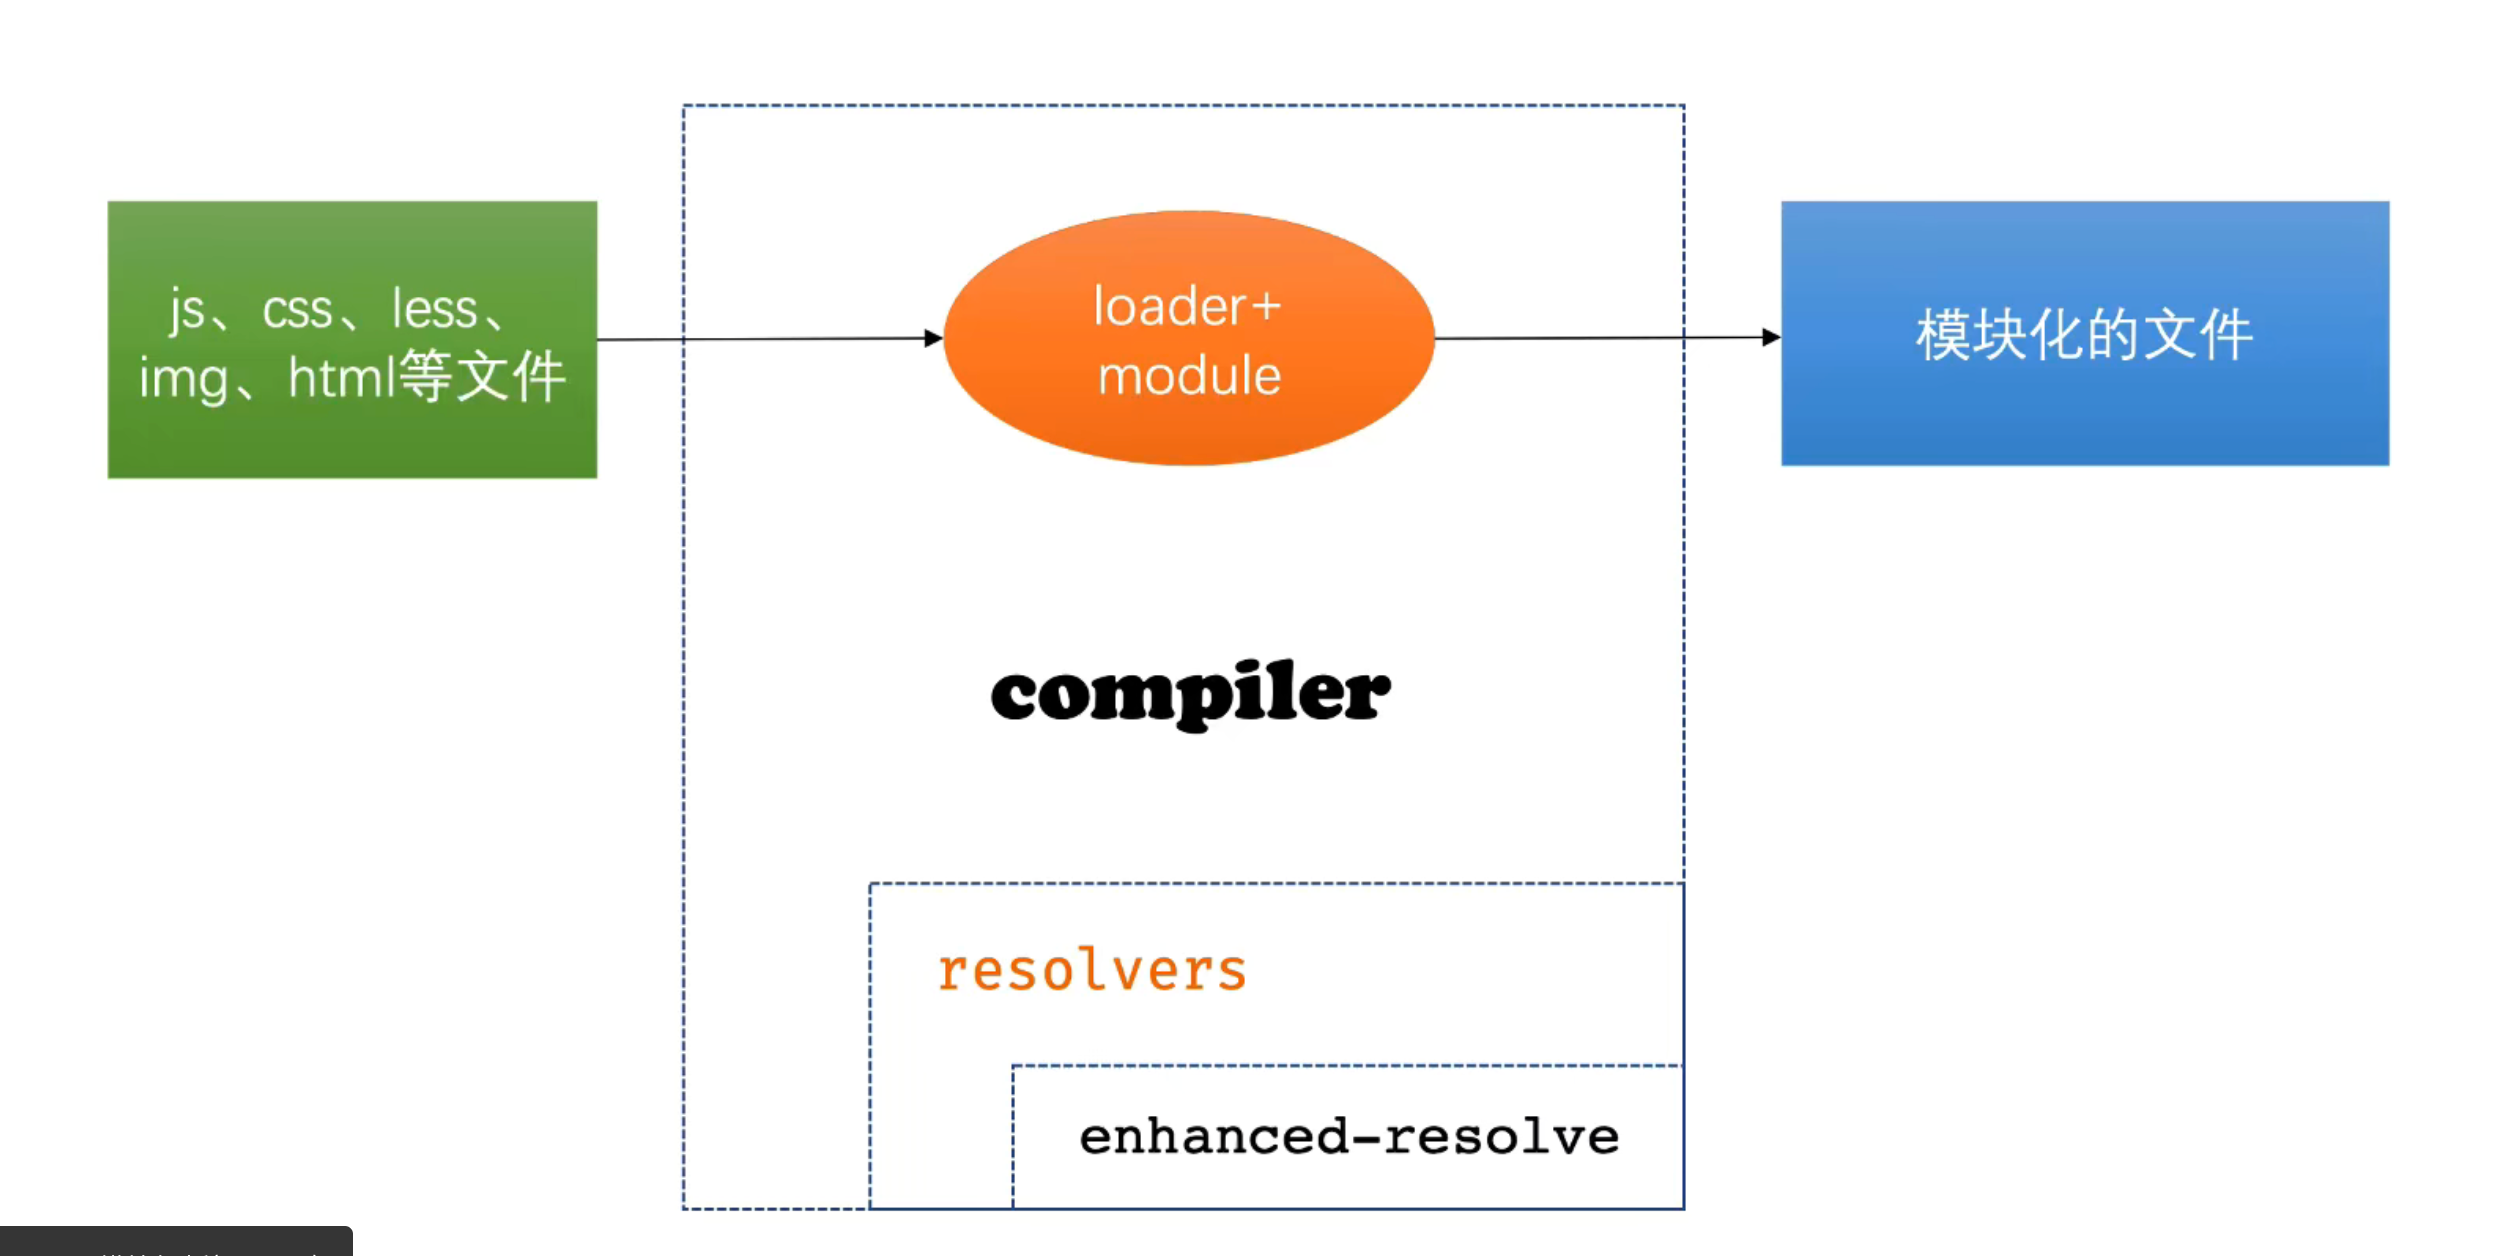
每当一个文件依赖另一个文件时,webpack 会直接将文件视为存在依赖关系。这使得 webpack 可以获取非代码资源,如 images 或 web 字体等。并会把它们作为 依赖提供给应用程序。当 webpack 开始工作时,它会根据我们写好的配置,从 入口(entry) 开始,webpack 会递归的构建一个 依赖关系图,这个依赖图包含着应用程序中所需的每个模块,然后将所有模块打包为bundle(也就是output的配置项)。 单纯讲似乎很抽象,我们更期望能够可视化打包产物的依赖图,下边列示了一些bundle分析工具。
bundle 分析(bundle analysis) 工具:
官方分析工具 是一个不错的开始。还有一些其他社区支持的可选项:
- webpack-chart:webpack stats 可交互饼图。
- webpackvisualizer:可视化并分析你的 bundle,检查哪些模块占用空间,哪些可能是重复使用的。
- webpack-bundle-analyzer: 一个 plugin 和CLI工具,它将 bundle 内容展示为一个便捷的、交互式、可缩放的 树状图形式。
- webpack bundle optimize helper:这个工具会分析你的 bundle,并提供可操作的改进措施,以减少 bundle 的 大小。
- bundle-stats:生成一个 bundle 报告 (bundle 大小、资源、模块),并比较不同构建之间的结果。
安装webpack-bundle-analyzer依赖
npm i webpack-bundle-analyzer-Dconst HtmlWebpackPlugin = require('html-webpack-plugin')
const { BundleAnalyzerPlugin } = require('webpack-bundle-analyzer')
module.exports = {
mode: 'development',
entry: {
app: './src/app.js',
app2: './src/app2.js'
},
plugins: [
new HtmlWebpackPlugin(),
new BundleAnalyzerPlugin()
]
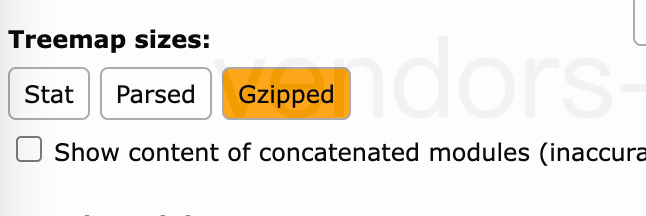
}stat、parsed、Gzipped 3个按钮
每个按钮都有不同含义

Postcss 是一个用 JavaScript 工具和插件转换CSS 代码的工具。比如可以使用 Autoprefixer 插件自动获取浏览器的流行度和能够支持的属性,并根据这些数据帮我们自动的为 CSS 规则添加前缀,将最新的 CSS 语法转换成大多数浏览器都能理解的语法。
css 模块 能让你永远不用担心命名太大众化而造成冲突,只要用最有意义的名字就行了。
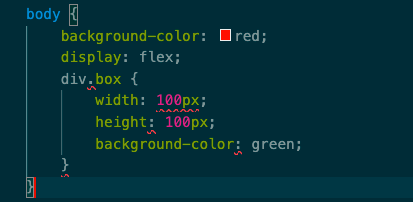
app.css
body {
    background-color: red;
    display: flex;
}
npm install postcss-loader -D
npm install autoprefixer -D在根目录新建postcss.config.js文件,使用autoprefixer插件
PostCSS插件,用于解析CSS,并使用我可以使用的值将供应商前缀添加到CSS规则。它也是由谷歌推荐的,并在Twitter和阿里巴巴使用。
module.exports = {
    plugins: [
        require('autoprefixer')
    ]
}
然后在package.json加入配置
  "browserslist": [
    "> 1%", //世界上大于1%的浏览器
    "last 2 version" //最后2个版本
  ]
运行webpack server
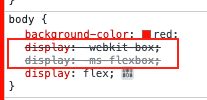
可以看到已经加入了每个浏览器适配的css语法
安装postcss-nested依赖,可以在css内写嵌套
npm install postcss-nested -Dmodule.exports = {
plugins: [
require('autoprefixer'),
require('postcss-nested')
]
}CSS本身就不支持嵌套写法
vsCode报错了,但是我们使用了postcss-nested插件帮助我们解析这种嵌套的写法,运行webpack server
这是postcss-nested帮我们解析后的结果
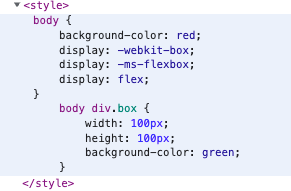
要是在别的css中也写了个.box这样就会冲突了。使用CSS模块来解决
修改webpack.config.js
 module: {
        rules: [
            {
                test: /\.css$/,
                use: [
                    'style-loader',
                    {
                        loader: 'css-loader',
                        options: {
                            modules: true,
                        }
                    },
                    'postcss-loader'
                ]
            }
        ]
    }
重新运行webpack server,发现样式失效了
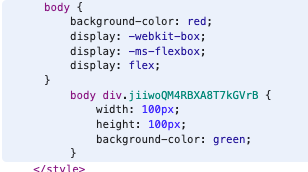
原因:css类名 变成了随机值,肯定样式不起作用了。
修改app.js引入css的写法
import style from  './app.css'

console.log(style); //打印一下
const div = document.createElement('div')
div.textContent = 'hello'
div.classList.add(style.box)
document.body.appendChild(div)
样式就恢复好了。(React也是这样的类似写法)
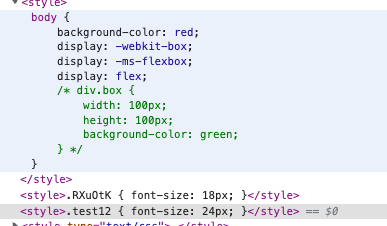
也可以开启CSS模块模式,比如全局样式可以冠以.global前缀,如:
-
*.global.css css普通模式
-
*.css css module模式
这里统一用global关键字进行识别。用正则表达式匹配文件:
 						{
                test: new RegExp(`^(?!.*\\.global).*\\.css$`),  //global.css 文件加入css模块化
                use: [
                    'style-loader',
                    {
                        loader: 'css-loader',
                        options: {
                            modules: {
                                localIdentName: '[hash:base64:6]'
                            }
                        }
                    },
                    'postcss-loader'
                ]
            },
            {
                test: new RegExp(`^(.*\\.global).*\\.css$`), // 普通css 普通模式
                use: [
                    'style-loader',
                    'css-loader',
                    'postcss-loader'
                ]
            },
test.css
.test1 {
    font-size: 18px;
}
test.global.css
.test12 {
    font-size: 24px;
}
app.js
import style from  './app.css'
import test from './test.css'
import testGlobal from './test.global.css'

console.log(style);
console.log(test);
console.log(testGlobal);
使用postcss可以帮我们把css解析为一个抽象语法树,调用一些插件处理这个抽象树,并添加一些特殊的功能。
为了防止css名称冲突,在css-loader中配置module为true,开启css模块化功能
html5新特性,将负责、耗时的操作放到浏览器后台进程去处理,不影响JS主线程UI的渲染
webpack5内置了这个功能
创建work.js
// web works

self.onmessage = (message) => {
    self.postMessage({
        answer: 1111
    })
}
创建app.js
const worker = new Worker(new URL('./work.js', import.meta.url))

worker.postMessage({
    question: "hi, how many the luck num today?"
})

worker.onmessage = message => console.log(message.data.answer)安装依赖
npm install typescript ts-loader -D配置webpack.config.js
const path = require('path')
const HtmlWebpackPlugin = require('html-webpack-plugin')

module.exports = {
    mode: 'development',
    entry: './src/app.ts',
    devtool: 'inline-source-map',
    module: {
        rules: [
            {
                test: /\.ts$/,
                use: 'ts-loader',
                exclude: /node_modules/
            }
        ]
    },
    resolve: {
        extensions: ['.ts', '.js']
    },
    output: {
        filename: 'bundle.js',
        path: path.resolve(__dirname, './dist')
    },
    plugins: [
        new HtmlWebpackPlugin()
    ]
}
编写src/app.ts
const age: number = 12
console.log(age)
运行webpack server

执行npx tsc --init
在根目录下生成tsconfig.json
{
  "compilerOptions": {
    /* Visit https://aka.ms/tsconfig to read more about this file */

    /* Projects */
    // "incremental": true,                              /* Save .tsbuildinfo files to allow for incremental compilation of projects. */
    // "composite": true,                                /* Enable constraints that allow a TypeScript project to be used with project references. */
    // "tsBuildInfoFile": "./.tsbuildinfo",              /* Specify the path to .tsbuildinfo incremental compilation file. */
    // "disableSourceOfProjectReferenceRedirect": true,  /* Disable preferring source files instead of declaration files when referencing composite projects. */
    // "disableSolutionSearching": true,                 /* Opt a project out of multi-project reference checking when editing. */
    // "disableReferencedProjectLoad": true,             /* Reduce the number of projects loaded automatically by TypeScript. */

    /* Language and Environment */
    "target": "es2016",                                  /* Set the JavaScript language version for emitted JavaScript and include compatible library declarations. */
    // "lib": [],                                        /* Specify a set of bundled library declaration files that describe the target runtime environment. */
    // "jsx": "preserve",                                /* Specify what JSX code is generated. */
    // "experimentalDecorators": true,                   /* Enable experimental support for TC39 stage 2 draft decorators. */
    // "emitDecoratorMetadata": true,                    /* Emit design-type metadata for decorated declarations in source files. */
    // "jsxFactory": "",                                 /* Specify the JSX factory function used when targeting React JSX emit, e.g. 'React.createElement' or 'h'. */
    // "jsxFragmentFactory": "",                         /* Specify the JSX Fragment reference used for fragments when targeting React JSX emit e.g. 'React.Fragment' or 'Fragment'. */
    // "jsxImportSource": "",                            /* Specify module specifier used to import the JSX factory functions when using 'jsx: react-jsx*'. */
    // "reactNamespace": "",                             /* Specify the object invoked for 'createElement'. This only applies when targeting 'react' JSX emit. */
    // "noLib": true,                                    /* Disable including any library files, including the default lib.d.ts. */
    // "useDefineForClassFields": true,                  /* Emit ECMAScript-standard-compliant class fields. */
    // "moduleDetection": "auto",                        /* Control what method is used to detect module-format JS files. */

    /* Modules */
    "module": "commonjs",                                /* Specify what module code is generated. */
    "rootDir": "./src",                                  /* Specify the root folder within your source files. */
    // "moduleResolution": "node",                       /* Specify how TypeScript looks up a file from a given module specifier. */
    // "baseUrl": "./",                                  /* Specify the base directory to resolve non-relative module names. */
    // "paths": {},                                      /* Specify a set of entries that re-map imports to additional lookup locations. */
    // "rootDirs": [],                                   /* Allow multiple folders to be treated as one when resolving modules. */
    // "typeRoots": [],                                  /* Specify multiple folders that act like './node_modules/@types'. */
    // "types": [],                                      /* Specify type package names to be included without being referenced in a source file. */
    // "allowUmdGlobalAccess": true,                     /* Allow accessing UMD globals from modules. */
    // "moduleSuffixes": [],                             /* List of file name suffixes to search when resolving a module. */
    // "resolveJsonModule": true,                        /* Enable importing .json files. */
    // "noResolve": true,                                /* Disallow 'import's, 'require's or '<reference>'s from expanding the number of files TypeScript should add to a project. */

    /* JavaScript Support */
    // "allowJs": true,                                  /* Allow JavaScript files to be a part of your program. Use the 'checkJS' option to get errors from these files. */
    // "checkJs": true,                                  /* Enable error reporting in type-checked JavaScript files. */
    // "maxNodeModuleJsDepth": 1,                        /* Specify the maximum folder depth used for checking JavaScript files from 'node_modules'. Only applicable with 'allowJs'. */

    /* Emit */
    // "declaration": true,                              /* Generate .d.ts files from TypeScript and JavaScript files in your project. */
    // "declarationMap": true,                           /* Create sourcemaps for d.ts files. */
    // "emitDeclarationOnly": true,                      /* Only output d.ts files and not JavaScript files. */
    // "sourceMap": true,                                /* Create source map files for emitted JavaScript files. */
    // "outFile": "./",                                  /* Specify a file that bundles all outputs into one JavaScript file. If 'declaration' is true, also designates a file that bundles all .d.ts output. */
    "outDir": "./dist",                                   /* Specify an output folder for all emitted files. */
    // "removeComments": true,                           /* Disable emitting comments. */
    // "noEmit": true,                                   /* Disable emitting files from a compilation. */
    // "importHelpers": true,                            /* Allow importing helper functions from tslib once per project, instead of including them per-file. */
    // "importsNotUsedAsValues": "remove",               /* Specify emit/checking behavior for imports that are only used for types. */
    // "downlevelIteration": true,                       /* Emit more compliant, but verbose and less performant JavaScript for iteration. */
    // "sourceRoot": "",                                 /* Specify the root path for debuggers to find the reference source code. */
    // "mapRoot": "",                                    /* Specify the location where debugger should locate map files instead of generated locations. */
    // "inlineSourceMap": true,                          /* Include sourcemap files inside the emitted JavaScript. */
    // "inlineSources": true,                            /* Include source code in the sourcemaps inside the emitted JavaScript. */
    // "emitBOM": true,                                  /* Emit a UTF-8 Byte Order Mark (BOM) in the beginning of output files. */
    // "newLine": "crlf",                                /* Set the newline character for emitting files. */
    // "stripInternal": true,                            /* Disable emitting declarations that have '@internal' in their JSDoc comments. */
    // "noEmitHelpers": true,                            /* Disable generating custom helper functions like '__extends' in compiled output. */
    // "noEmitOnError": true,                            /* Disable emitting files if any type checking errors are reported. */
    // "preserveConstEnums": true,                       /* Disable erasing 'const enum' declarations in generated code. */
    // "declarationDir": "./",                           /* Specify the output directory for generated declaration files. */
    // "preserveValueImports": true,                     /* Preserve unused imported values in the JavaScript output that would otherwise be removed. */

    /* Interop Constraints */
    // "isolatedModules": true,                          /* Ensure that each file can be safely transpiled without relying on other imports. */
    // "allowSyntheticDefaultImports": true,             /* Allow 'import x from y' when a module doesn't have a default export. */
    "esModuleInterop": true,                             /* Emit additional JavaScript to ease support for importing CommonJS modules. This enables 'allowSyntheticDefaultImports' for type compatibility. */
    // "preserveSymlinks": true,                         /* Disable resolving symlinks to their realpath. This correlates to the same flag in node. */
    "forceConsistentCasingInFileNames": true,            /* Ensure that casing is correct in imports. */

    /* Type Checking */
    "strict": true,                                      /* Enable all strict type-checking options. */
    // "noImplicitAny": true,                            /* Enable error reporting for expressions and declarations with an implied 'any' type. */
    // "strictNullChecks": true,                         /* When type checking, take into account 'null' and 'undefined'. */
    // "strictFunctionTypes": true,                      /* When assigning functions, check to ensure parameters and the return values are subtype-compatible. */
    // "strictBindCallApply": true,                      /* Check that the arguments for 'bind', 'call', and 'apply' methods match the original function. */
    // "strictPropertyInitialization": true,             /* Check for class properties that are declared but not set in the constructor. */
    // "noImplicitThis": true,                           /* Enable error reporting when 'this' is given the type 'any'. */
    // "useUnknownInCatchVariables": true,               /* Default catch clause variables as 'unknown' instead of 'any'. */
    // "alwaysStrict": true,                             /* Ensure 'use strict' is always emitted. */
    // "noUnusedLocals": true,                           /* Enable error reporting when local variables aren't read. */
    // "noUnusedParameters": true,                       /* Raise an error when a function parameter isn't read. */
    // "exactOptionalPropertyTypes": true,               /* Interpret optional property types as written, rather than adding 'undefined'. */
    // "noImplicitReturns": true,                        /* Enable error reporting for codepaths that do not explicitly return in a function. */
    // "noFallthroughCasesInSwitch": true,               /* Enable error reporting for fallthrough cases in switch statements. */
    // "noUncheckedIndexedAccess": true,                 /* Add 'undefined' to a type when accessed using an index. */
    // "noImplicitOverride": true,                       /* Ensure overriding members in derived classes are marked with an override modifier. */
    // "noPropertyAccessFromIndexSignature": true,       /* Enforces using indexed accessors for keys declared using an indexed type. */
    // "allowUnusedLabels": true,                        /* Disable error reporting for unused labels. */
    // "allowUnreachableCode": true,                     /* Disable error reporting for unreachable code. */

    /* Completeness */
    // "skipDefaultLibCheck": true,                      /* Skip type checking .d.ts files that are included with TypeScript. */
    "skipLibCheck": true                                 /* Skip type checking all .d.ts files. */
  }
}将需要的配置打开。这里只开启了rootDir 和 outDir 这2个配置
引入lodash依赖,发现ts引入第三方依赖都需要定义个模块的概念
搜索模块 进入后搜索相应依赖的模块,进行安装
const HtmlWebpackPlugin = require('html-webpack-plugin')
module.exports = {
    mode: 'development',
    plugins: [
        new HtmlWebpackPlugin()
    ],
    entry: {
        main: {
            import: ['./src/app2.js', './src/app.js'],
            dependOn: 'lodash'
        },
        lodash: 'lodash'
    }
}
创建个app3.js 并引入lodash依赖
const HtmlWebpackPlugin = require('html-webpack-plugin')
module.exports = {
    mode: 'development',
    plugins: [
        new HtmlWebpackPlugin()
    ],
    entry: {
        main: {
            import: ['./src/app2.js', './src/app.js'],
            dependOn: 'lodash'
        },
        main2: {
            import: ['./src/app3.js'],
            dependOn: 'lodash'
        },
        lodash: 'lodash'
    }
}
打包后的html文件
能不能将mian.js放在一个html、main2.js放在另外一个html
先在根目录创建个index.html,修改webpack.config.js
const HtmlWebpackPlugin = require('html-webpack-plugin')
module.exports = {
mode: 'development',
plugins: [
new HtmlWebpackPlugin({
template: './index.html',
title: '多页面应用功能', // index.html 页面内可以使用ejs语法注入这个变量 <title><%= htmlWebpackPlugin.options.title %></title>
inject: 'body', // 定义注入的位置
chunks: ['main'], //使用entry对象中哪些chunk
})
],
entry: {
main: {
import: ['./src/app2.js', './src/app.js'],
dependOn: 'lodash'
},
main2: {
import: ['./src/app3.js'],
dependOn: 'lodash'
},
lodash: 'lodash'
}
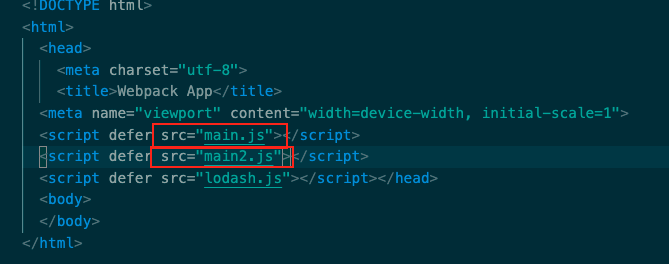
}上面的配置,还是单页面,只是我们可以指定哪些chunk注入到哪个html文件的位置,按照这个思路,我们在新建个HtmlWebpackPlugin就行啦。
plugins: [
        new HtmlWebpackPlugin({
            template: './index.html',
            title: '多页面应用功能',
            inject: 'body', // 定义注入的位置
        }),
        new HtmlWebpackPlugin({
            template: './index2.html',
            inject: 'body',
        })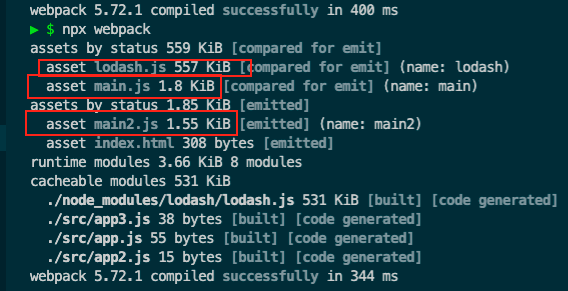
]现在先不指定chunk,看看默认webpack如何运行,但是运行报错了,原因是我们2个html打包后都叫同一个名称index.html,修改配置文件,再试试。
打包完成后,发现2个html的引入js文件都是一样的。都是entry的3个 main, main2, lodash
创建个index2.html,并且修改下webpack.config.js
const HtmlWebpackPlugin = require('html-webpack-plugin')
module.exports = {
    mode: 'development',
    plugins: [
        new HtmlWebpackPlugin({
            template: './index.html',
            title: '多页面应用功能',
            inject: 'body', // 定义注入的位置
            filename: 'chanel1/index.html', //配置html生成后的打包路径
            chunks: ['main', 'lodash'] // 使用main和lodash这个2个chunk
        }),
        new HtmlWebpackPlugin({
            template: './index2.html',
            inject: 'body',
            filename: 'chanel2/index2.html', //配置html生成后的打包路径
            chunks: ['main2', 'lodash'] // 使用main2和lodash这个2个chunk
        })
    ],
    output: {
        clean: true
    },
    entry: {
        main: {
            import: ['./src/app2.js', './src/app.js'],
            dependOn: 'lodash',
            filename: 'chanel1/[name].js' //配置js生成后的打包路径
        },
        main2: {
            import: ['./src/app3.js'],
            dependOn: 'lodash',
            filename: 'chanel2/[name].js' ////配置js生成后的打包路径
        },
        lodash: {
            import: ['lodash'],
            filename: 'common/[name].js'
        }
    }
}配置webpack.config.js
const HtmlWebpackPlugin = require('html-webpack-plugin')

module.exports = {
    mode: 'development',
    entry: './src/app.js',
    devtool: 'inline-source-map',
    plugins: [
        new HtmlWebpackPlugin()
    ],
    optimization: {
        usedExports: true
    }
}
创建math.js 与 app.js
// math.js
export const add = (x, y) => x + y
export const minus = (x, y) => x - y
// app.js
import { add, minus } from './math'
console.log(add(5, 6));运行npx webpack打包整个代码
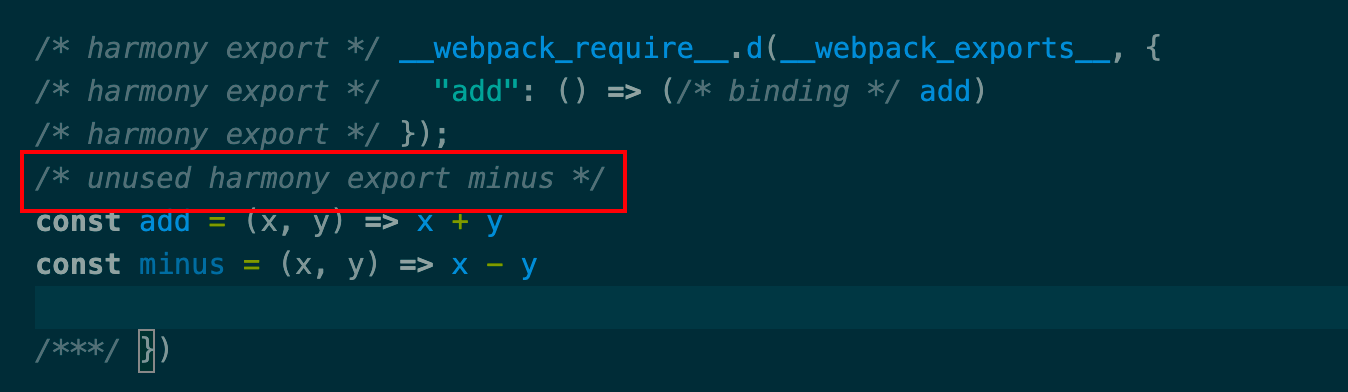
发现minus没有使用到,因为app.js 只使用了add方法,达到目的
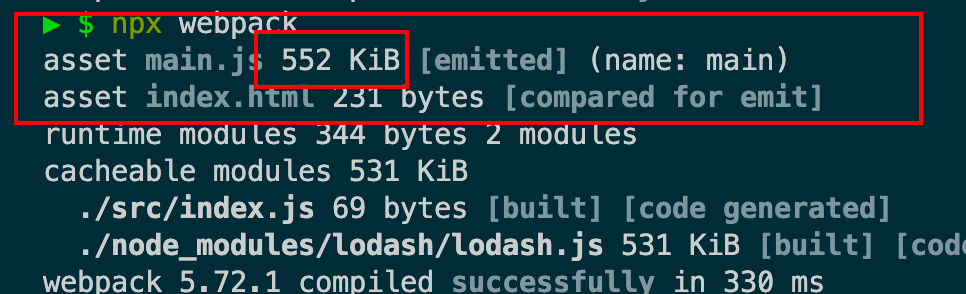
修改下webpack.config.js为生产环境
const HtmlWebpackPlugin = require('html-webpack-plugin')

module.exports = {
    mode: 'production',
    entry: './src/app.js',
    // devtool: 'inline-source-map',
    plugins: [
        new HtmlWebpackPlugin()
    ],
    optimization: {
        usedExports: true
    }
}
发现打包后的代码 ./dist/main.js
(()=>{"use strict";console.log(11)})();说明webpack帮我们优化到了极致,这个时候这变成了一行代码了。
那么引入第三方库呢,如lodash
// 全部引入
import _ from 'lodash';
// 部分引入
import {get} from 'lodash';
测试发现,上面的两种引入方式,不管你是否使用,都会把整个lodash打包进来。
这是因为lodash是通过moduls.exports = _这种方式导出的。
还好lodash提供了按需引入模式:
import get from 'lodash/get';上面的方式引入,只会引入get.js文件,其它模块都不会加载进来。
若开启,则引入css
import './xxxx.css'会起作用
修改package.json
{
  "sideEffects": ["*.css" ,"*.scss", "*.global.js"...]
}
{
  "sideEffects": false, // 所有引入没使用的,都会被排除掉
}
{
  "sideEffects": true, // 所有引入没使用的,都不会被排除掉
}
如果不需要某些文件被 webpack 清除,可以在 package.json 中配置 sideEffects 属性
配置webpack.config.js
const HtmlWebpackPlugin = require('html-webpack-plugin')
const webpack = require('webpack')
module.exports = {
    mode: 'development',
    entry: './src/index.js',
    plugins: [
        new HtmlWebpackPlugin(),
        new webpack.ProvidePlugin({
            _: 'lodash' //将lodash放在全局依赖下
        })
    ],
    output: {
        clean: true
    }
}
// import _ from 'lodash'
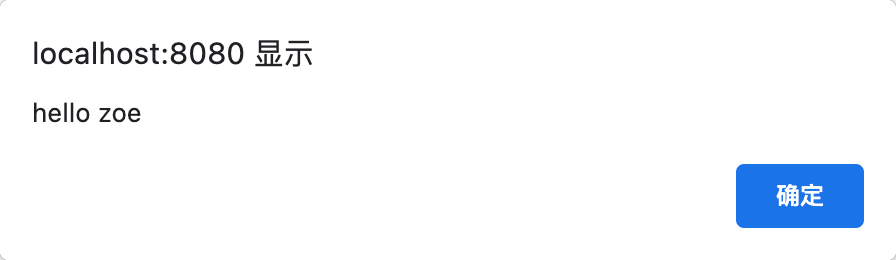
console.log(_.join(['hello', 'Zoe'], ' '));去掉import引入lodash的语句,直接使用_,运行webpack,打包完成~
可以看出lodash的大小在打包后的main.js内
修改index.js
this.alert('hello')运行webpack server
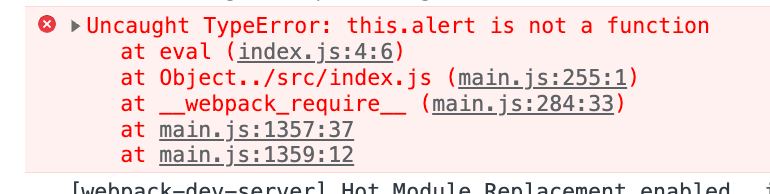
修改webpack.config.js
module: {
        rules: [
            {
                test: require.resolve('./src/index.js'), // 解析到./src/index.js使用下面的loader去处理
                use: 'imports-loader?wrapper=window', // 将当前的this指向window对象
            }
        ]
    }
项目内创建个globals.js
const file = 'example.txt'

const helpers = {
    test: function() {
        console.log('test something');
    },

    parse: function() {
        console.log('parse something');
    }
}
我们只使用这个文件的某个方法,不需要导入整个文件。
安装exports-loader
npm install exports-loader -D配置webpack.config.js. exports-loader官方文档
						{
                test: require.resolve('./src/globals.js'),
                use: 'exports-loader?type=commonjs&exports=file,multiple|helpers.parse|parse'
            }

// =>
{
                test: require.resolve('./src/globals.js'),
                loader: 'exports-loader',
                options: {
                    type: 'commonjs',
                    exports: ['file', 'multiple helpers.parse parse']
                },
}
业务代码中
const { file, parse } = require('./globals')
console.log(file);
parse()
将不同模块的js库,以commonjs的形式进行导入,并只使用里面在webpack.config.js里面exports的相应变量名称

创建src/index.js
import '@babel/polyfill'
// Array.from不是所有浏览器都支持的
console.log(Array.from([1, 2, 3], x => x + x));
创建webpack.config.js
module.exports = {
    mode: 'development',
    entry: './src/index.js'
}
运行webpack打包发现打包出来main.js多了些浏览器兼容的代码,保证了向下兼容
不建议使用 import @babel/polyfill。因为这样做的缺点是会全局引入整个 polyfill包,比如 Array.from 会全局引入,不但包的体积大,而且还会污染全局环境。
babel-preset-env package 通过 browserslist 来转译那些你浏览器中不支持的特性。这个 preset 使用useBuiltIns 选项,默认值是 false,这种方式可以将全局 babel-polyfill 导入,改进为更细粒度的import 格式:
安装依赖
npm install babel-loader @babel/core @babel/preset-env -D
npm install core-js@3 -D
修改webpack.config.js
module.exports = {
  mode: "development",
  entry: "./src/index.js",
  module: {
    rules: [
      {
        test: /\.js$/,
        exclude: /node_modules/,
        use: {
          loader: "babel-loader",
          options: {
            presets: [
              [
                "@babel/preset-env",
                {
                  targets: ["last 1 version", "> 1%"],
                  useBuiltIns: "usage",
                  corejs: 3,
                },
              ],
            ],
          },
        },
      },
    ],
  },
};创建src/index.js
export const add = (x, y) => x + y创建webpack.config.js
const path = require('path')
module.exports = {
    mode: 'production',
    entry: './src/index.js',
    output: {
        path: path.resolve(__dirname, 'dist'),
        filename: 'mylib.js',
    }
}
发现打包的mylib.js是空的,因为production模式下默认会排除掉没有使用的代码,加入library属性
const path = require('path')
module.exports = {
    mode: 'production',
    entry: './src/index.js',
    output: {
        path: path.resolve(__dirname, 'dist'),
        filename: 'mylib.js',
        library: 'mylib'
    }
}
上面的写法支持script引入的
改为commonjs
const path = require('path')
module.exports = {
    mode: 'production',
    entry: './src/index.js',
    output: {
        path: path.resolve(__dirname, 'dist'),
        filename: 'mylib.js',
        library: {
        	name: "mylib",
          type: "commonjs"
        },
    }
}
改为esModule
const path = require('path')
module.exports = {
    mode: 'production',
    entry: './src/index.js',
    experiments: {
      outputModule: true
    },
    output: {
        path: path.resolve(__dirname, 'dist'),
        filename: 'mylib.js',
        library: {
        	// name: "mylib",
          type: "module"
        },
    }
}
改为umd(支持commons、script、umd)
const path = require('path')
module.exports = {
    mode: 'production',
    entry: './src/index.js',
    output: {
        path: path.resolve(__dirname, 'dist'),
        filename: 'mylib.js',
        library: {
        	name: "mylib",
          type: "umd"
        },
        globalObject: 'globalThis'
    }
}安装依赖
npm install webpack webpack-cli lodash -Dconst path = require('path')
module.exports = {
mode: 'production',
entry: './src/index.js',
output: {
path: path.resolve(__dirname, 'dist'),
filename: 'webpack-numbers.js',
library: {
name: 'webpackNumbers',
type: 'umd'
},
globalObject: 'globalThis'
}
}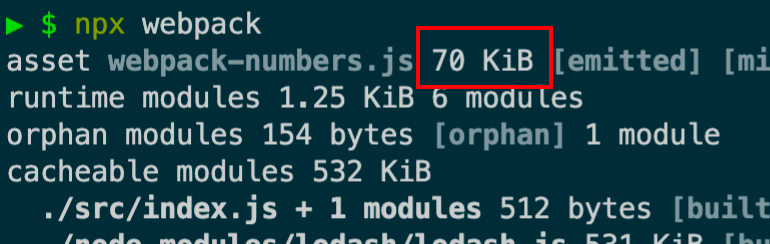
lodash都打到包了,但是不想整个都导入
const path = require('path')
module.exports = {
    mode: 'production',
    entry: './src/index.js',
    output: {
        path: path.resolve(__dirname, 'dist'),
        filename: 'webpack-numbers.js',
        library: {
            name: 'webpackNumbers',
            type: 'umd'
        },
        globalObject: 'globalThis'
    },
    externals: {
        lodash: {
            commonjs: 'lodash',
            commonjs2: 'lodash',
            amd: 'lodash',
            root: '_'
        }
    }
}
首先在npm仓库注册这个的号,并登陆
在项目根目录下运行
npm adduser
// 输入用户名、密码、邮箱
// 登陆成功后
npm publish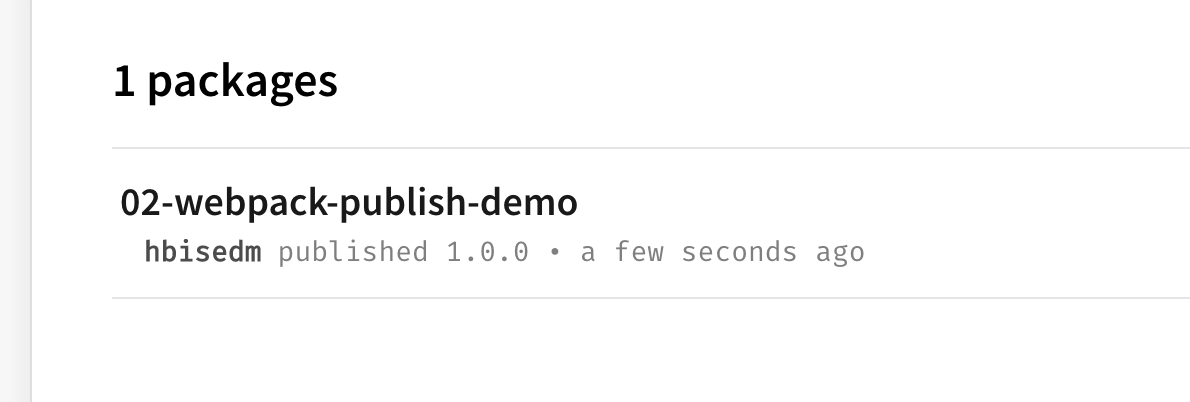
自己的仓库多了个
创建个新的目录,尝试将我们刚发布上npm仓库的包拉下来使用
const webpackNumbers = require('02-webpack-publish-demo')
console.log(webpackNumbers);
发现我们刚才打的包,package.json没有设置好。重新设置一下。
发布上去后,将原来的根目录下的package.json修改下版本号就可以了。
微前端的知识
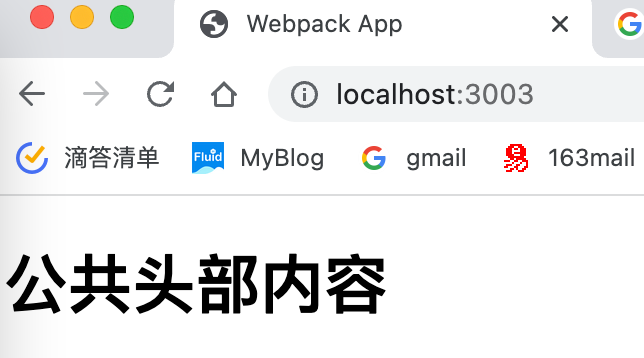
创建3个webpack应用
| Home | Nav | Search |
|---|---|---|
| http://localohost:3001 | http://localohost:3003 | http://localohost:3002 |
const Header = () => {
    const header = document.createElement('h1')
    header.textContent = '公共头部内容'
    return header
}
export default Header
const HtmlWebpackPlugin = require('html-webpack-plugin')
const { ModuleFederationPlugin } = require('webpack').container
module.exports = {
mode: 'production',
entry: './src/index.js',
plugins:[
new HtmlWebpackPlugin(),
new ModuleFederationPlugin({
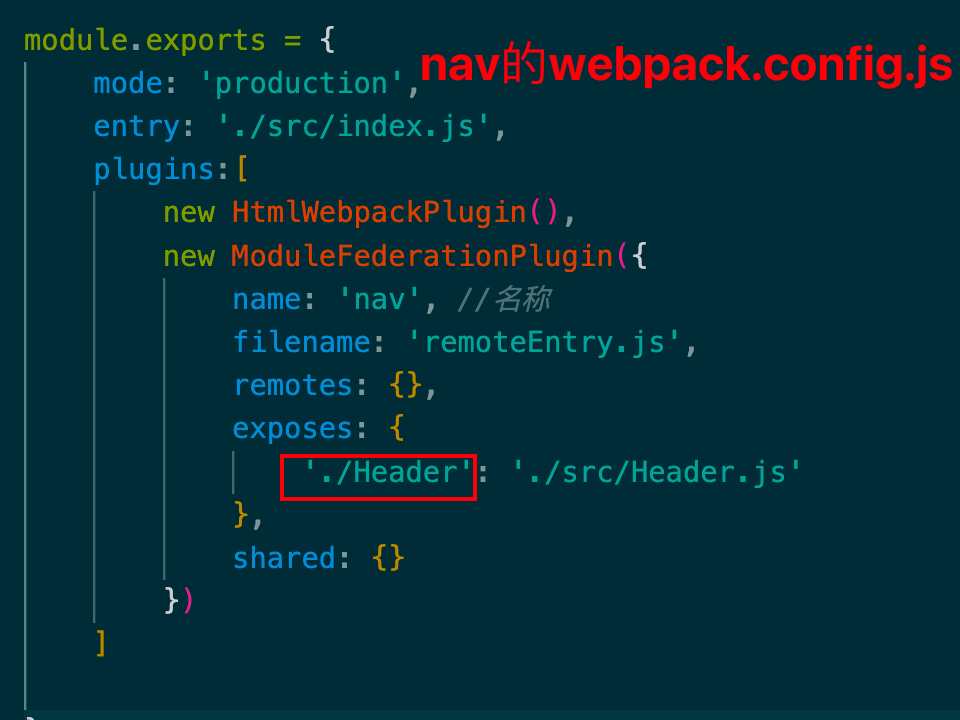
name: 'nav', //名称
filename: 'remoteEntry.js', //外部应用引入这个应用时候,使用这个文件名
remotes: {},
exposes: {
'./Header': './src/Header.js', // 导出的组件
},
shared: {}
})
]
}
引用nav应用
const HomeList = (num) => {
    let str = '<ul>'
    for(let i = 0; i < num; i++) {
        // str += `<li>item${num}</li>`
        str += '<li>item'+ i +'</li>'
    }
    str += '</ul>'
    return str
}

export default HomeList
const HtmlWebpackPlugin = require('html-webpack-plugin')
const { ModuleFederationPlugin } = require('webpack').container
module.exports = {
mode: 'production',
entry: './src/index.js',
plugins:[
new HtmlWebpackPlugin(),
new ModuleFederationPlugin({
name: 'home',
filename: 'remoteEntry.js',
remotes: {
nav: 'nav@http://localhost:3003/remoteEntry.js',
},
exposes: {
'./HomeList': './src/HomeList.js'
},
shared: {}
})
]
}// index.js
import a from './HomeList'
import ('nav/Header').then((Header) => {
const body = document.createElement('div')
body.appendChild(Header.default())
document.body.appendChild(body)
body.innerHTML += a(5)
})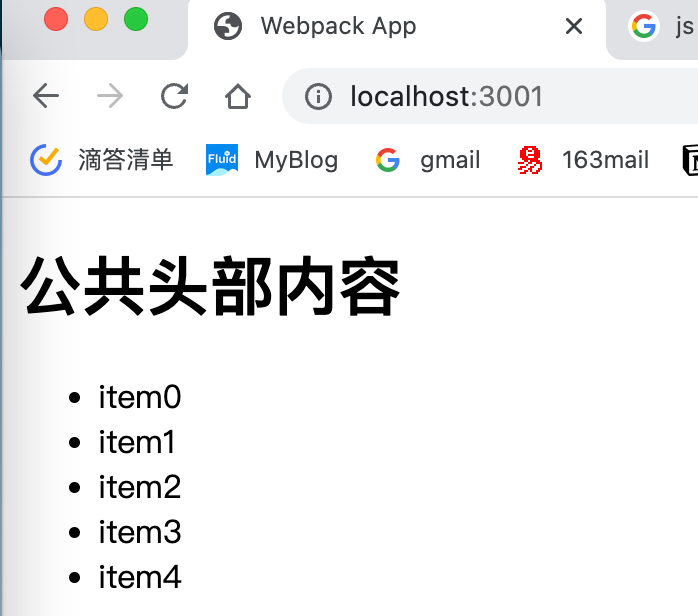
引用nav与home应用
// index.js
Promise.all([import('nav/Header'), import('home/HomeList')])
    .then(([
        {
            default: Header
        },
        {
            default: HomeList
        }
    ]) => {
        document.body.appendChild(Header())
        document.body.innerHTML += HomeList(3)
    })
const HtmlWebpackPlugin = require('html-webpack-plugin')
const { ModuleFederationPlugin } = require('webpack').container
module.exports = {
mode: 'production',
entry: './src/index.js',
plugins:[
new HtmlWebpackPlugin(),
new ModuleFederationPlugin({
name: 'search',
filename: 'remoteEntry.js',
remotes: {
nav: 'nav@http://localhost:3003/remoteEntry.js',
home: 'home@http://localhost:3001/remoteEntry.js'
}
})
]
}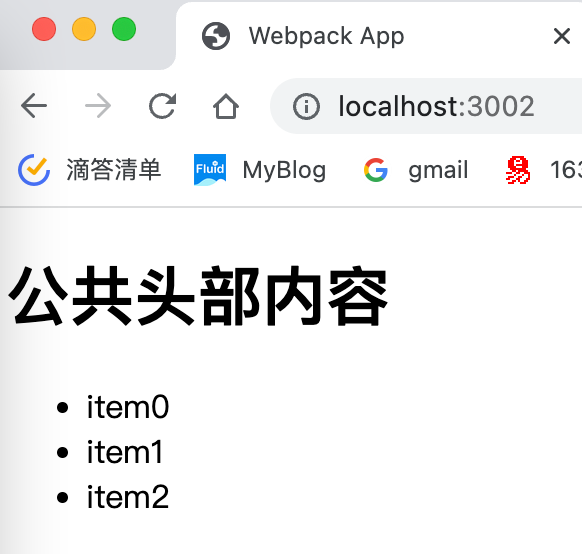
search应用导入nav应用
import('nav/Header')这个语句中 nav Header 怎么来的?

- 通过webpack来提升项目性能(网站的首屏时间,用于C端用户)
- 提升编译性能(提高打包速度,降低打包时间,用于开发人员)下面的内容的关于这种
三个环境提升构建性能
- 通用环境
- 开发环境
- 生产环境
-
提升环境版本,webpack、node版本
-
将loader应用于最少数量的必要模块
-
引导
- 每个额外的loader、plugin都有启动时间,尽量少用
-
解析
- 减少 resolve.modules, resolve.extensions,resolve.mainFiles, resolve.descriptionFiles 中条目数量,因为他们会增加文件系统调用的次数。
- 如果你不使用 symlinks(例如 npm link 或者 yarn link),可以设置 resolve.symlinks: false。
- 如果你使用自定义 resolve plugin 规则,并且没有指定 context上下文,可以设置 resolve.cache WithContext: false。
-
小就是快
减少编译结果的整体大小,以提高构建性能。尽量保持 chunk 体积小。
- 使用数量更少/体积更小的 library。
- 在多页面应用程序中使用 SplitChunksPlugin。
- 在多页面应用程序中使用 SplitChunksPlugin,并开启 async 模式。
- 移除未引用代码。
- 只编译你当前正在开发的那些代码。
-
持久化缓存
- 在webpack 配置中使用 cache 选项。使用 packagejson 中的"postinstall" 清除缓存目录。
- 将 cache 类型设置为内存或者文件系统。memory选项很简单,它告诉 webpack 在内存中存储缓存,不允许额外的配置:
module.exports = {
  cache: {
  	type: 'memory',
  },
};
-
自定义loader/plugin
-
dll
-
worker池(worker pool)