We read every piece of feedback, and take your input very seriously.
To see all available qualifiers, see our documentation.
Have a question about this project? Sign up for a free GitHub account to open an issue and contact its maintainers and the community.
By clicking “Sign up for GitHub”, you agree to our terms of service and privacy statement. We’ll occasionally send you account related emails.
Already on GitHub? Sign in to your account
在这篇文章中我们开始利用我们之前所学搭建一个简易的React开发环境,用以巩固我们之前学习的Webpack知识。首先我们需要明确这次开发环境需要达到的效果:1、能够编译JSX语言 2、css样式使用Sass开发 3.能够将基础的ES6转化为ES5 4.能够使用ESLint在开发的时候为我们做代码风格审查
首先,安装基本使用的webpack、webpack-dev-server
npm i webpack webpack-dev-server -D
为了可以生成一个基本的页面我们使用html-webpack-plugin,为了方便我们定制,我们自己在src定义一个html文件,使用template指定这个文件。
安装html-webpack-plugin
npm i html-webpack-plugin -D
在src文件夹下生成一个html文件,内容如下:
<!DOCTYPE html>
<html lang="en">
<head>
    <meta charset="UTF-8">
    <title>Title</title>
</head>
<body>
<div id="app"></div>
</body>
</html>
在webpack.config.js中写入以下内容作为基本的设置:
const path = require('path');
const HtmlWebpackPlugin = require('html-webpack-plugin');
const webpack = require('webpack');
const config = {
  entry: './src/main.js',
  output: {
    filename: 'bundle-[hash].js',
    path: path.join(__dirname, 'dist')
  },
  devtool:'inline-source-map',
  devServer: {
    contentBase: './dist',
    hot: true
  },
  plugins: [
    new HtmlWebpackPlugin({
      template: './src/index.html'
    }),
    new webpack.HotModuleReplacementPlugin()
  ]
}

module.exports = config;
此时在命令行中运行以下命令可以看到一切正常运行,尽管目前在浏览器上还没有任何效果:
webpack-dev-server --open
在React开发的时候我们使用jsx语言和es6,因此需要使用babel对我们的开发进行一个编译,使用babel即可: 安装babel-loader:
npm i babel-loader -D
为了使用这个babel-loader,我们需要安装babel-core(当我们需要以编程方式使用babel时就需要安装这个):
npm i babel-core -D
为了编译es6和jsx需要安装相应的preset,即需要安装babel-preset-react和babel-preset-es2015:
npm i babel-preset-es2015 babel-preset-react -D
在webpack的配置文件中引入babel-loader:
const config = {
  //....
  module:{
    rules: [
      {
        test: /\.(js|jsx)$/,
        use:[
          'babel-loader'
        ]
      }
    ]
  }
  // ......
}

module.exports = config;
配置babel的配置文件,在.babelrc文件中写入以下内容:
{
  "presets": [
    "es2015",
    "react"
  ]
}
此时我们测试一下是否可以正常编译jsx和es2015,安装react和react-dom,同时在src中的main.js和App.js写入部分内容
npm i react react-dom -S
main.js
import ReactDOM from 'react-dom';
import React from 'react';
import App from './App';

ReactDOM.render(<App />, document.getElementById('app'));
App.js
import React from 'react';

export default function () {
  return (
    <div className="header">
      React
    </div>
  );
}
在命令行运行命令,可以发现浏览器已经正常显示了,也就是说正常编译了jsx和es6
此时,整个webpack.config.js文件内容如下:
const path = require('path');
const HtmlWebpackPlugin = require('html-webpack-plugin');
const webpack = require('webpack');
const config = {
  entry: './src/main.js',
  output: {
    filename: 'bundle-[hash].js',
    path: path.join(__dirname, 'dist')
  },
  devtool:'inline-source-map',
  devServer: {
    contentBase: './dist',
    hot: true
  },
  module: {
    rules: [
      {
        test: /\.(js|jsx)/,
        use:[
          'babel-loader'
        ]
      }
    ]
  },
  plugins: [
    new HtmlWebpackPlugin({
      title:'React简易开发环境',
      template: './src/index.html'
    }),
    new webpack.HotModuleReplacementPlugin()
  ]
}

module.exports = config;
编译Sass和之前文章提到的一样,需要使用style-loader、css-loader、sass-loader,首先进行安装:
npm i style-loader css-loader sass-loader -D
因为sass-loader是依赖node-sass的,同时因为sass-loader的uri是相对于output的,因此需要使用resolve-url-loader
npm i node-sass resolve-url-loader -D
在webpack.config.js中进行配置:
const config = {
  // ......
  module: {
    rules: [
      //......
      {
        test: /\.(sass|scss|css)/,
        use: [
        "style-loader",
        "css-loader",
        "resolve-url-loader",
        "sass-loader?sourceMap"
        ]
      }
    ]
  },
  // ......
}

module.exports = config;
在src文件夹中新建一个名为sass的文件夹,同时新建_header.scss、_variablers.scss、main.scss,三个文件内容分别为: _variablers.scss
$bgColor: red;
$fontColor: #fff;
_header.scss
.header{
	background: $bgColor;
	color: $fontColor;
	height:300px;
}
main.scss
@import "variables"
,"header"
在main.js中引入main.scss文件:
import './sass/main.scss';
此时再次运行命令,可以在浏览器中看到header部分的样式已经生效。
此时整个webpack.config.js文件内容如下:
const path = require('path');
const HtmlWebpackPlugin = require('html-webpack-plugin');
const webpack = require('webpack');
const config = {
  entry: './src/main.js',
  output: {
    filename: 'bundle-[hash].js',
    path: path.join(__dirname, 'dist')
  },
  devtool:'inline-source-map',
  devServer: {
    contentBase: './dist',
    hot: true
  },
  module: {
    rules: [
      {
        test: /\.(js|jsx)/,
        use:[
          'babel-loader'
        ]
      },{
        test: /\.(sass|scss|css)/,
        use: [
        "style-loader",
        "css-loader",
        "resolve-url-loader",
        "sass-loader?sourceMap"
        ]
      }
    ]
  },
  plugins: [
    new HtmlWebpackPlugin({
      title:'React简易开发环境',
      template: './src/index.html'
    }),
    new webpack.HotModuleReplacementPlugin()
  ]
}

module.exports = config;
使用eslint首先安装eslint和eslint-loader:
npm i eslint eslint-loader -D
为了让eslint支持es6我们需要将eslint的解析器修改为babel-eslint,使用npm安装
npm i babel-eslint -D
在webpack.config.js中配置eslint-loader
const config = {
  // ......
  module: {
    rules: [
      {
        test: /\.(js|jsx)/,
        use:[
          'babel-loader',
          'eslint-loader'
        ]
      }
    ]
  },
  // ......
}

module.exports = config;
新建一个eslint的配置文件.eslintrc.js:
module.exports = {
  "parserOptions": {
    "ecmaVersion": 6,
    "sourceType": "module",
    "ecmaFeatures": {
      "jsx": true
    }
  },
  "env": {
    "browser": true,
    "node": true
  },
  "parser": "babel-eslint"
};
此时运行命令行会发现正常运行,原因是eslint默认所有规则都是禁用的,我们在.eslintrc.js中添加一条简单的禁用console的规则,当出现console时,将会报warning
module.exports = {
  "parserOptions": {
    "ecmaVersion": 6,
    "sourceType": "module",
    "ecmaFeatures": {
      "jsx": true
    }
  },
  "env": {
    "browser": true,
    "node": true
  },
  "parser": "babel-eslint",
  "rules": {
  	"no-console": 1
  }
};
此时再次运行命令,可以发现以下界面,控制台已经很明确的告诉我们,我们的App.js中出现了console,说明此时eslint已经生效。
但是在一个项目中我们如果配置每一个规则会显得非常麻烦,因此我们选择使用airbnb的规则,使用npm安装:
npm i eslint-config-airbnb -D
安装完成之后可以发现控制台告诉我们需要安装eslint-plugin-jsx-a11y、eslint-plugin-import、eslint-plugin-react,同时安装时应该大于或者等于某个版本号:
npm i eslint-plugin-jsx-a11y@5.1.1 eslint-plugin-import@2.7.0 eslint-plugin-react@7.1.0 -D
在.eslintrc.js文件中使用extends指定继承自airbnb的配置,如下:
module.exports = {
  "parserOptions": {
    "ecmaVersion": 6,
    "sourceType": "module",
    "ecmaFeatures": {
      "jsx": true
    }
  },
  "extends": "airbnb",
  "env": {
    "browser": true,
    "node": true
  },
  "parser": "babel-eslint",
  "rules": {
  	"no-console": 1
  }
};
此时,再次运行命令之后可以发现,在命令行和控制台中都报出了我们的代码风格问题,如下:
airbnb中的所有规则我们可以根据我们的需要进行重写,我们注意到其中一条error如下:
JSX not allowed in files with extension '.js' react/jsx-filename-extension
前面的为相应说明,后面的为规则,这条不允许我们在.js文件中书写JSX语言,后面为对应的规则,显然是eslint-plugin-react插件的规则,我们可以重写以允许我们在.js文件中书写JSX,如下:
module.exports = {
  "parserOptions": {
    "ecmaVersion": 6,
    "sourceType": "module",
    "ecmaFeatures": {
      "jsx": true
    }
  },
  "extends": "airbnb",
  "env": {
    "browser": true,
    "node": true
  },
  "parser": "babel-eslint",
  "rules": {
  	"no-console": 1,
  	"react/jsx-filename-extension": [1, { "extensions": [".js", ".jsx"] }]
  }
};
再次运行可以发现这条error已经不存在了。
在之前的文章中我们已经提到过了,我们可以使用file-loader来实现:
npm i file-loader -D
在webpack.config.js中配置:
const config = {
  // ......
  module: {
    rules: [
      {
        test: /\.(png|jpg|svg|gif)/,
        use:[
          "file-loader"
        ]
      }
    ]
  },
  // ......
}

module.exports = config;
此时我们可以引入图片资源了。
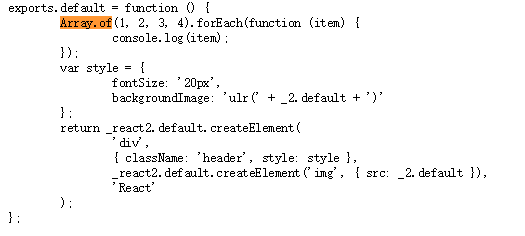
我们在使用babel的时候我们需要明确知道的一点是,babel默认只是为我们转化语法层面上的东西(如箭头函数),并不会为我们去将一些方法进行转化为es2015的实现,也就是说如果我使用Array.of方法,如果浏览器不支持这个方法,及时按照上面的babel转化也是依旧没有办法运行的,我们可以在App.js中使用Array.of方法来测试一下,如下:
Array.of(1,2,3,4).forEach(function(item){
		console.log(item);
	});
我们这次使用webpack命令直接在dist文件夹中生成相应的文件,我们可以在js文件中找到以下内容:
这就验证了上文的说法,因此我们需要使用babel-polyfill 首先进行安装:
npm i install babel-polyfill -D
安装完成之后我们需要在webpack的入口中进行配置,将webpack的entry修改为以下内容:
entry: ['babel-polyfill','./src/main.js']
我们现在使用webpack命令为我们打包一下内容,我们会发现打包后的文件非常大,只有部分内容却打包之后有3000+kb,这是不能用在生产环境上的,如下:
文件体积太大一个重要原因是devtool开启了inline-source-map方便我们定位bug,同时代码没有压缩也是重要原因之一,因此我们需要将开发和生产环境分离,使用不同的webpack配置。
还记得我们系列之前介绍的webpack-merge吗?我们通过这个插件可以将公共的配置分离到一起。首先进行安装
npm i webpack-merge -D
新建一个名为webpack.common.js文件作为公共配置,写入以下内容:
const path = require('path');
const HtmlWebpackPlugin = require('html-webpack-plugin');

const config = {
  entry: ['babel-polyfill','./src/main.js'],
  output: {
    filename: 'bundle-[hash].js',
    path: path.join(__dirname, 'dist')
  },
  plugins: [
    new HtmlWebpackPlugin({
      title:'React简易开发环境',
      template: './src/index.html'
    })
  ]
}

module.exports = config;
新建一个名为webpack.dev.js文件作为开发环境配置,写入以下内容:
const merge = require('webpack-merge');
const common = require('./webpack.common');
const webpack = require('webpack');

const config = merge(common, {
  devtool:'inline-source-map',
  devServer: {
    contentBase: './dist',
    hot: true
  },
  module: {
    rules: [
      {
        test: /\.(js|jsx)/,
        use:[
          'babel-loader',
          'eslint-loader'
        ]
      },{
        test: /\.(sass|scss|css)/,
        use: [
        "style-loader",
        "css-loader",
        "resolve-url-loader",
        "sass-loader?sourceMap"
        ]
      },{
        test: /\.(png|jpg|svg|gif)/,
        use:[
          "file-loader"
        ]
      }
    ]
  },
  plugins: [
    new webpack.HotModuleReplacementPlugin()
  ]
});

module.exports = config;
刚刚我们提到我们在开发环境中应该压缩混淆代码同时精简输出,因此需要使用uglifyjs-webpack-plugin插件,首先进行安装:
npm i uglifyjs-webpack-plugin -D
新建一个名为webpack.prod.js的文件作为生产环境配置,写入以下内容:
const merge = require('webpack-merge');
const common = require('./webpack.common');
const UglifyJSPlugin = require('uglifyjs-webpack-plugin');

const config = merge(common, {
  devtool:false,
  module: {
    rules: [
      {
        test: /\.(js|jsx)/,
        use:[
          'babel-loader'
        ]
      },{
        test: /\.(sass|scss|css)/,
        use: [
        "style-loader",
        "css-loader",
        "resolve-url-loader",
        "sass-loader?sourceMap"
        ]
      },{
        test: /\.(png|jpg|svg|gif)/,
        use:[
          "file-loader"
        ]
      }
    ]
  },
  plugins:[
    new UglifyJSPlugin()
  ]
});

module.exports = config;
因为在开发时我们需要使用的命令是
webpack-dev-server --open --config webpack.dev.js
而在生产中我们需要使用的命令是
webpack --config webpack.prod.js
为了精简我们在命令行中的输入我们将这些命令写在package.json中
"scripts": {
    "dev": "webpack-dev-server --open --colors --progress --inline --config webpack.dev.js",
    "build": "webpack --colors --progress --config webpack.prod.js"
  }
此时我们只要在命令行中输入npm run dev即可开启开发环境,使用npm run build即可自动生成用于生产环境的文件。
现在还有一个问题是我们修改文件之后再次使用npm run build命令则会出现多个js文件,这是因为我们使用了hash占位符, 这个占位符可以保证用户访问网站时始终保持最新的js文件,因此我们使用clean-webpack-plugin帮助我们每次删除dist文件夹的内容
npm i clean-webpack-plugin -D
在webpack.prod.js中引用:
const merge = require('webpack-merge');
const common = require('./webpack.common');
const UglifyJSPlugin = require('uglifyjs-webpack-plugin');
const CleanWebpackPlugin = require('clean-webpack-plugin');

const config = merge(common, {
  // ......
  plugins:[
    new CleanWebpackPlugin(['./dist']),
    new UglifyJSPlugin()
  ]
});

module.exports = config;
虽然目前一个简易的React开发环境已经搭建好了,但是还是需要对src目录进行划分以保证良好的开发体验,以下是划分的目录:
└───Components
      └───......
      └───......
└───Containers
      └───......
      └───......
└───static
      └───sass
      └───img
└───index.html
└───main.js
目录功能相信一眼就能看出来了。这时一个简易的环境就已经搭建好了。
The text was updated successfully, but these errors were encountered:
No branches or pull requests
在这篇文章中我们开始利用我们之前所学搭建一个简易的React开发环境,用以巩固我们之前学习的Webpack知识。首先我们需要明确这次开发环境需要达到的效果:1、能够编译JSX语言 2、css样式使用Sass开发 3.能够将基础的ES6转化为ES5 4.能够使用ESLint在开发的时候为我们做代码风格审查
首先,安装基本使用的webpack、webpack-dev-server
基本页面的生成
为了可以生成一个基本的页面我们使用html-webpack-plugin,为了方便我们定制,我们自己在src定义一个html文件,使用template指定这个文件。
安装html-webpack-plugin
在src文件夹下生成一个html文件,内容如下:
在webpack.config.js中写入以下内容作为基本的设置:
此时在命令行中运行以下命令可以看到一切正常运行,尽管目前在浏览器上还没有任何效果:
编译es6和jsx语言
在React开发的时候我们使用jsx语言和es6,因此需要使用babel对我们的开发进行一个编译,使用babel即可:
安装babel-loader:
为了使用这个babel-loader,我们需要安装babel-core(当我们需要以编程方式使用babel时就需要安装这个):
为了编译es6和jsx需要安装相应的preset,即需要安装babel-preset-react和babel-preset-es2015:
在webpack的配置文件中引入babel-loader:
配置babel的配置文件,在.babelrc文件中写入以下内容:
此时我们测试一下是否可以正常编译jsx和es2015,安装react和react-dom,同时在src中的main.js和App.js写入部分内容
main.js
App.js
在命令行运行命令,可以发现浏览器已经正常显示了,也就是说正常编译了jsx和es6
此时,整个webpack.config.js文件内容如下:
编译Sass样式
编译Sass和之前文章提到的一样,需要使用style-loader、css-loader、sass-loader,首先进行安装:
因为sass-loader是依赖node-sass的,同时因为sass-loader的uri是相对于output的,因此需要使用resolve-url-loader
在webpack.config.js中进行配置:
在src文件夹中新建一个名为sass的文件夹,同时新建_header.scss、_variablers.scss、main.scss,三个文件内容分别为:
_variablers.scss
_header.scss
main.scss
在main.js中引入main.scss文件:
此时再次运行命令,可以在浏览器中看到header部分的样式已经生效。
此时整个webpack.config.js文件内容如下:
配置ESLint为我们做代码风格检查
使用eslint首先安装eslint和eslint-loader:
为了让eslint支持es6我们需要将eslint的解析器修改为babel-eslint,使用npm安装
在webpack.config.js中配置eslint-loader
新建一个eslint的配置文件.eslintrc.js:
此时运行命令行会发现正常运行,原因是eslint默认所有规则都是禁用的,我们在.eslintrc.js中添加一条简单的禁用console的规则,当出现console时,将会报warning
此时再次运行命令,可以发现以下界面,控制台已经很明确的告诉我们,我们的App.js中出现了console,说明此时eslint已经生效。
但是在一个项目中我们如果配置每一个规则会显得非常麻烦,因此我们选择使用airbnb的规则,使用npm安装:
安装完成之后可以发现控制台告诉我们需要安装eslint-plugin-jsx-a11y、eslint-plugin-import、eslint-plugin-react,同时安装时应该大于或者等于某个版本号:
在.eslintrc.js文件中使用extends指定继承自airbnb的配置,如下:
此时,再次运行命令之后可以发现,在命令行和控制台中都报出了我们的代码风格问题,如下:
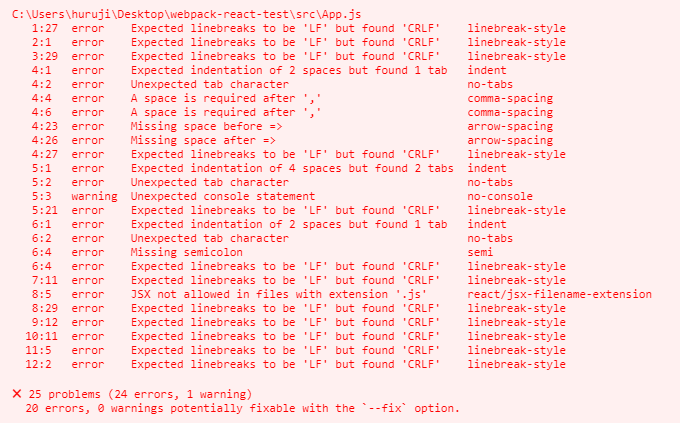
airbnb中的所有规则我们可以根据我们的需要进行重写,我们注意到其中一条error如下:
前面的为相应说明,后面的为规则,这条不允许我们在.js文件中书写JSX语言,后面为对应的规则,显然是eslint-plugin-react插件的规则,我们可以重写以允许我们在.js文件中书写JSX,如下:
再次运行可以发现这条error已经不存在了。
在项目中解析图片模块
在之前的文章中我们已经提到过了,我们可以使用file-loader来实现:
在webpack.config.js中配置:
此时我们可以引入图片资源了。
支持更多的ES6方法
我们在使用babel的时候我们需要明确知道的一点是,babel默认只是为我们转化语法层面上的东西(如箭头函数),并不会为我们去将一些方法进行转化为es2015的实现,也就是说如果我使用Array.of方法,如果浏览器不支持这个方法,及时按照上面的babel转化也是依旧没有办法运行的,我们可以在App.js中使用Array.of方法来测试一下,如下:
我们这次使用webpack命令直接在dist文件夹中生成相应的文件,我们可以在js文件中找到以下内容:
这就验证了上文的说法,因此我们需要使用babel-polyfill
首先进行安装:
安装完成之后我们需要在webpack的入口中进行配置,将webpack的entry修改为以下内容:
开发与生产环境分离
我们现在使用webpack命令为我们打包一下内容,我们会发现打包后的文件非常大,只有部分内容却打包之后有3000+kb,这是不能用在生产环境上的,如下:

文件体积太大一个重要原因是devtool开启了inline-source-map方便我们定位bug,同时代码没有压缩也是重要原因之一,因此我们需要将开发和生产环境分离,使用不同的webpack配置。
还记得我们系列之前介绍的webpack-merge吗?我们通过这个插件可以将公共的配置分离到一起。首先进行安装
新建一个名为webpack.common.js文件作为公共配置,写入以下内容:
新建一个名为webpack.dev.js文件作为开发环境配置,写入以下内容:
刚刚我们提到我们在开发环境中应该压缩混淆代码同时精简输出,因此需要使用uglifyjs-webpack-plugin插件,首先进行安装:
新建一个名为webpack.prod.js的文件作为生产环境配置,写入以下内容:
因为在开发时我们需要使用的命令是
而在生产中我们需要使用的命令是
为了精简我们在命令行中的输入我们将这些命令写在package.json中
此时我们只要在命令行中输入npm run dev即可开启开发环境,使用npm run build即可自动生成用于生产环境的文件。
使用clean-webpack-plugin
现在还有一个问题是我们修改文件之后再次使用npm run build命令则会出现多个js文件,这是因为我们使用了hash占位符,
这个占位符可以保证用户访问网站时始终保持最新的js文件,因此我们使用clean-webpack-plugin帮助我们每次删除dist文件夹的内容
在webpack.prod.js中引用:
开发src目录划分
虽然目前一个简易的React开发环境已经搭建好了,但是还是需要对src目录进行划分以保证良好的开发体验,以下是划分的目录:
目录功能相信一眼就能看出来了。这时一个简易的环境就已经搭建好了。
The text was updated successfully, but these errors were encountered: