原文:How to create Green noise in Python
这是我前面关于绿噪音的一篇博文的后续。下面,我们通过传递白噪音到Butterworth过滤器来在Python中创建绿噪音。
绿噪音位于声谱中间(巴克标度),使我们的听觉最为敏感的地方,类似于绿灯是我们的眼睛最为敏感的频率。看看前一篇博文以获得详细信息,包括关于下面的左截断和右阶段是从哪里来的解释。
下面是代码:
from scipy.io.wavfile import write
from scipy.signal import buttord, butter, filtfilt
from scipy.stats import norm
from numpy import int16

def turn_green(signal, samp_rate):
    # start and stop of green noise range
    left = 1612 # Hz
    right = 2919 # Hz

    nyquist = (samp_rate/2)
    left_pass  = 1.1*left/nyquist
    left_stop  = 0.9*left/nyquist
    right_pass = 0.9*right/nyquist
    right_stop = 1.1*right/nyquist

    (N, Wn) = buttord(wp=[left_pass, right_pass],
                      ws=[left_stop, right_stop],
                      gpass=2, gstop=30, analog=0)
    (b, a) = butter(N, Wn, btype='band', analog=0, output='ba')
    return filtfilt(b, a, signal)

def to_integer(signal):
    # Take samples in [-1, 1] and scale to 16-bit integers,
    # values between -2^15 and 2^15 - 1.
    signal /= max(signal)
    return int16(signal*(2**15 - 1))

N = 48000 # samples per second

white_noise= norm.rvs(0, 1, 3*N) # three seconds of audio
green = turn_green(white_noise, N)
write("green_noise.wav", N, to_integer(green))
然后,下面是是它听起来的样子:
http://www.johndcook.com/green_noise.wav
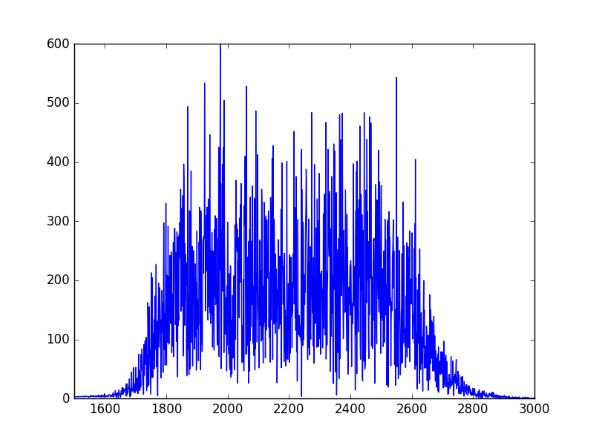
让我们看看声谱,来瞧瞧它看起来是否正确。我们将使用信号的二分之一,因此当我们绘制FFT时,x轴与频率一致。
from scipy.fftpack import fft

one_sec = green[0:N]
plt.plot(abs(fft(one_sec)))
plt.xlim((1500, 3000))
plt.show()
下面是输出,与预期一样,集中在1600和3000Hz之间: