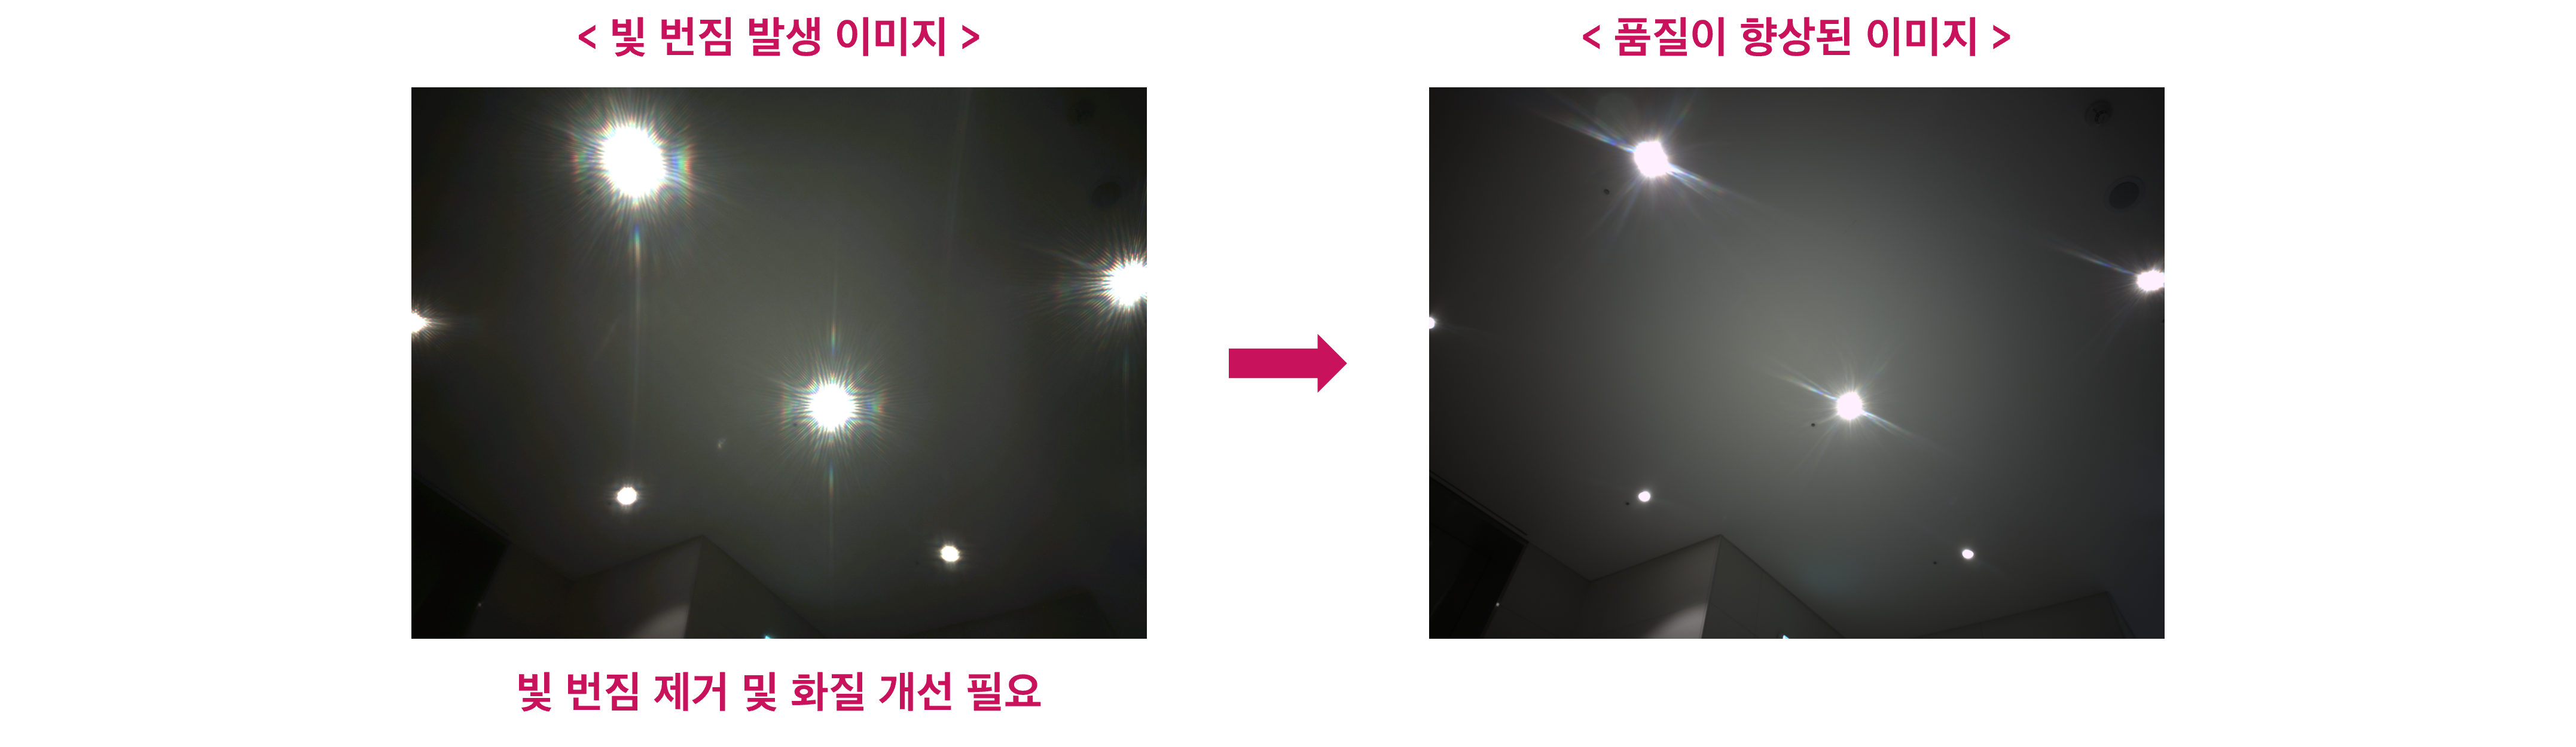
본 대회의 주제는 빛 번짐으로 저하된 카메라 이미지 품질을 향상시키는 AI 모델 개발이었습니다. 주어진 이미지는 아래 그림과 같이 빛번짐, 블러 현상 등을 포함하여 복합적인 문제를 해결할 필요가 있었습니다.
- 학습 데이터: 272장의 2448×3264, 350장의 1224×1632 이미지로 구성된 622장의 빛번짐 이미지
- 테스트 데이터: 20장의 2448×3264 빛번짐 이미지
- PSNR(Peak Signal-to-noise ratio): 신호가 가질 수 있는 최대 전력에 대한 잡음의 전력을 나타낸 것으로, 영상 또는 동영상 손실 압축에서 화질 손실 정보를 평가할때 사용됩니다.

# clone repository
$ git clone https://github.com/TeamBCP5/image-reconstruction.git

# install necessary tools
$ pip install -r requirements.txt# Download: https://dacon.io/competitions/official/235746/data
[camera_dataset]/
├── train_input_img/ # 학습 데이터 입력 이미지
├── train_label_img/
├── hinet_dataset/ # postprocessing 데이터셋 디렉토리 NOTE. 학습 과정 중 구축되는 디렉토리입니다.
│ ├── train_input_img/
│ └── train_label_img/
└── test_input_img/[code]
├── camera_dataset/ # 데이터셋 디렉토리
├── configs/ # 모델 config 파일 디렉토리
├── data/ # data 처리 관련 모듈 디렉토리
├── networks/ # 모델 아키텍처 관련 모듈 디렉토리
├── train_modules/ # 모델 학습 관련 모듈 디렉토리
├── utils/ # 유틸리티 관련 모듈 디렉토리
├── README.md
├── requirements.txt
├── demo_augmentations.py # Augmentation 테스트를 위한 스크립트 파일
├── demo_preprocessing.py # Preprocessing 테스트를 위한 스크립트 파일
├── train.py
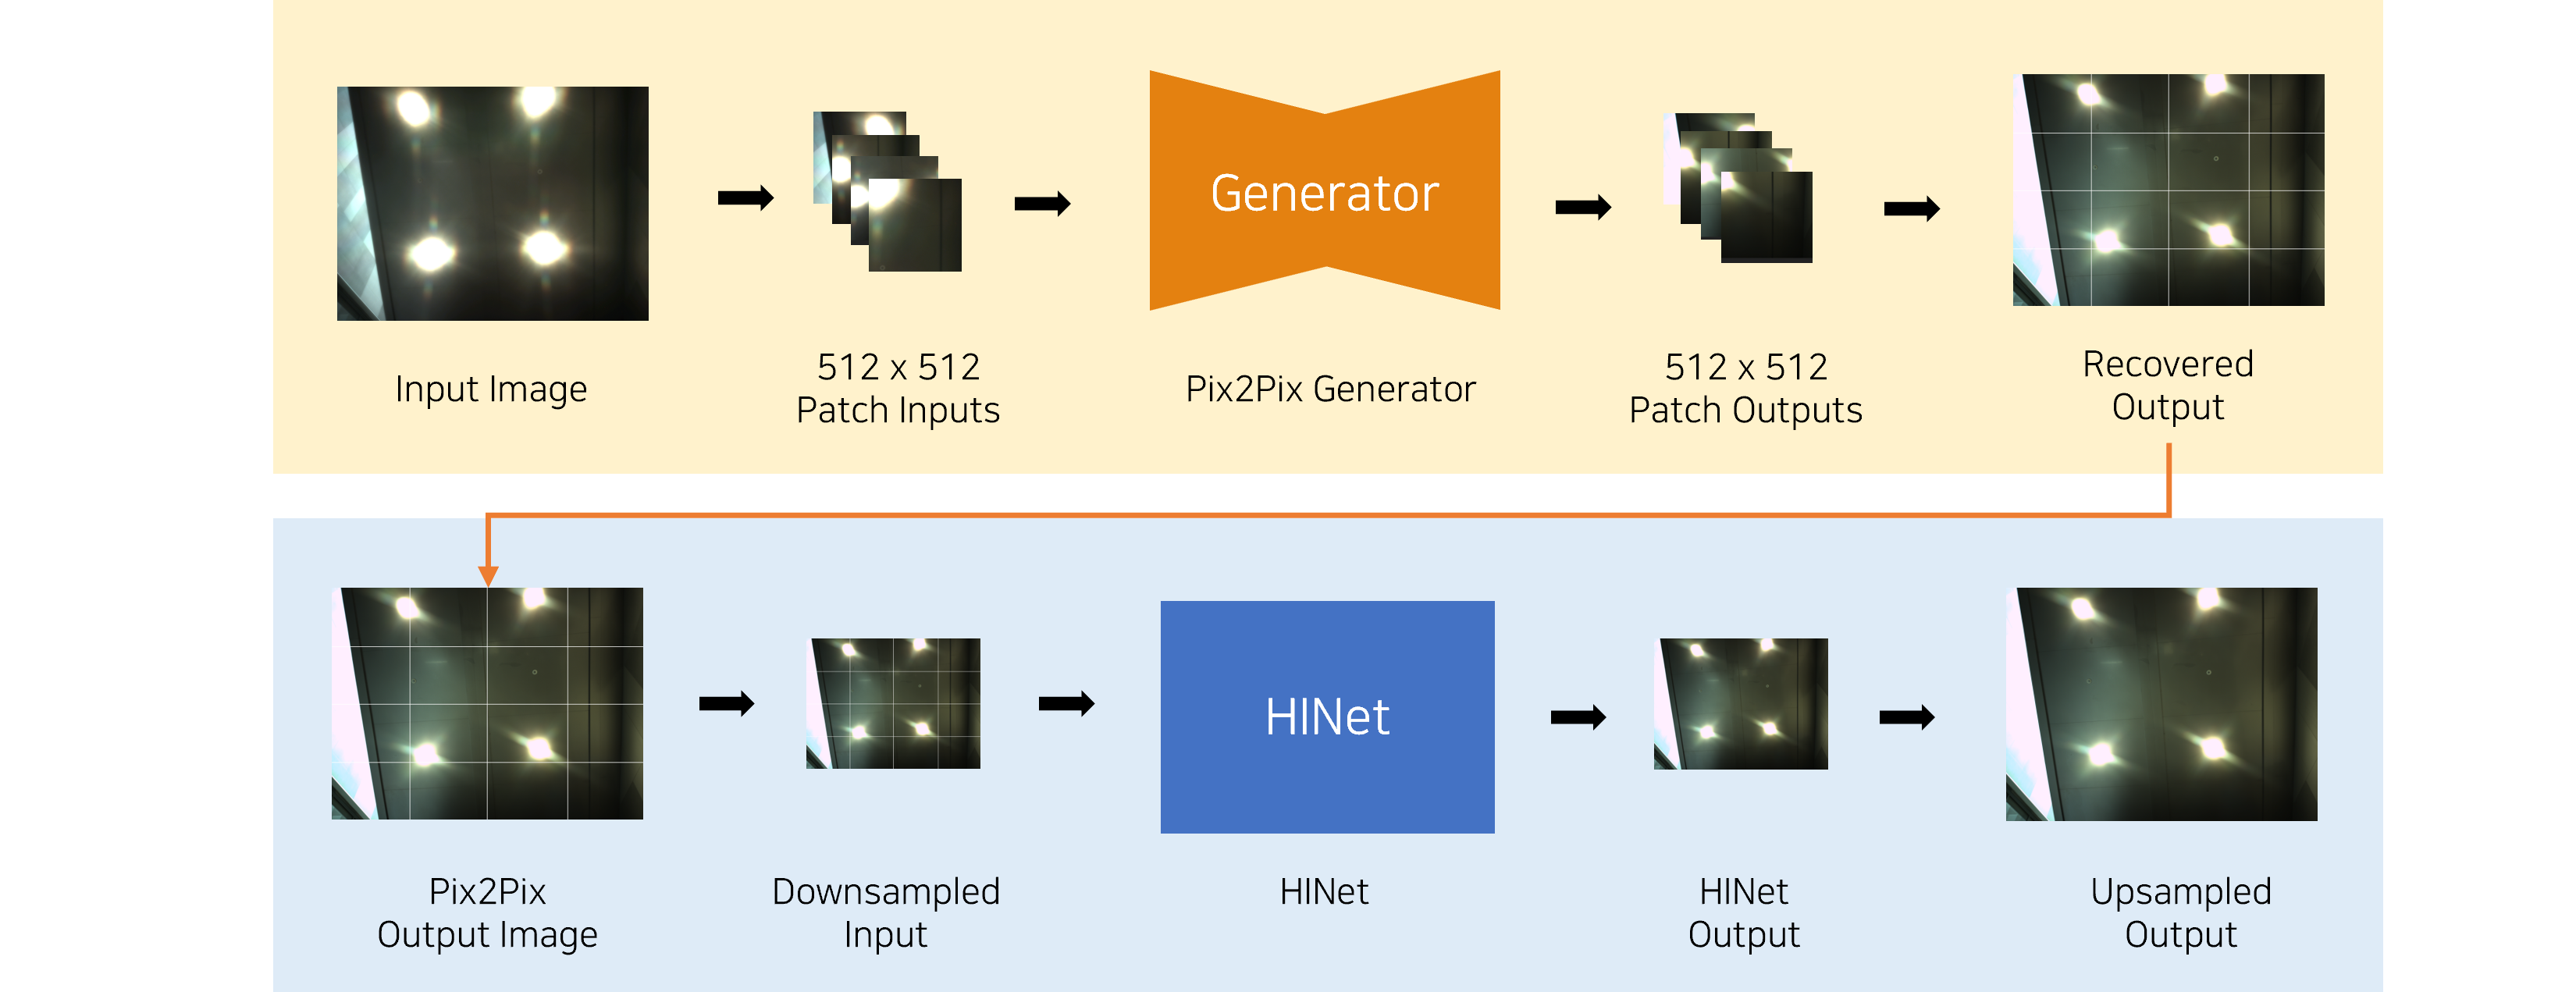
└── inference.py카메라 이미지 화질 개선 과정은 대략 다음 그림과 같습니다. Sliding Window 기반의 Pix2Pix 모델을 통해 1차적으로 빛번짐을 제거한 뒤, HINet 모델을 통해 격자 무늬 등 손상된 화질을 보완합니다. 특히, 학습 단계에서 Pix2Pix Generator는 Discriminator와 함께 학습됩니다.
모델 학습과 추론은 기본적으로 모델별 Configuration 파일을 바탕으로 진행됩니다. 각 Configuration 파일에는 모델 구조와 학습 데이터셋 경로 등 학습과 추론을 위한 설정값이 기록되어 있습니다. 원활한 학습/추론을 위해서는 데이터셋 경로 등 설정값을 환경에 맞게 설정해주셔야 합니다. Configuration 파일 명세는 이곳에서 확인하실 수 있습니다.
최종 결과물 제출에 활용된 모델은 다음의 3단계에 걸친 학습을 통해 제작되었습니다.
- Sliding Window 방법을 바탕으로 이미지 품질을 향상시키는 메인 모델(Pix2Pix)을 학습합니다.
- Input. 대회에서 주어진 학습 데이터의 input 이미지
- Label. 대회에서 주어진 학습 데이터의 label 이미지
- 후처리 모델(HINet)을 주어진 데이터를 활용하여 1차적으로 학습합니다.
- Input. 대회에서 주어진 학습 데이터의 input 이미지
- Label. 대회에서 주어진 학습 데이터의 label 이미지
- II에서 학습한 후처리 모델(HINet)을 불러와 학습을 진행합니다.
- Input. 대회에서 주어진 학습 데이터의 input 이미지에 대한 I에서 학습한 메인 모델(Pix2Pix)의 추론 결과
- Label. 대회에서 주어진 학습 데이터의 label 이미지
위 학습 단계를 모두 포함한 학습을 수행합니다.
$ python train.py --train_type 'all'단계 I에 해당되는 Pix2Pix 모델 학습을 수행합니다.
$ python train.py --train_type 'pix2pix'단계 II에 해당되는 HINet 모델 학습을 수행합니다.
$ python train.py --train_type 'hinet'train_type: 학습 방식 설정
'all': 위 세 단계에 걸친 학습을 진행합니다. 최종 결과물 재현에는 이 설정값을 사용됩니다.'pix2pix': Pix2Pix 모델의 개별 학습을 수행합니다.'hinet': HINet 모델의 개별 학습을 수행합니다. '단계 II. 후처리 모델(HINet) 1차 학습'을 기준으로 학습이 진행됩니다.
config_pix2pix: Pix2Pix 모델 configuration 파일 경로
config_hinet_phase1: HINet 모델(phase1) configuration 파일 경로
config_hinet_phase2: HINet 모델(phase2) configuration 파일 경로
메인 모델(Pix2Pix)과 후처리 모델(HINet)을 불러와 추론을 수행합니다. 추론은 다음의 두 단계를 거쳐 진행됩니다.
$ python inference.py --checkpoint_main "./best_models/pix2pix.pth" --checkpoint_post "./best_models/hinet.pth" --image_dir "./camera_dataset/test_input_img"- Input. 대회에서 주어진 테스트 데이터의 input 이미지
- Input. 단계 I에서 메인 모델의 추론 결과
- 해당 단계에서의 결과물이 최종 추론 결과물로 저장됩니다.
config_main: Main 모델(Pix2Pix) config 파일 경로
config_post: Postprocessing 모델(HINet) config 파일 경로
checkpoint_main: 학습한 main 모델(Pix2Pix)의 pth 파일 경로
checkpoint_post: 학습한 postprocessing 모델(HINet)의 pth 파일 경로
image_dir: 추론 시 사용될 데이터 디렉토리 경로
patch_size: 추론 시 사용될 이미지 patch의 크기
stride: 추론 시 사용될 stride의 크기
batch_size: 추론 시 사용될 batch의 크기
output_dir: 추론 결과를 저장할 디렉토리 경로. 해당 디렉토리 내 압축파일 형태로 결과물이 저장됩니다.
모델 학습에 활용한 data augmentation의 예시 결과물을 생성합니다.
$ python demo_augmentation.py --data_dir "./camera_dataset/" --num_samples 10 --save_dir './sample_augmentation/'[SAVE_DIR]
├── original/ # 원본 이미지
├── hinet/ # HINet을 위한 data augmentation 결과물
└── pix2pix/ # pix2pix를 위한 data augmentation 결과물data_dir: input 데이터 디렉토리 경로
num_samples: 생성할 샘플 수
save_dir: Augmentation 적용 결과를 저장할 디렉토리 경로
모델 학습에 활용한 data preprocessing의 예시 결과물을 생성합니다.
$ python demo_preprocessing.py --data_dir "./camera_dataset/" --num_samples 10 --save_dir './sample_preprocessing/'[SAVE_DIR]
├── original/ # 원본 이미지
├── hinet/ # HINet을 위한 data preprocessing 결과물
└── pix2pix/ # pix2pix를 위한 data preprocessing 결과물data_dir: input 데이터 디렉토리 경로
num_samples: 생성할 샘플 수
save_dir: Augmentation 적용 결과를 저장할 디렉토리 경로
stride: Sliding Window 시 사용할 stride
patch_size: Sliding Window 시 사용할 patch 사이즈