Wave provides a tool-set for cross platform remote command execution.
- Based on nodejs for platform abstraction
- Uses MQTT broker for communication.
- Mark down based execution engine
- Controller/CLI for sending commands and viewing real time outputs from targets.
The controller is an orchestrator that coordinates and sequences commands. The controller subscribes on job/controllerid topic and uses commands from a markdown table as follows. The controller is based on callbacks from the target agent as a mechanism of flow control. Commands are defined in markdown table with the following layout -
| Command | Host | Description |
|---|---|---|
./startServer.sh |
$(server) | server command |
.\loadtest.cmd $(server) $(serverurl) |
$(client) | Client command |
Environment variablesmay be persisted across commands in the agent which will be available in a spawned process.logdirandcwdcan be changed as a part of the environment command.
The commands can be directly sent the target using the CLI. There is also a web client which gives a remote shell like experience.
For details of the command line client goto ./client
The agent communication is handled through a set of topics which it listens to and outputs messages to. The controller or CLI communicates to the well-know topic as the contracts defined below.
| Topic | Description |
|---|---|
hostid |
Subscribed by the host for synchronous command execution |
hostid/async |
Subscribed by the host and commands are executed asynchronously |
hostid/output |
Command output stream |
hostid/status |
Last command executed |
client/hostid/config |
Birth and will message which is retained and includes config details like IP and status |
- Hostid defaults to
hostnameunless we override the value.
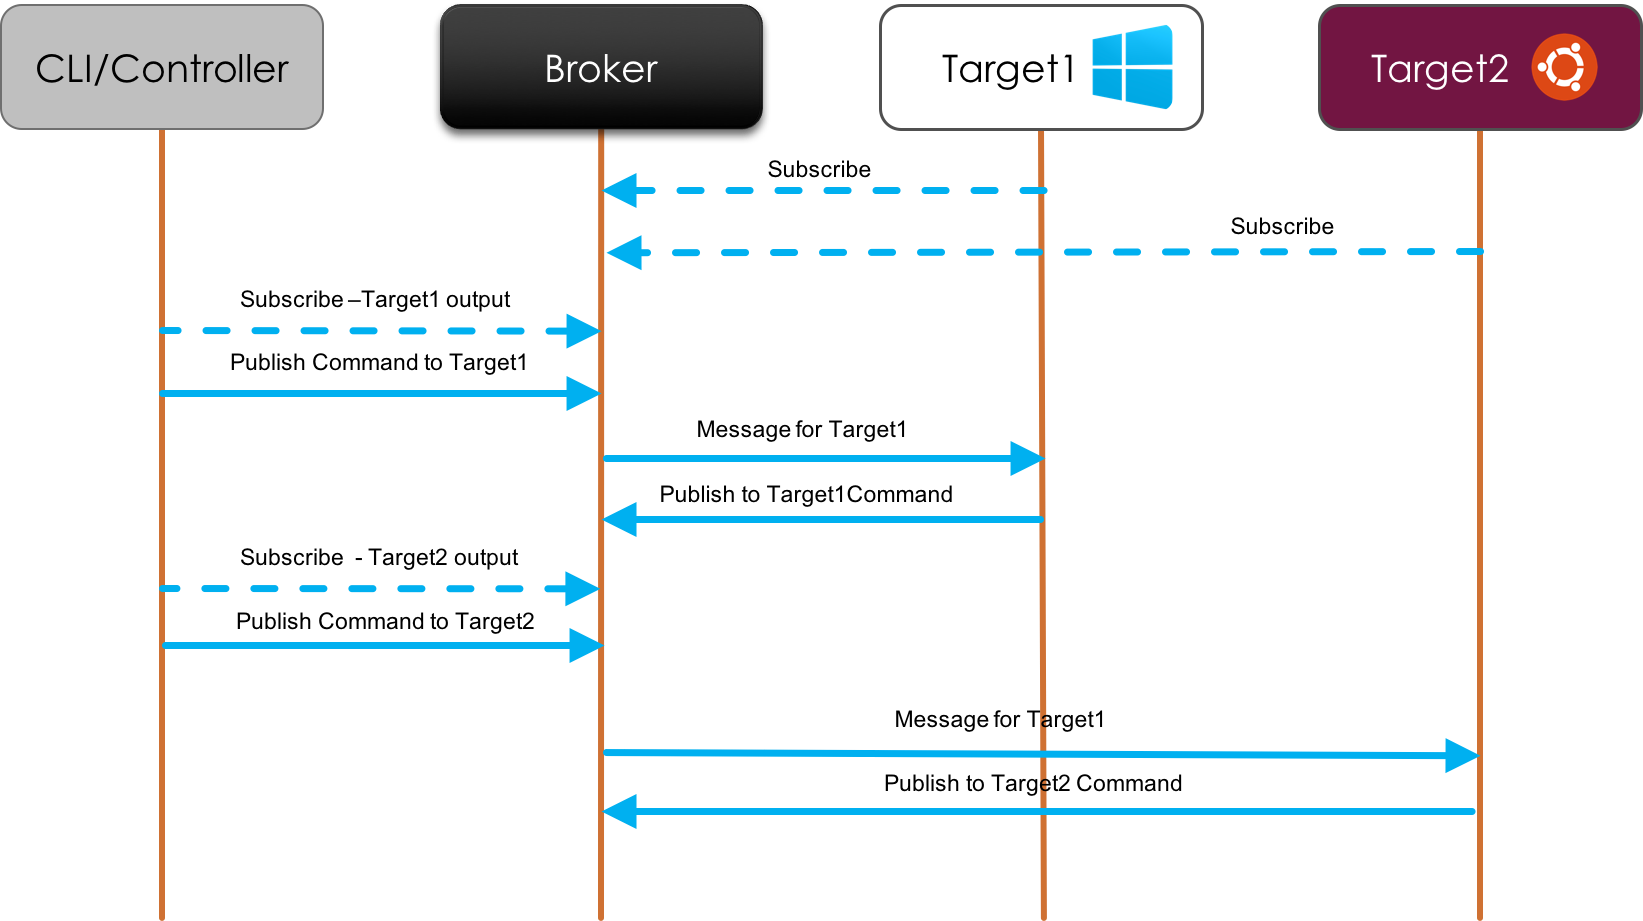
The diagram below provides an overview of the communication mechanism between the agents and CLI/Controller.
Install Node if needed.
msiexec /i https://nodejs.org/dist/v5.11.0/node-v5.11.0-x64.msi /passive
Setup the agent with the required credentials.
@powershell -NoProfile -ExecutionPolicy unrestricted -Command "&{$target='c:\cmdport\';$broker='test';$username='test';$password='test';iex ((new-object net.webclient).DownloadString('https://raw.githubusercontent.com/aspnet/Wave/master/scripts/Install.ps1'))}" Git clone the repo and run the install script as follows.
git clone http://github.com/aspnet/Wave
sudo ./Wave/scripts/install.sh testbroker testuser testpassword
This sets up the flow and connects to the broker and makes the machine ready for remote commands. Refer to install.sh for details.
The following commands should be used to setup or remove the agent as needed.
sudo update-rc.d cmdport defaults
sudo update-rc.d -f cmdport remove
Optional:
To allow shutdown scenario to work, add the following line to the sudoer file to avoid interactive prompt. Note that we do not currently support poweroff and reboot commands.
user_name ALL=(ALL) NOPASSWD: /sbin/shutdown

The docker image is based of the node:argon image and contains the agent that can be started using the following commands and the logs command enables you to see if the broker succcessfully connected or not.
docker pull dotnetperf/wave
docker run --name wave1 -p 8001:8000 -e BROKER=[broker] -e PORT=[port] -e USERNAME=[username] -e PASSWORD=[password] -h [hostname] -d dotnetperf/wave
docker logs wave1
The image takes 3 environment variables and the hostname which is used to setup the credentials in the agent. Refer to the Dockerfile
To connect to the running instance use the following command to start an interactive shell.
docker exec -it wave1 /bin/sh
Once you are done with the agent, you can use the following commands to stop the container and delete the image if necessary.
docker stop wave1 && docker rm wave1
docker rmi dotnetperf/wave
If you are deploying containers on Ubuntu VM on Hyper-V, then:
- run
nm-toolon the Ubuntu VM and pick any one of the DNS addresses in the output sudo vi /etc/default/dockerand add the DNS ip to DOCKER_OPTS parameter.sudo service docker restart
The following instructions are for a standard Mosquitto MQTT broker.
-
Use the following instructions to setup an MQTT broker for command dispatch.
sudo apt-add-repository ppa:mosquitto-dev/mosquitto-ppa sudo apt-get update sudo apt-get -y install mosquitto sudo apt-get -y install mosquitto-clients -
Configure the password and disable anonymous access
sudo mosquitto_passwd -c /etc/mosquitto/pwfile <username> sudo nano /etc/mosquitto/mosquitto.conf -
Add the following to disable anonymous access and enable websockets.
password_file /etc/mosquitto/pwfile allow_anonymous false port 1883 listener 1884 protocol websockets -
Restart the service
sudo service mosquitto restart -
To be able to connect to the broker you need to open up the port 1883 for Mosquitto. The following setup is for an azure VM. Follow the bread crumb described below and allow incoming packets for port 1883 for Azure VMs.
VM >> Settings >> Network Interfaces >> Network Interface >> Settings >> Network Security Group >> Settings >> Inbound Rules