Цель этого учебника - показать вам, какие новые возможности могут быть использованы в современных веб-приложениях без участия дополнительных зависимостей и противоречий с уже существующим кодом. Курс рассчитан на то, чтобы дать вам достаточно знаний для самостоятельного использования новых возможностей в своих приложениях.
-
Все упражнения проверялись в последних версиях браузера Chrome, но они должны работать и в последних версиях Safari и Firefox. Некоторые упражнения работают в Firefox не так, как задумано, из-за ограничений браузера. Я не проверял работоспособность в IE или Opera, но большая часть кода должна работать и там.
-
Ваш браузер должен иметь консоль JavaScript. Такая консоль уже имеется в Safari и Chrome. Если вы используете Firefox, не забудьте установить Firebug.
-
Вам понадобится текстовый редактор (Vi, Emacs, Textmate, Notepad, etc.) для внесения изменений в файлы проекта.
-
Скопируйте директорию
startиз этого проекта в какое-нибудь другое место. Эта директория содержит все необходимые зависимости и послужит основой для игры, которую мы будем делать. -
Изучите файл index.html в скопированной директории
start. Он представляет собой упрощенный шаблон, основанный на HTML5 Boilerplate project. Здесь вы можете найти полный шаблон. Это отличный способ изучить особенности HTML5.Обратите внимание на DOCTYPE, с которого начинается этот файл. Это все, что нужно, чтобы указать браузеру, что вы используете последнюю, самую современную версию HTML. Кроме того, в шаблоне используются новые семантические тэги
<header>и<footer>. Их можно использовать вместо менее семантической разметки вроде<div id="header"></div>. -
Откройте index.html в вашем браузере. Затем откройте консоль JavaScript (в Chrome это делается через меню Вид > Разработчик > Консоль Javascript; в Safari достаточно нажать option-Apple-C). В консоли должно быть сообщение "Ваша консоль работает". Если вы не видите это сообщение, попробуйте установить Firebug или открыть файл в другом браузере. Без работающей консоли следовать этому руководству крайне затруднительно.
Это сообщение было отправлено в консоль в файле
js/tutorial.js. Я буду использовать этот файл для всего кода приложения.
-
Изучите файл
js/libs/modernizr. Это библиотека Modernizr, которая выполняет определение возможностей браузера и помогает применять стили к новым семантическим элементам HTML5. Пока рано полагаться на то, что браузеры полностью поддерживают новые возможности, поэтому крайне важно проводить определение возможностей браузера и выдавать осмысленные сообщения об ошибках в случае необходимости. -
Чтобы подключить Modernizr, откройте текстовый редактор и добавьте в тэг
<HEAD>файлаindex.htmlследующую строку:<script src="js/libs/modernizr-1.7.js"></script>Затем добавьте класс
no-jsк тэгу<HTML>во второй строке файла index.html. -
Откройте
index.htmlв браузере и посмотрите на тэг<HTML>. Обратите внимание на то, что классno-jsбыл заменен на ряд объявлений CSS. Эти объявления можно использовать, чтобы показывать сообщения об ошибках или для стилизации контента, предъявлемого при недоступности некоторого функционала. -
Откройте консоль JavaScript и изучите объект Modernizr. Вы сможете выполнить все упражнения этого учебника, если все нижеприведенные свойства будут иметь значение true:
- Modernizr.canvas
- Modernizr.websockets
- Modernizr.audio
- Modernizr.geolocation
- Modernizr.localstorage
Если какие-либо из этих свойств не имеют значения "true", установите браузер Chrome.
Используя только CSS и HTML и полагаясь на классы touch и no-touch элемента <HEAD>, выведите соотвествующее сообщение о том, поддерживает ли устройство пользователя тач-интерфейс. Если у вас установлен симулятор мобильной ОС (например, iOS Simulator), проверьте оба случая.
-
Add
<canvas id="main" width="400" height="400"></canvas>just after the opening of the<body>tag in yourindex.htmlfile. -
To draw a rectangle in the canvas, add this code to js/tutorial.js:
var canvas = document.getElementById("main");
 var context = canvas.getContext("2d");
 context.fillRect(0,0,20,20);
All drawing operations happen on the canvas context, not the canvas itself. Right now "2d" is the only available context, but a future HTML spec may define a 3d context.
-
Open
index.htmlin your browser. You should see a black rectangle! -
Change the
fillRectcall tostrokeRectand reload your browser. Now the rectangle is not filled-in. -
Set the context's
fillStyleproperty to a CSS color like "red", then reload the page to see a red rectangle.context.fillStyle = "red";
-
To draw text, add lines like this to
tutorial.jsand reload.context.font = "bold 24px sans-serif"; context.fillStyle = "blue"; context.fillText("HTML5",100,100);
Try filling your rectangle with a gradient. You'll need to create a gradient object as explained in Dive Into HTML5, then set your fillStyle to that gradient.
-
Copy the file
media/water.jpgfrom the tutorial project to your project'smediadirectory. (This image is Creative Commons-licensed) -
Draw this image using the canvas by adding these lines to your
tutorial.jsfile:var img = new Image(); img.src = "media/water.jpg"; img.onload = function() { context.drawImage(img,0,110); }; -
Reload your browser to see the image.
-
Now add two additional parameters, a destination width and height, after the original 3 parameters:
context.drawImage(img,0,110,200,100);
-
Reload the browser and observe the image scaled to a different size.
-
Copy the sprite file we'll be using for our simple game,
media/characters.jpgto themediafolder of your project. (I got this CC-licensed file by David E. Gervais from the TomeTik project) -
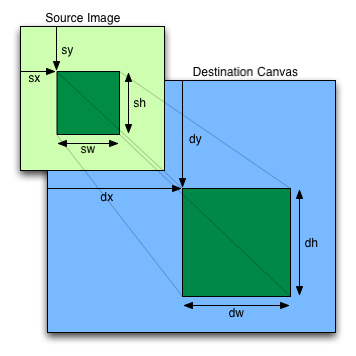
Use the 9 argument version of drawImage to slice out one character from the characters file and project it onto the canvas:
drawImage(image,sx,sy,sw,sh,dx,dy,dw,dh);
The 9 arguments are explained in this image:
Each sprite is 32 pixels wide and 32 pixels high. So if you want to slice out the 2nd character in the top row, with the red hood, you would start with these parameters:
- sx = 33
- sy = 0
- sw = 32
- sh = 32
Choose dx, dy, dw, and dh to your taste, then reload the browser. Consult the solution in
ex3if you get confused.
-
Copy
js/libs/jquery-1.5.2.jsto thejs/libsdirectory in your project. We'll be using jQuery to bind keyboard events and to perform other tasks. -
Add a this tag to the bottom of your index.html file, before the
tutorial.jsfile is loaded, to load the jQuery library:<script src="js/libs/jquery-1.5.2.js"></script> -
Comment out most of the drawing code we had been working with so the page starts clean. The only working code in your
tutorial.jsshould look like this:var canvas = document.getElementById("main"); var context = canvas.getContext("2d"); var characters = new Image(); characters.src = "media/characters.gif"; -
Initialize two variables,
xandy, to zero. We'll use these to keep track of the user's current position. -
Initialize variables to store the height and width of the canvas. Later we'll be changing the size of the canvas dynamically so it makes sense to not hard code these values.
var height = $(canvas).height();
�var width = $(canvas).width();
-
Setup another onload function for the characters object. When the characters image has loaded, we want to bind keyboard events to a function we'll write next:
$(window).keyup(move);
-
Write a move function that updates the character position on screen based on which arrow key was pressed. Using the binding from the above step, your move function should accept one argument passed by jQuery: an event object. That object has a "which" property containing the code for the key that was pressed.
The key codes are:
- Up = 38
- Down = 40
- Left = 37
- Right = 39
Increment or decrement x or y by 10, depending on which key was pressed. Be sure to guard against x or y going out of bounds (less than zero or greater than the canvas size).
If you get confused check out
ex4/js/tutorial.jsfor an example move function. -
At the end of your move function, call
context.drawImageto slice out one of the sprites from our file and project it on the screen at the coordinates stored in x and y.If you get confused check out
ex4/js/tutorial.jsto see what this looks like. -
Reload your browser and try it out. You should see your character tracking across the screen slowly.
-
Let's make this look nicer by clearing the screen before each draw command. Add this before your drawImage call:
context.clearRect(0,0,width,height);
-
You may also want to increase the number of pixels that the character travels per key press.
Try setting up an animation loop that redraws the screen a few times per second. This will let you decouple the keyboard events from the drawing. You'll need something like this to start your loop:
setInterval(runLoopFunction,interval);
Where runLoopFunction is the name of your function and interval is the number of milliseconds the browser should wait in between calls to that function.
-
When we link this game up with other players we want to know who's who. So let's add a username field that takes advantage of new HTML5 form features. Add this line to your
index.htmlfile:<input id="username" placeholder="Your name"> -
Reload the page. If you don't see any placerholder text, check the value of
Modernizr.input.placeholderin your JavaScript console. -
Now add the
autofocusattribute to that input field and reload. If your browser supports it, the field will automatically receive the focus. -
Let's try out a new form element, a slider we can use to control the size of our character. Add this to your
index.htmlfile (1):<input id="size" type="range" min="4" max="320" step="8" value="32"> -
Bind changes to that slider to a function in
tutorial.jsthat will control the destination width and height of your drawImage call. The binding should look like this:$('#size').change(function() { ... });To get the value of the slider, use
$('#size').val()
(1) This element does not render in Firefox. Try it out in Safari or Chrome.
Try out some of the other input elements listed in the Dive Into HTML5 book, like the color picker!
Note: this exercise will not work well in Firefox because of a bug in the way Firefox handles file:// URLs. If you want this to work in Firefox you'll need to serve up your code from a web server on your development machine. Details
-
At your JavaScript console, set a localStorage value:
localStorage.setItem('shaz','bot') -
Close the page completely, then reopen it in a new window and type this at your JavaScript console:
localStorage.getItem('shaz')If your browser supports localStorage, you should get the value of
shazback. -
Try the above steps with the sessionStorage object. How does sessionStorage differ from localStorage? What about when you merely reload a page? Do they perform in the same way?
-
Call
localStorage.clear()and try getting the 'shaz' item again. -
Bind a new function to the change event of the username input field we added in exercise 5, like this:
$('#username').change(function() { ... }); -
In that bound function, use localStorage to store the user's name. You may need to change the focus by clicking elsewhere on the page to get this event to fire. To fetch the value of the username field, use
$("#username").val(). -
Add a line of code to
tutorial.jsto fetch the user's name from localStorage (which you stored in the above step) when the page loads. If there is a previously-stored username, set the value of the username field to the pre-stored field like this:$("#username").val(nameStr). -
Reload the page. Type in a username, tab away from the username field (to make sure the change event fires), then reload the page. Your username should already be filled-in, instead of the placerholder text.
-
Try setting and getting numbers and hashes in localStorage. Does localStorage preserve type?
Your JavaScript console may also have an inspector for local and session storage. In WebKit's inspector, it's Storage tab.
-
Bind the window object's
storageevent to keep track of when new items are added to localStorage. See Dive Into HTML5 if you get stuck. -
What happens when you try to get an item that has not been previously set from localStorage?
-
Let's make things a little nicer before we add multi-player features to this "game". First, let's set a dark background for our canvas. Add this declaration to the
<head>section ofindex.html:<style> canvas { background-color: black; } input { display: block; } </style> -
You may also want to increase the width and height of your canvas element.
-
Increase the step size for your character so it moves 5 or 10 pixels at a time.
Note: WebSockets are disabled in Firefox. You may be able to get something working by using socket.io.
-
Let's connect to a websocket server in order to exchange information with other players. Add the following code to your
tutorial.jsfile. I noticed that I would sometimes get errors if this code fired before thecharacters.gifimage file loaded, so you may want to stick this in the onload handler for that object. See the exercise 8 solution if this is confusing.var ws = new WebSocket("ws://exp.subelsky.com:8011"); ws.onmessage = handleMessage; function handleMessage(event) { console.info(event.data); } -
Reload your browser. Every 10 seconds you should see a "ping" message from the server. Note that this is a JSON string that we'll need to unmarshal before we can work with it.
-
Check out the Ruby code in
server/server.rbto see what you're connecting to with that string. -
Modify the
handleMessagefunction to parse the JSON string. If your browser does not have a native JSON implementation, you'll need to add the scriptjs/libs/json2.jsto your project for this code to work.var msg = JSON.parse(event.data); console.info(msg);
-
Reload your browser, wait 10 seconds, then check your console. You should see the de-marshalled JSON object displayed.
-
Modify your
movefunction to send a JavaScript object out on the websocket every time you move your character. Use the websocket.send method like this:ws.send(JSON.stringify({ name: name, x: x, y: y, type: "move" })); -
Check out the server log being tailed on the screen. You should see your movement messages showing up every time you push a key.
If you are thinking of building an app with websockets, definitely check out Pusher which may save you the trouble of writing your own server.
The server is broadcasting all movement events to the whole class. To display other student positions on your screen, you'll need to keep track of their usernames and x and y positions (probably with a hash, where the keys are user names and the values are coordinates). Modify your handleMessage message to display multiple players, displaying a different image for your own sprite vs. other users.
Also, we're not doing anything to ensure uniqueness of usernames, so make sure you pick a name that won't collide with anyone else's name.
Let's add some sound effects to our game and take advantage of HTML5's data attributes to simplify our controls.
-
Add this list element to your
index.htmlbody:<ul> <li><a href="#" data-soundname='bubble'>Play Bubble</a></li> <li><a href="#" data-soundname='ray_gun'>Play Ray Gun</a></li> </ul> -
Use jQuery to bind the
<a>tag'sclickevent. You can figure out which soundname the user wants by inspecting the click event's data attribute, as below. I've included the cross-browser version as well as the version provided for in the HTML5 spec, which only Chrome seems to support.$('a').click(function(evt) { // this spec version is not as pretty but works across browsers $('#'+evt.target.getAttribute('data-soundname'))[0].play(); // the HTML5 spec provides a nicer API, but this version only seems to work in Chrome // $('#'+evt.target.dataset.soundname)[0].play(); });Note that data attributes are different from micro-data, because they are not intended for external consumption. See Dive Into HTML5 for more details about microdata.
-
Reload the page. Click each link to verify that you can read the
datasetproperty and are getting the correct soundname. -
Playing audio and video in HTML5 involves a lot of codec hassles. You usually have to provide your content in multiple formats. To make things simple, I've included these two sound files in four different formats. Copy the sound files from the
mediadirectory to your project. If you are serving these files through a web server (and not viewing them via a file:// URL), you may have to fiddle with your MIME settings because HTML5 will choke if your audio files aren't served with the proper MIME type. See MIME Types for details.The following audio embed should work for most people, though. The spec says that the browser should pick the first listed source that it can play.
 <div style="display:hidden">
   <audio id="bubble" preload>
     <source src="media/bubble.ogg">
     <source src="media/bubble.mp3">
     <source src="media/bubble.wav">
   </audio>

   <audio id="ray_gun" preload>
     <source src="media/ray_gun.ogg">
     <source src="media/ray_gun.mp3">
     <source src="media/ray_gun.wav">
   </audio>
 </div>
I chose to embed these directly on the page so we could take advantage of the browser's content fallback selection. You can also create audio objects just like we did with Image objects earlier:
var audio = new Audio; audio.src = "http://..."; -
Reload your page, then try playing both sounds at the console:
$('#bubble')[0].play() $('#ray_gun')[0].play() -
Modify your anchor click event handler to automatically play the requested sound using the above technique.
-
To see what basic HTML5 audio controls look like, remove
display:hiddenfrom the<div>and add thecontrolsattribute next topreload, then reload the page. -
Video embedding works the same way. We need to provide multiple versions of video files to ensure compatibility across modern browsers. Copy the files
short.mov,short.mp4,short.ogv, andshort.webmfrom themediadirectory to your project'smediadirectory.These files were created from a QuickTime movie using
ffmpeg2theora,ffmpegandHandBrakeCLI, using settings from Dive Into HTML5. -
Add this to the bottom of your
index.htmlpage:<video width="320" height="240" preload controls> <source src="media/short.ogg" type='video/ogg; codecs="theora, vorbis"' /> <source src="media/short.mp4" /> <source src="media/short.mov" /> </video> -
Reload the page. One of those four formats should display in your browser.
For a cool example of how to use the canvas to manipulate images from a video, check out this demo. There's also a good demonstration of using embedded media events to show a timer in this demo.
Use the FlowPlayer Flash-based video player as the ultimate fallback for this content (you'll need to embed a <object> tag after the <source> tags. The technique is explained
at Video for Everybody.
-
At the JavaScript console, type the following command:
navigator.geolocation.getCurrentPosition(function(loc) { console.info(loc.coords) }, function(err) { console.error(err) }) -
Inspect the location object in the console. If you lookup those coordinates in Google Maps you should get a result fairly close to the convention center! It's very easy to integrate this info with Google Maps to show a map at the user's location, but unfortunately this can't be done from localhost due to Google Maps API authentication issues. This link has a simple demo - be sure to view source on the page.
The first callback gets fired if the browser can guess its location. The second callback fires if it can't. For me, the second callback fired in Safari when I ran it on a machine with an Ethernet connection.
Check out SimpleGeo for some examples of other cool things you can do when you know a user's approximate location.
-
Examine the file
js/worker.jsand then copy it to your project. This is a simple brute-force algorithm to find all the factors of a given integer. -
Reload the page, then type these lines at your JavaScript console:
var worker = new Worker('js/worker.js');

 worker.addEventListener('message', function(e) {
   console.info(e.data);
 },false);

 worker.postMessage(100);
If you are using Chrome, you will get a security exception if you are loading index.html as a file:// URI. You can reopen Chrome with a command-line flag to circumvent the exception, though. This is what worked for me on OS X:
open -n -a 'Google Chrome.app' --args --allow-file-access-from-files
Or just use a different browser.
-
You should see the worker immediately post a response to the console. Try increasing the size of the number you pass to worker.postMessage until you get something that takes awhile to run (like 1,000,000). Notice that your web page continues to be responsive even as this task runs in the background.
Here's a more complicated webworker example.
-
Examine the
index.htmlfile in themanifestdirectory. This is a stripped-down version of the exercise 11 solution. Check out the<html>tag which now includes a reference todemo.manifest. -
Examine
demo.manifest. -
If you have a packet sniffer, start it sniffing on port 80. Otherwise, make sure your JavaScript console is recording network traffic.
-
In your packet sniffer or JavaScript console, note that all files are being downloaded, and note the MIME type of the
demo.manifestfile (text/cache-manifest). -
Now reload the page. If all goes well, the only traffic you'll see moving along the wire is a request to check the demo.manifest file, which doesn't even get downloaded since it is unchanged (because of the
304HTTP response status code).This is the same technique you can use to make an HTML5 app "installable" on a smart phone.
Get manifest/index.html running on your dev machine. All you need to do is serve up the directory from the webserver (vs. from file://), and make sure the manifest file has the right MIME type. In Apache,
I added this directive to httpd.conf:
AddType text/cache-manifest .manifest
Here are some other "HTML5-ish" features that you should be aware of that didn't fit into this tutorial or are too bleeding-edge to be used reliably:
-
Polyfills to get HTML5 features working across browsers and also Uber
-
Various CSS3 capabilities like rounded corners, 2D transforms, etc.
Thanks to Jeff Casimir for helping me organize this material, and to Mark Pilgrim for writing Dive Into HTML5 which was a big help. Any mistakes are my own of course!
Thanks for coming to my tutorial. I'm mike@subelsky.com or @subelsky on Twitter. I love talking about HTML5, so email me if you have questions or want to discuss interesting challenges.
Most of the techniques I discuss in this tutorial I learned building an HTML5-powered game for programmers named EXP. We're accepting beta testers now, visit exp.subelsky.com to signup!