Huddlr is a simple chatting 💬 application made using socket.io
Make sure that npm and Node.js are installed on your computer and that you have Python installed.
Before starting up the application, open your downloaded folder and install all the dependencies by running:
# Prerequisite only for windows users. This is optional, but should an error about node-gyp occur, you may want to run this.
npm install --global windows-build-tools

# Install required dependencies
npm install
IMPORTANT!!!
Before running the application, you may want to change the ip address used for the server. This is set up in src/server/index.js. If you plan on testing it locally, leave it as 'localhost'. However, if you want to test it on a local network, change the ip address into your ip address on the network. You can find this by running ipconfig (Windows) or ifconfig (Linux), and find the correct network interface.
When done, make sure you have all the prerequisites installed and you are connected to the internet, then execute the following comand and the app should be working fine and dandy 😄:
$ npm start
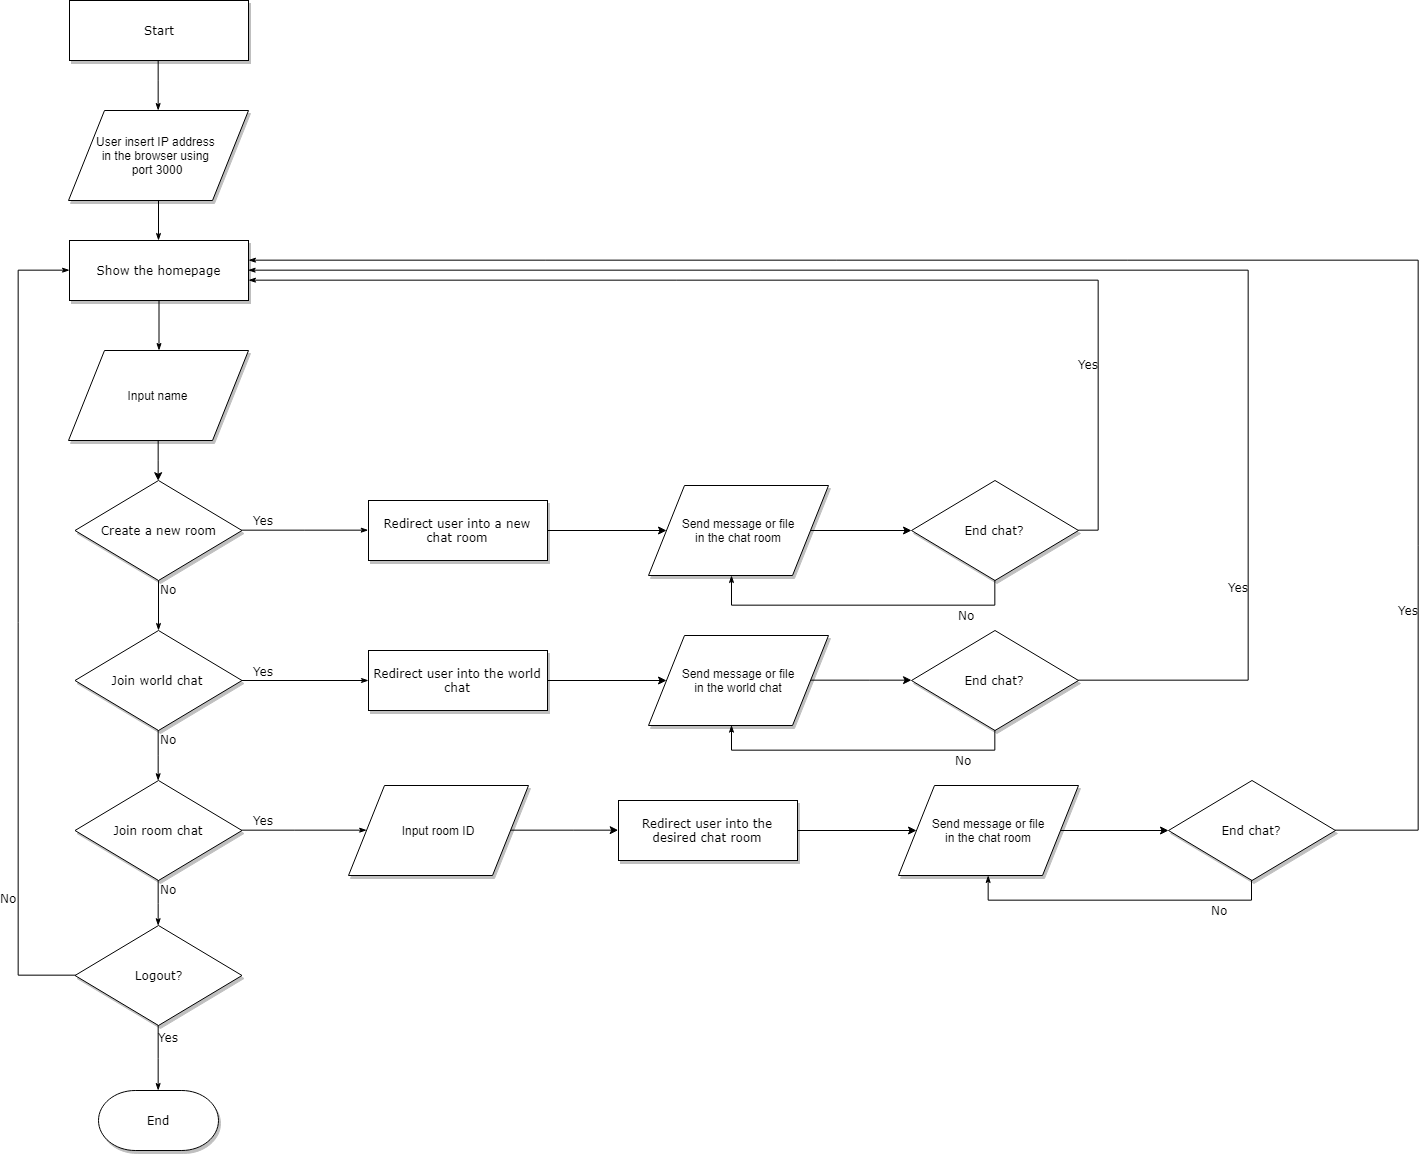
Listening on [ip-addr]:3000Now just open your favorite web browser and type the ip address of the server and voilà it works!

So that Huddlr is able to be accessed by other computers on the same network:
- Make sure that client computer and the server computer are in the same network
- Get the IP address of the server by using
ipconfigon windows orifconfigon linux on the server to reveal the IP address. - Then on the client computer access the IP address of the server that we got from the previous step
- ex: My server's IP address is 172.32.169.2 so I enter
http://172.32.169.2:3000on my client's web browser to access Huddlr
- ex: My server's IP address is 172.32.169.2 so I enter
Let's take a quick tour of Huddlr!

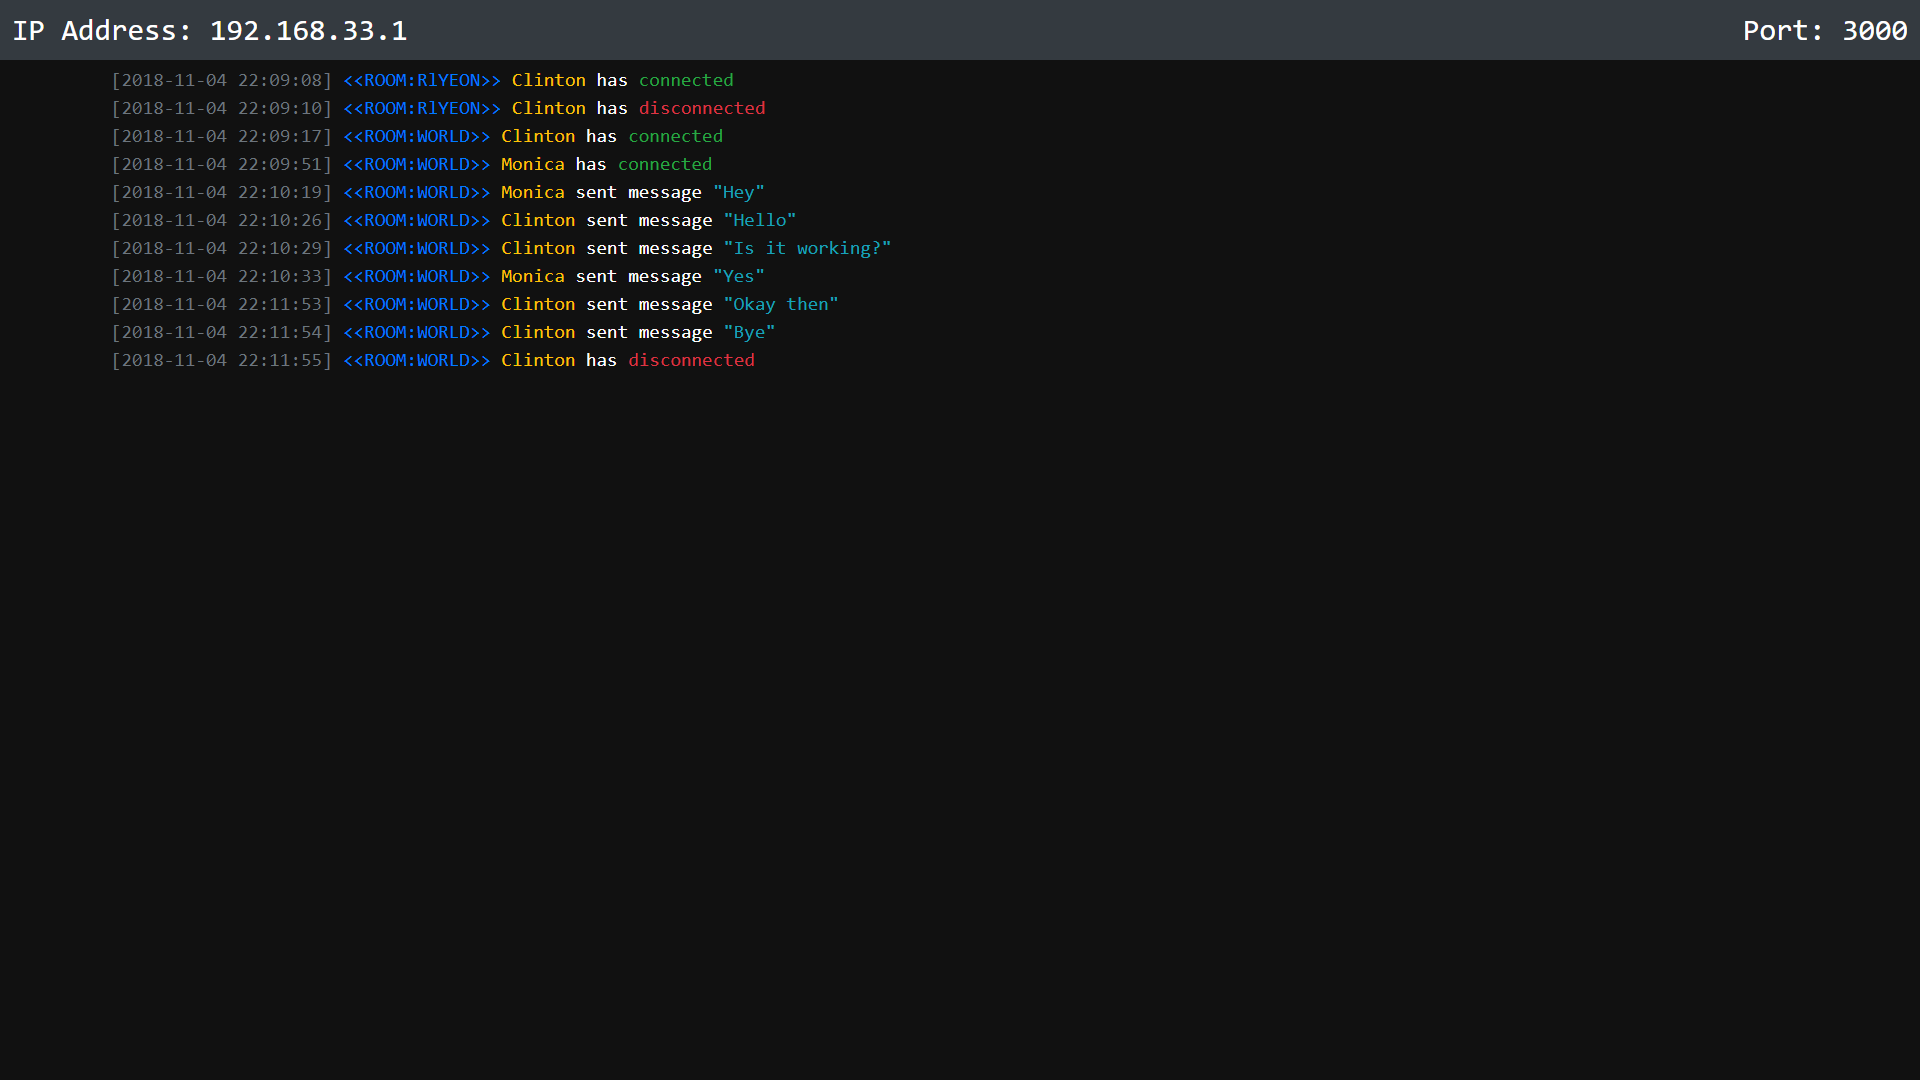
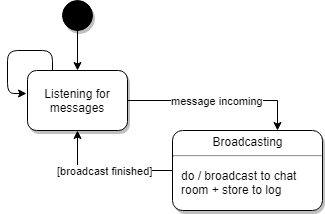
Client broadcasts message
- Client socket emits message to server Server receives message & logs it
- Server listens for messages in socket. When one is received, the server logs it Server rebroadcasts message to the rest of the clients in the room
- The server broadcasts the message to everyone in the same room as the sender
When certain client disconnect then in Server that specific client name will appear – not just “Lost a connection” how to make this happen ?
Socket ID
- Each socket has an ID.
- Each socket ID is mapped with a set of user data. & Once a socket disconnects, the corresponding user data is known, hence able to be logged.
Session management is important as all names are stored in sessions.
This is an illustration of how our file sharing system works when a client wants to share on the app:
- Client: Hey server we want to send a file, I’ll slice it for you!
- Server: Hey client i got it, send the next one
- Client: okay heres the next part
- Server: got it, any more?
- Client: Heres the next part!
- ...
- Client: That's it! I have no more slices to give
- Server: Okay since there's no more slices, I'll process this file then!
On this section, we will explain the techniques that we have used to achieve our results.
This section will explain the important parts that are in the "Server" Directory:
This javascript file acts as the starting point of the application. This file is responsible for starting the instance of the app and make the CSS and javascript file and compile it into one.
Since Huddlr is basically a web app, this file is also responsible for setting up the template engine so that the contents will be dynamically created according to our template. We also used Express so that our application could run as a web application. This meant that we needed to setup the "view" which is just the user-interface.
app.engine('html', mustache());
app.set('view engine', 'html');
Since HTTP is a stateless protocol, this file is also responsible for session management since we identify each clients based by its session.
// Set up session management middleware
var session = expressSession({
    genid: (req) => uuid(),
    secret: 'secret',
    resave: false,
    saveUninitialized: true
});
app.use(session);
This file is also used to setup the server IP address and the port that will be used. You can change the IP address of ther server and the port by editing this section in the file:
var ipaddr = '10.121.11.226';
var port = process.env.PORT || 3000;
This file is also responsible for configuring storage which is used to store all the data that is needed by the application. This includes the room IDs, usernames, session IDs, uploaded files, and more.
// Set up storage
let storage = new Storage();
Since we use Express which is a web application framework so that our chat application could run on a web-browser, we need to set-up the routes that will allow our app to have URLs that are accessible in the browser so that the user can access a certain functionality by accessing the specific URL which leads to a specific file in the server.
// Set up routes
let routes = new AppController(storage, ip, port).intitialize();
app.use('/', routes.router);
Now here comes the essential part which is setting up the socket for the communication functionality. We decided to buiild our app by building on top of Socket.io which is a realtime application framework which enables us to use real-time, bidirectional and event-based communication that works on every platform, browser or device, reliably and quickly. Since our application is built on Socket.io's framework, index.js is responsible for setting up the sockets needed. Here we setup Socket.io to use our custom classes called ServerSocket, ChatSocket, and PrivateChatSocket (explained in-depth individually below) that allows us to extend Socket.io's functionality for our goals.
// Set up sockets
let io = socketio(http);
io.use(function (socket, next) {
    session(socket.request, socket.request.res, next);
});

let serverSocket = new ServerSocket(io, storage);
let callback = serverSocket
    .broadcastServerLog
    .bind(serverSocket);
let worldSocket = new ChatSocket(io, storage, 'world', callback).initialize();
let privateSocket = new PrivateChatSocket(io, storage, 'private', callback).initialize();
This file is also responsible for terminating our application and handling events such as when the user closes the app so that the app can close properly.
http.on('close', function () {
    console.log('Stopping...');
    const directory = path.join(__dirname, '/../../upload/');
    fs.readdir(directory, (err, files) => {
        if (err)
            throw err;
        for (const file of files) {
            // console.log(file);
            if (file != '.gitkeep') {
                fs.unlink(path.join(directory, file), (err) => {
                    if (err) throw err;
                    }
                );
            }
        }
    });
});The controller.js file is responsible for defining routes so that the URL that the user visits ends with a route to access a specific page or functionality. This starts with the initialize() method which tells the routes that certain functionalities will end up in.
    intitialize() {
        this._router.get('/', this.RootGet.bind(this));
        this._router.post('/', this.RootPost.bind(this));
        this._router.get('/world', this.WorldGet.bind(this));
        this._router.get('/files/:fileName', this.Download.bind(this));
        this._router.get('/room/r/:id', this.PrivateGet.bind(this));
        this._router.get('/server', this.ServerGet.bind(this));
        this._router.post('/disconnect', this.Disconnect.bind(this));
        return this;
    }
For the code snippets above, if it is the room "room/r/:id", the end resuilt will be a link that ommits the “:” and leaves the url with the id. So for example if the room ID is 1234, it will then be "10.121.11.226/room/r/1234".
This javascript file also contains the method to create a new room which is used when the user creates the new private room and logs it in the server.
    createRoom() {
        let roomID = '';
        while (this.storage.getRoom(roomID = `R${utils.makeid(5)}`)) {
            console.log(roomID);
        }
        this.storage.addRoom(roomID);
        return roomID;
    }
A method in the file called rootPost() is essential for redirecting users to the routes that are intended by the user and to help add a user session into a chatroom. This method also passes the user's chosen name and also sets a random color to the user that is used in the UI as a color identifier and an elementID for the user which is based on the sessionID.
    RootPost(req, res, next) {
        req.session.name = req.body.name;
        this.storage.removeUserSession(req.sessionID);
        this.storage.addUserSession(req.sessionID, {
            name: req.body.name,
            color: utils.randomColor(),
            elementID: md5(req.sessionID),
        });
        ...
There are more methods in this file, however essentially the rest of the methods in this javascript file are the methods that are used to get the specific functionality so that it could be used to set the route when the initialize() method explained above is called.
This javascript file is responsible to setup the socket for the server's world chat functionality by utilizing Socket.io.
   initialize() {
        this.nsp.on('connection', (socket) => {
            let sessionID = socket.request.sessionID;
            let user = this.storage.getUser(sessionID);
            if (user) {
                this.broadcastConnectMessage(socket, user, sessionID);

                socket.on(events.CHAT_MESSAGE, (message) => {
                    this.broadcastChatMessage(socket, user, message);
                });

                socket.on(events.CLIENT_SEND_FILE_SLICE, (data) => {
                    this.storeFileSlice(socket, user, data);
                })

                socket.on('disconnect', () => {
                    this.broadcastDisconnectMessage(socket, user, sessionID);
                });
            }
        });
        return this;
    }
There are always two sockets, one for the client and one for the server. The client's socket is in the browser, and the server's socket is the Node.js server itself. Therefore this chatSocket.js is used only for setting up the server socket. Since socket.io is event based, if there is an event it will do something. When it doesn't, it actually is listening for events. Socket.io allows us to also communicate to a specific socket. In this case, we have set it up so that if there are any messages such as for sending file/disconnect/connect/ and any other communications it is broadcasted to the server.
Therefore there are four important methods that we have created:
- broadcastChatMessage()
- Method that provides chat functionality. This gets the user's name, message, current time, and user color and broadcasts the message while also logging it on the server.
   broadcastChatMessage(socket, user, message) {
    socket.broadcast.emit(events.CHAT_MESSAGE, {
        user: user.name,
        message: message,
        time: utils.getSimpleTime(),
        color: user.color
    });
    this.broadcastServerLog({
        type: events.SERVER_CHAT,
        user: user.name,
        message: message,
        room: 'WORLD',
    });
}
- Method that provides chat functionality. This gets the user's name, message, current time, and user color and broadcasts the message while also logging it on the server.
- broadcastDisconnectMessage()
- Method that handles when a user disconnects by removing the user from the room and broadcasting while also logging that the user has left.
    broadcastDisconnectMessage(socket, user, sessionID) {
    this.storage.removeUserFromRoom(sessionID, 'world');
    socket.broadcast.emit(events.CHAT_DISCONNECT, user);
    this.broadcastServerLog({
        type: events.SERVER_DISCONNECT,
        user: user.name,
        message: '',
        room: 'WORLD',
    });
}
- Method that handles when a user disconnects by removing the user from the room and broadcasting while also logging that the user has left.
- broadcastConnectMessage()
- Method that handles when a user connects by adding the user from the room and broadcasting while also logging that the user has connected.
    broadcastConnectMessage(socket, user, sessionID) {
this.storage.addUserToRoom(sessionID, this.namespace);
socket.broadcast.emit(events.CHAT_CONNECT, user);

this.broadcastServerLog({
    type: events.SERVER_CONNECT,
    user: user.name,
    message: '',
    room: 'WORLD',
});
- Method that handles when a user connects by adding the user from the room and broadcasting while also logging that the user has connected.
- storeFileSlice()
-
This method is used for the file transfer functionalities of the chat application. There are two parts of this method because the process of transfering files requires us to slice a file into smaller files and send the slices one by one to the server (hence the name storeFileSlice()). Therefore we decided to store the slices into 100,000 bytes for each file (explained in greater detail in the storage.js file explanation below).
-
The first part is to check if the file is complete. This means that this only happens once there are no more slices left for the file. If it is complete then it will finalize the file.
    storeFileSlice(socket, user, data) {
    ...
     if(complete) {
    console.log("FILE COMPLETE!");
    let res = this.storage.finalizeFile(data.name);
    if(!res.err) {
        socket.emit(events.SERVER_FINISH_RECEIVE_FILE);
        socket.broadcast.emit(events.CHAT_FILE, {
            user: user.name,
            file: {
                name: res.alias,
                size: res.size,
                path: '/files/' + res.name,
                ext: res.name.split('.').pop().toUpperCase(),
            },
            time: utils.getSimpleTime(),
            color: user.color,
        });
-
If the file is not complete it will request for another slice of the file.
else {
    var curr = this.storage.getCurrentFileSlice(data.name);
    // console.log("REQUEST FILE SLICE: " + curr);
    socket.emit(events.SERVER_REQUEST_FILE_SLICE, {
        currentSlice: curr
    });
-
This class is basically the same as above however instead it connects users into private chatrooms that the user can create and share the link to people so that they can join the private room instead of using the world chat.
This serverSocket.js file basically just sets up the server's socket using Socket.io.
import Server from 'socket.io';
import Storage from './storage';
import * as events from '../events';
import * as utils from '../utils';

export default class ServerSocket {
    /**
     * @param {Server} io
     * @param {Storage} storage
     */
    constructor(io, storage) {
        this.io = io;
        this.nsp = this.io.of('/server');
        this.storage = storage;

        this.broadcastServerLog.bind(this);
    }
Other than that, it keeps a log of all information and broadcasts and emits it. This broadcast method is not a method that we have created that acts as a callback to be called by all other methods (connect message/disconnect message etc.) so that the server socket can emit this.
broadcastServerLog(log) {
    log.time = utils.getTerminalTime();
    this.storage.appendLog(log);
    this.nsp.emit(events.SERVER_LOG, log);
}This file essentially sets up the storage management system that we have designed for our application. Since we do not use a database to store our files because we value privacy, we store everything as variables. So the all of the chats, users, logs, and other data that is communicated between clients and users are only stored temporarily as variables and logs are stored as arrays. This means if we terminate the server, these variables are cleared up and not saved on the server.
let Storage = function () {
    var users = {};
    var rooms = {
        world: new Set()
    };
    var logs = [];
    var files = {};
    var struct = {
        name: null,
        type: null,
        alias: null,
        size: 0,
        data: [],
        slice: 0,
    };
This storage.js file is also responsible for handling all the file transfer functionalities on our app. Since the best way to send files across devices is to slice bigger files into smaller files and send the slices one by one to the server, we decided to slice it to 100,000 bytes for each file.
This is an illustration of how our file sharing system works when a client wants to share on the app:
- Client: Hey server we want to send a file, I’ll slice it for you!
- Server: Hey client i got it, send the next one
- Client: okay heres the next part
- Server: got it, any more?
- Client: Heres the next part!
- ...
- Client: That's it! I have no more slices to give
- Server: Okay since there's no more slices, I'll process this file then!
This is the part of the code that slices the file.
    this.fileIsComplete = (name) => {
        let result = files[name].slice * 100000 >= files[name].size;
        if (result) console.log(files);
        return result;
    }
This part stores each slice of file.
 this.storeFileSlice = (data) => {
        if (!files[data.name]) {
            files[data.name] = Object.assign({}, struct, data);
            files[data.name].data = [];
        }

        //convert the ArrayBuffer to Buffer
        data.data = Buffer.from(new Uint8Array(data.data));

        //save the data
        files[data.name].data.push(data.data);
        files[data.name].slice++;
    }
This is the part of the code that finalizes the file once all the slices are sent to the server. Once it is finalized to load the file, the URL of the file is broadcasted so that the user can download the file directly form a new specific link that it gets it from the server.
this.finalizeFile = (name) => {
    var fileBuffer = Buffer.concat(files[name].data);
    let ext = files[name].alias.split('.').pop();
    let finalName = `${files[name].name}.${ext}`
    let path = __dirname + `/../../upload/${finalName}`;
    let res = {
        alias: files[name].alias,
        size: files[name].size,
        name: finalName
    };
...This section will explain the important parts that are in the "Client" Directory:
This page contains all the javascript needed for the functionalities of the user interface on the landing page. This contains the functionality for name input, buttons to go to world chat/private chat, buttons to create a new room, validating forms and more.
This javascript file handles all the front-end elements of the chat user interface and also manages some of the essential back-end elements. This means it handles all events for chat, if there is a new message, a new file, etc.
At the beginning of this javascript file, it will first initialize the UI. This means that it adds all the necessary listeners for the elements that are present in our UI which we can see in the views folder. However to do that, it needs a socket so it gets it from the ClientSocket class that we have created because this socket is used to handle the transmission of messages.
/**
 * @param {ClientSocket} socket;
 */
var ChatUI = function (socket) {
    var socket = socket;

    ...

this.initialize = () => {
        // Set up tooltips
        $('[data-toggle="tooltip"]').tooltip({
        ...
        // Add event listeners to elements
        chatSend.click(() => this.sendMessage());
        chatInput.keypress((e) => {
        ...
        chatForm.submit((e) => e.preventDefault());
        chatScroll.click(() => this.scrollToBottom());

        // Add scroll listeners to scrollbar
          chatWindow.on('ps-y-reach-end', () => {
          ...
          chatWindow.on('ps-scroll-up', () => {
          ...
          chatWindow.on('click', '.file-container', (e) => {
          ...
        fileInput.dropify();

        sendFile.click((e) => {
        ...
Functionality such as sending message is also available in this javascript file which basically gets the message input from the form on the user interface, clears it, and then appends it with user information such as the user name, message, time, and user color before actually sending the message
this.sendMessage = () => {
    let msg = this.getMessageInput();
    if (!msg.trim())
        return;
    this.clearMessageInput();
    this.appendMessage({
        user: 'self',
        message: msg,
        time: utils.getSimpleTime(),
        color: '#000'
    });
    socket.sendMessage(msg);
}
Also available in this file are the methods used for the UI to show whether a user is appended (meaning the user is online/active in any chat room). This means that if the user is online, on the UI it will show the user's ID, color, and name.
this.appendUser = (data) => {
        let id = utils.escapeHtml(data.elementID);
        let color = utils.escapeHtml(data.color);
        let name = utils.escapeHtml(data.name);
        let el = `<li id="${id}" class="hidden" style="color: rgba(0,0,0,.5)"><i class="fas fa-xs fa-circle mr-3" style="color:${color}"></i>${name}</li>`;
        userList.append(el);
        userListPS.update();
       ...
If the user has been inactive for some time such as the user's connection to the server is inactive, the method removeUser has the functionality to remove the user after a certain timeout.
this.removeUser = (data) => {
        let id = utils.escapeHtml(data.elementID);
        let name = utils.escapeHtml(data.name);
        $(`#${id}`).addClass('hidden');
        setTimeout(() => {
            $(`#${id}`).remove();
        }, 250);
        ...
This file also contains the send file or file sharing functionality of our application which lets a user browse their device and then upload a file which will then be sliced into smaller parts of 100,000bytes before being sent one by one to the server. At the same time, on the UI side this file also provides the functionality for the progress bar. Not only that but it also provides the downloading functionality so that the user can actually access the file to download it from the server while also providing a progress bar for feedback.
/**
     * @param {File} file
     */
    this.sendFile = (file) => {
        if (file) {
            uploading = true;
            // change into progress bar
    ...
    this.sendFileSlice = (progress, slice) => {
        fileModal
            .find('.file-progress-bar')
            .css({
                width: `${progress}%`
            });
     ...
     this.downloadFile = (id, fileName) => {
        let path = filePathMap[id];
        $.ajax({
            xhr: () => {
                var xhr = new window.XMLHttpRequest();
                //Download progress
                xhr.addEventListener("progress", (evt) => {
                    if (evt.lengthComputable) {
                        var percentComplete = Math.round(evt.loaded / evt.total * 100);
                        $(`#${id}`).parent().find('.file-download-progress-bar').css({
                            width: `${percentComplete}%`
                        });
                        //Do something with download progress
     ...
Everything that depends on Socket.io for the client is configured here including the chat or sendMessage functionality. This is done by the sendMessage() method which is responsible for broadcasting the message to the server. Basically chatting/sending a message between the client and the server works like this: A client will emmit a message that will then be sent to the client, the server listens for the event chatMessage, the chatSocket in the server will receive it. So it works by sending the message to the server first and then the server sends it to the rest of the other clients.
    this.sendMessage = function (message) {
        socket.emit(events.CHAT_MESSAGE, message);
    }
This file also contains all the callbacks needed for the client such as
- setConnectCallback
- setDisconnectCallback
- setMessageCallback
- setFileSliceRequestCallback
- setFileUploadFinishedCallback
- setFileUploadErrorCallback
- setFileMessageCallback
This javascript file is used to show the UI of the server on the client’s PC and handles the javascript aspects of the server on the user’s UI. This is done so that the user with the proper priviledge may be able to access the server's log and view the log in a better more user friendly way interface.
The following shows how the logs are loaded in the UI.
class ServerUI {
    constructor() {
        // Add fontawesome libraries
        library.add(fas, far);
        dom.watch();

        this.serverLog = $('.server-log');
        this.serverLogContainer = $('.server-log-container');

        this.serverLogContainerPS = new PerfectScrollbar('.server-log-container');

        this.scrolling = false;
When the log gets updated, it will then append the new information with the current information by using the appendLog() method
    appendLog(log) {
        let el = ServerUI.getLogElement(log);
        this.serverLog.append(el);
        // if(this.serverLog.children('li').length >= 100) {
        //     this.serverLog.find('li:first-child').remove();
        // }

        if(!this.scrolling) {
            this.serverLogContainer.scrollTop(this.serverLogContainer.prop('scrollHeight'));
        }
        this.serverLogContainerPS.update();
}This is used to handle the socket needs so that the client may be able to communicate with the server to get the logs from the server. Essentially this file handle’s the server’s socket to be used on the client side so that it can keep updating and append the current log with the newer logs.
import ServerUI from './serverUI';
import * as utils from '../utils';
import * as events from '../events';
import io from 'socket.io-client';

let serverUI = new ServerUI();

var socket = io('/server');

socket.on(events.SERVER_LOG, function(data) {
    // console.log(data);
    serverUI.appendLog(data);
});Since this web-app is designed and built on Express, it requires us to have routes and views. So here in this folder are the views which are in HTML which basically just displays all the UI to the user.
This page contains the landing page for Huddlr that contains all the forms and buttons necessary for the user to input their name, create a room, join a custom room, and join the world chat.
This page contains the form necessary for the user to input the message they want to send and all the necessary buttons to browse a file and send a file.
This page is the same as privateRoom.html however it is designed for the world chat functionalities.
This page is a simple page that allows a client to view the server's logs and the IP and port settings of the server.
Since socket.io is built on top of websocket and HTTP requests, three-way handshaking is used. This can be proven in Wireshark when the client first connected. As you can see, SYN, SYNACK, and ACK is present.

The work is divided into four large parts: the socket programming itself (including chat messages), storage and session management, file transfer, and user interface. Below is the corresponding responsible members:
- Socket + chat: James + Yefta
- Storage and session management: Madeleine + Nadya
- File transfer: Nicky
- User interface: Davis + Nicky And finishing touches :D
We learned a lot about teamwork this time. Given the limited time and resources, we are able to successfully create a chat application:
- Time management
- Prototyping: to give a better direction of the project.
- Project management
- GitHub documentation
Besides working as a team, we also learned a few technical skills, namely:
- Socket programming and its uses
- Accessing another computer in the same network
- Segmented file transfer
Should any errors occur, please open an issue here
This project is licensed under the MIT License - see the LICENSE file for details