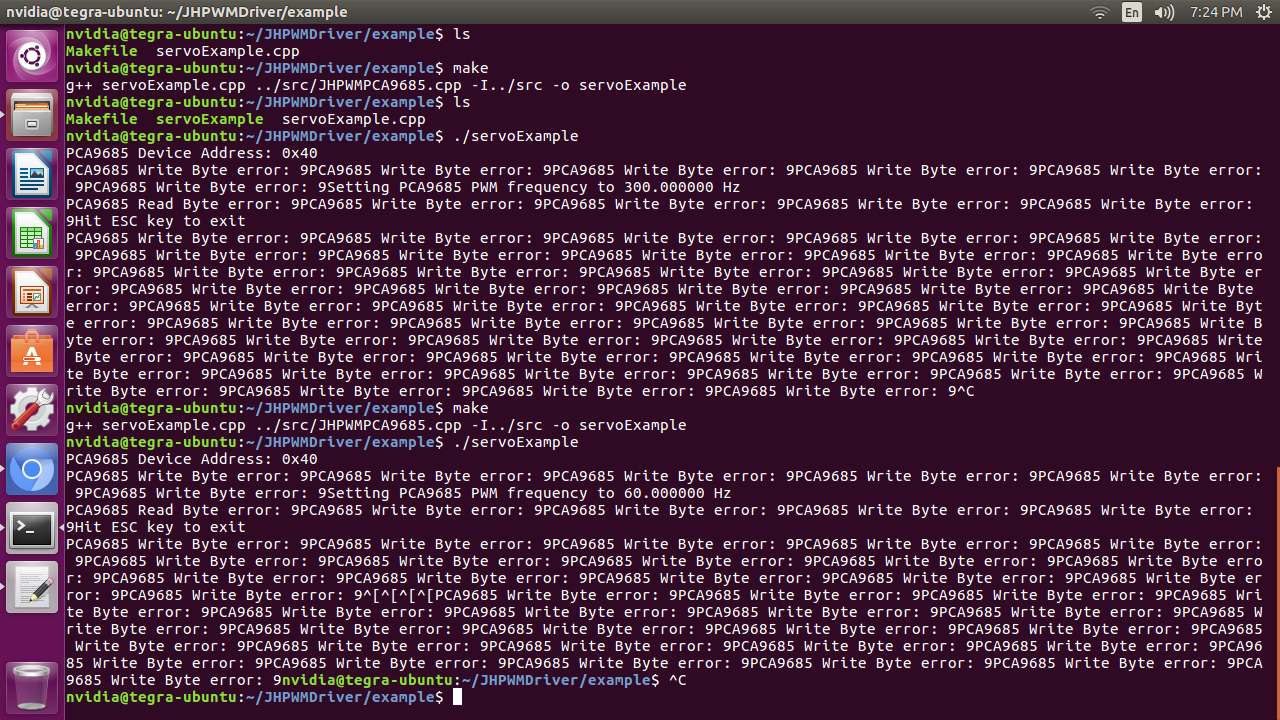
Write Byte Error #1
Comments
|
There's no information as to if the Jetson could actually see the PCA9685. Here's an article, did you do any of this: http://www.jetsonhacks.com/2016/01/26/jetson-racecar-part-3-esc-motor-control/ |
|
We are using a Jetson TX2, with Jetpack 3.0, and L4T R27.1. I am including another screenshot from our attempt to detect the i2c device using the sudo i2cdetect -y -r 1 command.
We are also working through the article you reference, but thought that the part 2 sequence of tutorials would be the first we would test. Thanks again. |

|
Note that this repository is for the NVIDIA Jetson TK1. As you can see from the i2cdetect in your image, the PCA9685 is not detected. The Jetson TX1 and TX2 have different I2C bus numbering schemes, you may be able to find it on I2C bus 0, i.e. $ sudo i2detect -y -r 0 The PCA9685 should be at location 0x40 in normal operation. However, I have not tested this . You can enumerate through the different I2C busses and try to find it. |
|
We have found success using the sudo i2cdetect -y -r 0 command. We are still getting the following errors: I understand this driver was created for the TK1, and not the TX2. I know you mentioned going on to the Part 3 tutorial. Do you believe we would be better moving onto the part 3? Thank you for your time. |


|
How did you modify the code to use bus 0 instead? |
|
We did not change anything in the code outside of what was recommended, (i.e., removing the commented portions of the code for steering calibration.) |
|
You might want to change the I2C bus (kI2CBus) of the PCA9685 object to be 0. |
|
Will do. Will circle back once we are able to provide a log. |
|
I get the same "Write byte error". In my case the address is 70. I have already changed the bus to 0. But where in the code do I change the address from 40 to 70? |
|
You set it when you initialize the PCA9685 instance. In the example code, ie: PCA9685 *pca9685 = new PCA9685(0x70) ; |
|
HI @michaelschleiss, did you managed to solve this? I'm seeing only address of 70 like you and I still getting "Write byte error". Update: I didn't change the BUS to 0.. now it's working |
|
hay guys .. I CONNECT MY PCA9685 WITH SERVO WHEN I RUN $ SUDO I2DETECT -Y -R 0 I GOT THIS IS IT FINE .. when i run this script after making $ sudo make .. the servo donot show any response .. plz any one help... thanks in advance |

|
The PCA9685 is not available in the screenshot you show. Address 0x40 is being used by a previously installed kernel driver (probably the power monitors). You should connect the device to bus 1. |
|
to set device to bus 1 ... i have to write this command..$ SUDO I2DETECT -Y -R 1 .. or something else.. |
|
You have to wire the device appropriately. The command is correct. |
|
ok jetsonhacks.. thanks for your help working time is over .so i will look in this tomorrow... again thanks... |
|
I am using jetson tx2 PCA9685 is getting detected in address 0x40 on bus 1 but it keeps on giving "writeByte Error". I am using bluerobotics Basic ESC at 300 Hz and pwm values are also between 1100-1900 |
|
To use the I2C bus, you need to have the proper permissions. For example: $ sudo ./servoExample |
|
Write Byte error usually indicates that either the wiring is incorrect (the Jetson cannot see the PCA9685). Use the i2cdetect tool to determine if the device is visible. The I2C bus requires root permission for access. If the Jetson can see the device, and you are receiving the "Write Byte" error, check to make sure that you are running using sudo, ie: sudo ./servoExample |
|
jetsonhacks .hope u r having a good day.. |
|
@sharoseali You will need to port the library to Python. |
|
thanks for your reply and soory for the late reply..... |
|
@sharoseali You should write Python code to control the servo. |
|
thanks for the help but another problem came up it is not working means the thrusters are not rotating. I tried changing the frequency and PWM value but nothing happened, Than I changed the frequency in JHPWMDriver.cpp To: and my pwm was 1700 so it sarted rotating but at 1500 it stopped. Motor was running in 1300 and 1500 only and for any other pwm it will remain stopped . Thank You Again for any suggestions. |
|
printf("PCA9685 Device Address: 0x%02X\n",pca9685->kI2CAddress) ; this code is running properly with my thrusters and i am able to control the speed using pwm but i do not know the reason. Thank You in advance |
|
I'm glad you got it to work. As noted in the example, that code is for controlling a servo motor, specifically a a Robot Geek RGS-13 Servo. ESCs are different. If you were perhaps to look at the more technical details of controlling your BESC, you would see: Stopped | 1500 microseconds which might help explain your code. |
|
Hi @jetsonhacks , I met some strange problem when using the PCA9685 board. A quick small summary. At beginning PCA9685 controls RaceCar suitably, but after restart the TX2, address is changing to 0x71 0x72 using "sudo i2cdetect -y -r 0". Changing source code using "0x71" and run the program, the address is back to 0x70 using "sudo i2cdetect -y -r 0", but the program does not controls RaceCar anymore. It is quite strange to me and I have no knowledge about it. Do you think the PCA9685 board is broken due to some bad usage? |
|
I have not experienced this kind of issue. The address of the PCA9685 should be fixed, and not change. I am not sure why it would change to two addresses, that seems really strange. If you find the issue, please let us know. |
|
@qiakeyufeiniao I have a same problem with you. How did you solve it? |
|
Same problem here, it actually occured with two PCA9685 boards of me. Would be great to know what causes it :) |
|
@qiakeyufeiniao I am having the exact same problem with several different PCA9685 boards by connecting with an Nvidia TX2 (with Orbitty carrier board). |
Foremost, thank you for your work in the field. I have included our wiring below, for your reference. We also have followed the directions concerning installation of software, and upon execution of the sample, we are getting the following error message:
" Write Byte error: 121PCA9685 "
Any assistance would be greatly appreciated.
The text was updated successfully, but these errors were encountered: