This dvrk_gravity_compensation package is designed for gravity compensation(GC) of Master Tool Manipulator(MTM) for dVRK. Compared to former work, our repository solves following problems:
- Elastic force and friction modeling in dynamics model
- New data collection strategy of 7 DOF serial manipulator for further estimation
- Multi-steps least square estimation
- Low-Friction Zero-Gravity controller
Notes:
- You will need Matlab with the Robotic Toolkit to use ROS. Version 2018b is known to work. Matlab can be installed on the same computer as the dVRK controller (simpler) or on a different computer since the gravity compensation data collection used ROS to communicate with the dVRK controller.
- If you happen to have a full da Vinci master console, please power it and raise the stereo display as high as you can (using the two round buttons on the left side of the arm rest). This will provide more space to move around the MTMs and identify the gravity compensation parameters.
- If you have two MTMs, you will need to repeat the procedure for each arm. While collecting data for one arm, try to keep the other arm all the way to the side. This is to provide as much space as possible while avoiding collisions.
Open a terminal to start roscore:
$ roscoreOpen another terminal to launch dVRK console
# if you have multiple controllers on your e-stop chain, close relays
$ qlacloserelays
#use a console config that contains the config file names of MTML and MTMR
$rosrun dvrk_robot dvrk_console_json -j <path_to_your_console_config.json>
After opening console, press home button to turn on MTM arms and move them to home position.
Open Matlab and go to the folder, dvrk_gravity_compensation.
Then initialize the system:
rosinit;
Make sure your path in Matlab is set properly and you've added support for CRTK messages. See:
- CRTK Matlab: https://github.com/collaborative-robotics/crtk_matlab_client
- dVRK Matlab: https://github.com/jhu-dvrk/dvrk-ros/tree/master/dvrk_matlab
Run the whole program in one command
mtm_gc_controller = estimate_gc_params('<ARM-NAME>','<Serial-Number>')
For example:
% For MTML
mtml_gc_controller = estimate_gc_params('MTML','12345')
% For MTMR
mtmr_gc_controller = estimate_gc_params('MTMR','54321')
Then the program starts. It will go through 4 processes:
A) [wizard_config_dataCollection],
B) [dataCollection],
C) [mlse]
D) [gc_controller].
In this process, users need to set joint limits for the data collection process. Going through this process is necessary because we don't want our MTMs hit the environments. For the reason that each MTM can be installed in different environment, we need this process to set joints limits.
After you step into this process, you will go through some instructions to set joint limits and then execute the collision checking.
Matlab console:

The console will show some information of instructions including instruction goal, MTM arm, Joint No which will be moved, the customized and current value and keyboard instruction.
-
To increase joint angle by 1 degree, type i and return.
-
To decrease joint angle by 1 degree, type d and type return.
-
To set joint limit value, type f and type return
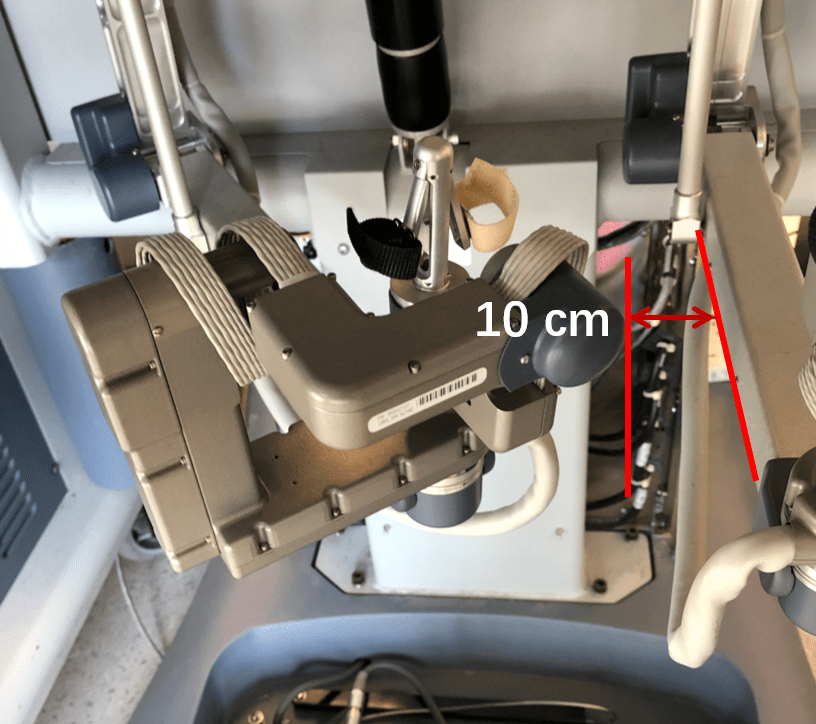
Set the joint limit when distal link of MTM is around 10cm away from top panel.
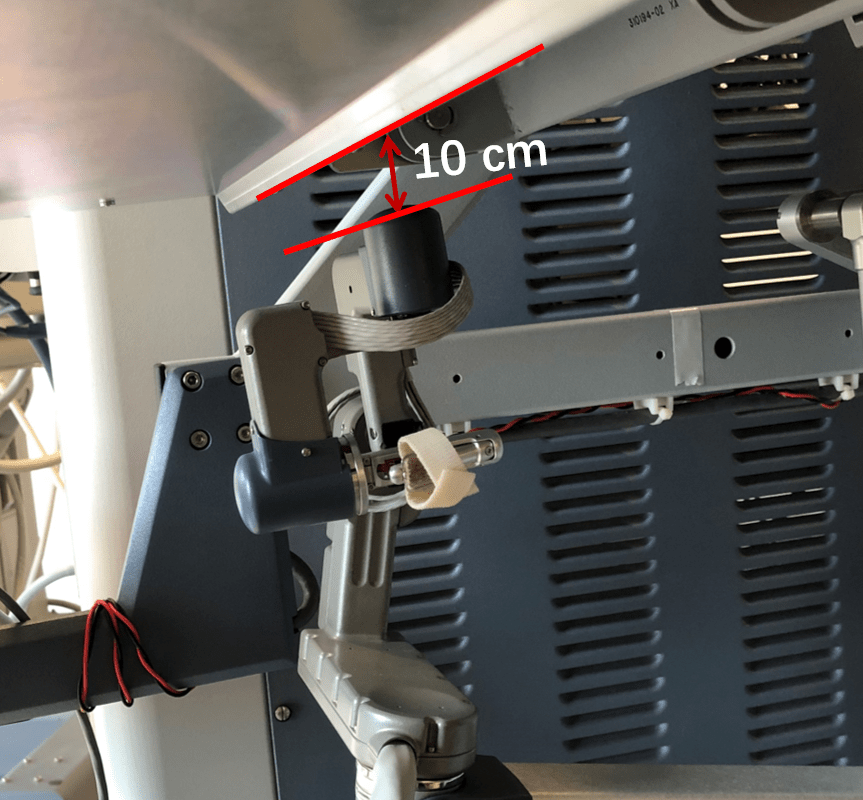
Matlab console:
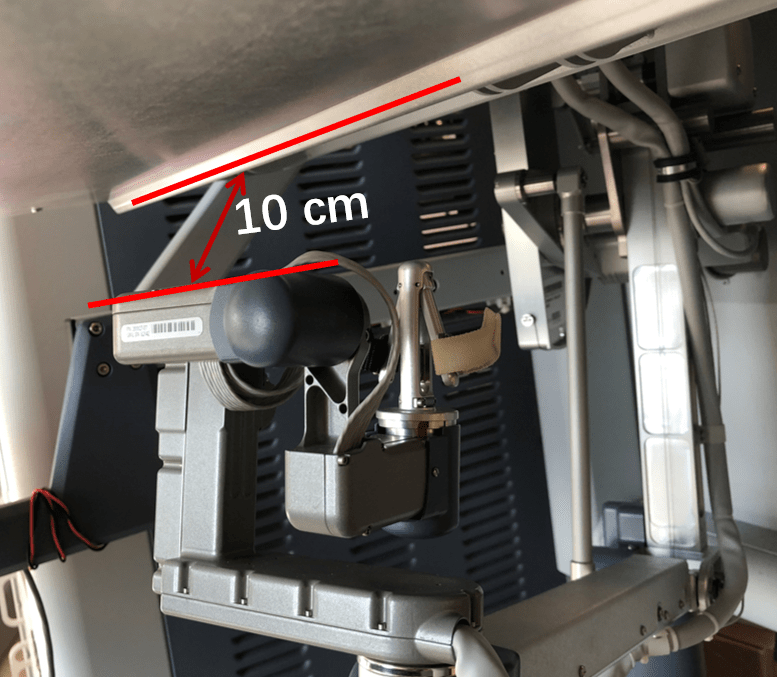
Set the joint limit when distal link of MTM is around 10cm away from front panel.

Matlab console:

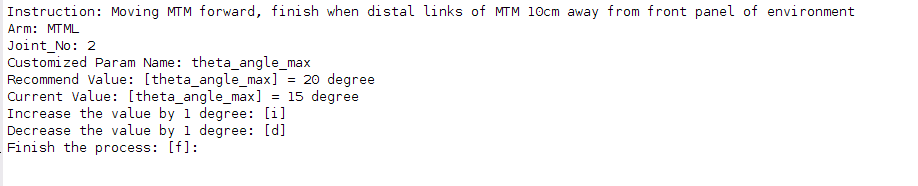
Set the joint limit when distal link of MTM is around 10cm away from top panel.
Matlab console:

Set the joint limit when distal link of MTM is around 10cm away from top panel.
Matlab console:

Set the joint limit when distal link of MTM is around 10cm away from left panel.
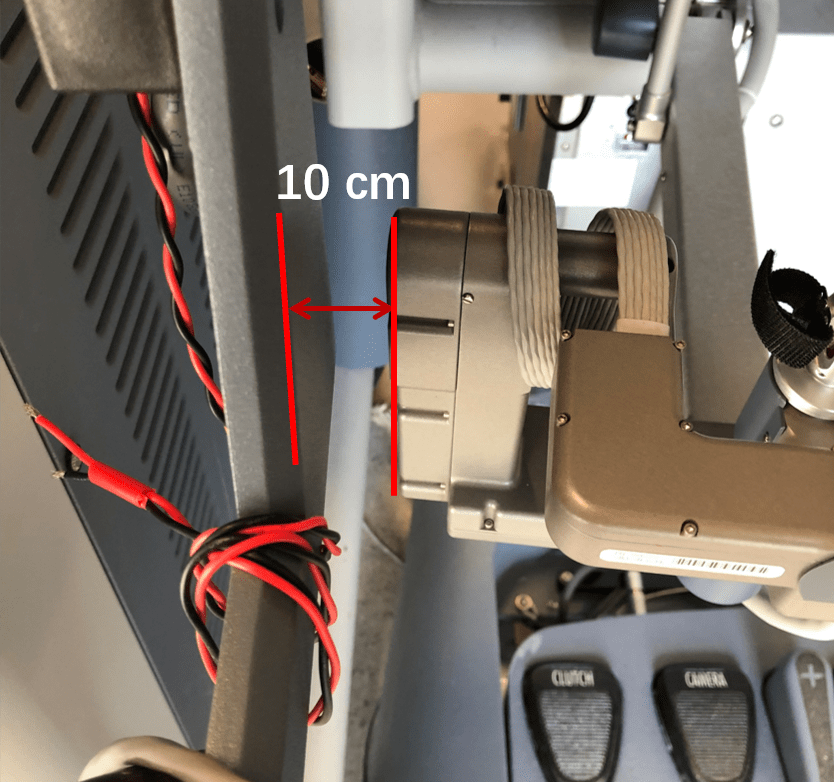
Matlab console:

Set the joint limit when distal link of MTM is around 10cm away from right panel.
Afterwards, it will execute collision checking. If you set the limit properly according to the previous instructions, MTM will not hit the environment. But if it unluckily hits the environment by mistakes, push E-button immediately.
Collision checking is making MTM to move according to preset trajectory which will be apply in dataCollection. Therefore, if collision checking passes, MTM in the dataCollection process will be free from collision.
In this process, dataCollection of MTM will be executed. This usually spend about 1hour. (No user input is required)
In this process, the dynamic parameters will be estimated by multi-steps least square estimation. (No user input is required)
- After finish estimation step, the process will pause waiting for user's console input. You can type [y] to contine the process
(It avoids applying gc controller when user is absent and therefore causing dangerous)
In this process, gravity compensation controller will be applied by loading the dynamics parameters.(No user input is required)
To stop the gravity controller demo, you need to call mtm_gc_controller.stop_gc() (or maybe ans.stop_gc() depending on the variable you used as result of estimate_gc_params. If you want to test the controller later on, i.e. without going through the first 3 steps, you can use gc = gc_controller('gc-MTMx-xxxxx.json').
After 4 processes are finished, users can move their MTM by hand to feel their MTM is being gravity-Compensated.
After the thrid process is finished, a GC configuration file will be generated according to the serial number of the MTM if GC controller can perform well with the parameters estimated in Process#3.
For example: <path-to-dvrk_Gravity_Compensation>/../GC_Data_stable/MTML_41878/November-30-2018-10:57:53/gc-MTML-41878.json will be generated for MTML-41878.
Copy the GC configuration file to ~/catkin_ws/src/cisst-saw/sawIntuitiveResearchKit/share/<your dVRK console configuration folder>. In the console configuration file, use the newly added field "arm" (dVRK 1.7) in the specific MTM object:
For example:
......
        {
            "name": "MTMR",
            "type": "MTM",
            "serial": "31519"
        }
......
You will also need to create the arm configuration file MTMR-31519.json in your system configuration folder with the fields "kinematic" and "gravity-compensation". For example:
{
     "kinematic": "mtm.json",
     "gravity-compensation": "gc-MTMR-31519.json"
}
To test the dVRK console with the new gravity compensation parameters, you can use the command line rostopic pub to turn gravity compensation on and off. We strongly recommend that you keep one hand on the MTM the whole time to prevent it from drifting/accelerating and potentially hit something. The steps are:
- Start the
dvrk_console_jsonnode. - Home the arm using the GUI
- In a separate terminal, use
rostopic pubto control the arm. Remember that using the "tab" key will autocomplete the rostopic as well as the possible playloads so use hit the "tab" key over and over...- To turn gravity on/off (replace
truebyfalse), use:
rostopic pub /dvrk/MTMR/use_gravity_compensation std_msgs/Bool "data: true" -1- To activate the effort mode, send a zero wrench using:
rostopic pub /dvrk/MTMR/body/servo_cf geometry_msgs/Wrench "force:
  x: 0.0
  y: 0.0
  z: 0.0
torque:
  x: 0.0
  y: 0.0
  z: 0.0" -1
- To turn gravity on/off (replace
Again, keep one hand on the MTM the whole time!
If you want to do estimation for multiple times or re-generate the "gc-<"ARM-NAME">-<"SN">.json" using existing collected data folder, run in matlab cosole:
mlse('<path-to-your-existing-data-folder-with-date>/dataCollection_info.json')
This software is being developed by Biorobotics and Medical Technology Group of The Chinese University of Hong Kong (CUHK). Feel free to contact us.
Hongbin LIN: hongbinlin@cuhk.edu.hk
Vincent Hui: vincent.hui@cuhk.edu.hk