![]()
KnitPi is a Raspberry Pi interface for a Brother KH-930 knitting machine.
Installation on a Raspberry Pi is very easy thanks to the "knitpi-install" script that is provided. Copy it to your Raspberry Pi and execute it as root. E.g.:
reliant joe $ scp knitpi-install root@192.168.1.200:
knitpi-install                   100% 6152     4.5MB/s   00:00
reliant joe $ ssh root@192.168.1.200
Linux raspberrypi 4.14.50-v7+ #1122 SMP Tue Jun 19 12:26:26 BST 2018 armv7l
[...]
root@raspberrypi:~# ./knitpi-install
Failed to stop knitpi-ui.service: Unit knitpi-ui.service not loaded.
Failed to stop knitpi-core.service: Unit knitpi-core.service not loaded.
Hit:1 http://raspbian.raspberrypi.org/raspbian stretch InRelease
Hit:2 http://archive.raspberrypi.org/debian stretch InRelease
Reading package lists... Done
Building dependency tree
Reading state information... Done
[...]
Successfully installed uwsgi-2.0.17.1
Installation finished. Changes require you to reboot your Raspberry Pi.
Note that on the first installation, the SPI module is activated and therefore a restart is required. If you're updating it later on, this isn't necessary anymore and only the required services will be restarted.
The script will do the following:
- Install all dependencies via apt-get.
- Create a "knitpi" user with the appropriate permissions and a /home/knitpi home directory.
- Clone the knitpi source files directly off GitHub, compile the knitting core.
- Install systemd services for both the core and the UI and start them.
This means, once you run the install script, everything should work, starting from a fresh Raspbian image. I've tested it with 2018-06-27-raspbian-stretch-lite.img -- if there's anything that doesn't work with future versions, please report it as a bug.
After the Pi has booted, it should now serve a webserver at port 80. I.e., you can browse to http://192.168.1.200 and should see the KnitPi UI.
The software runs directly on the Raspberry Pi. The core is written in C to get as low latency as possible. So far, we've not encountered issues regarding timing (e.g., lost rotary encoder ticks and such). It seems to work well without the need to use an external microcontroller, which should make replicating this project extremely simple. The UI is written in Python/JavaScript. A Python connector connects the internal UNIX socket that is opened by the code to a WebSocket that is then opened by the JavaScript. This allows events to be passed with low latency to the UI (so you can see the carriage position quickly).
This is a screenshot of the UI:
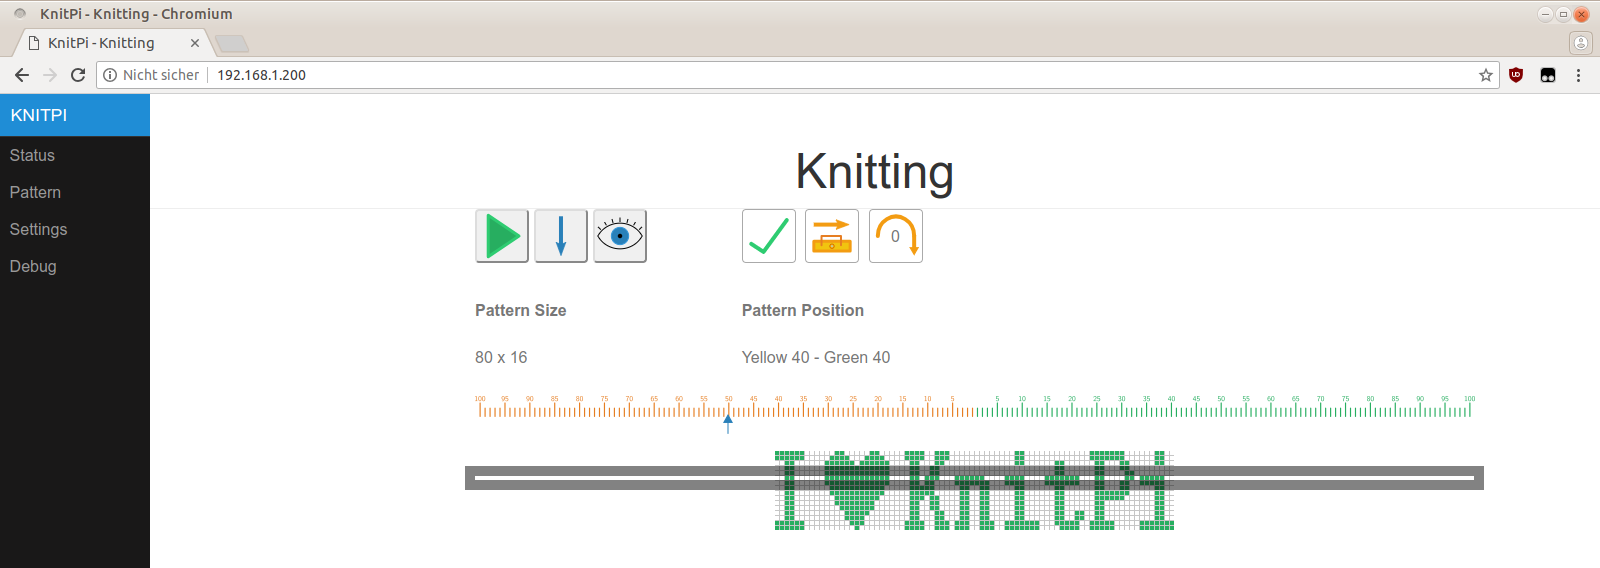
You can see three buttons:
- Leftmost is the play/stop button which starts/stops knitting.
- Next to it is the mode button: Oneshot, Repeat or Manual mode controls the way rows are advanced (only knit the pattern once, knit it indefinitely or do not advance at all).
- Rightmost is the "show all pattern" icon which temporarily will disable the "current row" bar.
Right next to it are three indicators:
- The leftmost shows if the carriage position is calibrated. Initially it isn't and you need to move it over the left or right hall sensor to get the checkmark.
- Right next to it is the carriage movement indicator. Here, the carriage moves from left to right.
- On the very right is the "skipped needles" indicator. This indicates how many times the rotary encoder got out of sync. If this number is too high (e.g., more than 4 or 8) then the Raspberry Pi was too slow and skipped steps. This means the position may not be accurate anymore. You should move ove the Hall sensor again to reset this to zero.
You can move the pattern around by using the left/right cursor keys. You can advance/change rows by using the up/down/page up/page down/home/end keys as well. Also, you can load/modify patterns using the "Pattern" submenu and control settings under "Settings".
KnitPi does not rely on any Raspberry Pi specific hardware, but I run it on a Pi 3+. It only relies on the Linux kernel GPIO and SPI drivers and so should be portable to any kind of embedded Linux system. For Raspbian, you can install the required header files using:
# apt-get install libgpiod-dev libpng-dev
To run the UI, you'll need uwsgi, gevent as well as Flask and Mako. Note that the uwsgi version that comes by default with Debian doesn't seem to work (couldn't get threading/gevent to play nicely), but the pip3 version works flawlessly:
# apt-get install python3-gevent python3-flask python3-mako
# pip3 install uwsgi
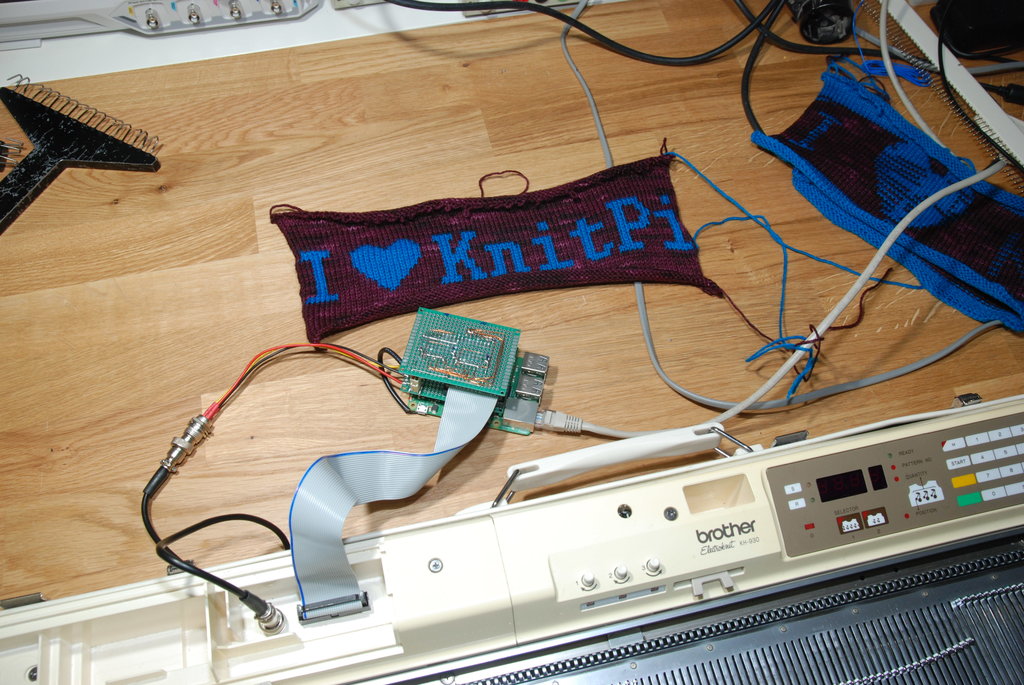
I've build a custom Raspberry Pi shield on prototype board from scratch. The schematics are in the Git repository. I've drawn them with CircuitMaker and the CircuitMaker project page can be found here. You can find a documentation of the inner workings here.
knitpi uses third-party code that is included in the tree for ease of use. In particular, it uses:
- The flask_uwsgi_websocket module of Zach Kelling / @zeekay. It is licensed under the MIT license.
- The pure.css framework. It is licensed under the Yahoo! Inc BSD license.
- The "pattern finished" chime is licensed under the CC-BY 3.0 license and was downloaded from freesound.org. It was created by JFRecords under the original name "vMax Bells".
- The software update spinner was made by Sam Herbert and is licensed under the MIT license.
My sincere thanks go out to all of these.
All my code is licensed under the GNU GPL-3. All included code is licensed under their respective licenses which are included in the 3rdparty subdirectory.