Commmonly used commands for working in the command line environment
This site will be continuously updated throughout the week. !img(url=
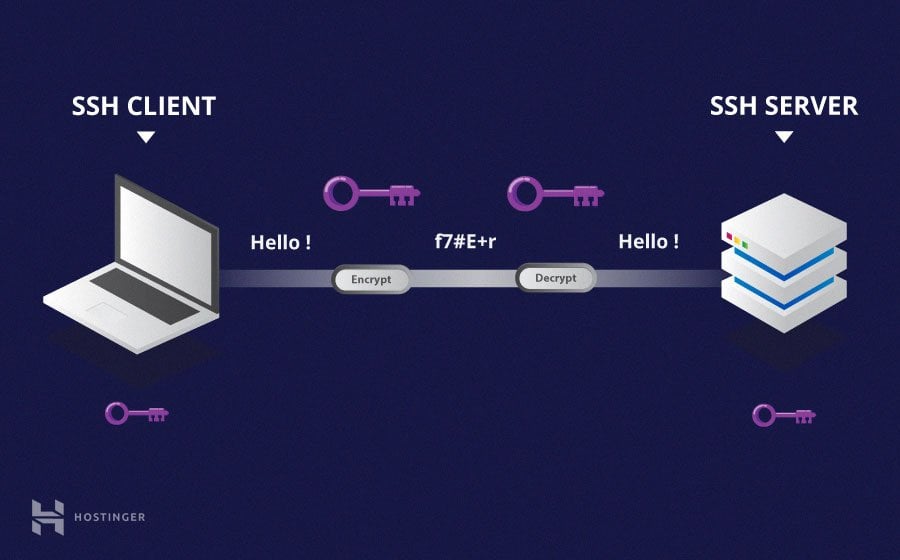
SSH is a method of securely communicating with another computer.

https://mobaxterm.mobatek.net/download.html

Alternative Tools:
-
Filezilla - https://filezilla-project.org/
-
WinSCP - https://winscp.net/eng/index.php
-
scp - for non-windows users. https://linuxize.com/post/how-to-use-scp-command-to-securely-transfer-files/
NH INBRE Bioinformatics tutorials
Itching for more? Try this In depth guide on BASH

Spaces are important. They delineate command, arguments and options.
Spelling and case sensitvity is important.
Tab complete! This will help with the two points above and save you a ton of time.
A lot of errors you get on the command line are because you're not using autocomplete. If a file exists path exists and the command doesn't autocomplete it means you have a mistake with something above.
# A simple example using the command 'echo'. echo prints whatever you put as an argument to the terminal.
echo "Hello World!"

# a simple example with the command 'cal'. cal displays the calender.
cal

# adding an option to 'cal' to remove the date highlight.
cal -h
# use the help option, this can vary command to command, sometimes its '-h' or '-help'
cal --help

# check the commands manual
man cal

# get a short description
whatis cal
Also try Google and/or email Devin/Joe
Absolute paths always start at the root directory of the server - '/'
- ex.) /home/genome/joseph7e
Relative paths are relative to where you are currently located.
- ex.) ../genome/devin/
special characters
-
../ means up one level
-
./ means your current directory
-
~/ means your home directory
The print working directory command tells you the abolsute path to where you currently are.
pwdThe list directory command - ls
# list the contents of your home directory, from anywhere
ls ~/

# list the content of the directory up one level
ls ../

# list the contents of a directory two levels up
ls ../../
The change directory command - cd
# change directory
cd /home/genome/joseph7e

cd ../../
Don't forget to autocomplete with the tab key. This will make you more efficient and less prone to mistakes.
The make directory command - mkdir
- mkdir <directory_name>
The move command - mv
- mv <file> <destination>
The copy command - cp
- cp <file> <destination>
The remove command - rm
- rm <file>
# make a new directory
mkdir my_directory/

# move a file up one directory
mv my_file.txt ../

# move and rename a file
mv my_file.txt ../my_renamed_file.txt

# copy a file and rename
cp my_file.txt my_renamed_file.txt

# remove a file
rm my_renamed_file.txt

# remove a directory with the -r option, recursive
rm -r my_directory/
There are a lot of commands to open files. The one you choose depends on what you want to do.
The more command allows you to view small pieces of a file at a time.
The less is similiar to more but has more options and is faster.
The head command shows you the top ten lines of a file.
The tail command shows you the bottom ten lines of a file.
The cat command prints the entire file to screen and also allows you to combine files together.
There are also a lot of commands to edit files. The easiest to use is nano.
https://wiki.gentoo.org/wiki/Nano/Basics_Guide
nano file.txt
grep is a tool that allows you to search through a file for a specified string. With default settings grep will print all lines from a file that contain the exact string that was searched.
grep "my search string" file.txt

# have a zipped file?
zgrep "my search string" file.txt.gz

# count the number of lines that contain the search string.
grep -c "my search string" file.txt

# diplay the lines that don't contain the search term.
grep -v "my search string" file.txt
Manuscript title - RepeatFS: a file system providing reproducibility through provenance and automation Github page - https://github.com/ToniWestbrook/repeatfs
RepeatFS functions as a transparent layer between you and your files, recording all IO activity. In order to use RepeatFS, you'll mount the target directory you want to monitor (which includes subdirectories and files). Then, anytime you wish to access any files within the monitored directory, you'll instead use the path to the RepeatFS mount.
Create a configuration file
repeatfs generate
less -S ~/.repeatfs/repeatfs.conf
Mount and monitor a directory: Usage: repeatfs mount
# Create a directory to store the analyses files
mkdir ~/repeatfs-analysis

# make a directory to store the repeatfs mount
mkdir ~/mnt

# mount the directory
repeatfs mount ~/repeatfs-analysis ~/mnt
cd ~/mnt

# download some data
wget "https://ftp.ncbi.nlm.nih.gov/genomes/all/GCF/001/188/955/GCF_001188955.3_ASM118895v3/GCF_001188955.3_ASM118895v3_genomic.fna.gz"
gunzip *.gz
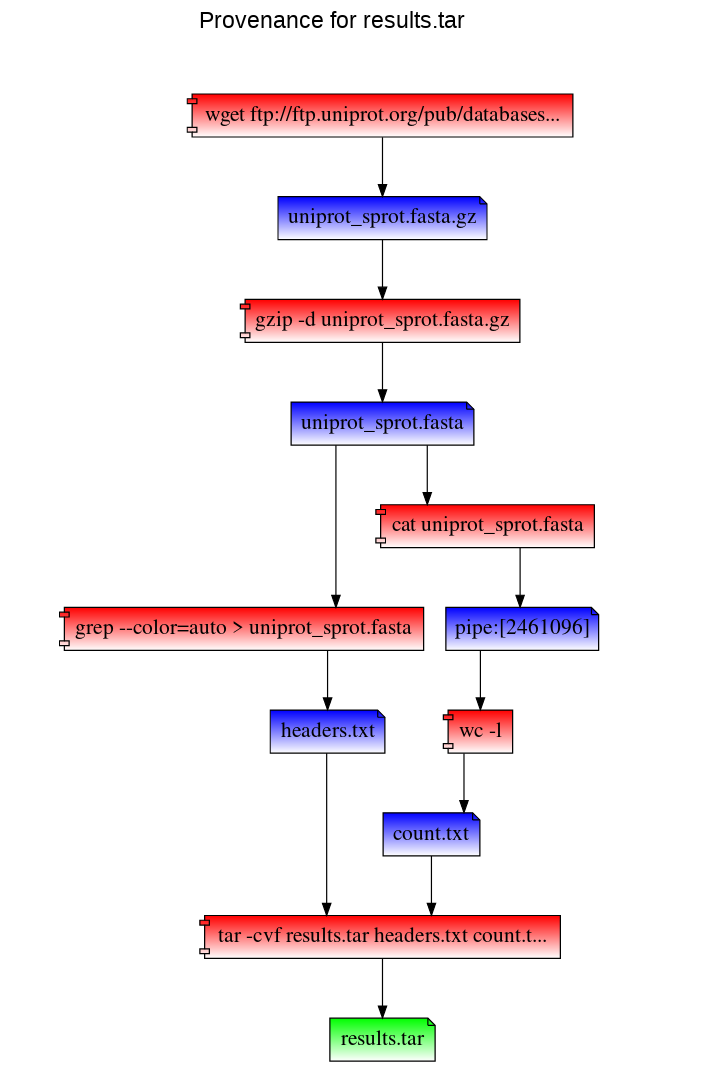
The most powerful feature of RepeatFS is the ability to record provenance and replicate the creation of the file on a different system. To ensure all operations are successfully recorded, be sure to perform the entirety of your analysis using a RepeatFS mount.
ls ~/mnt/GCF_001188955.3_ASM118895v3_genomic.fna+/
Path to a file's provenance record - this is a VDF, and is populated automatically when accessed, and may be copied to any location. Note the plus sign next to the file name below - all VDFs are available using a plus sign next to the filename:
Path to a file's provenance graph - like the provenance record, this is also a VDF. RepeatFS visualizes provenance by generating an HTML file that can be vieweed in any browser:
# annotate the genome
prokka --noanno --notrna --fast GCF_001188955.3_ASM118895v3_genomic.fna -o prokka-results

# pull out the 16S rRNA sequence from the genome
extract_sequences "BOACGFBO_08208 16S ribosomal RNA" prokka-results/*.ffn > Kitasatospora_aureofaciens_16S.fasta

# download another genome
wget "https://ftp.ncbi.nlm.nih.gov/genomes/all/GCF/009/569/385/GCF_009569385.1_ASM956938v1/GCF_009569385.1_ASM956938v1_genomic.fna.gz"
gunzip GCF_009569385.1_ASM956938v1_genomic.fna.gz

# annotate and pull out the 16S sequence
prokka --noanno --notrna --fast GCF_009569385.1_ASM956938v1_genomic.fna -o prokka-results-2
extract_sequences "DJKNPNDI_01625 16S ribosomal RNA" prokka-results-2/*.ffn > Streptomyces_kaniharaensis_16S.fasta

# combine the sequences and run an alignment
cat Kitasatospora_aureofaciens_16S.fasta Streptomyces_kaniharaensis_16S.fasta > combined-16S.fasta
muscle -in combined-16S.fasta -out combined-16S.clw -clw
mafft --distout --reorder --anysymbol --nomemsave --thread 18 combined-16S.fasta 1> combined-alignment.fasta 2> combined-alignment.fasta.log

# pull out the distance
tail -n 1 combined-16S.fasta.hat2 > distance.txt
cat distance.txt
ls combined-16S.fasta+

# to copy this file using an ssh gui (like cyberduck) you'll need to create a copy and put it in a non VDF difrectory
cp ~/mnt/combined-16S.fasta+/combined-16S.fasta.provenance.html ~/
cp ~/mnt/combined-16S.fasta+/combined-16S.fasta.provenance.json ~/
Replicate a file (replication destination must be within an active RepeatFS mount:
repeatfs replicate -r <replication destination> <provenance file>
RepeatFS can also replicate these steps to recreate combined-16S.fasta using the combined-16S.fasta.provenance.json file. You can use this file (or distribute it to others) to reproduce your work. In the following example, we've copied the provenance record into our home directory. We then mount a directory with RepeatFS and replicate the work (and save stdout and stderr into log files):
cd
mkdir ~/replicate

# unmount the repeatfs mnt
fusermount -u ~/mnt

# remount with a new directory
repeatfs mount ~/replicate ~/mnt
cd ~/mnt


# RepeatFS can also simply list the commands that would be used during replication (using the `-l` argument):
repeatfs replicate ~/combined-16S.fasta.provenance.json -l

# actually repeat the analysis
#repeatfs replicate ~/combined-16S.fasta.provenance.json --stdout stdout.log --stderr stderr.log
RepeatFS will execute and verify each step. Version mismatches or other errors will be reported:
This will list each command that will be run, in order. It will also list ID(s) next to each command, which can be used during replication (using the -e argument) to reconstruct a missing shell script.
Provenance and replication are only a part of RepeatFS's capabilities. RepeatFS can also automate commonly performed tasks using VDFs. VDFs are special files that represent the output of some operation, such as converting file formats, extracting text, indexing a reference, etc. Whenver RepeatFS detects a file that is a valid input for one of these types of operations, it will also show a corresponding output file. When this output file is accessed (opened, copied, read), RepeatFS will automatically run the program necessary to perform the action, and populate the output file in realtime. These VDFs look and act just like normal files, though they are stored in memory. VDFs may be converted into normal files simply by copying them to another directory.
VDFs are configured within the RepeatFS configuration file as follows:
# Comments start with #
# The following entry creates a VDF that shows a corresponding FASTA for any FASTQ.
# Accessing the FASTA will automatically run seqtk

[entry]                   # Each VDF entry starts with [entry]
match=\.fastq$            # This regular expression controls which files are valid input
ext=.fasta                # This extension will be appended to the end of the VDF
cmd=seqtk seq -A {input}  # This is the command that will be run when accessing the VDF
All VDF files, including system-provided ones like provenance, or user-defined ones like the FASTQ->FASTA example above, can be found by placing a plus sign + after the input filename. So if we had a FASTQ file located at ~/mnt/example.fastq, listing the contents of ~/mnt/example.fastq+ would show the following files:
example.fastq.fasta
example.fastq.provenance.html
example.fastq.provenance.json
Note that since VDFs are treated as normal files, they also can be used as inputs to other VDFs. In this way, multiple VDFs can be chained together to perform automated operations in a modular fashion. Using the above example, if we define the following VDF:
[entry]
match=.*
ext=.count
cmd=wc -l {input}
This would create a corresponding .count for every file in the RepeatFS mount, containing the number of lines the original file contained (even if that original file was a VDF). In this way, we can view the number of lines in a FASTA converted from the FASTQ file above:
less ~/mnt/example.fastq+/example.fastq.fasta+/example.fastq.fasta.count
While VDFs are not required to record provenance in RepeatFS, they do represent a powerful tool to aid in improving reproducibilty by performing common tasks in a uniform, documented fashion.
Stop monitoring a directory: Once you stop monitoring a directory you will lose the provenance and json file. Make a copy of them if you want to keep them.
#fusermount -u <RepeatFS mount directory>
fusermount -u ~/repeatfs-mnt
RepeatFS is actively being developed and improved all the time. If you encounter any issue at all, please don't hesitate to reach out and file a bug report here: https://github.com/ToniWestbrook/repeatfs/issues