This tutorial will guide you through the process of creating an Alchemy Create or Affect module. We assume you have at least a little experience with programming in either Java or something with similar syntax like Javascript, Actionscript, or Processing. We won’t be writing much code from scratch, but rather adapting a template and compiling a module that we can drop into the Alchemy modules folder and use straight away.
Alchemy is built using Java, so there are several things we first need to install before we can start coding in Java. If you have used Alchemy or other Java applications then chances are you already have the Java Runtime Environment (JRE) installed, this is the Java plugin that runs Java software
What we need to install to write Java software is the Java Development Kit (JDK). While it is possible to write Java code in a plain old text editor, this tutorial will use an Integrated Development Environment (IDE). An IDE gives us a graphical interface to work with and makes things a bit easier. We will use the NetBeans IDE.
We can download both the JDK and the IDE in one hit from this site here:
http://java.sun.com/javase/downloads/index.jsp
Go down to the ‘Java SE Development Kit (JDK) Bundles’ section and download the JDK with NetBeans.
Next step is to download the template code for this tutorial:
http://dev.al.chemy.org/files/AlchemyModuleTemplate-008.zip (4.6 MB)
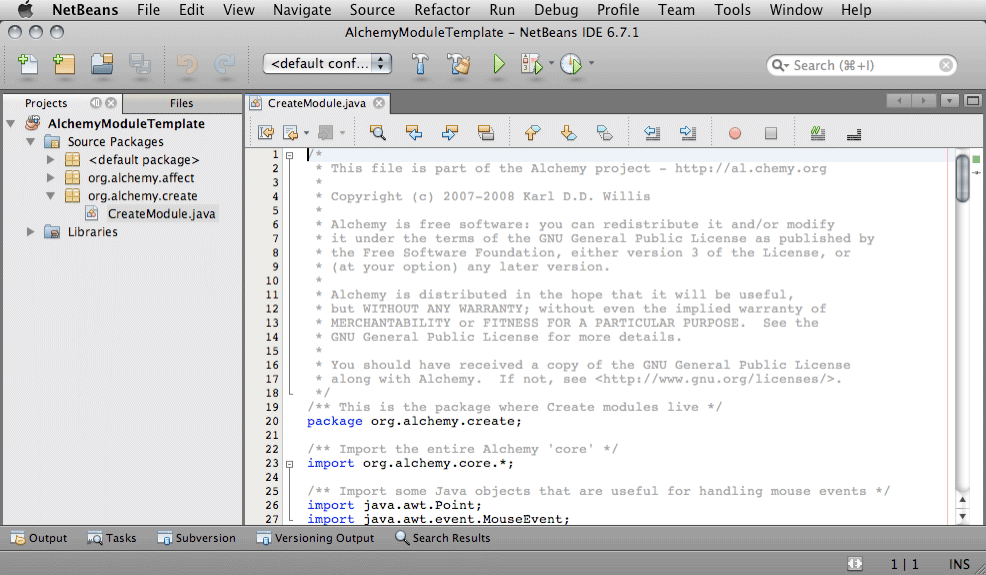
Once you have installed the NetBeans IDE, use the File > Open Project… menu to navigate and open the Alchemy module template code. You just need to select the project folder, not a specific file. The AlchemyModuleTemplate project should now appear in the left hand ‘Projects’ side bar. You may need to close the Netbeans ‘Welcome Window’ to see the side bar. Click on the arrow beside ‘Source Packages’ to reveal the source code packages. Next we want to navigate to the ‘org.alchemy.create’ package and open the CreateModule.java file. Your screen should look something like this:
Take a moment to browse this file and read the comments. At the top there are three functions setup(), cleared(), reselect() that relate to application level events. Below that are a series of functions that relate to user input with the mouse (or pen): mouseMoved(), mousePressed(), mouseDragged(), mouseReleased(), all the code for creating shapes is contained within these functions.
This is a rather boring example, but let’s run it to see what it does. Click on the Run Project button or choose Run > Run Project from the top menu. This will compile the CreateModule.java file into a module and start the Alchemy application.

You can see that this is the Alchemy we know and love, although with only two Create modules, the standard ‘Shapes’ module and the new ‘Create Module’. Right now the ‘Create Module’ only creates a plain line, but we can spice it up a little quite easily.
For Create modules, most of the action goes down inside the mouseDragged() function, so close the Alchemy application and return to CreateModule.java. The mouseDragged() function is called every time the mouse/pen is dragged, and that works out to be, well, quite a lot! First we start by extracting the x and y location of the mouse with this line:
Point p = e.getPoint();A Point object is basically a set of two numbers, one x and one y. We can change the contents of the Point object with code like this:
p.x = 100;
p.y = 100;
This will set the location of both x and y to 100. Hmm… that is not very useful. Something better would be to add some random chaos :)
int randomX = (int) math.random(-50, 50);
int randomY = (int) math.random(-50, 50);
Here we create two variables called randomX and randomY (you can call them anything actually, but something descriptive is always good) and we assign a random number between -50 and 50 to each. The math.random() is an Alchemy function that gives us the random numbers. The math.random() function returns a floating point (decimal) number, so we have to convert it to a regular integer with the (int) cast.
p.x += randomX;
p.y += randomY;
So if we add the random numbers to the point object with the += operator, we will get a line that moves away from the current mouse/pen location by some random amount. The next thing we need to do is add the newly randomized point to the current shape and redraw the canvas. The full function should now look like this:
@Override
    public void mouseDragged(MouseEvent e) {
        if (canvas.hasCreateShapes()) {
            Point p = e.getPoint();
            int randomX = (int) math.random(-50, 50);
            int randomY = (int) math.random(-50, 50);
            p.x += randomX;
            p.y += randomY;
            canvas.getCurrentCreateShape().curveTo(p);
            canvas.redraw();
        }
    }
In the above code I have made sure to check that there actually is a shape available by wrapping everything in an if statement that calls canvas.hasCreateShapes(). This was way if the user starts drawing a shape, then uses a shortcut key to delete everything, our code won’t return an error. Run the application again and you should be able to draw something like this:

If we make a slight change from using curved lines:
canvas.getCurrentCreateShape().curveTo(p);To using straight lines:
canvas.getCurrentCreateShape().lineTo(p);Then we get a very different look:

So that is a very basic overview of how to get up and running with a Create Module. There are many possibilities you can explore, using random numbers is a simple and satisfying one to get started with. It is always good to check out real examples, so browsing over the existing Alchemy module code is a good way to see how more complex stuff is done. You might also like to check out some of the Alchemy developer documentation, in particular the AlcCanvas, AlcModule, and AlcShape class documentation.
Next we are going to look at making an Affect module. Affect modules are generally used to change the shapes create by Create modules. For example the Mirror module, takes the shapes created by any Create module and duplicates and flips them. In the NetBeans ‘Projects’ side bar, navigate to the ‘org.alchemy.affect’ source package, and open up the AffectModule.java file. Things here look much the same as the CreateModule.java file, with the addition of the affect() function. This function is called on active Affect modules, after the active Create module has done its thing. Here is the code from inside the affect() function:
@Override
    protected void affect() {
        float randomNumber = math.random(1, 25);
        if (canvas.hasCreateShapes()) {
            canvas.getCurrentCreateShape().setLineWidth(randomNumber);
        }
    }
That probably looks quite familiar? This code creates a random number between 1 and 25, and sets the line width to that random value. If you run the application now you will get a good idea of how often the affect() function is called: every time the canvas is redraw. The line should flash between thick and thin at a rapid pace when drawing. Although if you are drawing with solid shapes, this will have no effect at all.
So that pretty much covers the basics of making Alchemy modules. The last thing we want to do is go over how to package your module for distribution by changing its name and giving it an icon. Lets say we want to change the name of our newly created module to ‘Crazy Shapes’. The first thing to do is to change the CreateModule.java file to CrazyShapes.java, and the name of the class inside the java file as so:
public class CrazyShapes extends AlcModule {Next we need to setup for module compilation, first by changing the ‘CreateModule’ folder (inside the modules folder) to ‘CrazyShapes’, then by editing the NetBeans build.xml file to copy across the CrazyShapes class files to be compiled as a module:
<copy todir="${basedir}/modules/CrazyShapes/org/alchemy/create">
     <fileset dir="${build.classes.dir}/org/alchemy/create/" includes="CrazyShapes*" casesensitive="no" />
</copy>
Finally we edit the plugin.xml file located in the modules/CreateModule folder to specify the name of the module as it appears in the Alchemy menu. The comments in the file outline most of the details; your final file will look like this (changes are highlighted):
<?xml version="1.0" ?>
<!DOCTYPE plugin PUBLIC "-//JPF//Java Plug-in Manifest 1.0" "http://jpf.sourceforge.net/plugin_1_0.dtd">

<plugin id="org.alchemy.create.CrazyShapes" version="1.0.0">

    <requires>
        <import plugin-id="org.alchemy.core"/>
    </requires>

     <runtime>
        <library id="CrazyShapes" path="/" type="code">
            <export prefix="*" />
        </library>
        <library type="resources" path="data/" id="data" />
    </runtime>

    <extension plugin-id="org.alchemy.core" point-id="Create" id="CrazyShapes">
        <parameter id="class" value="org.alchemy.create.CrazyShapes"/>
        <parameter id="name" value="Crazy Shapes"/>
        <parameter id="description" value="Crazy shapes for doing crazy drawings" />
        <parameter id="icon" value="icon.png" />
    </extension>

</plugin>
Adding an icon to your module is simply a matter of replacing the icon.png file in the modules/CrazyShapes/data folder with a 24×24 pixel transparent PNG image.
You should now be able to run the application and see your new module appear in the popup menu. It may be necessary to delete the old module from the modules folder. Modules will be rebuilt each time you run the application, so at any time you can copy them into the module folder in the ‘real’ Alchemy application or send them to friends to try out. Good luck and have fun!