/
segment_anything_in_keras_cv.py
501 lines (401 loc) · 16.5 KB
/
segment_anything_in_keras_cv.py
1
2
3
4
5
6
7
8
9
10
11
12
13
14
15
16
17
18
19
20
21
22
23
24
25
26
27
28
29
30
31
32
33
34
35
36
37
38
39
40
41
42
43
44
45
46
47
48
49
50
51
52
53
54
55
56
57
58
59
60
61
62
63
64
65
66
67
68
69
70
71
72
73
74
75
76
77
78
79
80
81
82
83
84
85
86
87
88
89
90
91
92
93
94
95
96
97
98
99
100
101
102
103
104
105
106
107
108
109
110
111
112
113
114
115
116
117
118
119
120
121
122
123
124
125
126
127
128
129
130
131
132
133
134
135
136
137
138
139
140
141
142
143
144
145
146
147
148
149
150
151
152
153
154
155
156
157
158
159
160
161
162
163
164
165
166
167
168
169
170
171
172
173
174
175
176
177
178
179
180
181
182
183
184
185
186
187
188
189
190
191
192
193
194
195
196
197
198
199
200
201
202
203
204
205
206
207
208
209
210
211
212
213
214
215
216
217
218
219
220
221
222
223
224
225
226
227
228
229
230
231
232
233
234
235
236
237
238
239
240
241
242
243
244
245
246
247
248
249
250
251
252
253
254
255
256
257
258
259
260
261
262
263
264
265
266
267
268
269
270
271
272
273
274
275
276
277
278
279
280
281
282
283
284
285
286
287
288
289
290
291
292
293
294
295
296
297
298
299
300
301
302
303
304
305
306
307
308
309
310
311
312
313
314
315
316
317
318
319
320
321
322
323
324
325
326
327
328
329
330
331
332
333
334
335
336
337
338
339
340
341
342
343
344
345
346
347
348
349
350
351
352
353
354
355
356
357
358
359
360
361
362
363
364
365
366
367
368
369
370
371
372
373
374
375
376
377
378
379
380
381
382
383
384
385
386
387
388
389
390
391
392
393
394
395
396
397
398
399
400
401
402
403
404
405
406
407
408
409
410
411
412
413
414
415
416
417
418
419
420
421
422
423
424
425
426
427
428
429
430
431
432
433
434
435
436
437
438
439
440
441
442
443
444
445
446
447
448
449
450
451
452
453
454
455
456
457
458
459
460
461
462
463
464
465
466
467
468
469
470
471
472
473
474
475
476
477
478
479
480
481
482
483
484
485
486
487
488
489
490
491
492
493
494
495
496
497
498
499
500
501
"""
Title: Segment Anything in KerasCV!
Author: Tirth Patel, Ian Stenbit
Date created: 2023/12/04
Last modified: 2023/12/19
Description: Segment anything using text, box, and points prompts in KerasCV.
Accelerator: GPU
"""
"""
## Overview
The Segment Anything Model (SAM) produces high quality object masks from input prompts
such as points or boxes, and it can be used to generate masks for all objects in an
image. It has been trained on a
[dataset](https://segment-anything.com/dataset/index.html) of 11 million images and 1.1
billion masks, and has strong zero-shot performance on a variety of segmentation tasks.
In this guide, we will show how to use KerasCV's implementation of the
[Segment Anything Model](https://github.com/facebookresearch/segment-anything)
and show how powerful TensorFlow's and JAX's performance boost is.
First, let's get all our dependencies and images for our demo.
"""
"""shell
pip install -Uq keras-cv
pip install -Uq keras
"""
"""shell
wget -q https://raw.githubusercontent.com/facebookresearch/segment-anything/main/notebooks/images/truck.jpg
"""
"""
## Choose your backend
With Keras 3, you can choose to use your favorite backend!
"""
import os
os.environ["KERAS_BACKEND"] = "jax"
import timeit
import numpy as np
import matplotlib.pyplot as plt
import keras
from keras import ops
import keras_cv
"""
## Helper functions
Let's define some helper functions for visulazing the images, prompts, and the
segmentation results.
"""
def show_mask(mask, ax, random_color=False):
if random_color:
color = np.concatenate([np.random.random(3), np.array([0.6])], axis=0)
else:
color = np.array([30 / 255, 144 / 255, 255 / 255, 0.6])
h, w = mask.shape[-2:]
mask_image = mask.reshape(h, w, 1) * color.reshape(1, 1, -1)
ax.imshow(mask_image)
def show_points(coords, labels, ax, marker_size=375):
pos_points = coords[labels == 1]
neg_points = coords[labels == 0]
ax.scatter(
pos_points[:, 0],
pos_points[:, 1],
color="green",
marker="*",
s=marker_size,
edgecolor="white",
linewidth=1.25,
)
ax.scatter(
neg_points[:, 0],
neg_points[:, 1],
color="red",
marker="*",
s=marker_size,
edgecolor="white",
linewidth=1.25,
)
def show_box(box, ax):
box = box.reshape(-1)
x0, y0 = box[0], box[1]
w, h = box[2] - box[0], box[3] - box[1]
ax.add_patch(
plt.Rectangle((x0, y0), w, h, edgecolor="green", facecolor=(0, 0, 0, 0), lw=2)
)
def inference_resizing(image, pad=True):
# Compute Preprocess Shape
image = ops.cast(image, dtype="float32")
old_h, old_w = image.shape[0], image.shape[1]
scale = 1024 * 1.0 / max(old_h, old_w)
new_h = old_h * scale
new_w = old_w * scale
preprocess_shape = int(new_h + 0.5), int(new_w + 0.5)
# Resize the image
image = ops.image.resize(image[None, ...], preprocess_shape)[0]
# Pad the shorter side
if pad:
pixel_mean = ops.array([123.675, 116.28, 103.53])
pixel_std = ops.array([58.395, 57.12, 57.375])
image = (image - pixel_mean) / pixel_std
h, w = image.shape[0], image.shape[1]
pad_h = 1024 - h
pad_w = 1024 - w
image = ops.pad(image, [(0, pad_h), (0, pad_w), (0, 0)])
# KerasCV now rescales the images and normalizes them.
# Just unnormalize such that when KerasCV normalizes them
# again, the padded values map to 0.
image = image * pixel_std + pixel_mean
return image
"""
## Get the pretrained SAM model
We can initialize a trained SAM model using KerasCV's `from_preset` factory method. Here,
we use the huge ViT backbone trained on the SA-1B dataset (`sam_huge_sa1b`) for
high-quality segmentation masks. You can also use one of the `sam_large_sa1b` or
`sam_base_sa1b` for better performance (at the cost of decreasing quality of segmentation
masks).
"""
model = keras_cv.models.SegmentAnythingModel.from_preset("sam_huge_sa1b")
"""
## Understanding Prompts
Segment Anything allows prompting an image using points, boxes, and masks:
1. Point prompts are the most basic of all: the model tries to guess the object given a
point on an image. The point can either be a foreground point (i.e. the desired
segmentation mask contains the point in it) or a backround point (i.e. the point lies
outside the desired mask).
2. Another way to prompt the model is using boxes. Given a bounding box, the model tries
to segment the object contained in it.
3. Finally, the model can also be prompted using a mask itself. This is useful, for
instance, to refine the borders of a previously predicted or known segmentation mask.
What makes the model incredibly powerful is the ability to combine the prompts above.
Point, box, and mask prompts can be combined in several different ways to achieve the
best result.
Let's see the semantics of passing these prompts to the Segment Anything model in
KerasCV. Input to the SAM model is a dictionary with keys:
1. `"images"`: A batch of images to segment. Must be of shape `(B, 1024, 1024, 3)`.
2. `"points"`: A batch of point prompts. Each point is an `(x, y)` coordinate originating
from the top-left corner of the image. In other works, each point is of the form `(r, c)`
where `r` and `c` are the row and column of the pixel in the image. Must be of shape `(B,
N, 2)`.
3. `"labels"`: A batch of labels for the given points. `1` represents foreground points
and `0` represents background points. Must be of shape `(B, N)`.
4. `"boxes"`: A batch of boxes. Note that the model only accepts one box per batch.
Hence, the expected shape is `(B, 1, 2, 2)`. Each box is a collection of 2 points: the
top left corner and the bottom right corner of the box. The points here follow the same
semantics as the point prompts. Here the `1` in the second dimension represents the
presence of box prompts. If the box prompts are missing, a placeholder input of shape
`(B, 0, 2, 2)` must be passed.
5. `"masks"`: A batch of masks. Just like box prompts, only one mask prompt per image is
allowed. The shape of the input mask must be `(B, 1, 256, 256, 1)` if they are present
and `(B, 0, 256, 256, 1)` for missing mask prompt.
Placeholder prompts are only required when calling the model directly (i.e.
`model(...)`). When calling the `predict` method, missing prompts can be omitted from the
input dictionary.
## Point prompts
First, let's segment an image using point prompts. We load the image and resize it to
shape `(1024, 1024)`, the image size the pretrained SAM model expects.
"""
# Load our image
image = np.array(keras.utils.load_img("truck.jpg"))
image = inference_resizing(image)
plt.figure(figsize=(10, 10))
plt.imshow(ops.convert_to_numpy(image) / 255.0)
plt.axis("on")
plt.show()
"""
Next, we will define the point on the object we want to segment. Let's try to segment the
truck's window pane at coordinates `(284, 213)`.
"""
# Define the input point prompt
input_point = np.array([[284, 213.5]])
input_label = np.array([1])
plt.figure(figsize=(10, 10))
plt.imshow(ops.convert_to_numpy(image) / 255.0)
show_points(input_point, input_label, plt.gca())
plt.axis("on")
plt.show()
"""
Now let's call the `predict` method of our model to get the segmentation masks.
**Note**: We don't call the model directly (`model(...)`) since placeholder prompts are
required to do so. Missing prompts are handled automatically by the predict method so we
call it instead. Also, when no box prompts are present, the points and labels need to be
padded with a zero point prompt and `-1` label prompt respectively. The cell below
demonstrates how this works.
"""
outputs = model.predict(
{
"images": image[np.newaxis, ...],
"points": np.concatenate(
[input_point[np.newaxis, ...], np.zeros((1, 1, 2))], axis=1
),
"labels": np.concatenate(
[input_label[np.newaxis, ...], np.full((1, 1), fill_value=-1)], axis=1
),
}
)
"""
`SegmentAnythingModel.predict` returns two outputs. First are logits (segmentation masks)
of shape `(1, 4, 256, 256)` and the other are the IoU confidence scores (of shape `(1,
4)`) for each mask predicted. The pretrained SAM model predicts four masks: the first is
the best mask the model could come up with for the given prompts, and the other 3 are the
alternative masks which can be used in case the best prediction doesn't contain the
desired object. The user can choose whichever mask they prefer.
Let's visualize the masks returned by the model!
"""
# Resize the mask to our image shape i.e. (1024, 1024)
mask = inference_resizing(outputs["masks"][0][0][..., None], pad=False)[..., 0]
# Convert the logits to a numpy array
# and convert the logits to a boolean mask
mask = ops.convert_to_numpy(mask) > 0.0
iou_score = ops.convert_to_numpy(outputs["iou_pred"][0][0])
plt.figure(figsize=(10, 10))
plt.imshow(ops.convert_to_numpy(image) / 255.0)
show_mask(mask, plt.gca())
show_points(input_point, input_label, plt.gca())
plt.title(f"IoU Score: {iou_score:.3f}", fontsize=18)
plt.axis("off")
plt.show()
"""
As expected, the model returns a segmentation mask for the truck's window pane. But, our
point prompt can also mean a range of other things. For example, another possible mask
that contains our point is just the right side of the window pane or the whole truck.
"""
"""
Let's also visualize the other masks the model has predicted.
"""
fig, ax = plt.subplots(1, 3, figsize=(20, 60))
masks, scores = outputs["masks"][0][1:], outputs["iou_pred"][0][1:]
for i, (mask, score) in enumerate(zip(masks, scores)):
mask = inference_resizing(mask[..., None], pad=False)[..., 0]
mask, score = map(ops.convert_to_numpy, (mask, score))
mask = 1 * (mask > 0.0)
ax[i].imshow(ops.convert_to_numpy(image) / 255.0)
show_mask(mask, ax[i])
show_points(input_point, input_label, ax[i])
ax[i].set_title(f"Mask {i+1}, Score: {score:.3f}", fontsize=12)
ax[i].axis("off")
plt.show()
"""
Nice! SAM was able to capture the ambiguity of our point prompt and also returned other
possible segmentation masks.
"""
"""
## Box Prompts
Now, let's see how we can prompt the model using boxes. The box is specified using two
points, the top-left corner and the bottom-right corner of the bounding box in xyxy
format. Let's prompt the model using a bounding box around the left front tyre of the
truck.
"""
# Let's specify the box
input_box = np.array([[240, 340], [400, 500]])
outputs = model.predict(
{"images": image[np.newaxis, ...], "boxes": input_box[np.newaxis, np.newaxis, ...]}
)
mask = inference_resizing(outputs["masks"][0][0][..., None], pad=False)[..., 0]
mask = ops.convert_to_numpy(mask) > 0.0
plt.figure(figsize=(10, 10))
plt.imshow(ops.convert_to_numpy(image) / 255.0)
show_mask(mask, plt.gca())
show_box(input_box, plt.gca())
plt.axis("off")
plt.show()
"""
Boom! The model perfectly segments out the left front tyre in our bounding box.
## Combining prompts
To get the true potential of the model out, let's combine box and point prompts and see
what the model does.
"""
# Let's specify the box
input_box = np.array([[240, 340], [400, 500]])
# Let's specify the point and mark it background
input_point = np.array([[325, 425]])
input_label = np.array([0])
outputs = model.predict(
{
"images": image[np.newaxis, ...],
"points": input_point[np.newaxis, ...],
"labels": input_label[np.newaxis, ...],
"boxes": input_box[np.newaxis, np.newaxis, ...],
}
)
mask = inference_resizing(outputs["masks"][0][0][..., None], pad=False)[..., 0]
mask = ops.convert_to_numpy(mask) > 0.0
plt.figure(figsize=(10, 10))
plt.imshow(ops.convert_to_numpy(image) / 255.0)
show_mask(mask, plt.gca())
show_box(input_box, plt.gca())
show_points(input_point, input_label, plt.gca())
plt.axis("off")
plt.show()
"""
Voila! The model understood that the object we wanted to exclude from our mask was the
rim of the tyre.
## Text prompts
Finally, let's see how text prompts can be used along with KerasCV's
`SegmentAnythingModel`.
For this demo, we will use the
[offical Grounding DINO model](https://github.com/IDEA-Research/GroundingDINO).
Grounding DINO is a model that
takes as input a `(image, text)` pair and generates a bounding box around the object in
the `image` described by the `text`. You can refer to the
[paper](https://arxiv.org/abs/2303.05499) for more details on the implementation of the
model.
For this part of the demo, we will need to install the `groundingdino` package from
source:
```
pip install -U git+https://github.com/IDEA-Research/GroundingDINO.git
```
Then, we can install the pretrained model's weights and config:
"""
"""shell
wget -q https://github.com/IDEA-Research/GroundingDINO/releases/download/v0.1.0-alpha/groundingdino_swint_ogc.pth
wget -q https://raw.githubusercontent.com/IDEA-Research/GroundingDINO/v0.1.0-alpha2/groundingdino/config/GroundingDINO_SwinT_OGC.py
"""
from groundingdino.util.inference import Model as GroundingDINO
CONFIG_PATH = "GroundingDINO_SwinT_OGC.py"
WEIGHTS_PATH = "groundingdino_swint_ogc.pth"
grounding_dino = GroundingDINO(CONFIG_PATH, WEIGHTS_PATH)
"""
Let's load an image of a dog for this part!
"""
filepath = keras.utils.get_file(
origin="https://storage.googleapis.com/keras-cv/test-images/mountain-dog.jpeg"
)
image = np.array(keras.utils.load_img(filepath))
image = ops.convert_to_numpy(inference_resizing(image))
plt.figure(figsize=(10, 10))
plt.imshow(image / 255.0)
plt.axis("on")
plt.show()
"""
We first predict the bounding box of the object we want to segment using the Grounding
DINO model. Then, we prompt the SAM model using the bounding box to get the segmentation
mask.
Let's try to segment out the harness of the dog. Change the image and text below to
segment whatever you want using text from your image!
"""
# Let's predict the bounding box for the harness of the dog
boxes = grounding_dino.predict_with_caption(image.astype(np.uint8), "harness")
boxes = np.array(boxes[0].xyxy)
outputs = model.predict(
{
"images": np.repeat(image[np.newaxis, ...], boxes.shape[0], axis=0),
"boxes": boxes.reshape(-1, 1, 2, 2),
},
batch_size=1,
)
"""
And that's it! We got a segmentation mask for our text prompt using the combination of
Gounding DINO + SAM! This is a very powerful technique to combine different models to
expand the applications!
Let's visualize the results.
"""
plt.figure(figsize=(10, 10))
plt.imshow(image / 255.0)
for mask in outputs["masks"]:
mask = inference_resizing(mask[0][..., None], pad=False)[..., 0]
mask = ops.convert_to_numpy(mask) > 0.0
show_mask(mask, plt.gca())
show_box(boxes, plt.gca())
plt.axis("off")
plt.show()
"""
## Optimizing SAM
You can use `mixed_float16` or `bfloat16` dtype policies to gain huge speedups and memory
optimizations at releatively low precision loss.
"""
# Load our image
image = np.array(keras.utils.load_img("truck.jpg"))
image = inference_resizing(image)
# Specify the prompt
input_box = np.array([[240, 340], [400, 500]])
# Let's first see how fast the model is with float32 dtype
time_taken = timeit.repeat(
'model.predict({"images": image[np.newaxis, ...], "boxes": input_box[np.newaxis, np.newaxis, ...]}, verbose=False)',
repeat=3,
number=3,
globals=globals(),
)
print(f"Time taken with float32 dtype: {min(time_taken) / 3:.10f}s")
# Set the dtype policy in Keras
keras.mixed_precision.set_global_policy("mixed_float16")
model = keras_cv.models.SegmentAnythingModel.from_preset("sam_huge_sa1b")
time_taken = timeit.repeat(
'model.predict({"images": image[np.newaxis, ...], "boxes": input_box[np.newaxis, np.newaxis, ...]}, verbose=False)',
repeat=3,
number=3,
globals=globals(),
)
print(f"Time taken with float16 dtype: {min(time_taken) / 3:.10f}s")
"""
Here's a comparison of KerasCV's implementation with the original PyTorch
implementation!
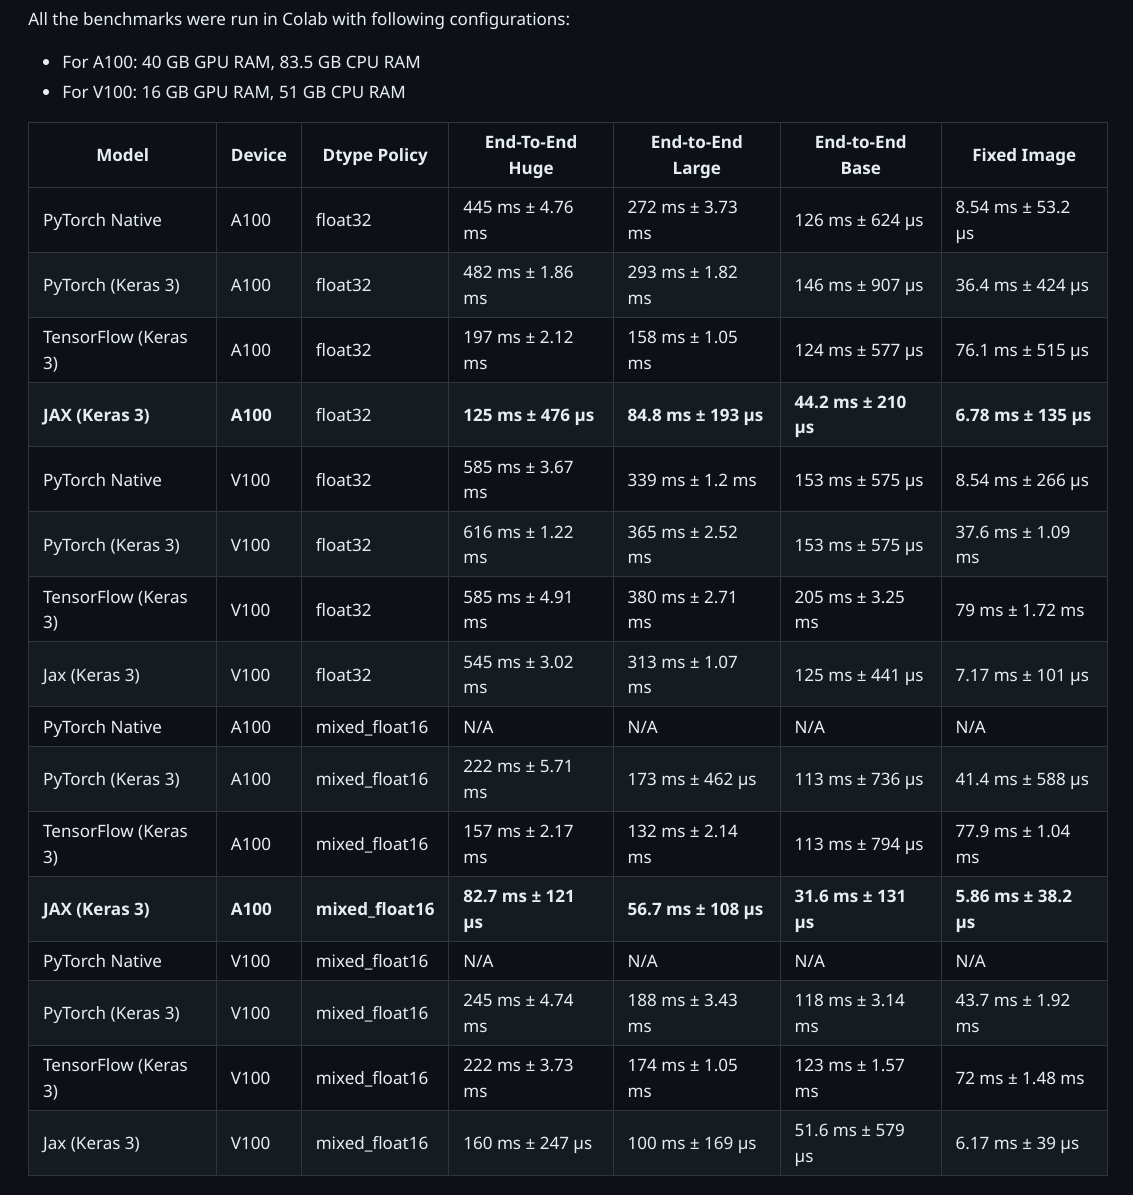
The script used to generate the benchmarks is present
[here](https://github.com/tirthasheshpatel/segment_anything_keras/blob/main/Segment_Anything_Benchmarks.ipynb).
"""
"""
## Conclusion
KerasCV's `SegmentAnythingModel` supports a variety of applications and, with the help of
Keras 3, enables running the model on TensorFlow, JAX, and PyTorch! With the help of XLA
in JAX and TensorFlow, the model runs several times faster than the original
implementation. Moreover, using Keras's mixed precision support helps optimize memory use
and computation time with just one line of code!
For more advanced uses, check out the
[Automatic Mask Generator demo](https://github.com/tirthasheshpatel/segment_anything_keras/blob/main/Segment_Anything_Automatic_Mask_Generator_Demo.ipynb).
"""