

Unofficial iRobot Roomba 980 node.js library (SDK)
With this library you can send commands to your Roomba 980 through the iRobot cloud API or directly from your LAN and integrate your roboot with your own Home Automation or IoT project.
See rest980 if you need a HTTP REST API interface.
All this document is only for firmware 1.6.6. Check your robot version!
If you have firmware version 2.0 click here to see the new documentation.
There are some breaking changes between 1.6.6 and 2.0.0.
- Get your username/password easily
- Auto discovery robot IP (optional)
- Cloud API control (from inside or outside your home)
- Local API control (from your LAN)
- Simplified Cleaning Preferences settings.
- Firmware 1.6.6 compatible. If you have firmware 2.0 go here.
- See rest980 if you need a HTTP REST API interface to use dorita980 throw.
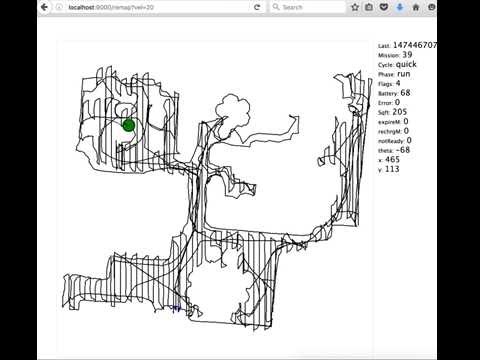
Video: Realtime cleaning map using dorita980 lib in rest980.
First you need node.js installed and then:
$ npm install dorita980 --saveYou can control the robot from your local network.
Create myapp.js file with this content:
var dorita980 = require('dorita980');

var myRobotViaLocal = new dorita980.Local('MyUsernameBlid', 'MyPassword', '192.168.1.104', 1); // robot IP address. Firmware major version.

// start to clean!
myRobotViaLocal.start().then((response) => {
  console.log(response);
}).catch((err) => {
  console.log(err);
});
Then install dorita980 using npm and run your program:
$ npm install dorita980 --save
$ node myapp.jsYou can control the robot from inside or outside your home.
Create myapp.js file with this content:
var dorita980 = require('dorita980');

var myRobotViaCloud = new dorita980.Cloud('MyUsernameBlid', 'MyPassword', 1); // No need robot IP. Firmware major version.

// start to clean!
myRobotViaCloud.start().then((response) => {
  console.log(response);
}).catch((err) => {
  console.log(err);
});
Then install dorita980 using npm and run your program:
$ npm install dorita980 --save
$ node myapp.jsGet robot status via Cloud request:
var dorita980 = require('dorita980');

var myRobotViaCloud = new dorita980.Cloud('MyUsernameBlid', 'MyPassword', 1); // No need robot IP. Firmware major version.

myRobotViaCloud.getStatus().then(function(data){
  console.log(data);
}).catch(function(err){
  console.error(err);
});
Pause the robot via Cloud request:
var dorita980 = require('dorita980');

var myRobotViaCloud = new dorita980.Cloud('MyUsernameBlid', 'MyPassword', 1); // No need robot IP. Firmware major version.

// Pause!
myRobotViaCloud.pause().then((response) => {
  console.log(response);
}).catch((err) => {
  console.log(err);
});
Pause the robot via Local request:
var dorita980 = require('dorita980');

var myRobotViaLocal = new dorita980.Local('MyUsernameBlid', 'MyPassword', '192.168.1.104', 1); // robot IP address. Firmware major version.

// Pause!
myRobotViaLocal.pause().then((response) => {
  console.log(response);
}).catch((err) => {
  console.log(err);
});(Needed for Cloud and Local requests)
Download or clone this repo then install, then run npm run getpassword. You need to know your robot IP address (look in your router or scan your LAN network with nmap to find it). Or use dorita980.getRobotIP() method.
$ git clone https://github.com/koalazak/dorita980.git
$ cd dorita980
$ npm install
$ npm run getpassword <robotIP> <firmwareversion>
Example Output:
$ cd dorita980
$ npm install
$ npm run getpassword 192.168.1.103 1
> node ./bin/getpassword.js "192.168.1.103" 1

Make sure your robot is on the Home Base and powered on. Then press and hold the HOME button on your robot until it plays a series of tones (about 2 seconds). Release the button and your robot will flash WIFI light. Then wait...
========>
Good job!
Password: xxxxxxxxxxxxx
Username/blid: yyyyyyyyyyyy
Use this credentials in dorita980 lib :)
If you dont known the robot IP address to use in dorita980.Local() you can use dorita980.getRobotIP() to find it.
This process takes 1 or 2 seconds, so if you known the IP just use it explicity.
var dorita980 = require('dorita980');

dorita980.getRobotIP(function (ierr, ip) {
  if (!ierr) {
    var myRobotViaLocal = new dorita980.Local('MyUsernameBlid', 'MyPassword', ip);

    myRobotViaLocal.getMission().then((response) => {
      console.log(response);
    }).catch((err) => {
      console.log(err);
    });
  } else {
    console.log('error looking for robot IP');
  }
});The library send commands direclty over wifi to your robot. You dont need internet connection.
A successfull response return an object with ok property and the internal request id:
{ ok: null, id: 2 }An error response return an object with err property and error number:
{ err: -32600 }{"ok":{"d":"sat","h":13,"m":8},"id":8}{"ok":null,"id":23}{"ok":null,"id":23}{"ok":{"hr":103,"min":10,"sqft":251,"nStuck":8,"nScrubs":62,"nPicks":280,"nPanics":97,"nCliffsF":518,"nCliffsR":1005,"nMBStll":0,"nWStll":1,"nCBump":0},"id":9}{ ok: { total: 5, iterIndex: 2, iterName: 'en-US' }, id: 2 }{ ok:
{ umi: 2,
pid: 2,
blid: 1,2,3,4,5,6,6,8],
sw: 'v1.6.6',
cfg: 0,
boot: 3580,
main: 4313,
wifi: 517,
nav: '01.09.08',
ui: 2996,
audio: 31,
bat: 'lith' },
id: 2 }{ ok: { softap: 0, station: 1, cloud: 3, strssi: 47, diagflags: 0 }, id: 2 }Monday disable and every day start at 10:30am
{ ok:
   { cycle: [ 'start', 'none', 'start', 'start', 'start', 'start', 'start' ],
     h: [ 10, 10, 10, 10, 10, 10, 10 ],
     m: [ 30, 30, 30, 30, 30, 30, 30 ] },
id: 2 }Disable Sunday and set every day at 10:30am
var newWeek = {"cycle":["none","start","start","start","start","start","start"],"h":[10,10,10,10,10,10,10],"m":[30,30,30,30,30,30,30]}
myRobotViaLocal.setWeek(newWeek)
Response:
{"ok":null,"id":218}If autoDecodeFlags is false the returned object not include cleaningPreferences property. Default is true so always decode flags.
{ ok:
   { flags: 1024, // See Cleaning Preferences table.
     lang: 2,
     timezone: 'America/Buenos_Aires',
     name: 'myRobotName',
     cleaningPreferences: {
        carpetBoost: 'auto', // 'auto', 'performance', 'eco'
        edgeClean: true,
        cleaningPasses: '1', // '1', '2', 'auto'
        alwaysFinish: true
      }
    },
id: 2 }var newPreferences = {
flags: 1107, // See Cleaning Preferences table.
lang: 2,
timezone: 'America/Buenos_Aires',
name: 'myRobotName'
};
myRobotViaLocal.setPreferences(newPreferences)Response:
{"ok":null,"id":293}With this you can draw a map :)
If autoDecodeFlags is false the returned object not include missionFlags and notReadyMsg properties. Default is true so always decode flags.
{ ok:
   { flags: 0,
     cycle: 'none',
     phase: 'charge',
     pos: { theta: 179, point: {x: 102, y: -13} },
     batPct: 99,
     expireM: 0,
     rechrgM: 0,
     error: 0,
     notReady: 0,
     mssnM: 0,
     sqft: 0,
     missionFlags: { idle: true, binFull: false, binRemoved: false, beeping: false },
     notReadyMsg: 'Ready'
     },
id: 2 }{ ok:
{ softap: 0,
station: 1,
strssi: 45,
dhcp: 1,
addr: 1744939200,
mask: 16777215,
gtwy: 16885952,
dns1: 16885952,
dns2: 0,
bssid: [ 123, 23, 23, 123, 23, 123 ],
sec: 4 },
id: 2 }{ ok: { cloudconfig: 'https://irobot-connect.axeda.com/ammp/' },
id: 2 }{"ok":null,"id":293}{"ok":null,"id":293}{"ok":null,"id":293}{"ok":null,"id":293}Note: before dock you need to pause() or stop() your robot.
{"ok":null,"id":293}(this is not a promise)
Example for 1024 value flags, return:
{
  carpetBoost: 'auto',
  edgeClean: true,
  cleaningPasses: '1',
  alwaysFinish: true
}This methods use setPreferences() with the correct flags for each setting.
{"ok":null,"id":293}{"ok":null,"id":293}{"ok":null,"id":293}{"ok":null,"id":293}{"ok":null,"id":293}{"ok":null,"id":293}{"ok":null,"id":293}{"ok":null,"id":293}{"ok":null,"id":293}{"ok":null,"id":293}See decodeCleaningPreferences(flags) mehod.
| Carpet Boost | Cleaning Passes | Finish Cleaning when bin is full | Edge Clean | Flags DEC |
|---|---|---|---|---|
| auto | auto | on | on | 0 |
| auto | auto | on | off | 2 |
| auto | auto | off | on | 32 |
| auto | auto | off | off | 24 |
| auto | one | on | on | 1024 |
| auto | one | on | off | 1026 |
| auto | one | off | on | 1056 |
| auto | one | off | off | 1058 |
| auto | two | on | on | 1025 |
| auto | two | on | off | 1027 |
| auto | two | off | on | 1057 |
| auto | two | off | off | 1059 |
| Performance | auto | on | on | 80 |
| Performance | auto | on | off | 82 |
| Performance | auto | off | on | 112 |
| Performance | auto | off | off | 114 |
| Performance | one | on | on | 1104 |
| Performance | one | on | off | 1106 |
| Performance | one | off | on | 1136 |
| Performance | one | off | off | 1138 |
| Performance | two | on | on | 1105 |
| Performance | two | on | off | 1107 |
| Performance | two | off | on | 1137 |
| Performance | two | off | off | 1139 |
| Eco | auto | on | on | 16 |
| Eco | auto | on | off | 18 |
| Eco | auto | off | on | 48 |
| Eco | auto | off | off | 50 |
| Eco | one | on | on | 1040 |
| Eco | one | on | off | 1042 |
| Eco | one | off | on | 1072 |
| Eco | one | off | off | 1074 |
| Eco | two | on | on | 1041 |
| Eco | two | on | off | 1043 |
| Eco | two | off | on | 1073 |
| Eco | two | off | off | 1075 |
When you connect your robot to your wifi network, the robot starting to receive remote commands from the iRobot Cloud Service and from the mobile app. iRobot Cloud Service has a public HTTP API to send commands to your robot if you known your user and password.
myRobotViaCloud.getStatus()myRobotViaCloud.accumulatedHistorical()myRobotViaCloud.missionHistory()myRobotViaCloud.clean()myRobotViaCloud.quick()myRobotViaCloud.spot()myRobotViaCloud.dock()myRobotViaCloud.start()myRobotViaCloud.pause()myRobotViaCloud.resume()myRobotViaCloud.stop()myRobotViaCloud.wake()myRobotViaCloud.reset()myRobotViaCloud.find()myRobotViaCloud.wipe()(untested)myRobotViaCloud.patch()(untested)myRobotViaCloud.dlpkg()(untested)myRobotViaCloud.rechrg()(untested)myRobotViaCloud.wlapon()(untested)myRobotViaCloud.wlapoff()(untested)myRobotViaCloud.wlston()(untested)myRobotViaCloud.wlstoff()(untested)myRobotViaCloud.wifiscan()(untested)myRobotViaCloud.ipdone()(untested)myRobotViaCloud.provdone()(untested)myRobotViaCloud.bye()(untested)myRobotViaCloud.wllogflush()(untested)myRobotViaCloud.sleep()myRobotViaCloud.off()myRobotViaCloud.fbeep()
dorita980 is compatible with node.js > 4.0 But you can use the getpassword feature in node.js < 4.0 using --harmony flag like that:
$ node --harmony ./bin/getpassword.js "192.168.1.104"