
This is a CDK Python project to show how to continuously load data from an Apache Kafka cluster to Amazon Simple Storage Service (Amazon S3).
The cdk.json file tells the CDK Toolkit how to execute your app.
This project is set up like a standard Python project. The initialization
process also creates a virtualenv within this project, stored under the .venv
directory. To create the virtualenv it assumes that there is a python3
(or python for Windows) executable in your path with access to the venv
package. If for any reason the automatic creation of the virtualenv fails,
you can create the virtualenv manually.
To manually create a virtualenv on MacOS and Linux:
$ python3 -m venv .venv
After the init process completes and the virtualenv is created, you can use the following step to activate your virtualenv.
$ source .venv/bin/activate
If you are a Windows platform, you would activate the virtualenv like this:
% .venv\Scripts\activate.bat
Once the virtualenv is activated, you can install the required dependencies.
(.venv) $ pip install -r requirements.txt
Before synthesizing the CloudFormation, you should set approperly the cdk context configuration file, cdk.context.json.
For example:
{
  "msk_cluster_name": "demo-msk-serverless",
  "firehose": {
    "buffering_hints": {
      "intervalInSeconds": 300,
      "sizeInMBs": 100
    },
    "topic_name": "ev_stream_data"
  }
}
At this point you can now synthesize the CloudFormation template for this code.
(.venv) $ export CDK_DEFAULT_ACCOUNT=$(aws sts get-caller-identity --query Account --output text)
(.venv) $ export CDK_DEFAULT_REGION=us-east-1 # your-aws-account-region
(.venv) $ cdk synth --all
To add additional dependencies, for example other CDK libraries, just add
them to your setup.py file and rerun the pip install -r requirements.txt
command.
We can provision each CDK stack one at a time like this:
(.venv) $ cdk list
MSKServerlessVpcStack
MSKServerlessStack
MSKClusterPolicyForFirehose
MSKClientEC2InstanceStack
MSKServerlesstoS3AsFirehoseDestinationStack
FirehosefromMSKServerlesstoS3Stack
(.venv) $ cdk deploy --require-approval never MSKServerlessVpcStack \
                                              MSKServerlessStack \
                                              MSKClusterPolicyForFirehose
Once MSK Serverless cluster has been successfully created, you should see a msk cluster policy similar to the following example on the terminal.
$ aws kafka get-cluster-policy --cluster-arn arn:aws:kafka:us-east-1:123456789012:cluster/demo-msk-serverless/a4c4ef8f-1cd4-4ca2-aa5b-7d215b523b18-s1
{
  "CurrentVersion": "KTVPDKIKX0DER",
  "Policy": "{\"Version\":\"2012-10-17\",\"Statement\":[{\"Effect\":\"Allow\",\"Principal\":{\"Service\":\"firehose.amazonaws.com\"},\"Action\":\"kafka:CreateVpcConnection\",\"Resource\":\"arn:aws:kafka:us-east-1:123456789012:cluster/demo-msk-serverless/a4c4ef8f-1cd4-4ca2-aa5b-7d215b523b18-s1\"}]}"
}
(.venv) $ cdk deploy --require-approval never MSKClientEC2InstanceStack
Once MSK Serverless cluster has been successfully created, proceed with the remaining steps.
(1) Get Broker servers information
$ export MSK_SERVERLESS_CLUSTER_ARN=$(aws kafka list-clusters-v2 | jq -r '.ClusterInfoList[] | select(.ClusterName == "your-msk-cluster-name") | .ClusterArn')
$ aws kafka get-bootstrap-brokers --cluster-arn $MSK_SERVERLESS_CLUSTER_ARN
{
   "BootstrapBrokerStringSaslIam": "boot-mcde48dt.c2.kafka-serverless.{regon-name}.amazonaws.com:9098"
}
(2) Connect the MSK client EC2 Host.
You can connect to an EC2 instance using the EC2 Instance Connect CLI.
Install ec2instanceconnectcli python package and Use the mssh command with the instance ID as follows.
$ sudo pip install ec2instanceconnectcli
$ mssh ec2-user@i-001234a4bf70dec41EXAMPLE
(3) Create an Apache Kafka topic
After connect your EC2 Host, you use the client machine to create a topic on the cluster.
Run the following command to create a topic called ev_stream_data.
[ec2-user@ip-172-31-0-180 ~]$ export PATH=$HOME/opt/kafka/bin:$PATH
[ec2-user@ip-172-31-0-180 ~]$ export BS={BootstrapBrokerStringSaslIam}
[ec2-user@ip-172-31-0-180 ~]$ kafka-topics.sh --bootstrap-server $BS \
                                              --command-config client.properties \
                                              --create \
                                              --topic ev_stream_data \
                                              --partitions 3 \
                                              --replication-factor 2
client.properties is a property file containing configs to be passed to Admin Client. This is used only with --bootstrap-server option for describing and altering broker configs.
For more information, see Getting started using MSK Serverless clusters - Step 3: Create a client machine
[ec2-user@ip-172-31-0-180 ~]$ cat client.properties
security.protocol=SASL_SSL
sasl.mechanism=AWS_MSK_IAM
sasl.jaas.config=software.amazon.msk.auth.iam.IAMLoginModule required;
sasl.client.callback.handler.class=software.amazon.msk.auth.iam.IAMClientCallbackHandler
(.venv) $ cdk deploy --require-approval never MSKServerlesstoS3AsFirehoseDestinationStack
(.venv) $ cdk deploy --require-approval never FirehosefromMSKServerlesstoS3Stack
The above command creates the Kinesis Data Firehose with the following configurations:
(1) Choose source and destination
- Source:
Amazon MSK - Destination:
Amazon S3
(2) Source settings
- Amazon MSK cluster connectivity:
Private bootstrap brokers - Amazon MSK Cluster:
{msk-cluster-name (e.g., demo-msk-serverless)} - Topic:
{kafka-topic-name (e.g., ev_stream_data)}
(3) Delivery stream name
- Delivery stream name:
demo-msk-serverless-to-s3
(4) Destination settings
- S3 bucket:
s3://msk-serverless-firehose-s3-us-east-1-{random-identifier} - S3 bucket prefix:
json-data/year=!{timestamp:yyyy}/month=!{timestamp:MM}/day=!{timestamp:dd}/hour=!{timestamp:HH}/ - S3 bucket error output prefix:
error/year=!{timestamp:yyyy}/month=!{timestamp:MM}/day=!{timestamp:dd}/hour=!{timestamp:HH}/!{firehose:error-output-type}
-
Produce and consume data
(1) To produce messages
Run the following command to generate messages into the topic on the cluster.
[ec2-user@ip-172-31-0-180 ~]$ python3 gen_fake_data.py | kafka-console-producer.sh \
   --bootstrap-server $BS --producer.config client.properties --topic ev_stream_data
(2) To consume messages
Keep the connection to the client machine open, and then open a second, separate connection to that machine in a new window.
[ec2-user@ip-172-31-0-180 ~]$ kafka-console-consumer.sh \
   --bootstrap-server $BS \
   --consumer.config client.properties \
   --topic ev_stream_data \
   --from-beginning
You start seeing the messages you entered earlier when you used the console producer command. Enter more messages in the producer window, and watch them appear in the consumer window.
-
Check streaming data in S3
After
5~7minutes, you can see that the streaming data have been delivered from MSK to S3.For example,


Delete the CloudFormation stacks by running the below command.
(.venv) $ cdk destroy --all
cdk lslist all stacks in the appcdk synthemits the synthesized CloudFormation templatecdk deploydeploy this stack to your default AWS account/regioncdk diffcompare deployed stack with current statecdk docsopen CDK documentation
Enjoy!
- Amazon MSK Introduces Managed Data Delivery from Apache Kafka to Your Data Lake (2023-09-27)
- Grant Kinesis Data Firehose Access to your Private Amazon MSK Clusters
- Amazon MSK integrations - Kinesis Data Firehose
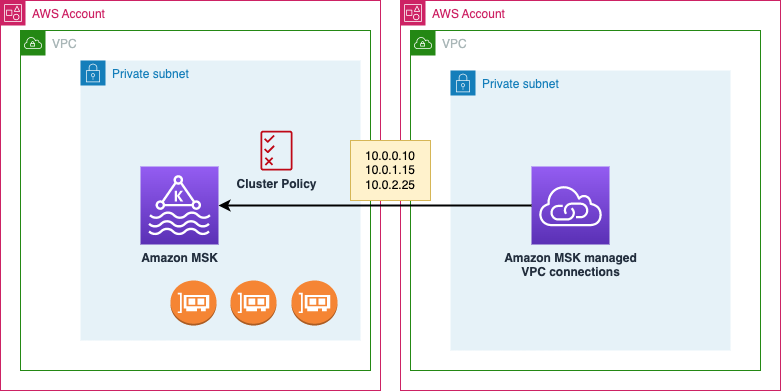
- Amazon MSK multi-VPC private connectivity in a single Region
- Requirements and limitations for multi-VPC private connectivity
- Multi-VPC private connectivity is supported only on Apache Kafka 2.7.1 or higher. Make sure that any clients that you use with the MSK cluster are running Apache Kafka versions that are compatible with the cluster.
- Multi-VPC private connectivity supports auth types IAM, TLS and SASL/SCRAM. Unauthenticated clusters can't use multi-VPC private connectivity.
- Multi-VPC private connectivity doesn’t support the t3.small instance type.
- Requirements and limitations for multi-VPC private connectivity
- Connect Kafka client applications securely to your Amazon MSK cluster from different VPCs and AWS accounts (2023-04-28)
- Connect using the EC2 Instance Connect CLI
$ sudo pip install ec2instanceconnectcli
$ mssh --region us-east-1 ec2-user@i-001234a4bf70dec41EXAMPLE

-
Set up
client.properties$ cat client.properties security.protocol=SASL_SSL sasl.mechanism=AWS_MSK_IAM sasl.jaas.config=software.amazon.msk.auth.iam.IAMLoginModule required; sasl.client.callback.handler.class=software.amazon.msk.auth.iam.IAMClientCallbackHandler
ℹ️
client.propertiesis a property file containing configs to be passed to Admin Client. This is used only with--bootstrap-serveroption for describing and altering broker configs.
For more information, see Getting started using MSK Serverless clusters - Step 3: Create a client machine -
Get Bootstrap server information
$ aws kafka get-bootstrap-brokers --cluster-arn msk_cluster_arn $ export BS={BootstrapBrokerStringSaslIam} -
List Kafka toipics
$ kafka-topics.sh --bootstrap-server $BS \ --command-config client.properties \ --list -
Create a Kafka toipic
$ kafka-topics.sh --bootstrap-server $BS \ --command-config client.properties \ --create \ --topic topic_name \ --partitions 3 \ --replication-factor 2 -
Consume records from a Kafka toipic
$ kafka-console-consumer.sh --bootstrap-server $BS \ --consumer.config client.properties \ --topic topic_name \ --from-beginning -
Produce records into a Kafka toipic
$ kafka-console-producer.sh --bootstrap-server $BS \
                            --producer.config client.properties \
                            --topic topic_name