
$ vagrant init centos/7
A `Vagrantfile` has been placed in this directory. You are now
ready to `vagrant up` your first virtual environment! Please read
the comments in the Vagrantfile as well as documentation on
`vagrantup.com` for more information on using Vagrant.
执行完上面的命令后,会在用户的家目录下生成Vagrantfile文件。
$ vagrant up
Bringing machine 'default' up with 'virtualbox' provider...
==> default: Box 'centos/7' could not be found. Attempting to find and install...
    default: Box Provider: virtualbox
    default: Box Version: >= 0
==> default: Loading metadata for box 'centos/7'
    default: URL: https://vagrantcloud.com/centos/7
==> default: Adding box 'centos/7' (v1905.1) for provider: virtualbox
    default: Downloading: https://vagrantcloud.com/centos/boxes/7/versions/1905.1/providers/virtualbox.box
    default: Download redirected to host: cloud.centos.org
    default: Progress: 0% (Rate: 6717/s, Estimated time remaining: 7:33:42)
下载镜像过程比较漫长,也可以采用先用下载工具下载到本地后,然后使用“ vagrant box add ”添加,再“vagrant up”即可
#将下载的镜像添加到virtualBox中
$ vagrant box add centos/7 E:\迅雷下载\CentOS-7-x86_64-Vagrant-1905_01.VirtualBox.box
==> box: Box file was not detected as metadata. Adding it directly...
==> box: Adding box 'centos/7' (v0) for provider:
    box: Unpacking necessary files from: file:///E:/%D1%B8%C0%D7%CF%C2%D4%D8/CentOS-7-x86_64-Vagrant-1905_01.VirtualBox.box
    box:
==> box: Successfully added box 'centos/7' (v0) for 'virtualbox'!

#启动
$ vagrant up
Bringing machine 'default' up with 'virtualbox' provider...
==> default: Importing base box 'centos/7'...
==> default: Matching MAC address for NAT networking...
==> default: Setting the name of the VM: Administrator_default_1588497928070_24634
==> default: Clearing any previously set network interfaces...
==> default: Preparing network interfaces based on configuration...
    default: Adapter 1: nat
    default: Adapter 2: hostonly
==> default: Forwarding ports...
    default: 22 (guest) => 2222 (host) (adapter 1)
==> default: Booting VM...
==> default: Waiting for machine to boot. This may take a few minutes...
    default: SSH address: 127.0.0.1:2222
    default: SSH username: vagrant
    default: SSH auth method: private key
    default:
    default: Vagrant insecure key detected. Vagrant will automatically replace
    default: this with a newly generated keypair for better security.
    default:
    default: Inserting generated public key within guest...
    default: Removing insecure key from the guest if it's present...
    default: Key inserted! Disconnecting and reconnecting using new SSH key...
==> default: Machine booted and ready!
==> default: Checking for guest additions in VM...
    default: No guest additions were detected on the base box for this VM! Guest
    default: additions are required for forwarded ports, shared folders, host only
    default: networking, and more. If SSH fails on this machine, please install
    default: the guest additions and repackage the box to continue.
    default:
    default: This is not an error message; everything may continue to work properly,
    default: in which case you may ignore this message.
==> default: Configuring and enabling network interfaces...
==> default: Rsyncing folder: /cygdrive/c/Users/Administrator/ => /vagrant
vagrant ssh 开启SSH,并登陆到centos7
$ vagrant ssh
[vagrant@localhost ~]$ ip addr
1: lo: <LOOPBACK,UP,LOWER_UP> mtu 65536 qdisc noqueue state UNKNOWN group default qlen 1000
    link/loopback 00:00:00:00:00:00 brd 00:00:00:00:00:00
    inet 127.0.0.1/8 scope host lo
       valid_lft forever preferred_lft forever
    inet6 ::1/128 scope host
       valid_lft forever preferred_lft forever
2: eth0: <BROADCAST,MULTICAST,UP,LOWER_UP> mtu 1500 qdisc pfifo_fast state UP group default qlen 1000
    link/ether 52:54:00:8a:fe:e6 brd ff:ff:ff:ff:ff:ff
    inet 10.0.2.15/24 brd 10.0.2.255 scope global noprefixroute dynamic eth0
       valid_lft 86091sec preferred_lft 86091sec
    inet6 fe80::5054:ff:fe8a:fee6/64 scope link
       valid_lft forever preferred_lft forever
3: eth1: <BROADCAST,MULTICAST,UP,LOWER_UP> mtu 1500 qdisc pfifo_fast state UP group default qlen 1000
    link/ether 08:00:27:d1:76:f6 brd ff:ff:ff:ff:ff:ff
    inet 192.168.56.102/24 brd 192.168.56.255 scope global noprefixroute dynamic eth1
       valid_lft 892sec preferred_lft 892sec
    inet6 fe80::8c94:1942:ba09:2458/64 scope link noprefixroute
       valid_lft forever preferred_lft forever
[vagrant@localhost ~]$C:\Users\Administrator>ipconfig
Windows IP 配置
以太网适配器 VirtualBox Host-Only Network:
连接特定的 DNS 后缀 . . . . . . . :
本地链接 IPv6 地址. . . . . . . . : fe80::a00c:1ffa:a39a:c8c2%16
IPv4 地址 . . . . . . . . . . . . : 192.168.56.1
子网掩码 . . . . . . . . . . . . : 255.255.255.0
默认网关. . . . . . . . . . . . . :配置网络信息,打开"Vagrantfile"文件:
config.vm.network "private_network", ip: "192.168.56.10"
修改完成后,重启启动vagrant
vagrant reload
检查宿主机和virtualBox之间的通信是否正常
[vagrant@localhost ~]$ ping 192.168.43.43                                                                                                         PING 192.168.43.43 (192.168.43.43) 56(84) bytes of data.
64 bytes from 192.168.43.43: icmp_seq=1 ttl=127 time=0.533 ms
64 bytes from 192.168.43.43: icmp_seq=2 ttl=127 time=0.659 ms
�
--- 192.168.43.43 ping statistics ---
2 packets transmitted, 2 received, 0% packet loss, time 999ms
rtt min/avg/max/mdev = 0.533/0.596/0.659/0.063 ms
[vagrant@localhost ~]$
[vagrant@localhost ~]$
[vagrant@localhost ~]$ ping www.baidu.com
PING www.a.shifen.com (112.80.248.76) 56(84) bytes of data.
64 bytes from 112.80.248.76 (112.80.248.76): icmp_seq=1 ttl=53 time=56.1 ms
64 bytes from 112.80.248.76 (112.80.248.76): icmp_seq=2 ttl=53 time=58.5 ms
64 bytes from 112.80.248.76 (112.80.248.76): icmp_seq=3 ttl=53 time=53.4 ms
�
开启远程登陆,修改“/etc/ssh/sshd_config”
PermitRootLogin yes
PasswordAuthentication yes
然后重启SSHD
systemctl restart sshd使用Xshell或SecureCRT进行远程连接。

[root@hadoop-104 module]# docker pull mysql:5.7
5.7: Pulling from library/mysql
123275d6e508: Already exists
27cddf5c7140: Pull complete
c17d442e14c9: Pull complete
2eb72ffed068: Pull complete
d4aa125eb616: Pull complete
52560afb169c: Pull complete
68190f37a1d2: Pull complete
3fd1dc6e2990: Pull complete
85a79b83df29: Pull complete
35e0b437fe88: Pull complete
992f6a10268c: Pull complete
Digest: sha256:82b72085b2fcff073a6616b84c7c3bcbb36e2d13af838cec11a9ed1d0b183f5e
Status: Downloaded newer image for mysql:5.7
docker.io/library/mysql:5.7
查看镜像
[root@hadoop-104 module]# docker images
REPOSITORY  TAG    IMAGE ID     CREATED       SIZE
mysql       5.7    f5829c0eee9e 2 hours ago   455MB
[root@hadoop-104 module]#
启动mysql
sudo docker run -p 3306:3306 --name mysql \
-v /mydata/mysql/log:/var/log/mysql \
-v /mydata/mysql/data:/var/lib/mysql \
-v /mydata/mysql/conf:/etc/mysql \
-e MYSQL_ROOT_PASSWORD=root \
-d mysql:5.7
修改配置
[root@hadoop-104 conf]# pwd
/mydata/mysql/conf


[root@hadoop-104 conf]# cat my.cnf
[client]
default-character-set=utf8
[mysql]
default-character-set=utf8
[mysqld]
init_connect='SET collation_connection = utf8_unicode_ci'
init_connect='SET NAMES utf8'
character-set-server=utf8
collation-server=utf8_unicode_ci
skip-character-set-client-handshake
skip-name-resolve
[root@hadoop-104 conf]#

[root@hadoop-104 conf]# docker restart mysql
mysql
[root@hadoop-104 conf]#
进入容器查看配置:
[root@hadoop-104 conf]# docker exec -it mysql /bin/bash
root@b3a74e031bd7:/# whereis mysql
mysql: /usr/bin/mysql /usr/lib/mysql /etc/mysql /usr/share/mysql

root@b3a74e031bd7:/# ls /etc/mysql
my.cnf
root@b3a74e031bd7:/# cat /etc/mysql/my.cnf
[client]
default-character-set=utf8
[mysql]
default-character-set=utf8
[mysqld]
init_connect='SET collation_connection = utf8_unicode_ci'
init_connect='SET NAMES utf8'
character-set-server=utf8
collation-server=utf8_unicode_ci
skip-character-set-client-handshake
skip-name-resolve
root@b3a74e031bd7:/#
设置启动docker时,即运行mysql
[root@hadoop-104 ~]# docker update mysql --restart=always
mysql
[root@hadoop-104 ~]#
下载docker
[root@hadoop-104 ~]# docker pull redis
Using default tag: latest
latest: Pulling from library/redis
123275d6e508: Already exists
f2edbd6a658e: Pull complete
66960bede47c: Pull complete
79dc0b596c90: Pull complete
de36df38e0b6: Pull complete
602cd484ff92: Pull complete
Digest: sha256:1d0b903e3770c2c3c79961b73a53e963f4fd4b2674c2c4911472e8a054cb5728
Status: Downloaded newer image for redis:latest
docker.io/library/redis:latest
启动docker
[root@hadoop-104 ~]# mkdir -p /mydata/redis/conf
[root@hadoop-104 ~]# touch /mydata/redis/conf/redis.conf
[root@hadoop-104 ~]# echo "appendonly yes"  >> /mydata/redis/conf/redis.conf
[root@hadoop-104 ~]# docker run -p 6379:6379 --name redis -v /mydata/redis/data:/data \
> -v /mydata/redis/conf/redis.conf:/etc/redis/redis.conf \
> -d redis redis-server /etc/redis/redis.conf
ce7ae709711986e3f90c9278b284fe6f51f1c1102ba05f3692f0e934ceca1565
[root@hadoop-104 ~]#
连接到docker的redis
[root@hadoop-104 ~]# docker exec -it redis redis-cli
127.0.0.1:6379> set key1 v1
OK
127.0.0.1:6379> get key1
"v1"
127.0.0.1:6379>
设置redis容器在docker启动的时候启动
[root@hadoop-104 ~]# docker update redis --restart=always
redis
[root@hadoop-104 ~]# gulimall_oms.sql gulimall_pms.sql gulimall_sms.sql gulimall_ums.sql gulimall_wms.sql pms_catelog.sql sys_menus.sql

克隆到本地:
git clone https://gitee.com/renrenio/renren-fast-vue.git

git clone https://gitee.com/renrenio/renren-fast.git
将拷贝下来的“renren-fast”删除“.git”后,拷贝到“gulimall”工程根目录下,然后将它作为gulimall的一个module
创建“gulimall_admin”的数据库,然后执行“renren-fast/db/mysql.sql”中的SQl脚本
修改“application-dev.yml”文件,默认为dev环境,修改连接mysql的url和用户名密码
spring:
    datasource:
        type: com.alibaba.druid.pool.DruidDataSource
        druid:
            driver-class-name: com.mysql.cj.jdbc.Driver
            url: jdbc:mysql://192.168.137.14:3306/gulimall_admin?useUnicode=true&characterEncoding=UTF-8&serverTimezone=Asia/Shanghai
            username: root
password: root启动“gulimall_admin”,然后访问“http://localhost:8080/renren-fast/”

安装node.js,并且安装仓库
npm config set registry http://registry.npm.taobao.org/
PS D:\tmp\renren-fast-vue> npm config set registry http://registry.npm.taobao.org/
PS D:\tmp\renren-fast-vue> npm install
npm WARN ajv-keywords@1.5.1 requires a peer of ajv@>=4.10.0 but none is installed. You must install peer dependencies yourself.
npm WARN sass-loader@6.0.6 requires a peer of node-sass@^4.0.0 but none is installed. You must install peer dependencies yourself.
npm WARN optional SKIPPING OPTIONAL DEPENDENCY: fsevents@1.2.9 (node_modules\fsevents):
npm WARN notsup SKIPPING OPTIONAL DEPENDENCY: Unsupported platform for fsevents@1.2.9: wanted {"os":"darwin","arch":"any"} (current: {"os":"win32","arch":"x64"})

up to date in 17.227s
PS D:\tmp\renren-fast-vue>
PS D:\tmp\renren-fast-vue> npm run dev
> renren-fast-vue@1.2.2 dev D:\tmp\renren-fast-vue
> webpack-dev-server --inline --progress --config build/webpack.dev.conf.js
10% building modules 5/10 modules 5 active ...-0!D:\tmp\renren-fast-vue\src\main.js(node:19864) Warning: Accessing non-existent property 'cat' of module exports inside circular dependency
(Use `node --trace-warnings ...` to show where the warning was created)
(node:19864) Warning: Accessing non-existent property 'cd' of module exports inside circular dependency
(node:19864) Warning: Accessing non-existent property 'chmod' of module exports inside circular dependency
(node:19864) Warning: Accessing non-existent property 'cp' of module exports inside circular dependency
(node:19864) Warning: Accessing non-existent property 'dirs' of module exports inside circular dependency
(node:19864) Warning: Accessing non-existent property 'pushd' of module exports inside circular dependency
(node:19864) Warning: Accessing non-existent property 'popd' of module exports inside circular dependency
(node:19864) Warning: Accessing non-existent property 'echo' of module exports inside circular dependency
(node:19864) Warning: Accessing non-existent property 'tempdir' of module exports inside circular dependency
(node:19864) Warning: Accessing non-existent property 'pwd' of module exports inside circular dependency常见问题1:“Module build failed: Error: Cannot find module 'node-sass”
运行过程中,出现“Module build failed: Error: Cannot find module 'node-sass'报错问题”,解决方法
用npm install -g cnpm --registry=https://registry.npm.taobao.org ,从淘宝镜像那下载,然后cnpm下载成功。
最后输入cnpm install node-sass --save。npm run dev终于能跑起来了!!! ———————————————— 版权声明:本文为CSDN博主「夕阳下美了剪影」的原创文章,遵循CC 4.0 BY-SA版权协议,转载请附上原文出处链接及本声明。 原文链接:https://blog.csdn.net/qq_38401285/article/details/86483278
常见问题2:cnpm - 解决 " cnpm : 无法加载文件 C:\Users\93457\AppData\Roaming\npm\cnpm.ps1,因为在此系统上禁止运行脚本。有关详细信息 。。。 "
https://www.cnblogs.com/500m/p/11634969.html
所有问题的根源都在“node_modules”,npm install之前,应该将这个文件夹删除,然后再进行安装和运行。
再次运行npm run dev恢复正常:

https://gitee.com/renrenio/renren-generator.git
然后将该项目放置到“gulimall”的跟路径下,然后添加该Module,并且提交到github上
renren-generator/src/main/resources/generator.properties
#代码生成器,配置信息

mainPath=com.bigdata
#包名
package=com.bigdata.gulimall
moduleName=product
#作者
author=cosmoswong
#Email
email=cosmoswong@sina.com
#表前缀(类名不会包含表前缀)
tablePrefix=pms_
点击“renren-fast”,能够看到它将“renren-fast”的所有表都列举了出来:

选择所有的表,然后点击“生成代码”,将下载的“renren.zip”,解压后取出main文件夹,放置到“gulimall-product”项目的main目录中。
下面的几个module,也采用同样的方式来操作。
但是针对于“undo_log”,存在一个问题

它的数据类型是“longblob”类型,逆向工程后,对应的数据类型未知:

这个问题该要怎么解决?
1)、导入依赖
<dependency>

    <groupId>com.baomidou</groupId>

    <artifactId>mybatis-plus-boot-starter</artifactId>

    <version>3.2.0</version>

</dependency>
2)、配置
1、配置数据源;
1)、导入数据库的驱动。https://dev.mysql.com/doc/connector-j/8.0/en/connector-j-versions.html
2)、在application.yml配置数据源相关信息
spring:
  datasource:
    username: root
    password: root
    url: jdbc:mysql://#:3306/gulimall_pms
    driver-class-name: com.mysql.cj.jdbc.Driver
2、配置MyBatis-Plus;
1)、使用@MapperScan
2)、告诉MyBatis-Plus,sql映射文件位置
mybatis-plus:
  mapper-locations: classpath:/mapper/**/*.xml
  global-config:
    db-config:
    	#主键自增
id-type: auto要注意nacos集群所在的server,一定要关闭防火墙,否则容易出现各种问题。
搭建nacos集群,然后分别启动各个微服务,将它们注册到Nacos中。
  application:
    name: gulimall-coupon
  cloud:
    nacos:
      discovery:
        server-addr: 192.168.137.14
查看注册情况:
http://192.168.137.14:8848/nacos/#/serviceManagement?dataId=&group=&appName=&namespace=

1)、引入open-feign
        <dependency>
            <groupId>org.springframework.cloud</groupId>
            <artifactId>spring-cloud-starter-openfeign</artifactId>
        </dependency>
2)、编写一个接口,告诉SpringCLoud这个接口需要调用远程服务
修改“io.niceseason.gulimall.coupon.controller.CouponController”,添加以下controller方法:
    @RequestMapping("/member/list")
    public R memberCoupons(){
        CouponEntity couponEntity = new CouponEntity();
        couponEntity.setCouponName("discount 20%");
        return R.ok().put("coupons",Arrays.asList(couponEntity));
    }
新建“io.niceseason.gulimall.member.feign.CouponFeignService”接口
@FeignClient("gulimall_coupon")
public interface CouponFeignService {
    @RequestMapping("/coupon/coupon/member/list")
    public R memberCoupons();
}
修改“io.niceseason.gulimall.member.GulimallMemberApplication”类,添加上"@EnableFeignClients":
@SpringBootApplication
@EnableDiscoveryClient
@EnableFeignClients(basePackages = "io.niceseason.gulimall.member.feign")
public class GulimallMemberApplication {

    public static void main(String[] args) {
        SpringApplication.run(GulimallMemberApplication.class, args);
    }
} 声明接口的每一个方法都是调用哪个远程服务的那个请求
3)、开启远程调用功能
io.niceseason.gulimall.member.controller.MemberController
    @RequestMapping("/coupons")
    public R test(){
        MemberEntity memberEntity=new MemberEntity();
        memberEntity.setNickname("zhangsan");
        R memberCoupons = couponFeignService.memberCoupons();

        return memberCoupons.put("member",memberEntity).put("coupons",memberCoupons.get("coupons"));
}(4)、访问http://localhost:8000/member/member/coupons

停止“gulimall-coupon”服务,能够看到注册中心显示该服务的健康值为0:

再次访问:http://localhost:8000/member/member/coupons

启动“gulimall-coupon”服务,再次访问,又恢复了正常。
添加pom依赖:
<dependency>
    <groupId>com.alibaba.cloud</groupId>
    <artifactId>spring-cloud-starter-alibaba-nacos-config</artifactId>
</dependency>
创建bootstrap.properties文件,该配置文件会优先于“application.yml”加载。
spring.application.name=gulimall-coupon
spring.cloud.nacos.config.server-addr=192.168.137.14:8848为了详细说明config的使用方法,先来看原始的方式
创建“application.properties”配置文件,添加如下配置内容:
coupon.user.name="zhangsan"
coupon.user.age=30
修改“io.niceseason.gulimall.coupon.controller.CouponController”文件,添加如下内容:
    @Value("${coupon.user.name}")
    private String name;
    @Value("${coupon.user.age}")
    private Integer age;

    @RequestMapping("/test")
    public R getConfigInfo(){
       return R.ok().put("name",name).put("age",age);
    }
启动“gulimall-coupon”服务:
访问:http://localhost:7000/coupon/coupon/test>

这样做存在的一个问题,如果频繁的修改application.properties,在需要频繁重新打包部署。下面我们将采用Nacos的配置中心来解决这个问题。
1、在Nacos注册中心中,点击“配置列表”,添加配置规则:

DataID:gulimall-coupon
配置格式:properties
文件的命名规则为:${spring.application.name}-${spring.profiles.active}.${spring.cloud.nacos.config.file-extension}
${spring.application.name}:为微服务名
${spring.profiles.active}:指明是哪种环境下的配置,如dev、test或info
${spring.cloud.nacos.config.file-extension}:配置文件的扩展名,可以为properties、yml等
2、查看配置:

3、修改“io.niceseason.gulimall.coupon.controller.CouponController”类,添加“@RefreshScope”注解
@RestController
@RequestMapping("coupon/coupon")
@RefreshScope
public class CouponController {
这样都会动态的从配置中心读取配置.
4、访问:http://localhost:7000/coupon/coupon/test

能够看到读取到了nacos 中的最新的配置信息,并且在指明了相同的配置信息时,配置中心中设置的值优先于本地配置。
Nacos支持“Namespace+group+data ID”的配置解决方案。
通过命名空间实现环境区分
下面是配置实例:
1、创建命名空间:
“命名空间”—>“创建命名空间”:

创建三个命名空间,分别为dev,test和prop
2、回到配置列表中,能够看到所创建的三个命名空间

下面我们需要在dev命名空间下,创建“gulimall-coupon.properties”配置规则:

3、访问:http://localhost:7000/coupon/coupon/test

并没有使用我们在dev命名空间下所配置的规则,而是使用的是public命名空间下所配置的规则,这是怎么回事呢?
查看“gulimall-coupon”服务的启动日志:
2020-04-24 16:37:24.158  WARN 32792 --- [           main] c.a.c.n.c.NacosPropertySourceBuilder     : Ignore the empty nacos configuration and get it based on dataId[gulimall-coupon] & group[DEFAULT_GROUP]
2020-04-24 16:37:24.163  INFO 32792 --- [           main] c.a.nacos.client.config.utils.JVMUtil    : isMultiInstance:false
2020-04-24 16:37:24.169  INFO 32792 --- [           main] b.c.PropertySourceBootstrapConfiguration : Located property source: [BootstrapPropertySource {name='bootstrapProperties-gulimall-coupon.properties,DEFAULT_GROUP'}, BootstrapPropertySource {name='bootstrapProperties-gulimall-coupon,DEFAULT_GROUP'}]
"gulimall-coupon.properties",默认就是public命名空间中的内容中所配置的规则。
4、指定命名空间
如果想要使得我们自定义的命名空间生效,需要在“bootstrap.properties”文件中,指定使用哪个命名空间:
spring.cloud.nacos.config.namespace=a2c83f0b-e0a8-40fb-9b26-1e9d61be7d6d这个命名空间ID来源于我们在第一步所创建的命名空间
5、重启“gulimall-coupon”,再次访问:http://localhost:7000/coupon/coupon/test

但是这种命名空间的粒度还是不够细化,对此我们可以为项目的每个微服务module创建一个命名空间。
6、为所有微服务创建命名空间

7、回到配置列表选项卡,克隆pulic的配置规则到coupon命名空间下

切换到coupon命名空间下,查看所克隆的规则:

8、修改“gulimall-coupon”下的bootstrap.properties文件,添加如下配置信息
spring.cloud.nacos.config.namespace=7905c915-64ad-4066-8ea9-ef63918e5f79这里指明的是,读取时使用coupon命名空间下的配置。
9、重启“gulimall-coupon”,访问:http://localhost:7000/coupon/coupon/test
通过指定spring.profile.active和配置文件的DataID,来使不同环境下读取不同的配置,读取配置时,使用的是默认命名空间public,默认分组(default_group)下的DataID。
默认情况,Namespace=public,Group=DEFAULT GROUP,默认Cluster是DEFAULT
通过制定spring.profiles.active=dev可以制定xxx-dev.properties的配置文件
通过Group实现环境区分
实例:通过使用不同的组,来读取不同的配置,还是以上面的gulimall-coupon微服务为例
1、新建“gulimall-coupon.properties”,将它置于“tmp”组下

2、修改“bootstrap.properties”配置,添加如下的配置
spring.cloud.nacos.config.group=tmp3、重启“gulimall-coupon”,访问:http://localhost:7000/coupon/coupon/test

当微服务数量很庞大时,将所有配置都书写到一个配置文件中,显然不是太合适。对此我们可以将配置按照功能的不同,拆分为不同的配置文件。
如下面的配置文件:
server:
  port: 7000

spring:
  datasource:
    #MySQL配置
    driverClassName: com.mysql.cj.jdbc.Driver
    url: jdbc:mysql://192.168.137.14:3306/gulimall_sms?useUnicode=true&characterEncoding=UTF-8&useSSL=false
    username: root
    password: root

  application:
    name: gulimall-coupon
  cloud:
    nacos:
      discovery:
        server-addr: 192.168.137.14:8848


mybatis-plus:
  global-config:
    db-config:
      id-type: auto
  mapper-locations: classpath:/mapper/**/*.xml
我们可以将,
数据源有关的配置写到一个配置文件中:
spring:
  datasource:
    #MySQL配置
    driverClassName: com.mysql.cj.jdbc.Driver
    url: jdbc:mysql://192.168.137.14:3306/gulimall_sms?useUnicode=true&characterEncoding=UTF-8&useSSL=false
    username: root
    password: root
和框架有关的写到另外一个配置文件中:
mybatis-plus:
  global-config:
    db-config:
      id-type: auto
  mapper-locations: classpath:/mapper/**/*.xml
也可以将上面的这些配置交给nacos来进行管理。
实例:将“gulimall-coupon”的“application.yml”文件拆分为多个配置,并放置到nacos配置中心
1、创建“datasource.yml”,用于存储和数据源有关的配置
spring:
  datasource:
    #MySQL配置
    driverClassName: com.mysql.cj.jdbc.Driver
    url: jdbc:mysql://192.168.137.14:3306/gulimall_sms?useUnicode=true&characterEncoding=UTF-8&useSSL=false
    username: root
    password: root
在coupon命名空间中,创建“datasource.yml”配置

2、将和mybatis相关的配置,放置到“mybatis.yml”中
mybatis-plus:
  global-config:
    db-config:
      id-type: auto
  mapper-locations: classpath:/mapper/**/*.xml
3、创建“other.yml”配置,保存其他的配置信息
server:
  port: 7000

spring:
  application:
    name: gulimall-coupon
  cloud:
    nacos:
      discovery:
        server-addr: 192.168.137.14:8848
现在“mybatis.yml”、“datasource.yml”和“other.yml”共同构成了微服务的配置。
4、修改“gulimall-coupon”的“bootstrap.properties”文件,加载“mybatis.yml”、“datasource.yml”和“other.yml”配置
spring.cloud.nacos.config.extension-configs[0].data-id=mybatis.yml
spring.cloud.nacos.config.extension-configs[0].group=dev
spring.cloud.nacos.config.extension-configs[0].refresh=true

spring.cloud.nacos.config.extension-configs[1].data-id=datasource.yml
spring.cloud.nacos.config.extension-configs[1].group=dev
spring.cloud.nacos.config.extension-configs[1].refresh=true


spring.cloud.nacos.config.extension-configs[2].data-id=other.yml
spring.cloud.nacos.config.extension-configs[2].group=dev
spring.cloud.nacos.config.extension-configs[2].refresh=true
"spring.cloud.nacos.config.ext-config"已经被废弃,建议使用“spring.cloud.nacos.config.extension-configs”,根据自己的版本选择配置。
5、注释“application.yml”文件中的所有配置
6、重启“gulimall-coupon”服务,然后访问:http://localhost:7000/coupon/coupon/test

7、访问:http://localhost:7000/coupon/coupon/list,查看是否能够正常的访问数据库

小结:
1)、微服务任何配置信息,任何配置文件都可以放在配置中心;
2)、只需要在bootstrap.properties中,说明加载配置中心的哪些配置文件即可;
3)、@Value, @ConfigurationProperties。都可以用来获取配置中心中所配置的信息;
4)、配置中心有的优先使用配置中心中的,没有则使用本地的配置。
SpringCloud gateway
        <dependency>
            <groupId>io.niceseason.gulimall</groupId>
            <artifactId>gulimall-common</artifactId>
            <version>1.0-SNAPSHOT</version>
        </dependency>
        <dependency>
            <groupId>org.springframework.cloud</groupId>
            <artifactId>spring-cloud-starter-gateway</artifactId>
        </dependency>
spring.application.name=gulimall-gateway
spring.cloud.nacos.config.server-addr=192.168.137.14:8848
spring.cloud.nacos.config.namespace=1c82552e-1af0-4ced-9a48-26f19c2d315fspring.application.name=gulimall-gateway
spring.cloud.nacos.discovery.server-addr=192.168.137.14:8848
server.port=88启动报错:
Description:

Failed to configure a DataSource: 'url' attribute is not specified and no embedded datasource could be configured.

Reason: Failed to determine a suitable driver class
解决方法:在“io.niceseason.gulimall.gulimallgateway.GulimallGatewayApplication”中排除和数据源相关的配置
@SpringBootApplication(exclude = {DataSourceAutoConfiguration.class})重新启动
访问:http://192.168.137.14:8848/nacos/#,查看到该服务已经注册到了Nacos中

spring:
  cloud:
    gateway:
      routes:
        - id: baidu_route
          uri: https://www.baidu.com
          predicates:
            - Query=url, baidu
        - id: qq_route
          uri: https://www.qq.com/
          predicates:
- Query=url, qq访问:http://localhost:88/hello?url=baidu
访问:http://localhost:88/hello?url=qq
安装vue
# 最新稳定版
$ npm install vue
        let vm = new Vue({
            el: "#app",//绑定元素
            data: {  //封装数据
                name: "张三",
                num: 1
            },
            methods:{  //封装方法
                cancle(){
                    this.num -- ;
                },
                hello(){
                    return "1"
                }
            }
});双向绑定使用v-model
<input type="text" v-model="num"><h1> {{name}} ,非常帅,有{{num}}个人为他点赞{{hello()}}</h1>
v-xx:指令 1、创建vue实例,关联页面的模板,将自己的数据(data)渲染到关联的模板,响应式的 2、指令来简化对dom的一些操作。 3、声明方法来做更复杂的操作。methods里面可以封装方法。
v-on是按钮的单击事件:
<button v-on:click="num++">点赞</button>
在VUE中el,data和vue的作用:
- el:用来绑定数据;
- data:用来封装数据;
- methods:用来封装方法,并且能够封装多个方法,如何上面封装了cancell和hello方法。
安装“Vue 2 Snippets”,用来做代码提示

为了方便的在浏览器上调试VUE程序,需要安装“vue-devtools”,编译后安装到chrome中即可。
详细的使用方法见:Vue调试神器vue-devtools安装
“v-html”不会对于HTML标签进行转义,而是直接在浏览器上显示data所设置的内容;而“ v-text”会对html标签进行转义
     <div id="app">
        {{msg}}  {{1+1}}  {{hello()}}<br/>
        <span v-html="msg"></span>
        <br/>
        <span v-text="msg"></span>
    </div>

    <script src="../node_modules/vue/dist/vue.js"></script>

    <script>
        new Vue({
            el:"#app",
            data:{
                msg:"<h1>Hello</h1>",
                link:"http://www.baidu.com"
            },
            methods:{
                hello(){
                    return "World"
                }
            }
        })
    </script>
运行结果:

{{msg}} :称为差值表达式,它必须要写在Html表达式,可以完成数学运算和方法调用
给html标签的属性绑定
 <!-- 给html标签的属性绑定 -->
    <div id="app">

        <a v-bind:href="link">gogogo</a>

        <!-- class,style  {class名:加上?}-->
        <span v-bind:class="{active:isActive,'text-danger':hasError}"
          :style="{color: color1,fontSize: size}">你好</span>

    </div>

    <script src="../node_modules/vue/dist/vue.js"></script>

    <script>
        let vm = new Vue({
            el:"#app",
            data:{
                link: "http://www.baidu.com",
                isActive:true,
                hasError:true,
                color1:'red',
                size:'36px'
            }
        })
    </script>
上面所完成的任务就是给a标签绑定一个超链接。并且当“isActive”和“hasError”都是true的时候,将属性动态的绑定到,则绑定该“active”和 "text-danger"class。这样可以动态的调整属性的存在。
而且如果想要实现修改vm的"color1"和“size”, span元素的style也能够随之变化,则可以写作v-bind:style,也可以省略v-bind。
<!DOCTYPE html>
<html lang="en">
<head>
    <meta charset="UTF-8">
    <meta name="viewport" content="width=device-width, initial-scale=1.0">
    <meta http-equiv="X-UA-Compatible" content="ie=edge">
    <title>Document</title>
</head>
<body>


    <!-- 表单项,自定义组件 -->
    <div id="app">

        精通的语言:
            <input type="checkbox" v-model="language" value="Java"> java<br/>
            <input type="checkbox" v-model="language" value="PHP"> PHP<br/>
            <input type="checkbox" v-model="language" value="Python"> Python<br/>
        选中了 {{language.join(",")}}
    </div>

    <script src="../node_modules/vue/dist/vue.js"></script>

    <script>
        let vm = new Vue({
            el:"#app",
            data:{
                language: []
            }
        })
    </script>

</body>
</html>
上面完成的功能就是通过“v-model”为输入框绑定多个值,能够实现选中的值,在data的language也在不断的发生着变化,

如果在控制台上指定vm.language=["Java","PHP"],则data值也会跟着变化。

通过“v-model”实现了页面发生了变化,则数据也发生变化,数据发生变化,则页面也发生变化,这样就实现了双向绑定。
数组的连接操作: 选中了 {{language.join(",")}}
        <!--事件中直接写js片段-->
        <button v-on:click="num++">点赞</button>
        <!--事件指定一个回调函数,必须是Vue实例中定义的函数-->
        <button @click="cancle">取消</button>
上面是为两个按钮绑定了单击事件,其中一个对于num进行自增,另外一个自减。
v-on:click也可以写作@click
事件的冒泡:
        <!-- 事件修饰符 -->
        <div style="border: 1px solid red;padding: 20px;" v-on:click="hello">
            大div
            <div style="border: 1px solid blue;padding: 20px;" @click="hello">
                小div <br />
                <a href="http://www.baidu.com" @click.prevent="hello">去百度</a>
            </div>
        </div>
上面的这两个嵌套div中,如果点击了内层的div,则外层的div也会被触发;这种问题可以事件修饰符来完成:
        <!-- 事件修饰符 -->
        <div style="border: 1px solid red;padding: 20px;" v-on:click.once="hello">
            大div
            <div style="border: 1px solid blue;padding: 20px;" @click.stop="hello">
                小div <br />
                <a href="http://www.baidu.com" @click.prevent.stop="hello">去百度</a>
                <!--这里禁止了超链接的点击跳转操作,并且只会触发当前对象的操作-->
            </div>
        </div>
关于事件修饰符:

按键修饰符:


<!DOCTYPE html>
<html lang="en">

<head>
    <meta charset="UTF-8">
    <meta name="viewport" content="width=device-width, initial-scale=1.0">
    <meta http-equiv="X-UA-Compatible" content="ie=edge">
    <title>Document</title>
</head>

<body>

    <div id="app">
        <ul>
            <li v-for="(user,index) in users" :key="user.name" v-if="user.gender == '女'">
                <!-- 1、显示user信息:v-for="item in items" -->
               当前索引:{{index}} ==> {{user.name}}  ==>   {{user.gender}} ==>{{user.age}} <br>
                <!-- 2、获取数组下标:v-for="(item,index) in items" -->
                <!-- 3、遍历对象:
                        v-for="value in object"
                        v-for="(value,key) in object"
                        v-for="(value,key,index) in object"
                -->
                对象信息:
                <span v-for="(v,k,i) in user">{{k}}=={{v}}=={{i}};</span>
                <!-- 4、遍历的时候都加上:key来区分不同数据,提高vue渲染效率 -->
            </li>


        </ul>

        <ul>
            <li v-for="(num,index) in nums" :key="index"></li>
        </ul>
    </div>
    <script src="../node_modules/vue/dist/vue.js"></script>
    <script>
        let app = new Vue({
            el: "#app",
            data: {
                users: [{ name: '柳岩', gender: '女', age: 21 },
                { name: '张三', gender: '男', age: 18 },
                { name: '范冰冰', gender: '女', age: 24 },
                { name: '刘亦菲', gender: '女', age: 18 },
                { name: '古力娜扎', gender: '女', age: 25 }],
                nums: [1,2,3,4,4]
            },
        })
    </script>
</body>

</html>
4、遍历的时候都加上:key来区分不同数据,提高vue渲染效率
<!DOCTYPE html>
<html lang="en">

<head>
    <meta charset="UTF-8">
    <meta name="viewport" content="width=device-width, initial-scale=1.0">
    <meta http-equiv="X-UA-Compatible" content="ie=edge">
    <title>Document</title>
</head>

<body>
    <!-- 过滤器常用来处理文本格式化的操作。过滤器可以用在两个地方:双花括号插值和 v-bind 表达式 -->
    <div id="app">
        <ul>
            <li v-for="user in userList">
                {{user.id}} ==> {{user.name}} ==> {{user.gender == 1?"男":"女"}} ==>
                {{user.gender | genderFilter}} ==> {{user.gender | gFilter}}
                <!-- 这里的"|"表示的管道,将user.gender的值交给genderFilter -->
            </li>
        </ul>
    </div>
    <script src="../node_modules/vue/dist/vue.js"></script>

    <script>
        // 全局过滤器
        Vue.filter("gFilter", function (val) {
            if (val == 1) {
                return "男~~~";
            } else {
                return "女~~~";
            }
        })

        let vm = new Vue({
            el: "#app",
            data: {
                userList: [
                    { id: 1, name: 'jacky', gender: 1 },
                    { id: 2, name: 'peter', gender: 0 }
                ]
            },
            filters: {
                //// filters 定义局部过滤器,只可以在当前vue实例中使用
                genderFilter(val) {
                    if (val == 1) {
                        return "男";
                    } else {
                        return "女";
                    }
                }
            }
        })
    </script>
</body>

</html><!DOCTYPE html>
<html lang="en">
<head>
<meta charset="UTF-8">
<meta name="viewport" content="width=device-width, initial-scale=1.0">
<meta http-equiv="X-UA-Compatible" content="ie=edge">
<title>Document</title>
</head>
<body>
<div id="app">
<button v-on:click="count++">我被点击了 {{count}} 次</button>
<counter></counter>
<counter></counter>
<counter></counter>
<counter></counter>
<counter></counter>
<!-- 使用所定义的组件button-counter -->
<button-counter></button-counter>
</div>
<script src="../node_modules/vue/dist/vue.js"></script>
<script>
//1、全局声明注册一个组件
Vue.component("counter", {
template: `<button v-on:click="count++">我被点击了 {{count}} 次</button>`,
data() {
return {
count: 1
}
}
});
//2、局部声明一个组件
const buttonCounter = {
template: `<button v-on:click="count++">我被点击了 {{count}} 次~~~</button>`,
data() {
return {
count: 1
}
}
};
new Vue({
el: "#app",
data: {
count: 1
},
components: {
//声明所定义的局部组件
'button-counter': buttonCounter
}
})
</script>
</body>
</html>
<!DOCTYPE html>
<html lang="en">

<head>
    <meta charset="UTF-8">
    <meta name="viewport" content="width=device-width, initial-scale=1.0">
    <meta http-equiv="X-UA-Compatible" content="ie=edge">
    <title>Document</title>
</head>

<body>
    <div id="app">
        <span id="num">{{num}}</span>
        <button @click="num++">赞!</button>
        <h2>{{name}},有{{num}}个人点赞</h2>
    </div>

    <script src="../node_modules/vue/dist/vue.js"></script>

    <script>
        let app = new Vue({
            el: "#app",
            data: {
                name: "张三",
                num: 100
            },
            methods: {
                show() {
                    return this.name;
                },
                add() {
                    this.num++;
                }
            },
            beforeCreate() {
                console.log("=========beforeCreate=============");
                console.log("数据模型未加载:" + this.name, this.num);
                console.log("方法未加载:" + this.show());
                console.log("html模板未加载:" + document.getElementById("num"));
            },
            created: function () {
                console.log("=========created=============");
                console.log("数据模型已加载:" + this.name, this.num);
                console.log("方法已加载:" + this.show());
                console.log("html模板已加载:" + document.getElementById("num"));
                console.log("html模板未渲染:" + document.getElementById("num").innerText);
            },
            beforeMount() {
                console.log("=========beforeMount=============");
                console.log("html模板未渲染:" + document.getElementById("num").innerText);
            },
            mounted() {
                console.log("=========mounted=============");
                console.log("html模板已渲染:" + document.getElementById("num").innerText);
            },
            beforeUpdate() {
                console.log("=========beforeUpdate=============");
                console.log("数据模型已更新:" + this.num);
                console.log("html模板未更新:" + document.getElementById("num").innerText);
            },
            updated() {
                console.log("=========updated=============");
                console.log("数据模型已更新:" + this.num);
                console.log("html模板已更新:" + document.getElementById("num").innerText);
            }
        });
    </script>
</body>

</html>官网: https://element.eleme.cn/#/zh-CN/component/installation
安装
npm i element-ui -S在 main.js 中写入以下内容:
import ElementUI  from 'element-ui'
import 'element-ui/lib/theme-chalk/index.css';

Vue.use(ElementUI);
在注册中心中“product”命名空间中,创建“gulimall-product.yml”配置文件:

将“application.yml”内容拷贝到该配置文件中
server:
  port: 10000

spring:
  datasource:
    #MySQL配置
    driverClassName: com.mysql.cj.jdbc.Driver
    url: jdbc:mysql://192.168.137.14:3306/gulimall_pms?useUnicode=true&characterEncoding=UTF-8&useSSL=false
    username: root
    password: root
  application:
    name: gulimall-product
  cloud:
    nacos:
      discovery:
        server-addr: 192.168.137.14:8848


mybatis-plus:
  global-config:
    db-config:
      id-type: auto
  mapper-locations: classpath:/mapper/**/*.xml
在本地创建“bootstrap.properties”文件,指明配置中心的位置和使用到的配置文件:
spring.application.name=gulimall-product
spring.cloud.nacos.config.server-addr=192.168.137.14:8848
spring.cloud.nacos.config.namespace=3c50ffaa-010b-4b59-9372-902e35059232
spring.cloud.nacos.config.extension-configs[0].data-id=gulimall-product.yml
spring.cloud.nacos.config.extension-configs[0].group=DEFAULT_GROUP
spring.cloud.nacos.config.extension-configs[0].refresh=true
然后启动gulimall-product,查看到该服务已经出现在了nacos的注册中心中了
修改“io.niceseason.gulimall.product.service.CategoryService”类,添加如下代码:
    /**
     * 列表
     */
    @RequestMapping("/list/tree")
    public List<CategoryEntity> list(){
        List<CategoryEntity> categoryEntities = categoryService.listWithTree();

        return categoryEntities;
}测试:http://localhost:10000/product/category/list/tree

如何区别是哪种分类级别?
答:可以通过分类的parent_cid来进行判断,如果是一级分类,其值为0.
     /**
     * 列表
     */
    @RequestMapping("/list/tree")
    public List<CategoryEntity> list(){
        List<CategoryEntity> categoryEntities = categoryService.listWithTree();
        //找到所有的一级分类
        List<CategoryEntity> level1Menus = categoryEntities.stream()
                .filter(item -> item.getParentCid() == 0)
                .map(menu->{
                    menu.setChildCategoryEntity(getChildrens(menu,categoryEntities));
                    return menu;
                })
                .sorted((menu1, menu2) -> {

                  return (menu1.getSort() ==null ? 0:menu1.getSort())- (menu2.getSort()==null?0:menu2.getSort());

                })
                .collect(Collectors.toList());


        return level1Menus;
    }

    public List<CategoryEntity> getChildrens(CategoryEntity root,List<CategoryEntity> all){

        List<CategoryEntity> childrens = all.stream().filter(item -> {
            return item.getParentCid() == root.getCatId();
        }).map(item -> {
            item.setChildCategoryEntity(getChildrens(item, all));
            return item;
        }).sorted((menu1, menu2) -> {
            return (menu1.getSort() ==null ? 0:menu1.getSort())- (menu2.getSort()==null?0:menu2.getSort());
        }).collect(Collectors.toList());

        return childrens;
    }
下面是得到的部分JSON数据
[
  {
    "catId": 1,
    "name": "图书、音像、电子书刊",
    "parentCid": 0,
    "catLevel": 1,
    "showStatus": 1,
    "sort": 0,
    "icon": null,
    "productUnit": null,
    "productCount": 0,
    "childCategoryEntity": [
      {
        "catId": 22,
        "name": "电子书刊",
        "parentCid": 1,
        "catLevel": 2,
        "showStatus": 1,
        "sort": 0,
        "icon": null,
        "productUnit": null,
        "productCount": 0,
        "childCategoryEntity": [
          {
            "catId": 165,
            "name": "电子书",
            "parentCid": 22,
            "catLevel": 3,
            "showStatus": 1,
            "sort": 0,
            "icon": null,
            "productUnit": null,
            "productCount": 0,
            "childCategoryEntity": []
          },
          {
            "catId": 166,
            "name": "网络原创",
            "parentCid": 22,
            "catLevel": 3,
            "showStatus": 1,
            "sort": 0,
            "icon": null,
            "productUnit": null,
            "productCount": 0,
            "childCategoryEntity": []
          },
          {
            "catId": 167,
            "name": "数字杂志",
            "parentCid": 22,
            "catLevel": 3,
            "showStatus": 1,
            "sort": 0,
            "icon": null,
            "productUnit": null,
            "productCount": 0,
            "childCategoryEntity": []
          },
          {
            "catId": 168,
            "name": "多媒体图书",
            "parentCid": 22,
            "catLevel": 3,
            "showStatus": 1,
            "sort": 0,
            "icon": null,
            "productUnit": null,
            "productCount": 0,
            "childCategoryEntity": []
          }
        ]
      },
      {
        "catId": 23,
        "name": "音像",
        "parentCid": 1,
        "catLevel": 2,
        "showStatus": 1,
        "sort": 0,
        "icon": null,
        "productUnit": null,
        "productCount": 0,
        "childCategoryEntity": [
          {
            "catId": 169,
            "name": "音乐",
            "parentCid": 23,
            "catLevel": 3,
            "showStatus": 1,
            "sort": 0,
            "icon": null,
            "productUnit": null,
            "productCount": 0,
            "childCategoryEntity": []
          },
          {
            "catId": 170,
            "name": "影视",
            "parentCid": 23,
            "catLevel": 3,
            "showStatus": 1,
            "sort": 0,
            "icon": null,
            "productUnit": null,
            "productCount": 0,
            "childCategoryEntity": []
          },
          {
            "catId": 171,
            "name": "教育音像",
            "parentCid": 23,
            "catLevel": 3,
            "showStatus": 1,
            "sort": 0,
            "icon": null,
            "productUnit": null,
            "productCount": 0,
            "childCategoryEntity": []
          }
        ]
      },
      {
启动后端项目renren-fast
启动前端项目renren-fast-vue:
npm run dev
访问: http://localhost:8001/#/login
创建一级菜单:

创建完成后,在后台的管理系统中会创建一条记录:

然后创建子菜单:

创建renren-fast-vue\src\views\modules\product目录,子所以是这样来创建,是因为product/category,对应于product-category
在该目录下,新建“category.vue”文件:
<!--  -->
<template>
  <el-tree :data="menus" :props="defaultProps" @node-click="handleNodeClick"></el-tree>
</template>

<script>
//这里可以导入其他文件(比如:组件,工具js,第三方插件js,json文件,图片文件等等)
//例如:import 《组件名称》 from '《组件路径》';

export default {
  //import引入的组件需要注入到对象中才能使用
  components: {},

  //监听属性 类似于data概念
  computed: {},
  //监控data中的数据变化
  watch: {},
  data() {
    return {
      menus: [],
       defaultProps: {
        children: "childrens",
        label: "name"
      },
    }
  },

  methods: {
    handleNodeClick(data) {
      console.log(data);
    },

    getMenus() {
      this.dataListLoading = true;
      this.$http({
        url: this.$http.adornUrl("/product/category/list/tree"),
        method: "get"
      }).then(({ data }) => {
        console.log("获取到数据", data);
        this.menus=data;
      });
    }
  },


  //生命周期 - 创建完成(可以访问当前this实例)
  created() {
    this.getMenus();
  },
  //生命周期 - 挂载完成(可以访问DOM元素)
  mounted() {},
  beforeCreate() {}, //生命周期 - 创建之前
  beforeMount() {}, //生命周期 - 挂载之前
  beforeUpdate() {}, //生命周期 - 更新之前
  updated() {}, //生命周期 - 更新之后
  beforeDestroy() {}, //生命周期 - 销毁之前
  destroyed() {}, //生命周期 - 销毁完成
  activated() {} //如果页面有keep-alive缓存功能,这个函数会触发
};
</script>
<style scoped>刷新页面出现404异常,查看请求发现,请求的是“http://localhost:8080/renren-fast/product/category/list/tree”

这个请求是不正确的,正确的请求是:http://localhost:10000/product/category/list/tree,
修正这个问题:
替换“static\config\index.js”文件中的“window.SITE_CONFIG['baseUrl']”
替换前:
window.SITE_CONFIG['baseUrl'] = 'http://localhost:8080/renren-fast';
替换后:
window.SITE_CONFIG['baseUrl'] = 'http://localhost:88/api';
http://localhost:88,这个地址是我们网关微服务的接口。
这里我们需要通过网关来完成路径的映射,因此将renren-fast注册到nacos注册中心中,并添加配置中心
application:
    name: renren-fast
  cloud:
    nacos:
      discovery:
        server-addr: 192.168.137.14:8848

      config:
        name: renren-fast
        server-addr: 192.168.137.8848
namespace: ee409c3f-3206-4a3b-ba65-7376922a886d配置网关路由,前台的所有请求都是经由“http://localhost:88/api”来转发的,在“gulimall-gateway”中添加路由规则:
        - id: admin_route
          uri: lb://renren-fast
          predicates:
- Path=/api/**但是这样做也引入了另外的一个问题,再次访问:http://localhost:8001/#/login,发现验证码不再显示:
分析原因:
- 现在的验证码请求路径为,http://localhost:88/api/captcha.jpg?uuid=69c79f02-d15b-478a-8465-a07fd09001e6
- 原始的验证码请求路径:http://localhost:8001/renren-fast/captcha.jpg?uuid=69c79f02-d15b-478a-8465-a07fd09001e6
在admin_route的路由规则下,在访问路径中包含了“api”,因此它会将它转发到renren-fast,网关在转发的时候,会使用网关的前缀信息,为了能够正常的取得验证码,我们需要对请求路径进行重写
关于请求路径重写:
6.16. The RewritePath GatewayFilter Factory
The RewritePath GatewayFilter factory takes a path regexp parameter and a replacement parameter. This uses Java regular expressions for a flexible way to rewrite the request path. The following listing configures a RewritePath GatewayFilter:
Example 41. application.yml
spring:
  cloud:
    gateway:
      routes:
      - id: rewritepath_route
        uri: https://example.org
        predicates:
        - Path=/foo/**
        filters:
        - RewritePath=/red(?<segment>/?.*), $\{segment}
For a request path of /red/blue, this sets the path to /blue before making the downstream request. Note that the $ should be replaced with $\ because of the YAML specification.
修改“admin_route”路由规则:
        - id: admin_route
          uri: lb://renren-fast
          predicates:
            - Path=/api/**
          filters:
- RewritePath=/api/(?<segment>/?.*), /renren-fast/$\{segment}再次访问:http://localhost:8001/#/login,验证码能够正常的加载了。
但是很不幸新的问题又产生了,访问被拒绝了

问题描述:已拦截跨源请求:同源策略禁止读取位于 http://localhost:88/api/sys/login 的远程资源。(原因:CORS 头缺少 'Access-Control-Allow-Origin')。
问题分析:这是一种跨域问题。访问的域名和端口和原来的请求不同,请求就会被限制

跨域流程:


解决方法:在网关中定义“GulimallCorsConfiguration”类,该类用来做过滤,允许所有的请求跨域。
@Configuration
public class GulimallCorsConfiguration {

    @Bean
    public CorsWebFilter corsWebFilter(){
        UrlBasedCorsConfigurationSource source=new UrlBasedCorsConfigurationSource();
        CorsConfiguration corsConfiguration = new CorsConfiguration();
        corsConfiguration.addAllowedHeader("*");
        corsConfiguration.addAllowedMethod("*");
        corsConfiguration.addAllowedOrigin("*");
        corsConfiguration.setAllowCredentials(true);

        source.registerCorsConfiguration("/**",corsConfiguration);
        return new CorsWebFilter(source);
    }
}再次访问:http://localhost:8001/#/login

http://localhost:8001/renre已拦截跨源请求:同源策略禁止读取位于 http://localhost:88/api/sys/login 的远程资源。(原因:不允许有多个 'Access-Control-Allow-Origin' CORS 头)n-fast/captcha.jpg?uuid=69c79f02-d15b-478a-8465-a07fd09001e6
出现了多个请求,并且也存在多个跨源请求。
为了解决这个问题,需要修改renren-fast项目,注释掉“io.renren.config.CorsConfig”类。然后再次进行访问。
在显示分类信息的时候,出现了404异常,请求的http://localhost:88/api/product/category/list/tree不存在

这是因为网关上所做的路径映射不正确,映射后的路径为http://localhost:8001/renren-fast/product/category/list/tree
但是只有通过http://localhost:10000/product/category/list/tree路径才能够正常访问,所以会报404异常。
解决方法就是定义一个product路由规则,进行路径重写:
        - id: product_route
          uri: lb://gulimall-product
          predicates:
            - Path=/api/product/**
          filters:
            - RewritePath=/api/(?<segment>/?.*),/$\{segment}
在路由规则的顺序上,将精确的路由规则放置到模糊的路由规则的前面,否则的话,精确的路由规则将不会被匹配到,类似于异常体系中try catch子句中异常的处理顺序。
添加delete和append标识,并且增加复选框
 <el-tree
    :data="menus"
    show-checkbox  //显示复选框
    :props="defaultProps"
    :expand-on-click-node="false" //设置节点点击时不展开
    node-key="catId"
  >
    <span class="custom-tree-node" slot-scope="{ node, data }">
      <span>{{ node.label }}</span>
      <span>
        <el-button v-if="node.level <= 2" type="text" size="mini" @click="() => append(data)">Append</el-button>
        <el-button
          v-if="node.childNodes.length == 0"
          type="text"
          size="mini"
          @click="() => remove(node, data)"
        >Delete</el-button>
      </span>
    </span>
  </el-tree>
测试删除数据,打开postman输入“ http://localhost:88/api/product/category/delete ”,请求方式设置为POST,为了比对效果,可以在删除之前查询数据库的pms_category表:

由于delete请求接收的是一个数组,所以这里使用JSON方式,传入了一个数组:

再次查询数据库能够看到cat_id为1000的数据已经被删除了。
修改“io.niceseason.gulimall.product.controller.CategoryController”类,添加如下代码:
 @RequestMapping("/delete")
    public R delete(@RequestBody Long[] catIds){
        //删除之前需要判断待删除的菜单那是否被别的地方所引用。
//		categoryService.removeByIds(Arrays.asList(catIds));

        categoryService.removeMenuByIds(Arrays.asList(catIds));
        return R.ok();
    }
io.niceseason.gulimall.product.service.impl.CategoryServiceImpl
    @Override
    public   void removeMenuByIds(List<Long> asList) {
        //TODO 检查当前的菜单是否被别的地方所引用
        categoryDao.deleteBatchIds(asList);
    }
然而多数时候,我们并不希望删除数据,而是标记它被删除了,这就是逻辑删除;
可以设置show_status为0,标记它已经被删除。

mybatis-plus的逻辑删除:

配置全局的逻辑删除规则,在“src/main/resources/application.yml”文件中添加如下内容:
mybatis-plus:
  global-config:
    db-config:
      id-type: auto
      logic-delete-value: 1
      logic-not-delete-value: 0
修改“io.niceseason.gulimall.product.entity.CategoryEntity”类,添加上@TableLogic,表明使用逻辑删除:
	/**
	 * 是否显示[0-不显示,1显示]
	 */
	@TableLogic(value = "1",delval = "0")
	private Integer showStatus;
然后在POSTMan中测试一下是否能够满足需要。另外在“src/main/resources/application.yml”文件中,设置日志级别,打印出SQL语句:
logging:
  level:
    io.niceseason.gulimall.product: debug
打印的日志:
 ==>  Preparing: UPDATE pms_category SET show_status=0 WHERE cat_id IN ( ? ) AND show_status=1
 ==> Parameters: 1431(Long)
 <==    Updates: 1
 get changedGroupKeys:[]
删除细节优化
  remove(node, data) {
      //讲删除id传入数组
      var ids = [data.catId];
      //删除前弹出确认框
      this.$confirm(`是否删除【${data.name}】菜单?`, "提示", {
        confirmButtonText: "确定",
        cancelButtonText: "取消",
        type: "warning",
      })
        .then(() => {
          this.$http({
            url: this.$http.adornUrl("/product/category/delete"),
            method: "post",
            data: this.$http.adornData(ids, false),
          }).then(({ data }) => {
            //成功删除后弹出提示
            this.$message({
              message: "菜单删除成功",
              type: "success",
            });
            //刷新出新的菜单
            this.getMenus();
            //设置需要默认展开的菜单,使得删除后当前目录处于展开的状态
            this.expandedKey = [node.parent.data.catId];
          });
        })
        .catch(() => {});

      console.log("remove", node, data);
    },
添加数据
在模板上添加分类对话框
 <el-dialog title="添加分类" :visible.sync="dialogFormVisible">
  <el-form :model="category">
    <el-form-item label="分类名称">
      <el-input v-model="category.name" autocomplete="off"></el-input>
    </el-form-item>
  </el-form>
  <div slot="footer" class="dialog-footer">
    <el-button @click="dialogFormVisible = false">取 消</el-button>
    <el-button type="primary" @click="addCategory">确 定</el-button>
  </div>
</el-dialog>在data属性中增加对话框显示属性dialogFormVisible和提交数据category
data() {
    return {
      menus: [],
      defaultProps: {
        children: "childrens",
        label: "name",
      },
      //展开菜单的id
      expandedKey: [],
      //添加分类对话框默认关闭
      dialogFormVisible: false,
      //提交分类的数据
      category: {
        name:"",
        parentCid: 0,
        catLevel: 0,
        showStatus: 1,
        sort: 0,
        productUnit: "",
        icon: "",
        catId: null,
      },
    };
},分别添加添加和确定对应函数
//点击添加调用此函数
append(data) {
      console.log("添加数据", data);
    //显示对话框
      this.dialogFormVisible=true;
    //父id为当前点击数据id
      this.category.parentCid = data.catId;
    //显示层级为当前点击数据下一级
      this.category.catLevel = data.catLevel * 1 + 1;
      this.category.catId = null;
      this.category.name = "";
      this.category.icon = "";
      this.category.productUnit = "";
      this.category.sort = 0;
      this.category.showStatus = 1;
    },

    addCategory(){
      this.$http({
      url: this.$http.adornUrl('/product/category/save'),
      method: 'post',
      data: this.$http.adornData(this.category, false)
       }).then(({ data }) => {
        this.$message({
          message: "菜单保存成功",
          type: "success",
        });
        //关闭对话框
        this.dialogFormVisible = false;
        //刷新出新的菜单
        this.getMenus();
        //设置需要默认展开的菜单
        this.expandedKey = [this.category.parentCid];
      });
    },
},添加修改按钮
<el-button type="text" size="mini" @click="() => edit(data)">Edit</el-button>使对话框回显数据并显示标题修改分类,由于与 增加分类公用统一对话框,所以需要添加属性title并定制函数submitData()
<el-dialog :title="title" :visible.sync="dialogFormVisible">
    <el-form :model="category">
        <el-form-item label="分类名称">
            <el-input v-model="category.name" autocomplete="off"></el-input>
        </el-form-item>
        <el-form-item label="图标">
            <el-input v-model="category.icon" autocomplete="off"></el-input>
        </el-form-item>
        <el-form-item label="计量单位">
            <el-input v-model="category.productUnit" autocomplete="off"></el-input>
        </el-form-item>
    </el-form>
    <div slot="footer" class="dialog-footer">
        <el-button @click="dialogFormVisible = false">取 消</el-button>
        <el-button type="primary" @click="submitData">确 定</el-button>
    </div>
</el-dialog> data() {
return {
menus: [],
defaultProps: {
children: "childrens",
label: "name",
},
//展开菜单的id
expandedKey: [],
dialogFormVisible: false,
category: {
catId: null,
name: "",
parentCid: 0,
catLevel: 0,
showStatus: 1,
sort: 0,
productUnit: "",
icon: "",
catId: null,
},
//对话框显示标题:添加分类/修改分类
title: "",
dialogType: "" // add/edit
};
},
//点击修改按钮调用函数
edit(data) {
this.title = "修改分类",
this.dialogFormVisible = true,
this.dialogType="edit",
console.log("修改数据", data);
this.$http({
url: this.$http.adornUrl(`/product/category/info/${data.catId}`),
method: "get",
}).then(({ data }) => {
console.log("回显数据", data.category);
this.category = data.category;
});
},
//点击确定按钮调用函数
editCategory(){
var {catId,name,icon,productUnit}=this.category;
this.$http({
url: this.$http.adornUrl("/product/category/update"),
method: "post",
data: this.$http.adornData({catId,name,icon,productUnit}, false),
}).then(({ data }) => {
this.$message({
message: "菜单修改成功",
type: "success",
});
//关闭对话框
this.dialogFormVisible = false;
//刷新出新的菜单
this.getMenus();
//设置需要默认展开的菜单
this.expandedKey = [this.category.parentCid];
});
},
//根据提交类型是add/edit选择调用不同的方法
submitData(){
this.dialogType=="add"?this.addCategory():this.editCategory();
},
},开启拖拽功能
在<el-tree>添加属性draggable开启拖拽功能
<el-tree
      :data="menus"
      :props="defaultProps"
      :expand-on-click-node="false"
      show-checkbox
      node-key="catId"
      :default-expanded-keys="expandedKey"
      :draggable="draggable"
      :allow-drop="allowDrop"  //绑定允许拖拽的函数
      @node-drop="handleDrop"
      ref="menuTree"
    >
限制可拖拽范围
由于我们的菜单是三级分类,所以未防止超出三级的情况,有部分情况不允许被拖入:比如被拖拽的节点本身包含两级菜单,将其拖进第二层级的节点,那么最深层级就达到了四级,为防止这种情况的出现,我们需要编写在<el-tree>中绑定allow-drop属性并编写allowDrop()函数
allowDrop()的思路为将被拖拽节点的子节点通过递归遍历找出最深节点的level,然后将被拖拽节点的相对深度与目标节点的相对深度相加,看是否超出最大深度3
   //拖拽时判定目标节点能否被放置。type 参数有三种情况:'prev'、'inner' 和 'next',
    //分别表示放置在目标节点前、插入至目标节点和放置在目标节点后
    allowDrop(draggingNode, dropNode, type){
      console.log("拖拽节点",draggingNode,dropNode,type);
      this.maxLevel=draggingNode.level;
      this.countNodeLevel(draggingNode);
      //当前拖拽节点距离最深节点的深度
      let deep=(this.maxLevel-draggingNode.level)+1;
      console.log("deep:",deep,"maxlevel:",this.maxLevel,"dragging:",draggingNode.level);
      if(type=="inner"){
        return deep+dropNode.level<=3;
      }else{
        return deep+dropNode.parent.level<=3;
      }
    },

    //判断当前拖动菜单的最深层级
    countNodeLevel(node){
      if(node.childNodes!=null&&node.childNodes.length!=0){
        for(let i=0;i<node.childNodes.length;i++){
        if(node.childNodes[i].level>this.maxLevel){
          this.maxLevel=node.childNodes[i].level;
        }
        this.countNodeLevel(node.childNodes[i]);
      }
      }
    },
拖拽完成
拖拽完成后我们需要更新三个状态:
-
当前节点最新的父节点id,
-
当前拖拽节点的最新顺序
遍历姊妹节点的顺序即为新顺序
-
当前拖拽节点的最新层级
当前拖拽层级变化需要更新拖拽节点及其子节点
拖拽完成后需要更新变化的节点,根据被拖拽节点的防止位置的不同,变化的部分也有所不同
-
inner
父节点为
dropNode节点姊妹节点为
dropNode的孩子节点 -
before/after
父节点为
dropNode的父节点姊妹节点为
dropNode的父节点的孩子节点
   //拖拽成功完成时触发的事件
    //共四个参数,依次为:
    //被拖拽节点对应的 Node、结束拖拽时最后进入的节点、被拖拽节点的放置位置(before、after、inner)、event
    handleDrop(draggingNode, dropNode, dropType, ev) {
      //1、当前节点最新的父节点id
      let pCid=0;
      let siblings=null;
      if(dropType=="inner"){
        pCid=dropNode.data.catId;
        siblings=dropNode.childNodes;
      }else{
        pCid=dropNode.parent.data.catId==undefined?0:dropNode.parent.data.catId;
        siblings=dropNode.parent.childNodes;
      }
      //2、当前拖拽节点的最新顺序,
      //3、当前拖拽节点的最新层级
      this.pCid.push(pCid);
      for(let i=0;i<siblings.length;i++){
        if(siblings[i].data.catId==draggingNode.data.catId){
           let catLevel=draggingNode.catLevel;
           //被拖拽节点的层级发生变化
           //其子节点的层级也需要变化
           if(catLevel!=draggingNode.level){
                this.updateChildNodeLevel(siblings[i]);
                catLevel=draggingNode.level;
           }
           this.updateNodes.push({
             catId:siblings[i].data.catId,
             catLevel,
             sort:i,
             parentCid:pCid,
           });
        }else{
          this.updateNodes.push({
            catId:siblings[i].data.catId,
            sort:i,
          });
        }
      }
      console.log(this.updateNodes);
    },

    //更新子节点的层级
    updateChildNodeLevel(node){
        if(node.childNodes.length>0){
          for(let i=0;i<node.childNodes.length;i++){
            this.updateNodes.push({
              catId:node.childNodes[i].data.catId,
              catLevel:node.childNodes[i].level,
            });
            this.updateChildNodeLevel(node.childNodes[i]);
          }
        }
    },
设置菜单拖动开关
<el-switch v-model="draggable" active-text="开启拖拽" inactive-text="关闭拖拽"></el-switch>
<el-button v-if="draggable" @click="batchSave">批量保存</el-button>
现在存在的一个问题是每次拖拽的时候,都会发送请求,更新数据库这样频繁的与数据库交互,现在想要实现一个拖拽过程中不更新数据库,拖拽完成后,通过
批量保存统一提交拖拽后的数据。
 	//批量保存拖动分类
    batchSave(){
      this.$http({
      url: this.$http.adornUrl('/product/category/updateNodes'),
      method: 'post',
      data: this.$http.adornData(this.updateNodes, false)
      }).then(({ data }) => {
          this.$message({
          message: "菜单顺序等修改成功",
          type: "success"
        });
        //刷新出新的菜单
        this.getMenus();
        //设置需要默认展开的菜单
        this.expandedKey = this.pCid;
        //将更新节点置空
        this.updateNodes = [];
        this.maxLevel = 0;
      });
    }
现在还存在一个问题,如果是将一个菜单连续的拖拽,最终还放到了原来的位置,但是updateNode中却出现了很多节点更新信息,这样显然也是一个问题。
添加删除按钮
<el-button type="danger" plain size="small" @click="batchDelete">批量删除</el-button>在<el-tree>中添加 ref="tree"属性以获得选中节点
	 //批量删除
    batchDelete(){
        // this.$refs表示当前el-tree的所有引用
       let checkNodes = this.$refs.tree.getCheckedNodes();
       let ids=[];
       let names=[];
       for(let i=0;i<checkNodes.length;i++){
         ids.push(checkNodes[i].catId);
         names.push(checkNodes[i].name);
       }
       this.$confirm(`是否删除【${names}】菜单?`, "提示", {
        confirmButtonText: "确定",
        cancelButtonText: "取消",
        type: "warning",
      }).then(()=>{
          //获取选中节点
      //$refs表示所有属性,由于在之前定义了ref="tree"

        this.$http({
        url: this.$http.adornUrl('/product/category/delete'),
        method: 'post',
        data: this.$http.adornData(ids, false)
        }).then(() => {
          this.$message({
          message: "批量删除成功",
          type: "success"
        });
        this.getMenus();
        });
      }
      ).catch();
    },
(2)将“”逆向工程得到的resources\src\views\modules\product文件拷贝到gulimall/renren-fast-vue/src/views/modules/product目录下,也就是下面的两个文件
brand.vue brand-add-or-update.vue
但是显示的页面没有新增和删除功能,这是因为权限控制的原因,

<el-button v-if="isAuth('product:brand:save')" type="primary" @click="addOrUpdateHandle()">新增</el-button>
<el-button v-if="isAuth('product:brand:delete')" type="danger" @click="deleteHandle()" :disabled="dataListSelections.length <= 0">批量删除</el-button>
查看“isAuth”的定义位置:

它是在“index.js”中定义,现在将它设置为返回值为true,即可显示添加和删除功能。
再次刷新页面能够看到,按钮已经出现了:

brand.vue
<template slot-scope="scope">
  <el-switch
    v-model="scope.row.showStatus"
    active-color="#13ce66"
    inactive-color="#ff4949"
    @change="updateBrandStatus(scope.row)"
    :active-value = "1"
    :inactive-value	= "0"
  ></el-switch>
</template>
brand-add-or-update.vue
 <el-form-item label="显示状态" prop="showStatus">
    <el-switch v-model="dataForm.showStatus" active-color="#13ce66" inactive-color="#ff4949"></el-switch>
 </el-form-item>
//更新开关的状态
updateBrandStatus(data) {
console.log("最新状态", data);
let {brandId,showStatus} = data;
this.$http({
url: this.$http.adornUrl("/product/brand/update"),
method: "post",
data: this.$http.adornData({brandId,showStatus}, false)
}).then(({ data }) => {
this.$message({
message: "状态更新成功",
type: "success"
});
});
},和传统的单体应用不同,这里我们选择将数据上传到分布式文件服务器上。
这里我们选择将图片放置到阿里云上,使用对象存储。
阿里云上使使用对象存储方式:

创建Bucket

上传文件:

上传成功后,取得图片的URL

这种方式是手动上传图片,实际上我们可以在程序中设置自动上传图片到阿里云对象存储。
上传模型:

查看阿里云关于文件上传的帮助: https://help.aliyun.com/document_detail/32009.html?spm=a2c4g.11186623.6.768.549d59aaWuZMGJ
在Maven项目中加入依赖项(推荐方式)
在 Maven 工程中使用 OSS Java SDK,只需在 pom.xml 中加入相应依赖即可。以 3.8.0 版本为例,在 内加入如下内容:
<dependency>
    <groupId>com.aliyun.oss</groupId>
    <artifactId>aliyun-sdk-oss</artifactId>
    <version>3.8.0</version>
</dependency>以下代码用于上传文件流:
// Endpoint以杭州为例,其它Region请按实际情况填写。
String endpoint = "http://oss-cn-hangzhou.aliyuncs.com";
// 云账号AccessKey有所有API访问权限,建议遵循阿里云安全最佳实践,创建并使用RAM子账号进行API访问或日常运维,请登录 https://ram.console.aliyun.com 创建。
String accessKeyId = "<yourAccessKeyId>";
String accessKeySecret = "<yourAccessKeySecret>";

// 创建OSSClient实例。
OSS ossClient = new OSSClientBuilder().build(endpoint, accessKeyId, accessKeySecret);

// 上传文件流。
InputStream inputStream = new FileInputStream("<yourlocalFile>");
ossClient.putObject("<yourBucketName>", "<yourObjectName>", inputStream);

// 关闭OSSClient。
ossClient.shutdown();
endpoint的取值:

accessKeyId和accessKeySecret需要创建一个RAM账号:

创建用户完毕后,会得到一个“AccessKey ID”和“AccessKeySecret”,然后复制这两个值到代码的“AccessKey ID”和“AccessKeySecret”。
另外还需要添加访问控制权限:

@Test
    public void testUpload() throws FileNotFoundException {
        // Endpoint以杭州为例,其它Region请按实际情况填写。
        String endpoint = "oss-cn-shanghai.aliyuncs.com";
        // 云账号AccessKey有所有API访问权限,建议遵循阿里云安全最佳实践,创建并使用RAM子账号进行API访问或日常运维,请登录 https://ram.console.aliyun.com 创建。
        String accessKeyId = "LTAI4G4W1RA4JXz2QhoDwHhi";
        String accessKeySecret = "R99lmDOJumF2x43ZBKT259Qpe70Oxw";

        // 创建OSSClient实例。
        OSS ossClient = new OSSClientBuilder().build(endpoint, accessKeyId, accessKeySecret);

        // 上传文件流。
        InputStream inputStream = new FileInputStream("C:\\Users\\Administrator\\Pictures\\timg.jpg");
        ossClient.putObject("gulimall-images", "time.jpg", inputStream);

        // 关闭OSSClient。
        ossClient.shutdown();
        System.out.println("上传成功.");
    }
更为简单的使用方式,是使用SpringCloud Alibaba

详细使用方法,见: https://help.aliyun.com/knowledge_detail/108650.html
(1)添加依赖
        <dependency>
            <groupId>com.alibaba.cloud</groupId>
            <artifactId>spring-cloud-starter-alicloud-oss</artifactId>
            <version>2.2.0.RELEASE</version>
        </dependency>
(2)创建“AccessKey ID”和“AccessKeySecret”
(3)配置key,secret和endpoint相关信息
      access-key: LTAI4G4W1RA4JXz2QhoDwHhi
      secret-key: R99lmDOJumF2x43ZBKT259Qpe70Oxw
      oss:
        endpoint: oss-cn-shanghai.aliyuncs.com
(4)注入OSSClient并进行文件上传下载等操作

但是这样来做还是比较麻烦,如果以后的上传任务都交给gulimall-product来完成,显然耦合度高。最好单独新建一个Module来完成文件上传任务。
        <dependency>
            <groupId>com.alibaba.cloud</groupId>
            <artifactId>spring-cloud-starter-alicloud-oss</artifactId>
            <version>2.2.0.RELEASE</version>
        </dependency>

        <dependency>
            <groupId>com.bigdata.gulimall</groupId>
            <artifactId>gulimall-common</artifactId>
            <version>1.0-SNAPSHOT</version>
            <exclusions>
                <exclusion>
                    <groupId>com.baomidou</groupId>
                    <artifactId>mybatis-plus-boot-starter</artifactId>
                </exclusion>
            </exclusions>
        </dependency>
另外也需要在“pom.xml”文件中,添加如下的依赖管理
<dependencyManagement>

        <dependencies>
            <dependency>
                <groupId>org.springframework.cloud</groupId>
                <artifactId>spring-cloud-dependencies</artifactId>
                <version>${spring-cloud.version}</version>
                <type>pom</type>
                <scope>import</scope>
            </dependency>
            <dependency>
                <groupId>com.alibaba.cloud</groupId>
                <artifactId>spring-cloud-alibaba-dependencies</artifactId>
                <version>2.2.1.RELEASE</version>
                <type>pom</type>
                <scope>import</scope>
            </dependency>
        </dependencies>
</dependencyManagement>@EnableDiscoveryClient(1)创建命名空间“ gulimall-third-party ”

(2)在“ gulimall-third-party”命名空间中,创建“ gulimall-third-party.yml”文件
spring:
  cloud:
    alicloud:
      access-key: LTAI4G4W1RA4JXz2QhoDwHhi
      secret-key: R99lmDOJumF2x43ZBKT259Qpe70Oxw
      oss:
endpoint: oss-cn-shanghai.aliyuncs.comapplication.yml
server:
  port: 30000

spring:
  application:
    name: gulimall-third-party
  cloud:
    nacos:
      discovery:
        server-addr: 192.168.137.14:8848

logging:
  level:
    io.niceseason.gulimall.product: debug
bootstrap.properties
spring.cloud.nacos.config.name=gulimall-third-party
spring.cloud.nacos.config.server-addr=192.168.137.14:8848
spring.cloud.nacos.config.namespace=f995d8ee-c53a-4d29-8316-a1ef54775e00
spring.cloud.nacos.config.extension-configs[0].data-id=gulimall-third-party.yml
spring.cloud.nacos.config.extension-configs[0].group=DEFAULT_GROUP
spring.cloud.nacos.config.extension-configs[0].refresh=truepackage io.niceseason.gulimall.thirdparty;
import com.aliyun.oss.OSS;
import com.aliyun.oss.OSSClient;
import com.aliyun.oss.OSSClientBuilder;
import org.junit.jupiter.api.Test;
import org.springframework.beans.factory.annotation.Autowired;
import org.springframework.boot.test.context.SpringBootTest;
import java.io.FileInputStream;
import java.io.FileNotFoundException;
import java.io.InputStream;
@SpringBootTest
class GulimallThirdPartyApplicationTests {
@Autowired
OSSClient ossClient;
@Test
public void testUpload() throws FileNotFoundException {
// Endpoint以杭州为例,其它Region请按实际情况填写。
String endpoint = "oss-cn-shanghai.aliyuncs.com";
// 云账号AccessKey有所有API访问权限,建议遵循阿里云安全最佳实践,创建并使用RAM子账号进行API访问或日常运维,请登录 https://ram.console.aliyun.com 创建。
String accessKeyId = "LTAI4G4W1RA4JXz2QhoDwHhi";
String accessKeySecret = "R99lmDOJumF2x43ZBKT259Qpe70Oxw";
// 创建OSSClient实例。
OSS ossClient = new OSSClientBuilder().build(endpoint, accessKeyId, accessKeySecret);
//上传文件流。
InputStream inputStream = new FileInputStream("C:\\Users\\Administrator\\Pictures\\timg.jpg");
ossClient.putObject("gulimall-images", "time3.jpg", inputStream);
// 关闭OSSClient。
ossClient.shutdown();
System.out.println("上传成功.");
}
}https://help.aliyun.com/document_detail/31926.html?spm=a2c4g.11186623.6.1527.228d74b8V6IZuT
背景
采用JavaScript客户端直接签名(参见JavaScript客户端签名直传)时,AccessKeyID和AcessKeySecret会暴露在前端页面,因此存在严重的安全隐患。因此,OSS提供了服务端签名后直传的方案。
原理介绍
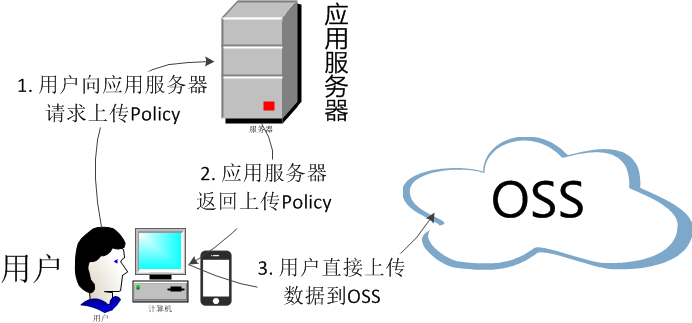
服务端签名后直传的原理如下:
- 用户发送上传Policy请求到应用服务器。
- 应用服务器返回上传Policy和签名给用户。
- 用户直接上传数据到OSS。
编写“io.niceseason.gulimall.thirdparty.controller.OssController”类:
package io.niceseason.gulimall.thirdparty.controller;

import com.aliyun.oss.OSS;
import com.aliyun.oss.common.utils.BinaryUtil;
import com.aliyun.oss.model.MatchMode;
import com.aliyun.oss.model.PolicyConditions;
import org.springframework.beans.factory.annotation.Autowired;
import org.springframework.beans.factory.annotation.Value;
import org.springframework.web.bind.annotation.RequestMapping;
import org.springframework.web.bind.annotation.RestController;

import java.text.SimpleDateFormat;
import java.util.Date;
import java.util.LinkedHashMap;
import java.util.Map;

@RestController
public class OssController {

    @Autowired
    OSS ossClient;
    @Value ("${spring.cloud.alicloud.oss.endpoint}")
    String endpoint ;

    @Value("${spring.cloud.alicloud.oss.bucket}")
    String bucket ;

    @Value("${spring.cloud.alicloud.access-key}")
    String accessId ;
    @Value("${spring.cloud.alicloud.secret-key}")
    String accessKey ;
    @RequestMapping("/oss/policy")
    public Map<String, String> policy(){

        String host = "https://" + bucket + "." + endpoint; // host的格式为 bucketname.endpoint

        String format = new SimpleDateFormat("yyyy-MM-dd").format(new Date());
        String dir = format; // 用户上传文件时指定的前缀。

        Map<String, String> respMap=null;
        try {
            long expireTime = 30;
            long expireEndTime = System.currentTimeMillis() + expireTime * 1000;
            Date expiration = new Date(expireEndTime);
            PolicyConditions policyConds = new PolicyConditions();
            policyConds.addConditionItem(PolicyConditions.COND_CONTENT_LENGTH_RANGE, 0, 1048576000);
            policyConds.addConditionItem(MatchMode.StartWith, PolicyConditions.COND_KEY, dir);

            String postPolicy = ossClient.generatePostPolicy(expiration, policyConds);
            byte[] binaryData = postPolicy.getBytes("utf-8");
            String encodedPolicy = BinaryUtil.toBase64String(binaryData);
            String postSignature = ossClient.calculatePostSignature(postPolicy);

            respMap= new LinkedHashMap<String, String>();
            respMap.put("accessid", accessId);
            respMap.put("policy", encodedPolicy);
            respMap.put("signature", postSignature);
            respMap.put("dir", dir);
            respMap.put("host", host);
            respMap.put("expire", String.valueOf(expireEndTime / 1000));

        } catch (Exception e) {
            // Assert.fail(e.getMessage());
            System.out.println(e.getMessage());
        } finally {
            ossClient.shutdown();
        }
        return respMap;
    }
}
测试: http://localhost:30000/oss/policy
{"accessid":"LTAI4G4W1RA4JXz2QhoDwHhi","policy":"eyJleHBpcmF0aW9uIjoiMjAyMC0wNC0yOVQwMjo1ODowNy41NzhaIiwiY29uZGl0aW9ucyI6W1siY29udGVudC1sZW5ndGgtcmFuZ2UiLDAsMTA0ODU3NjAwMF0sWyJzdGFydHMtd2l0aCIsIiRrZXkiLCIyMDIwLTA0LTI5LyJdXX0=","signature":"s42iRxtxGFmHyG40StM3d9vOfFk=","dir":"2020-04-29/","host":"https://gulimall-images.oss-cn-shanghai.aliyuncs.com","expire":"1588129087"}
以后在上传文件时的访问路径为“ http://localhost:88/api/thirdparty/oss/policy”,
在“gulimall-gateway”中配置路由规则:
        - id: third_party_route
          uri: lb://gulimall-third-party
          predicates:
            - Path=/api/thirdparty/**
          filters:
            - RewritePath=/api/thirdparty/(?<segment>/?.*),/$\{segment}
测试是否能够正常跳转: http://localhost:88/api/thirdparty/oss/policy

放置项目提供的upload文件夹到components目录下,一个是单文件上传,另外一个是多文件上传
PS D:\Project\gulimall\renren-fast-vue\src\components\upload> ls


    目录: D:\Project\gulimall\renren-fast-vue\src\components\upload


Mode                LastWriteTime         Length Name
----                -------------         ------ ----
-a----  2020/4/29 星期三     12:0           3122 multiUpload.vue
                                2
-a----  2019/11/11 星期一     21:            343 policy.js
                               20
-a----  2020/4/29 星期三     12:0           3053 singleUpload.vue
                                1


PS D:\Project\gulimall\renren-fast-vue\src\components\upload>
修改这两个文件的配置后
开始执行上传,但是在上传过程中,出现了如下的问题:

Access to XMLHttpRequest at 'http://gulimall-images.oss-cn-shanghai.aliyuncs.com/' from origin 'http://localhost:8001' has been blocked by CORS policy: Response to preflight request doesn't pass access control check: No 'Access-Control-Allow-Origin' header is present on the requested resource.
这又是一个跨域的问题,解决方法就是在阿里云上开启跨域访问:

再次执行文件上传。
在Java中提供了一系列的校验方式,它这些校验方式在“javax.validation.constraints”包中,提供了如@Email,@NotNull等注解。
在非空处理方式上提供了@NotNull,@Blank和@
(1)@NotNull
The annotated element must not be null. Accepts any type. 注解元素禁止为null,能够接收任何类型
(2)@NotEmpty
the annotated element must not be null nor empty.
该注解修饰的字段不能为null或""
Supported types are:
支持以下几种类型
CharSequence (length of character sequence is evaluated)
字符序列(字符序列长度的计算)
Collection (collection size is evaluated) 集合长度的计算
Map (map size is evaluated) map长度的计算
Array (array length is evaluated) 数组长度的计算
(3)@NotBlank
The annotated element must not be null and must contain at least one non-whitespace character. Accepts CharSequence. 该注解不能为null,并且至少包含一个非空白字符。接收字符序列。
    @RequestMapping("/save")
    public R save(@Valid @RequestBody BrandEntity brand){
		brandService.save(brand);

        return R.ok();
    }
测试: http://localhost:88/api/product/brand/save
在postman种发送上面的请求
{
    "timestamp": "2020-04-29T09:20:46.383+0000",
    "status": 400,
    "error": "Bad Request",
    "errors": [
        {
            "codes": [
                "NotBlank.brandEntity.name",
                "NotBlank.name",
                "NotBlank.java.lang.String",
                "NotBlank"
            ],
            "arguments": [
                {
                    "codes": [
                        "brandEntity.name",
                        "name"
                    ],
                    "arguments": null,
                    "defaultMessage": "name",
                    "code": "name"
                }
            ],
            "defaultMessage": "不能为空",
            "objectName": "brandEntity",
            "field": "name",
            "rejectedValue": "",
            "bindingFailure": false,
            "code": "NotBlank"
        }
    ],
    "message": "Validation failed for object='brandEntity'. Error count: 1",
    "path": "/product/brand/save"
}
能够看到"defaultMessage": "不能为空",这些错误消息定义在“hibernate-validator”的“\org\hibernate\validator\ValidationMessages_zh_CN.properties”文件中。在该文件中定义了很多的错误规则:
javax.validation.constraints.AssertFalse.message     = 只能为false
javax.validation.constraints.AssertTrue.message      = 只能为true
javax.validation.constraints.DecimalMax.message      = 必须小于或等于{value}
javax.validation.constraints.DecimalMin.message      = 必须大于或等于{value}
javax.validation.constraints.Digits.message          = 数字的值超出了允许范围(只允许在{integer}位整数和{fraction}位小数范围内)
javax.validation.constraints.Email.message           = 不是一个合法的电子邮件地址
javax.validation.constraints.Future.message          = 需要是一个将来的时间
javax.validation.constraints.FutureOrPresent.message = 需要是一个将来或现在的时间
javax.validation.constraints.Max.message             = 最大不能超过{value}
javax.validation.constraints.Min.message             = 最小不能小于{value}
javax.validation.constraints.Negative.message        = 必须是负数
javax.validation.constraints.NegativeOrZero.message  = 必须是负数或零
javax.validation.constraints.NotBlank.message        = 不能为空
javax.validation.constraints.NotEmpty.message        = 不能为空
javax.validation.constraints.NotNull.message         = 不能为null
javax.validation.constraints.Null.message            = 必须为null
javax.validation.constraints.Past.message            = 需要是一个过去的时间
javax.validation.constraints.PastOrPresent.message   = 需要是一个过去或现在的时间
javax.validation.constraints.Pattern.message         = 需要匹配正则表达式"{regexp}"
javax.validation.constraints.Positive.message        = 必须是正数
javax.validation.constraints.PositiveOrZero.message  = 必须是正数或零
javax.validation.constraints.Size.message            = 个数必须在{min}和{max}之间

org.hibernate.validator.constraints.CreditCardNumber.message        = 不合法的信用卡号码
org.hibernate.validator.constraints.Currency.message                = 不合法的货币 (必须是{value}其中之一)
org.hibernate.validator.constraints.EAN.message                     = 不合法的{type}条形码
org.hibernate.validator.constraints.Email.message                   = 不是一个合法的电子邮件地址
org.hibernate.validator.constraints.Length.message                  = 长度需要在{min}和{max}之间
org.hibernate.validator.constraints.CodePointLength.message         = 长度需要在{min}和{max}之间
org.hibernate.validator.constraints.LuhnCheck.message               = ${validatedValue}的校验码不合法, Luhn模10校验和不匹配
org.hibernate.validator.constraints.Mod10Check.message              = ${validatedValue}的校验码不合法, 模10校验和不匹配
org.hibernate.validator.constraints.Mod11Check.message              = ${validatedValue}的校验码不合法, 模11校验和不匹配
org.hibernate.validator.constraints.ModCheck.message                = ${validatedValue}的校验码不合法, ${modType}校验和不匹配
org.hibernate.validator.constraints.NotBlank.message                = 不能为空
org.hibernate.validator.constraints.NotEmpty.message                = 不能为空
org.hibernate.validator.constraints.ParametersScriptAssert.message  = 执行脚本表达式"{script}"没有返回期望结果
org.hibernate.validator.constraints.Range.message                   = 需要在{min}和{max}之间
org.hibernate.validator.constraints.SafeHtml.message                = 可能有不安全的HTML内容
org.hibernate.validator.constraints.ScriptAssert.message            = 执行脚本表达式"{script}"没有返回期望结果
org.hibernate.validator.constraints.URL.message                     = 需要是一个合法的URL

org.hibernate.validator.constraints.time.DurationMax.message        = 必须小于${inclusive == true ? '或等于' : ''}${days == 0 ? '' : days += '天'}${hours == 0 ? '' : hours += '小时'}${minutes == 0 ? '' : minutes += '分钟'}${seconds == 0 ? '' : seconds += '秒'}${millis == 0 ? '' : millis += '毫秒'}${nanos == 0 ? '' : nanos += '纳秒'}
org.hibernate.validator.constraints.time.DurationMin.message        = 必须大于${inclusive == true ? '或等于' : ''}${days == 0 ? '' : days += '天'}${hours == 0 ? '' : hours += '小时'}${minutes == 0 ? '' : minutes += '分钟'}${seconds == 0 ? '' : seconds += '秒'}${millis == 0 ? '' : millis += '毫秒'}${nanos == 0 ? '' : nanos += '纳秒'}
想要自定义错误消息,可以覆盖默认的错误提示信息,如@NotBlank的默认message是
public @interface NotBlank {

	String message() default "{javax.validation.constraints.NotBlank.message}";
可以在添加注解的时候,修改message:
	@NotBlank(message = "品牌名必须非空")
	private String name;
当再次发送请求时,得到的错误提示信息:
{
    "timestamp": "2020-04-29T09:36:04.125+0000",
    "status": 400,
    "error": "Bad Request",
    "errors": [
        {
            "codes": [
                "NotBlank.brandEntity.name",
                "NotBlank.name",
                "NotBlank.java.lang.String",
                "NotBlank"
            ],
            "arguments": [
                {
                    "codes": [
                        "brandEntity.name",
                        "name"
                    ],
                    "arguments": null,
                    "defaultMessage": "name",
                    "code": "name"
                }
            ],
            "defaultMessage": "品牌名必须非空",
            "objectName": "brandEntity",
            "field": "name",
            "rejectedValue": "",
            "bindingFailure": false,
            "code": "NotBlank"
        }
    ],
    "message": "Validation failed for object='brandEntity'. Error count: 1",
    "path": "/product/brand/save"
}
但是这种返回的错误结果并不符合我们的业务需要。
 	@RequestMapping("/save")
    public R save(@Valid @RequestBody BrandEntity brand, BindingResult result){
        if( result.hasErrors()){
            Map<String,String> map=new HashMap<>();
            //1.获取错误的校验结果
            result.getFieldErrors().forEach((item)->{
                //获取发生错误时的message
                String message = item.getDefaultMessage();
                //获取发生错误的字段
                String field = item.getField();
                map.put(field,message);
            });
            return R.error(400,"提交的数据不合法").put("data",map);
        }else {

        }
		brandService.save(brand);

        return R.ok();
    }
这种是针对于该请求设置了一个内容校验,如果针对于每个请求都单独进行配置,显然不是太合适,实际上可以统一的对于异常进行处理。
可以使用SpringMvc所提供的@ControllerAdvice,通过“basePackages”能够说明处理哪些路径下的异常。
(1)抽取一个异常处理类
package io.niceseason.gulimall.product.exception;

import io.niceseason.common.utils.R;
import lombok.extern.slf4j.Slf4j;
import org.springframework.validation.BindingResult;
import org.springframework.web.bind.MethodArgumentNotValidException;
import org.springframework.web.bind.annotation.ControllerAdvice;
import org.springframework.web.bind.annotation.ExceptionHandler;
import org.springframework.web.bind.annotation.ResponseBody;
import org.springframework.web.bind.annotation.RestControllerAdvice;

import java.util.HashMap;
import java.util.Map;

/**
 * 集中处理所有异常
 */
@Slf4j
@RestControllerAdvice(basePackages = "io.niceseason.gulimall.product.controller")
public class GulimallExceptionAdvice {


    @ExceptionHandler(value = Exception.class)
    public R handleValidException(MethodArgumentNotValidException exception){
        Map<String,String> map=new HashMap<>();
        BindingResult bindingResult = exception.getBindingResult();
        bindingResult.getFieldErrors().forEach(fieldError -> {
            String message = fieldError.getDefaultMessage();
            String field = fieldError.getField();
            map.put(field,message);
        });

        log.error("数据校验出现问题{},异常类型{}",exception.getMessage(),exception.getClass());
        return R.error(400,"数据校验出现问题").put("data",map);
    }

}
(2)测试: http://localhost:88/api/product/brand/save

(3)默认异常处理
   @ExceptionHandler(value = Throwable.class)
    public R handleException(Throwable throwable){
        log.error("未知异常{},异常类型{}",throwable.getMessage(),throwable.getClass());
        return R.error(BizCodeEnum.UNKNOW_EXEPTION.getCode(),BizCodeEnum.UNKNOW_EXEPTION.getMsg());
    }
(4)错误状态码
上面代码中,针对于错误状态码,是我们进行随意定义的,然而正规开发过程中,错误状态码有着严格的定义规则,如该在项目中我们的错误状态码定义

为了定义这些错误状态码,我们可以单独定义一个常量类,用来存储这些错误状态码
package io.niceseason.common.exception;

/***
 * 错误码和错误信息定义类
 * 1. 错误码定义规则为5为数字
 * 2. 前两位表示业务场景,最后三位表示错误码。例如:100001。10:通用 001:系统未知异常
 * 3. 维护错误码后需要维护错误描述,将他们定义为枚举形式
 * 错误码列表:
 *  10: 通用
 *      001:参数格式校验
 *  11: 商品
 *  12: 订单
 *  13: 购物车
 *  14: 物流
 */
public enum BizCodeEnum {

    UNKNOW_EXEPTION(10000,"系统未知异常"),

    VALID_EXCEPTION( 10001,"参数格式校验失败");

    private int code;
    private String msg;

    BizCodeEnum(int code, String msg) {
        this.code = code;
        this.msg = msg;
    }

    public int getCode() {
        return code;
    }

    public String getMsg() {
        return msg;
    }
}
(5)测试: http://localhost:88/api/product/brand/save

如:指定在更新和添加的时候,都需要进行校验
	@NotEmpty
	@NotBlank(message = "品牌名必须非空",groups = {UpdateGroup.class,AddGroup.class})
	private String name;
在这种情况下,没有指定分组的校验注解,默认是不起作用的。想要起作用就必须要加groups。
@Validated的value方法:
Specify one or more validation groups to apply to the validation step kicked off by this annotation. 指定一个或多个验证组以应用于此注释启动的验证步骤。
JSR-303 defines validation groups as custom annotations which an application declares for the sole purpose of using them as type-safe group arguments, as implemented in SpringValidatorAdapter.
JSR-303 将验证组定义为自定义注释,应用程序声明的唯一目的是将它们用作类型安全组参数,如 SpringValidatorAdapter 中实现的那样。
Other SmartValidator implementations may support class arguments in other ways as well.
其他SmartValidator 实现也可以以其他方式支持类参数。
@Documented
@Constraint(validatedBy = { ListValueConstraintValidator.class})
@Target({ METHOD, FIELD, ANNOTATION_TYPE, CONSTRUCTOR, PARAMETER, TYPE_USE })
@Retention(RUNTIME)
public @interface ListValue {
    String message() default "{io.niceseason.common.valid.ListValue.message}";

    Class<?>[] groups() default { };

    Class<? extends Payload>[] payload() default { };

    int[] value() default {};
}public class ListValueConstraintValidator implements ConstraintValidator<ListValue,Integer> {
private Set<Integer> set=new HashSet<>();
@Override
public void initialize(ListValue constraintAnnotation) {
int[] value = constraintAnnotation.value();
for (int i : value) {
set.add(i);
}
}
@Override
public boolean isValid(Integer value, ConstraintValidatorContext context) {
return set.contains(value);
}
}@Constraint(validatedBy = { ListValueConstraintValidator.class}) /**
* 显示状态[0-不显示;1-显示]
*/
@ListValue(value = {0,1},groups ={AddGroup.class})
private Integer showStatus;重新执行“sys_menus.sql”
现在想要实现点击菜单的左边,能够实现在右边展示数据

父子组件传递数据:
1)子组件给父组件传递数据,事件机制;
在category中绑定node-click事件,
<el-tree :data="menus" :props="defaultProps" node-key="catId" ref="menuTree" @node-click="nodeClick" ></el-tree>2)子组件给父组件发送一个事件,携带上数据;
    nodeClick(data,Node,component){
       console.log("子组件",data,Node,component);
       this.$emit("tree-node-click",data,Node,component);
    },
this.$emit(事件名,"携带的数据");
3)父组件中的获取发送的事件
<category @tree-node-click="treeNodeClick"></category> //获取发送的事件数据
treenodeclick(data, node, component) {
//只有点击三层分类时才进行查询
if (node.level == 3) {
this.catId = data.catId;
this.getDataList(); //重新查询
}
},
getDataList() {
this.dataListLoading = true;
this.$http({
url: this.$http.adornUrl(`/product/attrgroup/list/${this.catId}`),
method: "get",
params: this.$http.adornParams({
page: this.pageIndex,
limit: this.pageSize,
key: this.dataForm.key
})
}).then(({ data }) => {
if (data && data.code === 0) {
this.dataList = data.page.list;
this.totalPage = data.page.totalCount;
} else {
this.dataList = [];
this.totalPage = 0;
}
this.dataListLoading = false;
});
},4)分组新增&级联选择器

由于三级分类的children属性为[],因此显示效果如上,为了避免这种效果,我们可以为该字段添加注解 @JsonInclude(JsonInclude.Include.NON_EMPTY),表示当只有该字段不为空时才会返回该属性。
	@JsonInclude(JsonInclude.Include.NON_EMPTY)
	private List<CategoryEntity> children;
4)分组修改与回显
由于修改时所属分类不能正常回显,因为缺少完整的三级路径,因此我们在AttrGroupEntity中添加字段catelogPath,并使用递归查找
	@TableField(exist = false)
private Long[] catelogPath; @RequestMapping("/info/{attrGroupId}")
public R info(@PathVariable("attrGroupId") Long attrGroupId){
AttrGroupEntity attrGroup = attrGroupService.getById(attrGroupId);
Long[] catelogPath=categoryService.findCatelogPathById(attrGroup.getCatelogId());
attrGroup.setCatelogPath(catelogPath);
return R.ok().put("attrGroup", attrGroup);
}
//使用递归查找该路径
@Override
public Long[] findCatelogPathById(Long categorygId) {
List<Long> path = new LinkedList<>();
findPath(categorygId, path);
Collections.reverse(path);
Long[] objects = path.toArray(new Long[path.size()]);
return objects;
}
private void findPath(Long categorygId, List<Long> path) {
if (categorygId!=0){
path.add(categorygId);
CategoryEntity byId = getById(categorygId);
findPath(byId.getParentCid(),path);
}
}5)分页插件激活
springboot采取以下方式:
@EnableTransactionManagement
@Configuration
@MapperScan("com.baomidou.cloud.service.*.mapper*")
public class MybatisPlusConfig {

    @Bean
    public PaginationInterceptor paginationInterceptor() {
        PaginationInterceptor paginationInterceptor = new PaginationInterceptor();
        // 设置请求的页面大于最大页后操作, true调回到首页,false 继续请求  默认false
        // paginationInterceptor.setOverflow(false);
        // 设置最大单页限制数量,默认 500 条,-1 不受限制
        // paginationInterceptor.setLimit(500);
        // 开启 count 的 join 优化,只针对部分 left join
        paginationInterceptor.setCountSqlParser(new JsqlParserCountOptimize(true));
        return paginationInterceptor;
    }
}- 关联分类
点击关联分类要查出所有已经关联的所有数据

根据品牌id查出关联所有信息
 	@RequestMapping("catelog/list")
    public R cateloglist(@RequestParam Long brandId){
        QueryWrapper<CategoryBrandRelationEntity> queryWrapper = new QueryWrapper<>();
        queryWrapper.eq("brand_id", brandId);
        List<CategoryBrandRelationEntity> data = categoryBrandRelationService.list(queryWrapper);
        return R.ok().put("data", data);
    }
新增关联

保存对应分类
   @RequestMapping("/save")
    public R save(@RequestBody CategoryBrandRelationEntity categoryBrandRelation){
//		categoryBrandRelationService.save(categoryBrandRelation);
        categoryBrandRelationService.saveDetail(categoryBrandRelation);
        return R.ok();
    }


	//由于从表单中只能获取分类、品牌的id,因此需要从数据库将其name字段查出,并保存至关联表
   @Override
    public void saveDetail(CategoryBrandRelationEntity categoryBrandRelation) {
        Long brandId = categoryBrandRelation.getBrandId();
        Long catelogId = categoryBrandRelation.getCatelogId();
        BrandEntity brandEntity = brandDao.selectById(brandId);
        CategoryEntity categoryEntity = categoryDao.selectById(catelogId);
        categoryBrandRelation.setBrandName(brandEntity.getName());
        categoryBrandRelation.setCatelogName(categoryEntity.getName());
        this.save(categoryBrandRelation);
}规格参数新增时,请求的URL:Request URL:
http://localhost:88/api/product/attr/base/list/0?t=1588731762158&page=1&limit=10&key=
当有新增字段时,我们往往会在entity实体类中新建一个字段,并标注数据库中不存在该字段,然而这种方式并不规范

比较规范的做法是,新建一个vo文件夹,将每种不同的对象,按照它的功能进行了划分。在java中,涉及到了这几种类型

@Data
public class AttrVo extends AttrEntity {
    private Long attrGroupId;
}
并且由于查询时显示了所属分类名和所属分组名,并且在修改时要回显其三级分类,所以我们要为返回时的属性定制vo


@Data
public class AttrRespVo extends AttrVo {
    /**
     * 			"catelogName": "手机/数码/手机", //所属分类名字
     * 			"groupName": "主体", //所属分组名字
     */
    private String catelogName;
    private String groupName;

    private Long[] catelogPath;
}
通过" BeanUtils.copyProperties(attr,attrEntity);"能够实现在两个Bean之间拷贝数据,但是两个Bean的字段要相同
   @Override
    public void saveAttr(AttrVo attr) {
        AttrEntity attrEntity = new AttrEntity();
        BeanUtils.copyProperties(attr,attrEntity);
        this.save(attrEntity);
    }
问题:现在有两个查询,一个是查询部分,另外一个是查询全部,但是又必须这样来做吗?还是有必要的,但是可以在后台进行设计,两种查询是根据catId是否为零进行区分的。
查询
可以通过在添加路径变量{attrType}同时用一个方法查询销售属性和规格参数
 	@RequestMapping("/{attrType}/list/{catelogId}")
    public R infoCatelog(@RequestParam Map<String, Object> params,
                         @PathVariable("catelogId") long catelogId,
                         @PathVariable("attrType") String attrType) {
        PageUtils page = attrService.queryPage(params,catelogId,attrType);

        return R.ok().put("page", page);
    }

 @Transactional
    @Override
    public PageUtils queryPage(Map<String, Object> params, long catelogId,String attrType) {
        //根据attrType进行查询,1规格参数,2销售属性
        QueryWrapper<AttrEntity> attrEntityQueryWrapper = new QueryWrapper<AttrEntity>().eq("attr_type","base".equalsIgnoreCase(attrType)?1:0);
        //如果参数带有分类id,则按分类查询
        if (catelogId != 0) {
            attrEntityQueryWrapper.eq("catelog_id", catelogId);
        }
        String key = (String) params.get("key");
        //搜索的模糊查询
        if (!StringUtils.isEmpty(key)) {
            attrEntityQueryWrapper.and((wrapper) -> wrapper.eq("attr_id", key).or().like("attr_name", key));
        }
        IPage<AttrEntity> page = this.page(
                new Query<AttrEntity>().getPage(params),
                attrEntityQueryWrapper
        );
        List<AttrEntity> records = page.getRecords();
        List<AttrRespVo> collect = records.stream().map((entity) -> {
            AttrRespVo respVo = new AttrRespVo();
            BeanUtils.copyProperties(entity, respVo);
            //查询分类并设置分类名
            CategoryEntity categoryEntity = categoryDao.selectOne(new QueryWrapper<CategoryEntity>().eq("cat_id", entity.getCatelogId()));
            respVo.setCatelogName(categoryEntity.getName());
            //如果是查询规格参数才查询设置分组名
            if ("base".equalsIgnoreCase(attrType)) {
                //查询参数、分组关系
                AttrAttrgroupRelationEntity attrAttrgroupRelationEntity = attrAttrgroupRelationDao.selectOne(new QueryWrapper<AttrAttrgroupRelationEntity>().eq("attr_id", entity.getAttrId()));
                //如果分组id不为空。则查出分组名
                if (attrAttrgroupRelationEntity != null && attrAttrgroupRelationEntity.getAttrGroupId() != null) {
                    AttrGroupEntity attrGroupEntity = attrGroupDao.selectOne(new QueryWrapper<AttrGroupEntity>().eq("attr_group_id", attrAttrgroupRelationEntity.getAttrGroupId()));
                    //设置分组名
                    respVo.setGroupName(attrGroupEntity.getAttrGroupName());
                }
            }
            return respVo;
        }).collect(Collectors.toList());
        PageUtils pageUtils = new PageUtils(page);
        pageUtils.setList(collect);
        return pageUtils;
    }
保存
使用AttrVo封装属性,如果AttrGroupId非空,则为规则参数,需要更新属性-分组表
  @RequestMapping("/save")
    public R save(@RequestBody AttrVo attr){
		attrService.saveAttr(attr);

        return R.ok();
    }

	@Transactional
    @Override
    public void saveAttr(AttrVo attr) {
        AttrEntity attrEntity = new AttrEntity();
        BeanUtils.copyProperties(attr,attrEntity);
        this.save(attrEntity);
        //如果分组id不为空,说明是规格参数而不是销售属性,则对属性-分组表进行更新
        if (attr.getAttrGroupId() != null) {
            AttrAttrgroupRelationEntity attrAttrgroupRelationEntity = new AttrAttrgroupRelationEntity();
            attrAttrgroupRelationEntity.setAttrGroupId(attr.getAttrGroupId());
            attrAttrgroupRelationEntity.setAttrId(attrEntity.getAttrId());
            attrAttrgroupRelationDao.insert(attrAttrgroupRelationEntity);
        }
    }
修改
   	@RequestMapping("/update")
    public R update(@RequestBody AttrVo attr){
//		attrService.updateById(attr);
        attrService.updateAttr(attr);
        return R.ok();
    }

	  @Override
    public void updateAttr(AttrVo attr) {
        AttrEntity entity = new AttrEntity();
        BeanUtils.copyProperties(attr,entity);
        this.baseMapper.updateById(entity);
        //只有当属性分组不为空时,说明更新的是规则参数,则需要更新关联表
        if (attr.getAttrGroupId() != null) {
            //查询属性-分组名对应关系
            AttrAttrgroupRelationEntity attrAttrgroupRelationEntity = new AttrAttrgroupRelationEntity();
            attrAttrgroupRelationEntity.setAttrId(attr.getAttrId());
            attrAttrgroupRelationEntity.setAttrGroupId(attr.getAttrGroupId());
            Integer c = attrAttrgroupRelationDao.selectCount(new QueryWrapper<AttrAttrgroupRelationEntity>().eq("attr_id", attrAttrgroupRelationEntity.getAttrId()));
            //在关联表中已有该属性分组数据时进行更新,否则插入新数据
            if (c>0){
                attrAttrgroupRelationDao.update(attrAttrgroupRelationEntity, new UpdateWrapper<AttrAttrgroupRelationEntity>().eq("attr_id", attr.getAttrId()));
            }else {
                attrAttrgroupRelationDao.insert(attrAttrgroupRelationEntity);
            }
        }
    }
    }
修改回显时查询数据
@RequestMapping("/info/{attrId}")
    public R info(@PathVariable("attrId") Long attrId){
        AttrRespVo respVo=attrService.getAttrInfo(attrId);
        return R.ok().put("attr", respVo);
    }

 @Transactional
    @Override
    public AttrRespVo getAttrInfo(Long attrId) {
        AttrEntity attrEntity = this.baseMapper.selectById(attrId);
        AttrRespVo respVo = new AttrRespVo();
        BeanUtils.copyProperties(attrEntity,respVo);
        //查询并设置分组名
        AttrAttrgroupRelationEntity attrAttrgroupRelationEntity = attrAttrgroupRelationDao.selectOne(new QueryWrapper<AttrAttrgroupRelationEntity>().eq("attr_id", attrEntity.getAttrId()));
        //如果分组id不为空。则查出分组名
        if (attrAttrgroupRelationEntity != null && attrAttrgroupRelationEntity.getAttrGroupId() != null) {
            AttrGroupEntity attrGroupEntity = attrGroupDao.selectOne(new QueryWrapper<AttrGroupEntity>().eq("attr_group_id", attrAttrgroupRelationEntity.getAttrGroupId()));
            //设置分组名
            respVo.setGroupName(attrGroupEntity.getAttrGroupName());
            respVo.setAttrGroupId(attrGroupEntity.getAttrGroupId());
        }
        //查询到分类信息
        CategoryEntity categoryEntity = categoryDao.selectOne(new QueryWrapper<CategoryEntity>().eq("cat_id", attrEntity.getCatelogId()));
        //设置分类名
        respVo.setCatelogName(categoryEntity.getName());
        //查询并设置分类路径
        Long[] catelogPathById = categoryService.findCatelogPathById(categoryEntity.getCatId());
        respVo.setCatelogPath(catelogPathById);
        return respVo;
}获取属性分组的关联的所有属性
API:https://easydoc.xyz/doc/75716633/ZUqEdvA4/LnjzZHPj
发送请求:/product/attrgroup/{attrgroupId}/attr/relation
获取当前属性分组所关联的属性

如何查找:既然给出了attr_group_id,那么到中间表中查询出来所关联的attr_id,然后得到最终的所有属性即可。
可能出现null值的问题
/product/attrgroup/{attrgroupId}/noattr/relation
API:https://easydoc.xyz/doc/75716633/ZUqEdvA4/d3EezLdO
获取属性分组里面还没有关联的本分类里面的其他基本属性,方便添加新的关联
Request URL: http://localhost:88/api/product/attrgroup/1/noattr/relation?t=1588780783441&page=1&limit=10&key=

属性分组,对应于“pms_attr_group”表,每个分组下,需要查看到关联了哪些属性信息,销售属性不需要和分组进行关联,但是规格参数要和属性分组进行关联。
规格参数:对应于pms_attr表,attr_type=1,需要显示分组信息
销售属性:对应于pms_attr`表,attr_type=0,不需要显示分组信息
分组ID为9的分组:Request URL: http://localhost:88/api/product/attrgroup/9/noattr/relation?t=1588822258669&page=1&limit=10&key=
对应的数据库字段
attr_group_id attr_group_name sort descript icon catelog_id
        9  主体                    1  型号 平台                   wu               454
       10  显卡                    1  显存容量                    wu               454
       11  输入设备                  1  鼠标 键盘                   wu               454
       12  主板                    1  显卡类型 芯片组                wu               454
       13  规格                    1  尺寸                      wu               454
查询attrgroupId=9的属性分组:
AttrGroupEntity attrGroupEntity = attrGroupDao.selectById(attrgroupId);获取到分类信息:
Long catelogId = attrGroupEntity.getCatelogId();
目标:获取属性分组没有关联的其他属性
也就是获取attrgroupId=9的属性分组中,关联的分类catelog_id =454 (台式机),其他基本属性
在该属性分组中,现在已经关联的属性:

本分类下,存在哪些基本属性?
没有关联的其他属性
已经关联的属性,这些属性是如何关联上的?
答:在创建规格参数的时候,已经设置了需要关联哪些属性分组。
想要知道还没有关联哪些,先查看关联了哪些,如何排除掉这些就是未关联的
在中间表中显示了属性和属性分组之间的关联关系,在属性表中显示了所有的属性,
先查询中间表,得到所有已经关联的属性的id,然后再次查询属性表,排除掉已经建立关联的属性ID,将剩下的属性ID和属性建立起关联关系
请求类型:Request URL: http://localhost:88/api/product/attrgroup/attr/relation
请求方式:POST
请求数据:[{"attrId":10,"attrGroupId":9}]
API:https://easydoc.xyz/doc/75716633/ZUqEdvA4/VhgnaedC
响应数据:
{
	"msg": "success",
	"code": 0
}
本质就是在中间表pms_attr_attrgroup_relation中,添加一条记录的过程
获取所有会员等级:/member/memberlevel/list
API:https://easydoc.xyz/doc/75716633/ZUqEdvA4/jCFganpf
在“gulimall-gateway”中修改“”文件,添加对于member的路由
        - id: gulimall-member
          uri: lb://gulimall-member
          predicates:
            - Path=/api/member/**
          filters:
            - RewritePath=/api/(?<segment>/?.*),/$\{segment}
在“gulimall-member”中,创建“bootstrap.properties”文件,内容如下:
spring.cloud.nacos.config.name=gulimall-member
spring.cloud.nacos.config.server-addr=192.168.137.14:8848
spring.cloud.nacos.config.namespace=795521fa-77ef-411e-a8d8-0889fdfe6964
spring.cloud.nacos.config.extension-configs[0].data-id=gulimall-member.yml
spring.cloud.nacos.config.extension-configs[0].group=DEFAULT_GROUP
spring.cloud.nacos.config.extension-configs[0].refresh=true获取分类关联的品牌:/product/categorybrandrelation/brands/list
API:https://easydoc.xyz/doc/75716633/ZUqEdvA4/HgVjlzWV
遇到PubSub问题
分类变化后请求没有被监听无法发送查询品牌信息的请求
- 首先安装pubsub-js
`npm install --save pubsub-js`
- 订阅方组件
import PubSub from 'pubsub-js'
Vue.prototype.PubSub = PubSub
获取分类下所有分组&关联属性
请求类型:/product/attrgroup/{catelogId}/withattr
请求方式:GET
请求URL:http://localhost:88/api/product/attrgroup/225/withattr?t=1588864569478
mysql默认的隔离级别为读已提交,为了能够在调试过程中,获取到数据库中的数据信息,可以调整隔离级别为读未提交:
SET SESSION TRANSACTION ISOLATION LEVEL READ UNCOMMITTED;但是它对于当前的事务窗口生效,如果想要设置全局的,需要加上global字段。
当新建时:
t: 1588983621569
status: 0
key:
brandId: 0
catelogId: 0
page: 1
limit: 10
当上架时:
t: 1588983754030
status: 1
key:
brandId: 0
catelogId: 0
page: 1
limit: 10
当下架时:
t: 1588983789089
status: 2
key:
brandId: 0
catelogId: 0
page: 1
limit: 10
在SPU中,写出的日期数据都不符合规则:

想要符合规则,可以设置写出数据的规则:
spring.jackson
  jackson:
    date-format: yyyy-MM-dd HH:mm:ss
SKU检索:
Request URL: http://localhost:88/api/product/skuinfo/list?t=1588989437944&page=1&limit=10&key=&catelogId=0&brandId=0&min=0&max=0
请求体:
t: 1588989437944
page: 1
limit: 10
key:
catelogId: 0
brandId: 0
min: 0
max: 0
API: https://easydoc.xyz/doc/75716633/ZUqEdvA4/ucirLq1D
库存信息表:wms_ware_info
【1】仓库列表功能:
【2】查询商品库存:
【3】查询采购需求:
【4】 合并采购需求:
合并整单选中parcharseID:Request URL: http://localhost:88/api/ware/purchase/merge
请求数据:
{purchaseId: 1, items: [1, 2]}
items: [1, 2]
合并整单未选择parcharseID :Request URL: http://localhost:88/api/ware/purchase/merge

items: [1, 2]
涉及到两张表:wms_purchase_detail,wms_purchase
现在采购单中填写数据,然后关联用户,关联用户后,
总的含义,就是根据采购单中的信息,更新采购需求,在采购单中填写采购人员,采购单号,采购的时候,更新采购细节表中的采购人员ID和采购状态。

领取采购单
http://localhost:88/api/ware/purchase/received
(1)某个人领取了采购单后,先看采购单是否处于未分配状态,只有采购单是新建或以领取状态时,才更新采购单的状态
(2)
【1】仓库列表功能: https://easydoc.xyz/doc/75716633/ZUqEdvA4/mZgdqOWe
【2】查询商品库存: https://easydoc.xyz/doc/75716633/ZUqEdvA4/hwXrEXBZ
【3】查询采购需求: https://easydoc.xyz/doc/75716633/ZUqEdvA4/Ss4zsV7R
【4】 合并采购需求:https://easydoc.xyz/doc/75716633/ZUqEdvA4/cUlv9QvK
【5】查询未领取的采购单: https://easydoc.xyz/doc/75716633/ZUqEdvA4/hI12DNrH
【6】领取采购单: https://easydoc.xyz/doc/75716633/ZUqEdvA4/vXMBBgw1
完成采购,在完成采购过程中,需要涉及到设置SKU的name信息到仓库中,这是通过远程调用“gulimall-product”来实现根据sku_id查询得到sku_name的,如果这个过程发生了异常,事务不想要回滚,目前采用的方式是通过捕获异常的方式,防止事务回滚,是否还有其他的方式呢?这个问题留待以后解决。
 @Override
    public void addStock(Long skuId, Long wareId, Integer skuNum) {

        List<WareSkuEntity> wareSkuEntities = wareSkuDao.selectList(new QueryWrapper<WareSkuEntity>().eq("sku_id", skuId).eq("ware_id", wareId));

        if(wareSkuEntities == null || wareSkuEntities.size() ==0 ){
             //新增
            WareSkuEntity wareSkuEntity = new WareSkuEntity();
            wareSkuEntity.setSkuId(skuId);
            wareSkuEntity.setWareId(wareId);
            wareSkuEntity.setStock(skuNum);
            wareSkuEntity.setStockLocked(0);

            //远程查询SKU的name,若失败无需回滚
            try {
                R info = productFeignService.info(skuId);
                if(info.getCode() == 0){
                    Map<String,Object> data=(Map<String,Object>)info.get("skuInfo");
                    wareSkuEntity.setSkuName((String) data.get("skuName"));
                }
            } catch (Exception e) {

            }

            wareSkuDao.insert(wareSkuEntity);
        }else{
            //插入
            wareSkuDao.addStock(skuId,wareId,skuNum);
        }

}在SPU管理页面,获取商品规格的时候,出现400异常,浏览器显示跳转不了
问题现象:

出现问题的代码:
    attrUpdateShow(row) {
      console.log(row);
      this.$router.push({
        path: "/product-attrupdate",
        query: { spuId: row.id, catalogId: row.catalogId }
      });
    },
暂时不知道如何解决问题。只能留待以后解决。
经过测试发现,问题和上面的代码没有关系,问题出现在“attrupdate.vue”上,该vue页面无法通过浏览器访问,当输入访问URL( http://localhost:8001/#/product-attrupdate )的时候,就会出现404,而其他的请求则不会出现这种情况,不知为何。
通过POSTMAN进行请求的时候,能够请求到数据。
经过分析发现,是因为在数据库中没有该页面的导航所导致的,为了修正这个问题,可以在“sys-menu”表中添加一行,内容位:

这样当再次访问的时候,在“平台属性”下,会出现“规格维护”菜单,

当再次点击“规格”的时候,显示出菜单

不过这种菜单并不符合我们的需要,我们需要让它以弹出框的形式出现。
API: https://easydoc.xyz/doc/75716633/ZUqEdvA4/GhnJ0L85
URL:/product/attr/update/{spuId}
调用方:
@FeignClient(value = "gulimall-coupon")
public interface CouponFenService {

    @PostMapping("/coupon/spubounds/save")
    R saveSpuBounds(@RequestBody SpuBoundTo spuBoundTo);

    @PostMapping("/coupon/skufullreduction/saveInfo")
    R saveSkuReduction(@RequestBody SkuReductionTo skuReductionTo);
}
被调用方:
    @PostMapping("/save")
    public R save(@RequestBody SpuBoundsEntity spuBounds){
		spuBoundsService.save(spuBounds);

        return R.ok();
    }

    @PostMapping("/saveInfo")
    public R saveInfo(@RequestBody SkuReductionTo skuReductionTo){
        skuFullReductionService.saveSkuReduction(skuReductionTo);
        return R.ok();
    }
调用方JSON化时的对象SpuBoundTo:
@Data
public class SpuBoundTo {
    private Long spuId;
    private BigDecimal buyBounds;
    private BigDecimal growBounds;
}
被调用方JSON数据对象化时的对象SpuBoundsEntity:
/**
 * 商品spu积分设置
 *
 * @author cosmoswong
 * @email cosmoswong@sina.com
 * @date 2020-04-23 23:38:48
 */
@Data
@TableName("sms_spu_bounds")
public class SpuBoundsEntity implements Serializable {
	private static final long serialVersionUID = 1L;

	/**
	 * id
	 */
	@TableId
	private Long id;
	/**
	 *
	 */
	private Long spuId;
	/**
	 * 成长积分
	 */
	private BigDecimal growBounds;
	/**
	 * 购物积分
	 */
	private BigDecimal buyBounds;
	/**
	 * 优惠生效情况[1111(四个状态位,从右到左);0 - 无优惠,成长积分是否赠送;1 - 无优惠,购物积分是否赠送;2 - 有优惠,成长积分是否赠送;3 - 有优惠,购物积分是否赠送【状态位0:不赠送,1:赠送】]
	 */
	private Integer work;

}存在Batch操作的时候,才需要加上事务,单个操作无需添加事务控制。
SpringBoot中的是事务
批量操作的时候,才需要事务
一个事务标注的方法上,方法内存在这些操作:
(1)批量更新一个表中字段
(2)更新多张表中的操作
实际上不论是哪种类型,方法中所有对于数据库的写操作,都会被整体当做一个事务,在这个事务过程中,如果某个操作出现了异常,则整体都不会被提交。这就是对于SpringBoot中的@Transactional的理解。
@EnableTransactionManagement和@Transactional的区别?
https://blog.csdn.net/abysscarry/article/details/80189232 https://blog.csdn.net/Driver_tu/article/details/99679145
https://www.cnblogs.com/leaveast/p/11765503.html
https://blog.csdn.net/ok_wolf/article/details/105400748
https://www.cnblogs.com/javalbb/p/12690862.html
https://blog.csdn.net/ok_wolf/article/details/105456170
https://easydoc.xyz/doc/75716633/ZUqEdvA4/jCFganpf

在Docker中设置开机启动容器

#查看防火墙状态
[root@hadoop-104 module]# systemctl status firewalld
  firewalld.service - firewalld - dynamic firewall daemon
   Loaded: loaded (/usr/lib/systemd/system/firewalld.service; enabled; vendor preset: enabled)
   Active: active (running) since Wed 2020-04-22 21:26:23 EDT; 10min ago
     Docs: man:firewalld(1)
 Main PID: 5947 (firewalld)
   CGroup: /system.slice/firewalld.service
           └─5947 /usr/bin/python -Es /usr/sbin/firewalld --nofork --nopid

Apr 22 21:26:20 hadoop-104 systemd[1]: Starting firewalld - dynamic firewall daemon...
Apr 22 21:26:23 hadoop-104 systemd[1]: Started firewalld - dynamic firewall daemon.
#查看防火墙是否是开机启动
[root@hadoop-104 module]# systemctl list-unit-files|grep firewalld
firewalld.service                             enabled
#关闭开机启动防火墙
[root@hadoop-104 module]# systemctl disable firewalld
Removed symlink /etc/systemd/system/multi-user.target.wants/firewalld.service.
Removed symlink /etc/systemd/system/dbus-org.fedoraproject.FirewallD1.service.
#停止防火墙
[root@hadoop-104 module]# systemctl stop firewalld
#再次查看防火墙
[root@hadoop-104 module]# systemctl list-unit-files|grep firewalld
firewalld.service                             disabled
[root@hadoop-104 module]# whereis mysql:查看mysql的安装位置

新建一个全局的代码片段,名字为vue,然后回车:

将下面的代码片段粘贴到“vue.code-snippets”
{
    // Place your 全局 snippets here. Each snippet is defined under a snippet name and has a scope, prefix, body and
    // description. Add comma separated ids of the languages where the snippet is applicable in the scope field. If scope
    // is left empty or omitted, the snippet gets applied to all languages. The prefix is what is
    // used to trigger the snippet and the body will be expanded and inserted. Possible variables are:
    // $1, $2 for tab stops, $0 for the final cursor position, and ${1:label}, ${2:another} for placeholders.
    // Placeholders with the same ids are connected.
    // Example:
    // "Print to console": {
    // 	"scope": "javascript,typescript",
    // 	"prefix": "log",
    // 	"body": [
    // 		"console.log('$1');",
    // 		"$2"
    // 	],
    // 	"description": "Log output to console"
    // }
    "生成vue模板": {
        "prefix": "vue",
        "body": [
            "<!-- $1 -->",
            "<template>",
            "<div class='$2'>$5</div>",
            "</template>",
            "",
            "<script>",
            "//这里可以导入其他文件(比如:组件,工具js,第三方插件js,json文件,图片文件等等)",
            "//例如:import 《组件名称》 from '《组件路径》';",
            "",
            "export default {",
            "//import引入的组件需要注入到对象中才能使用",
            "components: {},",
            "data() {",
            "//这里存放数据",
            "return {",
            "",
            "};",
            "},",
            "//监听属性 类似于data概念",
            "computed: {},",
            "//监控data中的数据变化",
            "watch: {},",
            "//方法集合",
            "methods: {",
            "",
            "},",
            "//生命周期 - 创建完成(可以访问当前this实例)",
            "created() {",
            "",
            "},",
            "//生命周期 - 挂载完成(可以访问DOM元素)",
            "mounted() {",
            "",
            "},",
            "beforeCreate() {}, //生命周期 - 创建之前",
            "beforeMount() {}, //生命周期 - 挂载之前",
            "beforeUpdate() {}, //生命周期 - 更新之前",
            "updated() {}, //生命周期 - 更新之后",
            "beforeDestroy() {}, //生命周期 - 销毁之前",
            "destroyed() {}, //生命周期 - 销毁完成",
            "activated() {}, //如果页面有keep-alive缓存功能,这个函数会触发",
            "}",
            "</script>",
            "<style lang='scss' scoped>",
            "//@import url($3); 引入公共css类",
            "$4",
            "</style>"
        ],
        "description": "生成VUE模板"
    },
    "http-get请求": {
        "prefix": "httpget",
        "body": [
            "this.\\$http({",
            "url: this.\\$http.adornUrl(''),",
            "method: 'get',",
            "params: this.\\$http.adornParams({})",
            "}).then(({ data }) => {",
            "})"
        ],
        "description": "httpGET请求"
    },
    "http-post请求": {
        "prefix": "httppost",
        "body": [
            "this.\\$http({",
            "url: this.\\$http.adornUrl(''),",
            "method: 'post',",
            "data: this.\\$http.adornData(data, false)",
            "}).then(({ data }) => { });"
        ],
        "description": "httpPOST请求"
    }
}
更多详细说明见: https://blog.csdn.net/z772330927/article/details/105730430/
ctrl+shift+f 全局搜索
alt+shift+f 格式化代码

在Marketplace中搜索“mybatisx”,安装后重启IDEA,使用时会自动在@Mapper标注的接口上,产生小图标,然后alt+enter,generate statement,就会自动的在xml文件中生成SQL。

DELETE FROM `pms_attr_attrgroup_relation` WHERE (attr_id= ? AND attr_group_id ) OR (attr_id= ? AND attr_group_id )java.lang.String @NotNull
public static String join(@NotNull CharSequence delimiter,
@NotNull Iterable<? extends CharSequence> elements)Returns a new String composed of copies of the CharSequence elements joined together with a copy of the specified delimiter.
返回一个由CharSequence元素的副本和指定分隔符的副本组成的新字符串。
For example,
 List<String> strings = new LinkedList<>();
 strings.add("Java");strings.add("is");
 strings.add("cool");
 String message = String.join(" ", strings);
 //message returned is: "Java is cool"

 Set<String> strings = new LinkedHashSet<>();
 strings.add("Java"); strings.add("is");
 strings.add("very"); strings.add("cool");
 String message = String.join("-", strings);
 //message returned is: "Java-is-very-cool"
Note that if an individual element is null, then "null" is added.
注意,如果单个元素为null,则添加“null”。
Params: delimiter – a sequence of characters that is used to separate each of the elements in the resulting String 用于分隔结果字符串中的每个元素的字符序列
elements – an Iterable that will have its elements joined together. 将其元素连接在一起的可迭代的。
Returns: a new String that is composed from the elements argument 由elements参数组成的新字符串
Throws: NullPointerException – If delimiter or elements is null
    public static String join(CharSequence delimiter,
            Iterable<? extends CharSequence> elements) {
        Objects.requireNonNull(delimiter);
        Objects.requireNonNull(elements);
        StringJoiner joiner = new StringJoiner(delimiter);
        for (CharSequence cs: elements) {
            joiner.add(cs);
        }
        return joiner.toString();
    }
能够看到实际上它就是通过创建StringJoiner,然后遍历elements,加入每个元素来完成的。
StringJoiner
java.util public final class StringJoiner
extends Object
StringJoiner is used to construct a sequence of characters separated by a delimiter and optionally starting with a supplied prefix and ending with a supplied suffix. tringJoiner用于构造由分隔符分隔的字符序列,可以选择以提供的前缀开始,以提供的后缀结束。
Prior to adding something to the StringJoiner, its sj.toString() method will, by default, return prefix + suffix. However, if the setEmptyValue method is called, the emptyValue supplied will be returned instead. This can be used, for example, when creating a string using set notation to indicate an empty set, i.e. "{}", where the prefix is "{", the suffix is "}" and nothing has been added to the StringJoiner. 在向StringJoiner添加内容之前,它的sj.toString()方法在默认情况下会返回前缀+后缀。但是,如果调用setEmptyValue方法,则返回所提供的emptyValue。例如,当使用set符号创建一个字符串来表示一个空集时,可以使用这种方法。“{}”,其中前缀是“{”,后缀是“}”,没有向StringJoiner添加任何内容。
apiNote: The String "[George:Sally:Fred]" may be constructed as follows:
 StringJoiner sj = new StringJoiner(":", "[", "]");
 sj.add("George").add("Sally").add("Fred");
 String desiredString = sj.toString();
A StringJoiner may be employed to create formatted output from a java.util.stream.Stream using java.util.stream.Collectors.joining(CharSequence). For example: 使用StringJoiner从java.util.stream创建格式化输出流,使用java.util.stream.Collectors.joining (CharSequence进行)。例如:
 List<Integer> numbers = Arrays.asList(1, 2, 3, 4);
 String commaSeparatedNumbers = numbers.stream()
     .map(i -> i.toString())
     .collect(Collectors.joining(", "));
通过分析源码发现,在“”内部维护了一个StringBuilder,所有加入到它内部的元素都会先拼接上分割符,然后再拼接上加入的元素
 public StringJoiner add(CharSequence newElement) {
        prepareBuilder().append(newElement);
        return this;
 }
private StringBuilder prepareBuilder() {
if (value != null) {
value.append(delimiter);
} else {
value = new StringBuilder().append(prefix);
}
return value;
}
以后再运行时,直接选择这个compound即可很方便的运行或停止一组微服务:

另外可以单独为每个微服务,设置需要的运行时最大堆内存大小:

MySQL中datetime和timestamp的区别及使用
TIMESTAMP和DATETIME的相同点:
1> 两者都可用来表示YYYY-MM-DD HH:MM:SS[.fraction]类型的日期。
TIMESTAMP和DATETIME的不同点:
1> 两者的存储方式不一样
对于TIMESTAMP,它把客户端插入的时间从当前时区转化为UTC(世界标准时间)进行存储。查询时,将其又转化为客户端当前时区进行返回。
而对于DATETIME,不做任何改变,基本上是原样输入和输出。
2> 两者所能存储的时间范围不一样
timestamp所能存储的时间范围为:'1970-01-01 00:00:01.000000' 到 '2038-01-19 03:14:07.999999'。
datetime所能存储的时间范围为:'1000-01-01 00:00:00.000000' 到 '9999-12-31 23:59:59.999999'。
总结:TIMESTAMP和DATETIME除了存储范围和存储方式不一样,没有太大区别。当然,对于跨时区的业务,TIMESTAMP更为合适。
https://www.cnblogs.com/Jashinck/p/10472398.html