If you find this repo useful, please consider citing us, appreciate it!
@article{le2022accurate,
  title={Accurate and Real-time 3D Pedestrian Detection Using an Efficient Attentive Pillar Network},
  author={Le, Duy Tho and Shi, Hengcan and Rezatofighi, Hamid and Cai, Jianfei},
  journal={IEEE Robotics and Automation Letters},
  year={2022},
  publisher={IEEE}
}This repository is based on SECOND project.
ONLY support python 3.6+, pytorch 1.0.0+. Tested in Ubuntu 16.04/18.04/20.04/22.04, Windows 10.
This repo is not optimal on nuScenes dataset, consider using Det3D
If you want to train nuScenes dataset, see this.
12/2022: The paper has been accepted for publication at IEEE Robotics and Automation Letters (RA-L)
02/2022: JRDB dataset supported
WARNING: you should rerun info generation after every code update.
PiFeNet/KITTI/xyres_16_submission.config + 150 epochs:
Benchmark	                Easy   Moderate	 Hard
Pedestrian (Detection)	        72.74%	62.35%	59.29%
Pedestrian (Orientation)	55.11%	46.59%	44.14%
Pedestrian (3D Detection)	56.39%	46.71%	42.71%
Pedestrian (Bird's Eye View)	63.25%	53.92%	50.53%
PiFeNet/jrdb22/xyres_16_largea_JRDB2022.config + 40 epochs:
JRDB 2019:
         AP@0.3      AP@0.5     AP@0.7
PiFeNet  74.284      42.617      4.886
JRDB 2022:
         AP@0.3      AP@0.5     AP@0.7
PiFeNet  70.724      39.838      4.59
git clone https://github.com/ldtho/PiFeNet.git --recursive
cd ./PiFeNet/secondIt is recommend to use Anaconda package manager.
Create environment:
conda create --name pifenet python=3.8.6 pytorch=1.7.1 cudatoolkit=11.0.221 cudatoolkit-dev cmake=3.18.2 cuda-nvcc cudnn boost -c pytorch -c conda-forge -c nvidia
conda activate pifenet
Install dependencies
conda install addict einops fire jupyterlab jupyter-packaging tensorboard libboost matplotlib numba numpy open3d addict scikit-image psutil boost einops scikit-learn fire jupyterlab tensorboardx libboost matplotlib numba numpy open3d pandas pillow protobuf scipy seaborn tqdm yaml -c pytorch -c conda-forge -c nvidia -c numba -c open3d-admin
pip install opencv-python
Follow instructions in spconv to install spconv or you can try:
git clone https://github.com/traveller59/spconv.git --recursive
cd spconv
git checkout fad3000249d27ca918f2655ff73c41f39b0f3127 && git submodule update --recursive
python setup.py bdist_wheel
cd dist && pip install .
Sample conda environment PiFeNet.yml is available for your reference.
If you want to train with fp16 mixed precision (train faster in RTX series, Titan V/RTX and Tesla V100, but I only have 1080Ti), you need to install apex.
export PYTHONPATH=$PYTHONPATH:/path/to/PiFeNet- KITTI Dataset preparation
Download KITTI dataset and create some directories first:
└── KITTI_DATASET_ROOT
       ├── training    <-- 7481 train data
       |   ├── image_2 <-- for visualization
       |   ├── calib
       |   ├── label_2
       |   ├── velodyne
       |   └── velodyne_reduced <-- empty directory
       └── testing     <-- 7580 test data
           ├── image_2 <-- for visualization
           ├── calib
           ├── velodyne
           └── velodyne_reduced <-- empty directory
Then run
python create_data.py kitti_data_prep --root_path=KITTI_DATASET_ROOT- JRDB Dataset preparation.
Download NuScenes dataset:
└── train_dataset_with_activity
       ├── calibration
       ├── images          <-- frames without annotation
       ├── detections      <-- sample test detection - unused
       └── pointclouds     <-- point cloud files
└── test_dataset_without_labels
       ├── calibration
       ├── images          <-- frames without annotation
       ├── detections      <-- sample train detection - unused
       ├── labels          <-- train set annotations
       └── pointclouds     <-- point cloud files
Then run
python create_data.py jrdb22_data_prep --root_path=JRDB_DATASET_ROOT- Modify config file
There is some path need to be configured in config file:
train_input_reader: {
  ...
  database_sampler {
    database_info_path: "/path/to/dataset_dbinfos_train.pkl"
    ...
  }
  dataset: {
    dataset_class_name: "DATASET_NAME"
    kitti_info_path: "/path/to/dataset_infos_train.pkl"
    kitti_root_path: "DATASET_ROOT"
  }
}
...
eval_input_reader: {
  ...
  dataset: {
    dataset_class_name: "DATASET_NAME"
    kitti_info_path: "/path/to/dataset_infos_val.pkl"
    kitti_root_path: "DATASET_ROOT"
  }
}KITTI:
python ./pytorch/train.py train --config_path=./configs/PiFeNet/KITTI/xyres_16_submission.config --model_dir=/your/save/dirJRDB:
python ./pytorch/train.py train --config_path=./configs/PiFeNet/jrdb/xyres_16_largea_JRDB2022.config --model_dir=/your/save/dirNote: add --resume=True if you want to continue training where you left off.
Assume you have 4 GPUs and want to train with 3 GPUs:
CUDA_VISIBLE_DEVICES=0,1,3 python ./pytorch/train.py train --config_path=./configs/PiFeNet/KITTI/xyres_16_submission.config --model_dir=/your/save/dir --multi_gpu=TrueNote: The batch_size and num_workers in config file is per-GPU, if you use multi-gpu, they will be multiplied by number of GPUs. Don't modify them manually.
You need to modify total step in config file. For example, 50 epochs = 15500 steps for car.lite.config and single GPU, if you use 4 GPUs, you need to divide steps and steps_per_eval by 4.
Modify config file, set enable_mixed_precision to true.
-
Make sure "/path/to/model_dir" doesn't exist if you want to train new model. A new directory will be created if the model_dir doesn't exist, otherwise will read checkpoints in it.
-
training process use batchsize=2 as default, you can increase or decrease depend on your GPU capability
python ./pytorch/train.py evaluate --config_path=./configs/PiFeNet/KITTI/xyres_16_submission.config --model_dir=/your/save/dir --measure_time=True --batch_size=1- detection result will saved as a result.pkl file in model_dir/eval_results/step_xxx or save as official KITTI label format if you use --pickle_result=False.
You can download pretrained models in google drive. The models' configs are the same as above
-
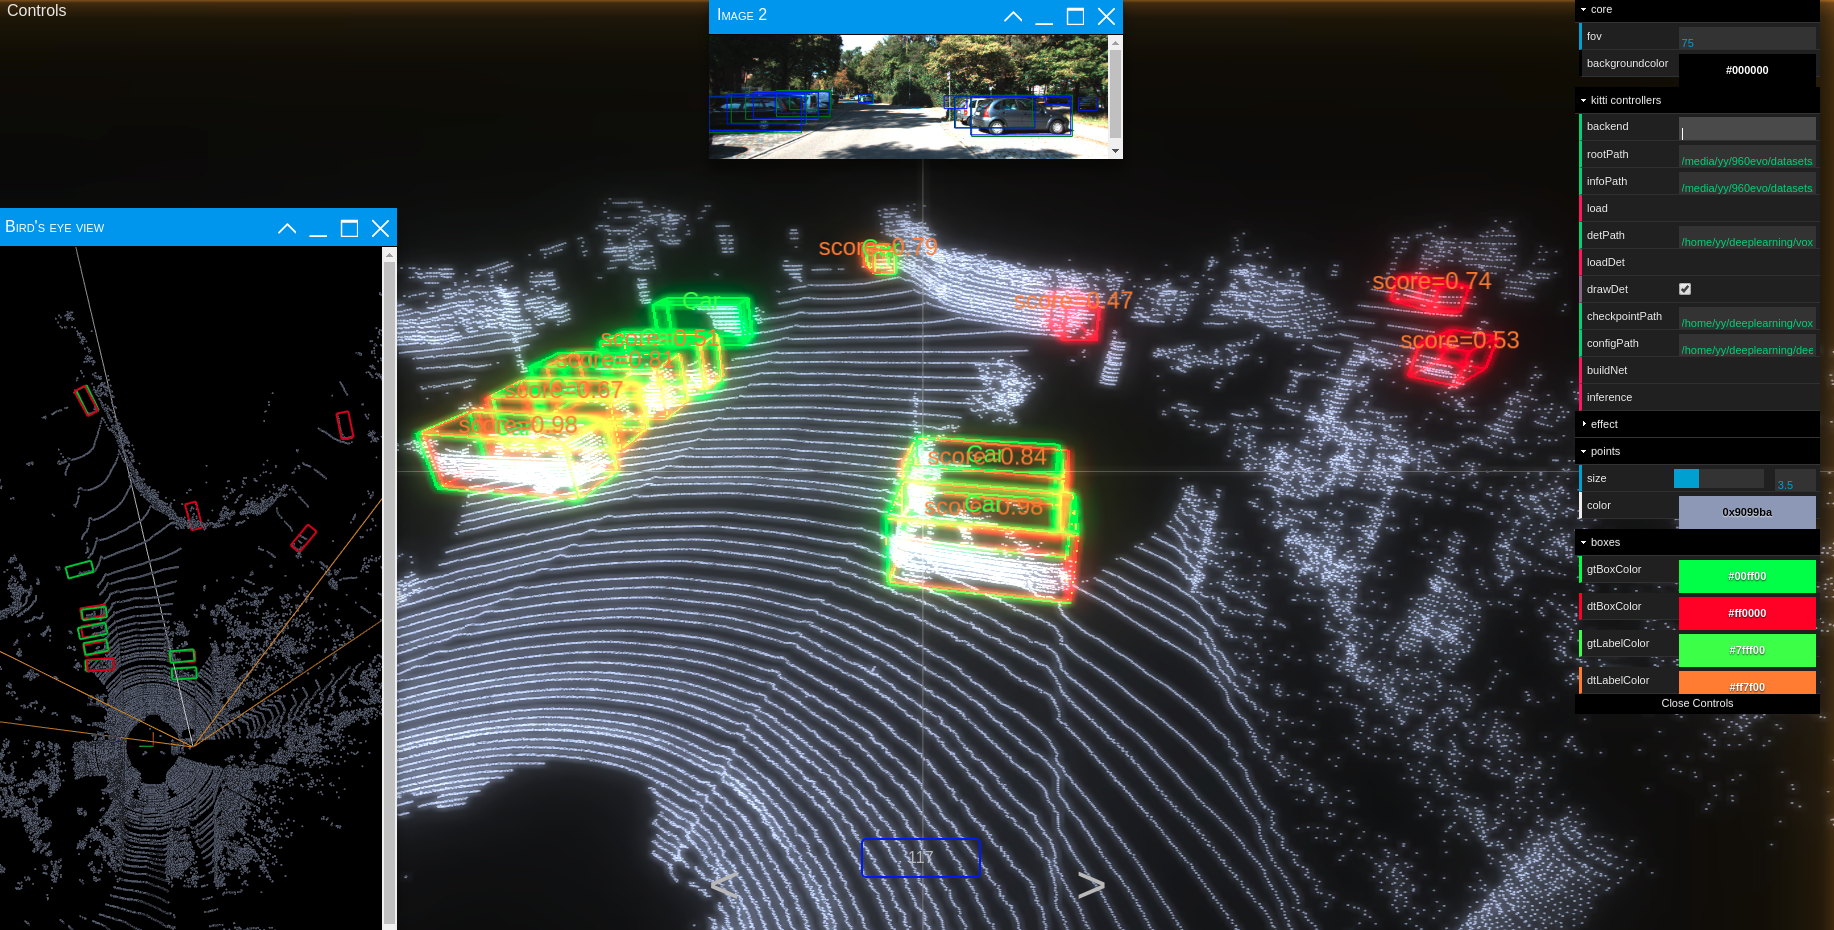
run
python ./kittiviewer/backend/main.py main --port=xxxxin your server/local. -
run
cd ./kittiviewer/frontend && python -m http.serverto launch a local web server. -
open your browser and enter your frontend url (e.g. http://127.0.0.1:8000, default]).
-
input backend url (e.g. http://127.0.0.1:16666)
-
input root path, info path and det path (optional)
-
click load, loadDet (optional), input image index in center bottom of screen and press Enter.
Firstly the load button must be clicked and load successfully.
-
input checkpointPath and configPath.
-
click buildNet.
-
click inference.
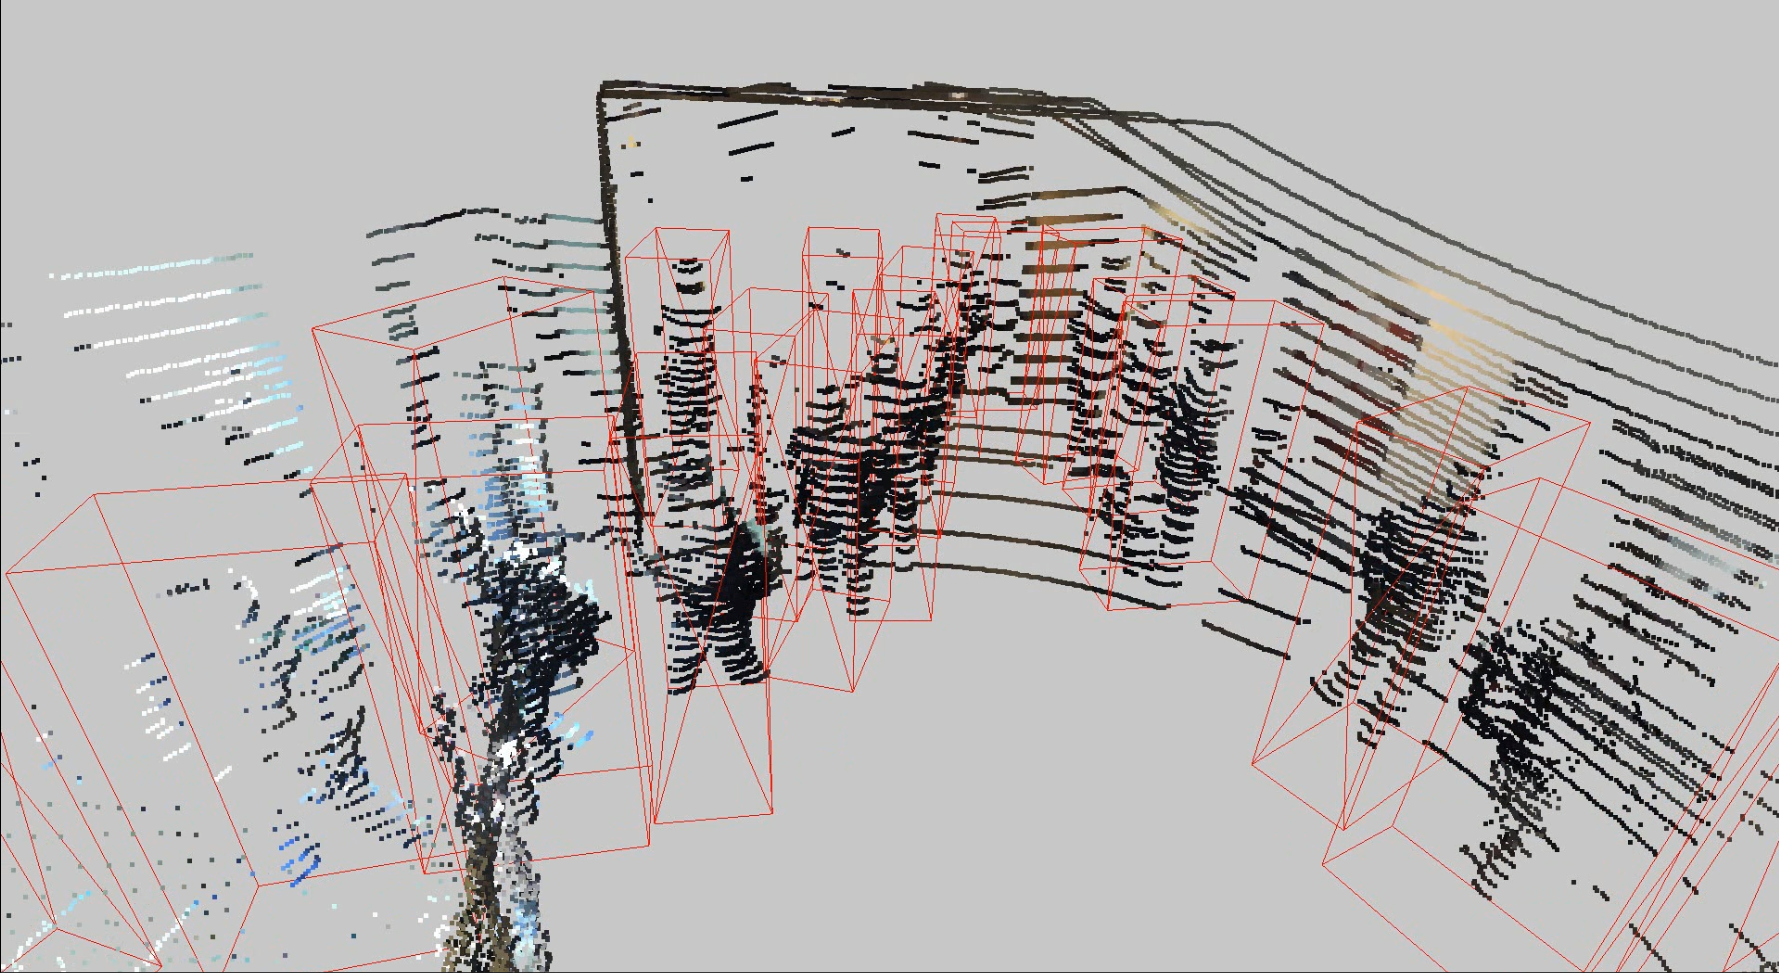
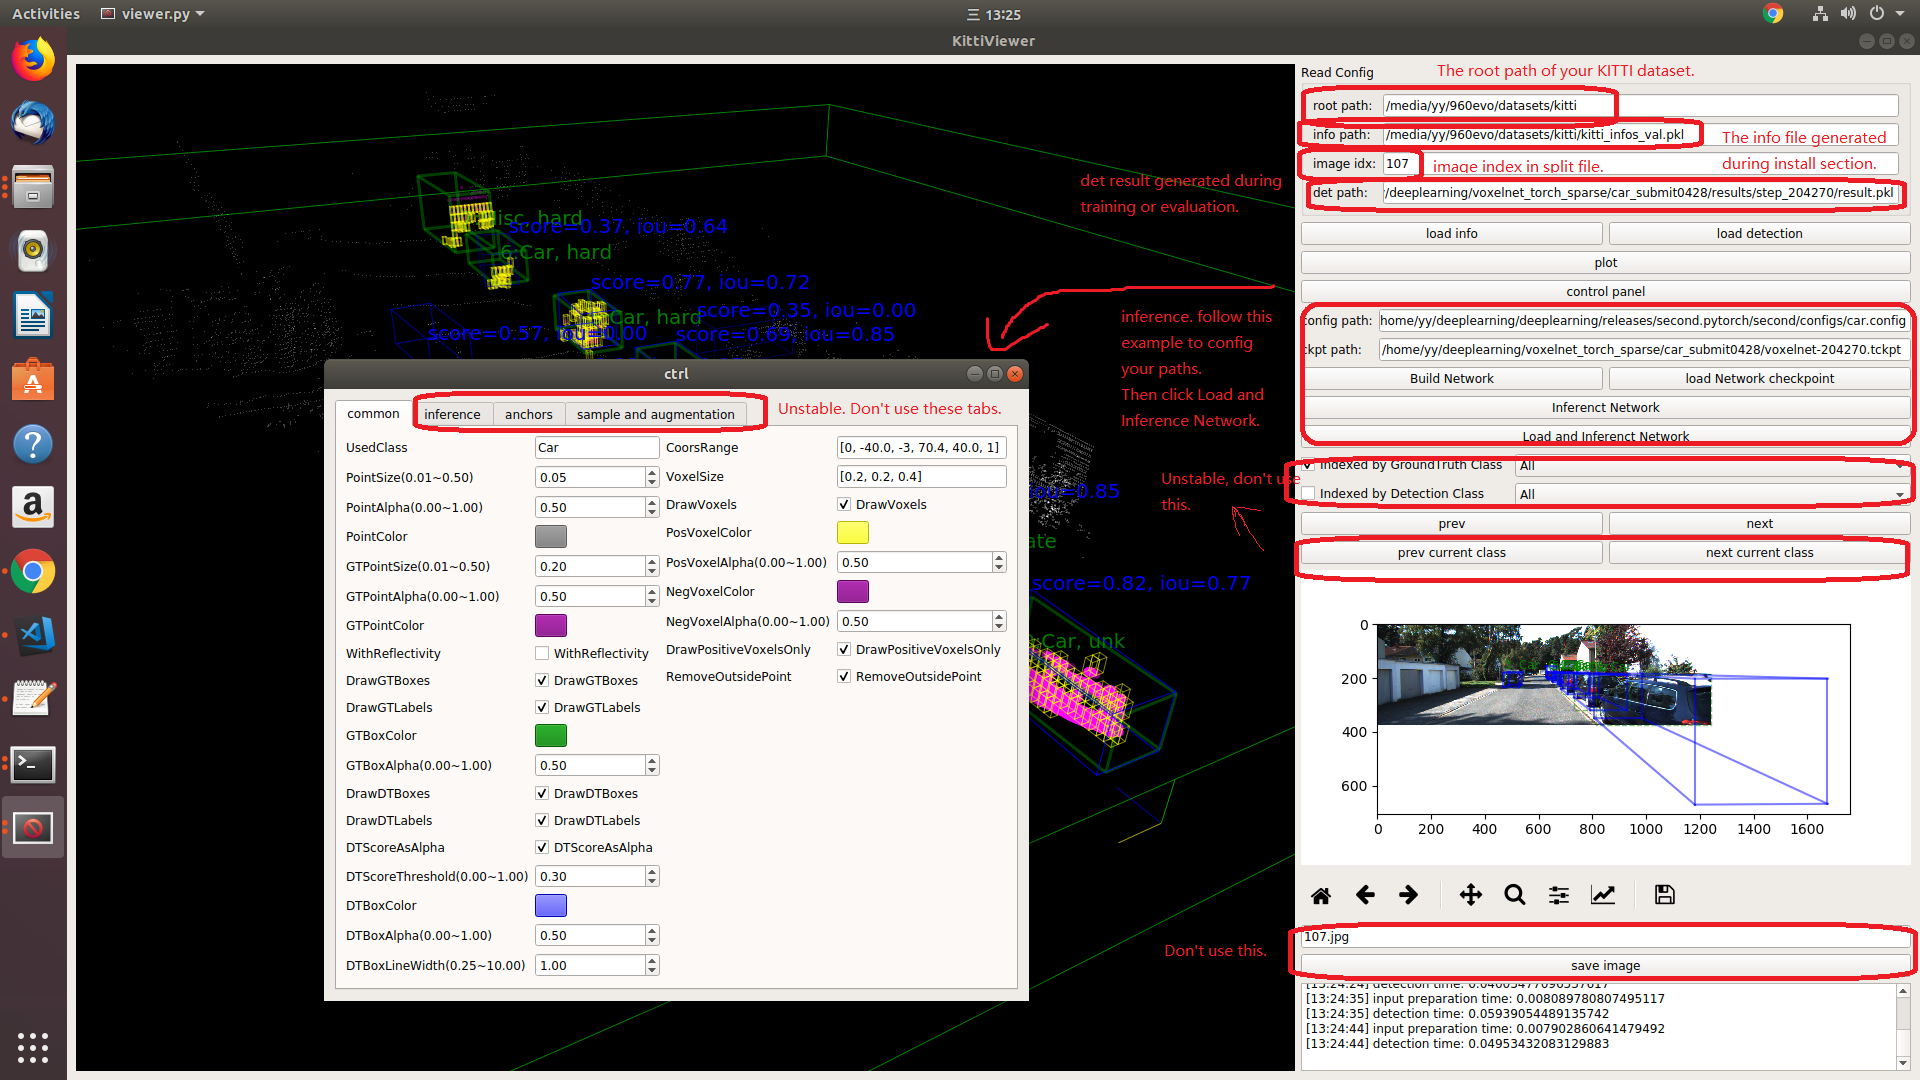
You should use kitti viewer based on pyqt and pyqtgraph to check data before training.
run python ./kittiviewer/viewer.py, check following picture to use kitti viewer:
First run the model, make predictions and convert is to KITTI-similar format
python ./pytorch/train.py evaluate --config_path=/path/to/config --model_dir=/pretrained_model/location --ckpt_path=/path/to/pretrained_model.tckptFollow the instructions in the JRDB visualisation toolkit
I also share the JRDB test set detections in KITTI format so that you can test the visualisation script.
2D:

3D: