@(WebDev)[webdev]
Document using languages: portuguese and english
Source: Introdução ao Kubernetes
Cluster é um conjunto de máquinas (Nodes). Cada máquina possui uma quantidade de vCPU e memória.
- Pods: unidade que contém os containers provisionados
- O Pod representa os processos rodando no cluster
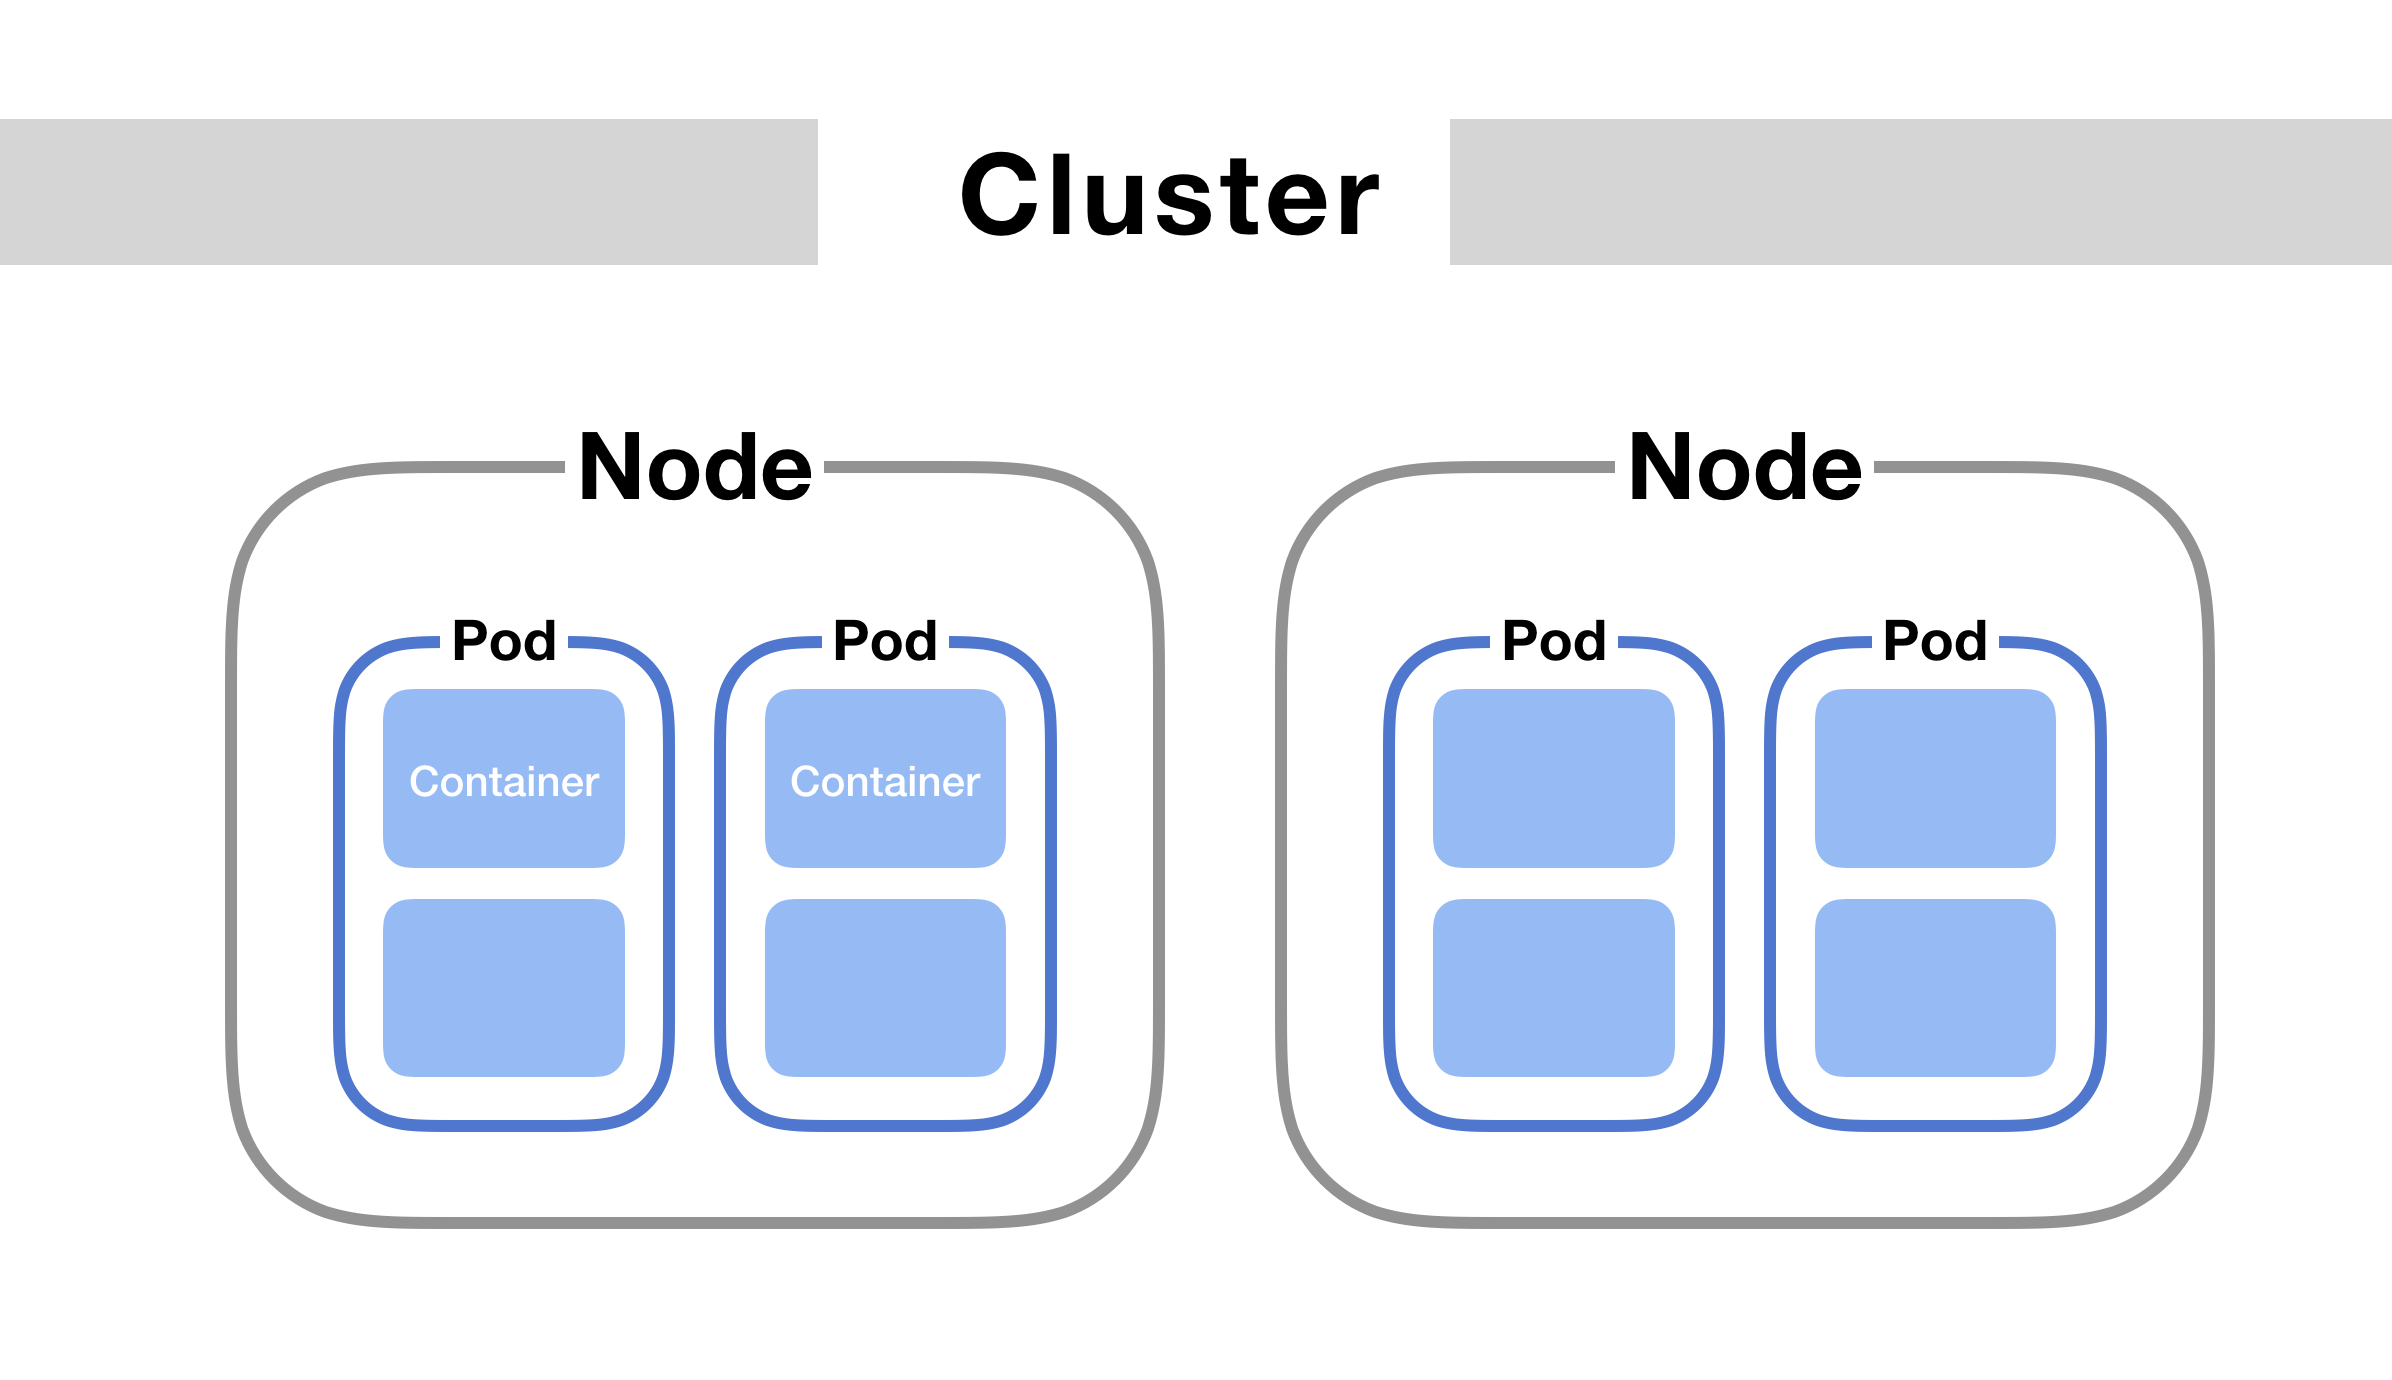
É uma forma de agregar um conjunto de pods para então implementar políticas de visibilidade.


minikube start
- or according the article Minikube on Windows 10 with Hyper-V:
minikube start --vm-driver hyperv --hyperv-virtual-switch "Primary Virtual Switch"
- Show services
kubectl get svc - Show pods
kubectl get pods - Show deployments
kubectl get deployments
kubectl apply -f pod.yaml# kubectl apply -f pod.yaml apiVersion: v1 kind: Pod metadata: name: pod-exemplo spec: containers: - name: pod-exemplo image: nginx:1.17-alpine- View log of pod by name
kubectl logs pod-exemplo
-
Create a deployment
kubectl create deployment hello-nginx --image=nginx:1.17-alpine- Check it with
kubectl get deployments
- Check it with
-
Create a service
kubectl expose deployment hello-nginx --type=LoadBalancer --port=80- To show it you can run
kubectl get services
NAME TYPE CLUSTER-IP EXTERNAL-IP PORT(S) hello-nginx LoadBalancer 10.97.138.76 pending80:31365/TCP - To show it you can run
-
To test on browser use
minikube service hello-nginx

- create a file
deployment.yamlwith# kubectl apply -f deployment.yaml apiVersion: apps/v1 kind: Deployment metadata: name: hello-nginx labels: app: nginx spec: replicas: 1 selector: matchLabels: app: hello-nginx template: metadata: labels: app: hello-nginx spec: containers: - name: nginx image: nginx:1.17-alpine ports: - containerPort: 80
- Delete previous deployment with
kubectl delete deployments --all kubectl apply -f deployment.yaml
- create a file
service.yamlwith# kubectl apply -f service.yaml apiVersion: v1 kind: Service metadata: name: nginx-service spec: type: LoadBalancer ports: - port: 80 selector: app: hello-nginx
- Run
kubectl apply -f service.yaml - Test on command line
kubectl get services - Test on browser with
minikube service nginx-service
- create a file
configmap.yamlwith# kubectl apply -f configmap.yaml apiVersion: v1 kind: ConfigMap metadata: name: nginx-conf labels: app: myapplication data: nginx.conf: | server { listen 80; index index.php index.html; root /usr/share/nginx/html; rewrite ^/google$ http://google.com permanent; }
- Add new volume and volumeMount to
deployment.yamlspec: containers: - name: nginx image: nginx:1.17-alpine ports: - containerPort: 80 volumeMounts: - mountPath: /etc/nginx/conf.d name: nginx-conf readOnly: true volumes: - name: nginx-conf configMap: name: nginx-conf items: - key: nginx.conf path: nginx.conf - Test config with
kubectl get configmaps - Test on browser
minikube service nginx-service
- create a folder
mysqland a new filedeployment.yaml
# kubectl apply -f deployment.yaml
apiVersion: apps/v1
kind: Deployment
metadata:
  name:  mysql-server
  labels:
    name:  mysql-server
spec:
  replicas: 1

  selector: # Selector using to create a Service
    matchLabels:
      app: mysql-server
      tier: db

  template: # POD
    metadata:
      labels:
        app: mysql-server
        tier: db
    spec: # spec do POD
      containers:
      - image:  mysql:5.7
        name:  mysql-server
        args:
          - "--ignore-db-dir=lost+found"

        env:
        - name: MYSQL_ROOT_PASSWORD
          value: root
        ports:
        - containerPort:  3306
        volumeMounts:
         - name: mysql-persistent-storage
           mountPath: /var/lib/mysql

      volumes:
      - name: mysql-persistent-storage
        persistentVolumeClaim:
          claimName: mysql-pv-claim
- Creating a persistent volume
persistent-volume.yamlkubectl apply -f persistent-volume.yaml
apiVersion: v1
kind: PersistentVolumeClaim
metadata:
  name: mysql-pv-claim
spec:
  accessModes:
  - ReadWriteOnce
  resources:
    requests:
      storage: 10Gi
kubectl create secret generic mysql-pass --from-literal=password='a1s2d3f4'- Check it with
kubectl get secrets - Change
deployment.yamlto read secret:
spec: # spec do POD
  containers:
  - image:  mysql:5.7
    name:  mysql-server
    args:
      - "--ignore-db-dir=lost+found"

    env:
    - name: MYSQL_ROOT_PASSWORD
      valueFrom:
        secretKeyRef:
          name: mysql-pass
          key: password
- Create a file
service.yamlwith
# kubectl apply -f service.yaml
apiVersion: v1
kind: Service
metadata:
  name: mysql-service
spec:
  ports:
    - port: 3306
  selector:
    app: mysql-server
    tier: db
  clusterIP: None
kubectl apply -f service.yaml- Check services with
kubectl get svc kubectl get pods- Executar pod com
kubectl exec -it mysql-server-866f9b567b-4bp62 bash - Abrir mysql com:
mysql -uroot -pe senhaa1s2d3f4
kubectl delete PersistentVolumeClaim mysql-pv-claimkubectl delete deployment mysql
Testing nginx deployment.yaml:
- limitar o uso de cpu de cada Pod com:
cpu: "80m"- unidade de medida de uso de vCPU é chamada milicore
mCPUno kubernetes
- unidade de medida de uso de vCPU é chamada milicore
- No caso da memória se o pode bater o limite
memory: "100Mi"então ele nem sobe, é bem diferente do caso do cpu que sobe apenas deixando processamento mais lento. - resources:
- requests: significa o requisito mínimo para subir o pod
- limits: significa o máximo de recursos que pode ser consumido pelo pod
- Qualquer coisa além disso o Kubernetes vai tentar duas estratégias:
- diminuir a quantidade computacional ou
- simplesmente matar o container para não dar um crash
# kubectl apply -f deployment.yaml
apiVersion: apps/v1
kind: Deployment
metadata:
  name: hello-nginx
  labels:
    app: nginx
spec:
  replicas: 2

  selector:
    matchLabels:
      app: hello-nginx

  template:
    metadata:
      labels:
        app: hello-nginx
    spec:
      containers:
      - name: nginx
        image: nginx:1.17-alpine
        ports:
        - containerPort: 80

        resources:
          requests:
            memory: "100Mi"
            cpu: "80m"
          limits:
            memory: "150Mi"
            cpu: "100m"

        volumeMounts:
        - mountPath:  /etc/nginx/conf.d
          name:  nginx-conf
          readOnly: true

      volumes:
      - name: nginx-conf
        configMap:
          name: nginx-conf
          items:
            - key: nginx.conf
              path: nginx.conf
- create a folder
php-apache - create
index.php
<?php

$x = 0.000001;
for ($i = 0; $i <= 100000000; ++$i) {
    $x += sqrt($x);
}
echo PHP_EOL.'Code.education Rocks! '.PHP_EOL;- create a Dockerfile
# docker build -t lfrichter/php-apache-hpa .
# docker run -it lfrichter/php-apache-hpa bash
# docker push lfrichter/php-apache-hpa
FROM php:7-apache
COPY index.php /var/www/html/index.php
RUN chmod a+rx index.php
- create HPA deployment with
kubectl run php-apache-hpa --image=lfrichter/php-apache-hpa --requests=cpu=200m --expose --port=80
- creating command to autoscaling (optional)
kubectl autoscale deployment php-apache-hpa --cpu-percent=20 --min=1 --max=10
- creating a file to autoscaling (better choice)
- create a file
hpa.yamlwith:
- create a file
# kubectl apply -f hpa.yaml
# kubectl get hpa
apiVersion: autoscaling/v1
kind: HorizontalPodAutoscaler
metadata:
  name: php-apache-hpa
spec:
  maxReplicas: 5
  minReplicas: 1
  scaleTargetRef:
    apiVersion: extensions/v1beta1
    kind: Deployment
    name: php-apache-hpa
  targetCPUUtilizationPercentage: 20
kubectl run -it loader --image=busybox /bin/shbusyboxé um linux super pequeno, o mais básico para rodar algo
- Criar e executar um looping para essa máquina ficar chamando o php-apache
defaulté o namespace padrão do kubernetes- Acessar página PHP
# wget -q -O- http://php-apache-hpa.default.svc.cluster.local;- Criar looping infinito
while true; do wget -q -O- http://php-apache-hpa.default.svc.cluster.local; done; - Verifique se está funcionando em
watch kubectl get hpa