| ML.NET version | API type | Status | App Type | Data type | Scenario | ML Task | Algorithms |
|---|---|---|---|---|---|---|---|
| Microsoft.ML 1.4 | Dynamic API | Up-to-date | Console apps and Web App | Image files | Image classification | Image classification with TensorFlow model retrain based on transfer learning | DNN architectures: ResNet, InceptionV3, MobileNet, etc. |
Image classification is a common problem within the Deep Learning subject. This sample shows how to create your own custom image classifier by training your model based on the transfer learning approach which is basically retraining a pre-trained model (architecture such as InceptionV3 or ResNet) so you get a custom model trained on your own images.
In this sample app you create your own custom image classifier model by natively training a TensorFlow model from ML.NET API with your own images.
Image classifier scenario – Train your own custom deep learning model with ML.NET
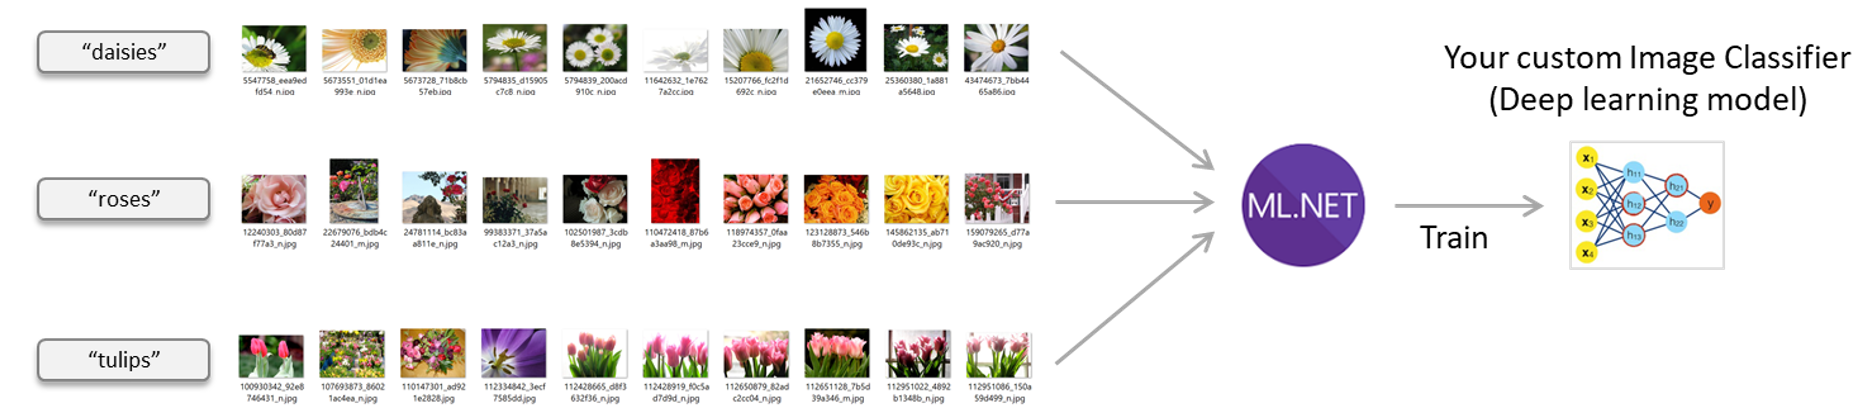
Image set license
This sample's dataset is based on the 'flower_photos imageset' available from Tensorflow at this URL. All images in this archive are licensed under the Creative Commons By-Attribution License, available at: https://creativecommons.org/licenses/by/2.0/
The full license information is provided in the LICENSE.txt file which is included as part of the same image set downloaded as a .zip file.
The by default imageset being downloaded by the sample has 200 images evenly distributed across 5 flower classes:
Images --> flower_photos_small_set -->
           |
           daisy
           |
           dandelion
           |
           roses
           |
           sunflowers
           |
           tulips
The name of each sub-folder is important because that'll be the name of each class/label the model is going to use to classify the images.
To solve this problem, first we will build an ML model. Then we will train the model on existing data, evaluate how good it is, and lastly we'll consume the model to classify a new image.

By default this solution uses CPU for training and scoring. But if your machine has a compatible GPU available (basically most NVIDIA GPU graphics cards), you can configure the project to use GPU.
When using CPU, your project has to reference the following redist library:
SciSharp.TensorFlow.Redist(CPU training)
Sample references screenshot in training project using CPU:

When using GPU, your project has to reference the following redist library (and remove the CPU version reference):
-
SciSharp.TensorFlow.Redist-Windows-GPU(GPU training on Windows) -
SciSharp.TensorFlow.Redist-Linux-GPU(GPU training on Linux)
Sample references screenshot in training project using GPU:

Building the model includes the following steps:
- Loading the image files (file paths in this case) into an IDataView
- Image classification using the ImageClassification estimator (high level API)
Define the schema of data in a class type and refer that type while loading the images from the files folder.
public class ImageData
{
    public ImageData(string imagePath, string label)
    {
        ImagePath = imagePath;
        Label = label;
    }

    public readonly string ImagePath;
    public readonly string Label;
}
Since the API uses in-memory images so later on you'll be able to score the model with in-memory images, you need to define a class containing the image's bits in the type byte[] Image, like the following:
public class InMemoryImageData
{
    public InMemoryImageData(byte[] image, string label, string imageFileName)
    {
        Image = image;
        Label = label;
        ImageFileName = imageFileName;
    }

    public readonly byte[] Image;
    public readonly string Label;
    public readonly string ImageFileName;
}
Download the imageset and load its information by using the LoadImagesFromDirectory() and LoadFromEnumerable().
// 1. Download the image set and unzip
string finalImagesFolderName = DownloadImageSet(imagesDownloadFolderPath);
string fullImagesetFolderPath = Path.Combine(imagesDownloadFolderPath, finalImagesFolderName);

var mlContext = new MLContext(seed: 1);

// 2. Load the initial full image-set into an IDataView and shuffle so it'll be better balanced
IEnumerable<ImageData> images = LoadImagesFromDirectory(folder: fullImagesetFolderPath, useFolderNameAsLabel: true);
IDataView fullImagesDataset = mlContext.Data.LoadFromEnumerable(images);
IDataView shuffledFullImageFilePathsDataset = mlContext.Data.ShuffleRows(fullImagesDataset);
Once it's loaded into the IDataView, the rows are shuffled so the dataset is better balanced before spliting into the training/test datasets.
Now, this next step is very important. Since we want the ML model to work with in-memory images, we need to load the images into the dataset and actually do it by calling fit() and transform(). This step needs to be done in a initial and seggregated pipeline in the first place so the filepaths won't be used by the pipeline and model to create when training.
// 3. Load Images with in-memory type within the IDataView and Transform Labels to Keys (Categorical)
IDataView shuffledFullImagesDataset = mlContext.Transforms.Conversion.
        MapValueToKey(outputColumnName: "LabelAsKey", inputColumnName: "Label", keyOrdinality: KeyOrdinality.ByValue)
    .Append(mlContext.Transforms.LoadRawImageBytes(
                                    outputColumnName: "Image",
                                    imageFolder: fullImagesetFolderPath,
                                    inputColumnName: "ImagePath"))
    .Fit(shuffledFullImageFilePathsDataset)
    .Transform(shuffledFullImageFilePathsDataset);
In addition we also transformed the Labels to Keys (Categorical) before splitting the dataset. This is also important to do it before splitting if you don't want to deal/match the KeyOrdinality if transforming the labels in a second pipeline (the training pipeline).
Now, let's split the dataset in two datasets, one for training and the second for testing/validating the quality of the model.
// 4. Split the data 80:20 into train and test sets, train and evaluate.
var trainTestData = mlContext.Data.TrainTestSplit(shuffledFullImagesDataset, testFraction: 0.2);
IDataView trainDataView = trainTestData.TrainSet;
IDataView testDataView = trainTestData.TestSet;
As the most important step, you define the model's training pipeline where you can see how easily you can train a new TensorFlow model which under the covers is based on transfer learning from a by default architecture (pre-trained model) such as Resnet V2 500.
// 5. Define the model's training pipeline using DNN default values
//
var pipeline = mlContext.MulticlassClassification.Trainers
        .ImageClassification(featureColumnName: "Image",
                                labelColumnName: "LabelAsKey",
                                validationSet: testDataView)
    .Append(mlContext.Transforms.Conversion.MapKeyToValue(outputColumnName: "PredictedLabel",
                                                          inputColumnName: "PredictedLabel"));
The important line in the above code is the line using the mlContext.MulticlassClassification.Trainers.ImageClassification classifier trainer which as you can see is a high level API where you just need to provide which column has the images, the column with the labels (column to predict) and a validation dataset to calculate quality metrics while training so the model can tune itself (change internal hyper-parameters) while training.
Under the covers this model training is based on a native TensorFlow DNN transfer learning from a default architecture (pre-trained model) such as Resnet V2 50. You can also select the one you want to derive from by configuring the optional hyper-parameters.
It is that simple, you don't even need to make image transformations (resize, normalizations, etc.). Depending on the used DNN architecture, the framework is doing the required image transformations under the covers so you simply need to use that single API.
There’s another overloaded method for advanced users where you can also specify those optional hyper-parameters such as epochs, batchSize, learningRate, a specific DNN architecture such as Inception v3 or Resnet v2101 and other typical DNN parameters, but most users can get started with the simplified API.
The following is how you use the advanced DNN parameters:
// 5.1 (OPTIONAL) Define the model's training pipeline by using explicit hyper-parameters

var options = new ImageClassificationTrainer.Options()
{
    FeatureColumnName = "Image",
    LabelColumnName = "LabelAsKey",
    // Just by changing/selecting InceptionV3/MobilenetV2/ResnetV250
    // you can try a different DNN architecture (TensorFlow pre-trained model).
    Arch = ImageClassificationTrainer.Architecture.MobilenetV2,
    Epoch = 50,       //100
    BatchSize = 10,
    LearningRate = 0.01f,
    MetricsCallback = (metrics) => Console.WriteLine(metrics),
    ValidationSet = testDataView
};

var pipeline = mlContext.MulticlassClassification.Trainers.ImageClassification(options)
        .Append(mlContext.Transforms.Conversion.MapKeyToValue(
            outputColumnName: "PredictedLabel",
inputColumnName: "PredictedLabel"));In order to begin the training process you run Fit on the built pipeline:
// 4. Train/create the ML model
ITransformer trainedModel = pipeline.Fit(trainDataView);After the training, we evaluate the model's quality by using the test dataset.
The Evaluate function needs an IDataView with the predictions generated from the test dataset by calling Transfor().
// 5. Get the quality metrics (accuracy, etc.)
IDataView predictionsDataView = trainedModel.Transform(testDataset);

var metrics = mlContext.MulticlassClassification.Evaluate(predictionsDataView, labelColumnName:"LabelAsKey", predictedLabelColumnName: "PredictedLabel");
ConsoleHelper.PrintMultiClassClassificationMetrics("TensorFlow DNN Transfer Learning", metrics);
Finally, you save the model:
// Save the model to assets/outputs (You get ML.NET .zip model file and TensorFlow .pb model file)
mlContext.Model.Save(trainedModel, trainDataView.Schema, outputMlNetModelFilePath);You should proceed as follows in order to train a model your model:
- Set
ImageClassification.Trainas starting project in Visual Studio - Press F5 in Visual Studio. After some seconds, the process will finish and you should have a new ML.NET model saved as the file
assets/outputs/imageClassifier.zip
When consuming/scoring the model you can also choose between CPU/GPU, however, if using GPU you also need to make sure that the machine/server running the model supports a GPU.
The way you set up the scoring/consumption project to use GPU is the same way explained at the begining of this readme.md by simply using one or the other redist library.
In the sample's solution there's a second project named ImageClassifcation.Predict. That console app is simply loading your custom trained ML.NET model and performing a few sample predictions the same way a hypothetical end-user app could do.
First thing to do is to copy/paste the generated assets/outputs/imageClassifier.zip file into the inputs/MLNETModel folder of the consumption project.
In regards the code, you first need to load the model created during model training app execution.
MLContext mlContext = new MLContext(seed: 1);
ITransformer loadedModel = mlContext.Model.Load(imageClassifierModelZipFilePath, out var modelInputSchema);
Then, your create a predictor engine object and finally make a few sample predictions by using the first image of the folder assets/inputs/images-for-predictions which has just a few images that were not used when training the model.
Note that now, when scoring, you only need the InMemoryImageData type which has the in-memory image.
That image could also be coming thorugh any other channel instead of loading it from a file.
For instance, the ImageClassification.WebApp in this same solution gets the image to use for the prediction through HTTP as an image provided by an end-user.
var predictionEngine = mlContext.Model.CreatePredictionEngine<InMemoryImageData, ImagePrediction>(loadedModel);

//Predict the first image in the folder
IEnumerable<InMemoryImageData> imagesToPredict = LoadInMemoryImagesFromDirectory(
                                                        imagesFolderPathForPredictions, false);

InMemoryImageData imageToPredict = new InMemoryImageData
{
    Image = imagesToPredict.First().Image,
    ImageFileName = imagesToPredict.First().ImageFileName
};

var prediction = predictionEngine.Predict(imageToPredict);

// Get the highest score and its index
float maxScore = prediction.Score.Max();

Console.WriteLine($"Image Filename : [{imageToPredict.ImageFileName}], " +
                    $"Predicted Label : [{prediction.PredictedLabel}], " +
                    $"Probability : [{maxScore}] "
                    );
The prediction engine receives as parameter an object of type InMemoryImageData (containing 2 properties: Image and ImageFileName).
The ImageFileName is not used byt the model. You simple have it there so you can print the filename out out when showing the prediction. The prediction is only using the image's bits in the byte[] Image field.
Then the model returns and object of type ImagePrediction, which holds the PredictedLabel and all the Scores for all the classes/types of images.
Since the PredictedLabel is already a string it'll be shown in the console.
About the score for the predicted label, we just need to take the highest score which is the probability for the predicted label.
You should proceed as follows in order to train a model your model:
- Set
ImageClassification.Predictas starting project in Visual Studio - Press F5 in Visual Studio. After some seconds, the process will show you predictions by loading and using your custom
imageClassifier.zipmodel.
In the sample's solution there's another project named ImageClassification.WebApp which is an ASP.NET Core web app that allows the user to submit an image through HTTP and score/predict with that in-memory image.
This sample also uses the PredictionEnginePool which is recommended for multi-threaded and scalable applications.
Below you can see an screenshot of the app:

This sample app is retraining a TensorFlow model for image classification. As a user, you could think it is pretty similar to this other sample Image classifier using the TensorFlow Estimator featurizer. However, the internal implementation is very different under the covers. In that mentioned sample, it is using a 'model composition approach' where an initial TensorFlow model (i.e. InceptionV3 or ResNet) is only used to featurize the images and produce the binary information per image to be used by another ML.NET classifier trainer added on top (such as LbfgsMaximumEntropy). Therefore, even when that sample is using a TensorFlow model, you are training only with a ML.NET trainer, you don't retrain a new TensorFlow model but train an ML.NET model. That's why the output of that sample is only an ML.NET model (.zip file).
In contrast, this sample is natively retraining a new TensorFlow model based on a Transfer Learning approach but training a new TensorFlow model derived from the specified pre-trained model (Inception V3 or ResNet).
The important difference is that this approach is internally retraining with TensorFlow APIs and creating a new TensorFlow model (.pb). Then, the ML.NET .zip file model you use is just like a wrapper around the new retrained TensorFlow model. This is why you can also see a new .pb file generated after training:

In the screenshot below you can see how you can see that retrained TensorFlow model (custom_retrained_model_based_on_InceptionV3.meta.pb) in Netron, since it is a native TensorFlow model:

Benefits:
-
Train and inference using GPU: When using this native DNN approach based on TensorFlow you can either use the CPU or GPU (if available) for a better performance (less time needed for training and scoring).
-
Reuse across multiple frameworks and platforms: This ultimately means that since you natively trained a Tensorflow model, in addition to being able to run/consume that model with the ML.NET 'wrapper' model (.zip file), you could also take the .pb TensorFlow frozen model and run it on any other framework such as Python/Keras/TensorFlow, or a Java/Android app or any framework that supports TensorFlow.
-
Flexibility and performace: Since ML.NET is internally retraining natively on Tensorflow layers, the ML.NET team will be able to optimize further and take multiple approaches like training on the last layer or training on multiple layers across the TensorFlow model and achive better quality levels.