I wanted to make a project with as much hype as possible. Hold your horses, this project features: An Arduino, a Raspberry Pi, a Rails API and client with server push through Faye, responsive layout using Bootstrap and an iOS mobile app. I wanted to use Node.js, Go and put a map in there, but I ran out of time. Maybe next time.
The idea was to prototype as fast as I could a proof of concept of an Internet connected device. I chose to do an energy monitor. The idea is pretty simple: I have a thingy at home that consumes energy, I want to send how much energy consumes to a central webapp through an API. This API will be consumed by the iOS app and I will also have a responsive web version.
The project has many moving parts. I know it will be hard to replicate everything exactly the same, but I hope some parts could help you build your own system. The truth is I scrapped most of its parts from Internet and hack it together. You can do something similar any day, I am sure.
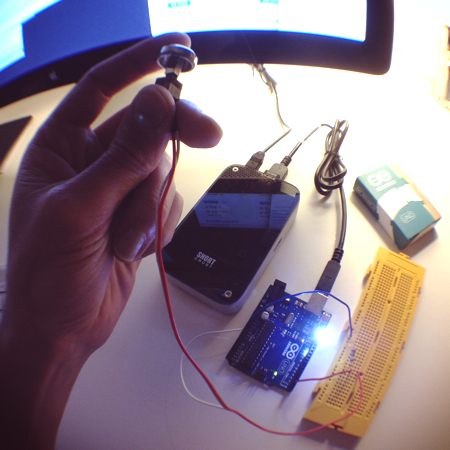
The hardware part could be simpler to be fair. If you have an Arduino with a Wi-Fi shield you can skip the RPi altogether. I find the Arduino Uno and the 512MB RPi to be the best to have around. They both are very well supported, have a huge community behind and are very flexible. Anyway, here are the components:
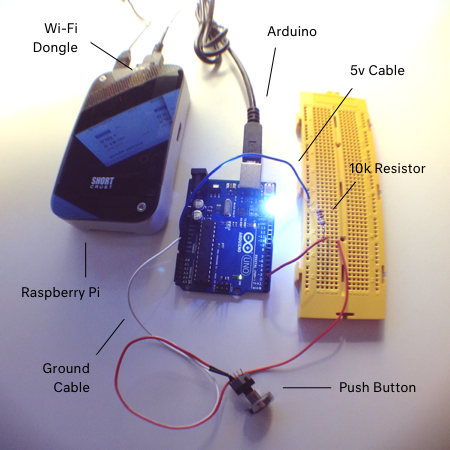
You do not need a case for the RPi nor the Wi-Fi dongle. I do not have my Internet router close to me so I connected the RPi to the home network and then the Arduino through USB to the RPi. If I need to upload software to the Arduino I just plug it to my laptop and then to the RPi again. You could do this directly through SSH, though.
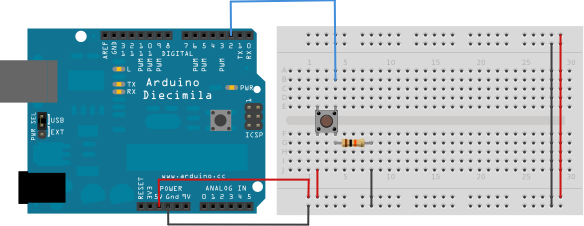
The labels "5v Cable" and "Ground Cable" are there just to point out how to wire it. I took the schematics from the Arduino website:
Our energy monitor will be a lamp AKA a led. We will use a push button to toggle the lamp on and after toggling it off we will send the milliseconds to the RPi and from there to the webapp. The code to make the push button work is in the Sensor folder.
Javier Gamarra (@nhpatt on Twitter) pointed me that you do not need the resistor if you use the input pullup serial of the Arduino. I did not know that and it is a very cool Arduino feature indeed.
Wire it up and upload the code. Moving on!
Ok, the first thing you need is to setup the RPi creating the SD card image. This used to be scary but now there is an app for OSX and you will need the Raspbian Wheezy image too. Then connect through SSH to the RPi, user is pi and password is raspberry. You will need to install a few things:
sudo -i
apt-get update
apt-get upgrade
raspi-config
apt-get install vim screen python-serial curl
After that there is a Python script in the Router folder. This script will read the output of the Arduino through the USB serial port. You can run this with an init.d script or with a cron job. I just log using SSH, then use screen to run it:
screen
python ./Router.py
Now, my laptop is on 192.168.0.12 on the local network and I always assign that IP to it. If you have a different IP you will need to edit the Python script so cURL can access your webapp on http://192.168.0.12:3000 or whatever IP you have. With that we are ready to run the Rails app.
Go to the Webapp folder and bootstrap the Rails app:
bundle install
rake db:setup
rake db:migrate
rake db:seed
foreman start
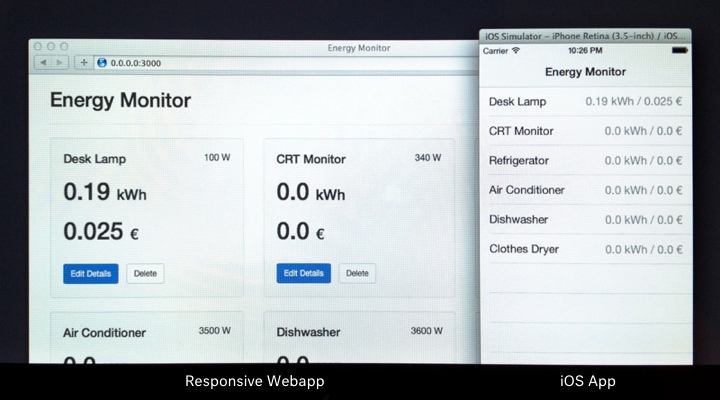
You can go to http://0.0.0.0:3000 or http://192.168.0.12:3000 to see the app running with some seed data already in there. Faye will run on http://0.0.0.0:9292 or http://192.168.0.12:9292. You can take a look to the responsive layout by visiting the same URL on you phone.
We are almost done. I added another piece to the puzzle. Because the prices of electricity fluctuate in the real world I created a bash script that cURLs to the API and changes that price. In this way I can simulate having another service feeding the system. This script is under the SAP folder, a homage to cutting edge technology. You can run it issuing the following command on your laptop:
bash ./SAP.sh
Because I wanted to see changes after waiting a few milliseconds, I changed how the energy consumption is calculated taking milliseconds as seconds. If you go to the thing.rb file for the Thing model you will see how I am doing this:
def energy
  # Take milliseconds as seconds
  (self.time / 60) * (self.watts * 0.001) # kWh

  # Take milliseconds as milliseconds
  # (self.time / 3600000) * (self.watts * 0.001) # kWh
end
Finally, you can also run the iOS app by opening the project under the App folder on XCode and building it. It will throw some warnings but do not worry, the iOS simulator will open with the app ready to rock. I modified the app from Joseph Lee Hoffman's work removing screens and adding a periodical refresh of the TableView.
Here is a quick demo of the end result:
The code in this project is messy and untested. Do not use it in production. I did very bad things to cut corners and have everything working. Every part of the project needs more work. Horrible things I did:
- Send all the cURL calls unencrypted over HTTP.
- No testing at all for the API, the client, nothing. Craftsman rejoice.
- Remove the authenticity token from Rails so Faye did not complain.
- I refresh with Turbolinks the whole page instead of just changes.
- No user authentication for the webapp or the iOS app.
- Dumb, continuous, 0.5 seconds refresh on the iOS app.
I think you get the idea. This is meant to be a proof of concept, not a production ready system.
This is one of those projects that is like a milestone. In your daily work you learn stuff here and there but you never realize how much stuff you actually know. In this project there is a little bit of everything: electronics, server administration, networking, backend, frontend and mobile apps. Many different languages: Java-like, Python, Ruby, HTML, Javascript, CSS, Objetive-C and Bash. All very basic, but connecting it together makes it more difficult.
While hacking the iOS app from the code I found I also realized that XCode development environment is really nice to work with. Having worked with scripting languages is really refreshing to have real time evaluation of errors in the code and drag and drop to build the interface.
Finally, I understood better what means "realtime". With the pub/sub model something closer to "realtime" but not really. After having everything running I realized that to have "true realtime" I would have to start by rethinking how the push button works. In the current version I push changes after the button goes off, but it should really report every few milliseconds and have polling in all the client apps. I can see how much more complex "true realtime" would be for a real world system like this.
I hope you enjoyed this as much as I did building it and fear not, you can absolutely do something similar. If you get stuck just do a DuckDuckGo search or go to StackOverflow. Every part is charted territory.
And remember to have fun!