- Introduction
- Configuration
- Configuring a Data Extension
- [Creating an Attribute Group](#Creating-an-Attribute Group)
- Creating an Interaction
- Firing an Event using Automation Studio
- Firing an Event using the Fuel REST API contactEvents Method
- Firing an Event using the Fuel REST API Events Method
- Further Information
An Interaction starts when an Event is fired. The Event will be heard by a Trigger, which prompts the Interaction to begin. Contacts that meet the Contact Filter Criteria defined by the Trigger will enter the Interaction.
Events can be fired either by using the Fuel REST API, or by creating an Automation using Automation Studio.
This document details the procedural steps for creating a customer Data Extension and building a simple Interaction that updates an Attribute in the Data Extension once the Contact enters the Interaction.
Before an Event can be fired, the following tasks must be completed:
- Create a Data Extension for customer data and add records to it.
- Create an Attribute Group.
- Create and start an Interaction.
Data Extensions can either be managed from within the Email app in Marketing Cloud, or from within the Contact Builder app. Managing Data Extensions from Contact Builder provides convenience (if you are already in Contact Builder you don't need to open another application) and also provides additional functionality for adding and editing records in the Data Extension.
The steps are as follows.
1. To create a new Data Extension, open Contact Builder from the Data & Analytics menu and select the Data Extensions tab. Click Create and enter a name for the Data Extension in the Name field. You can optionally complete the other fields in this dialog.
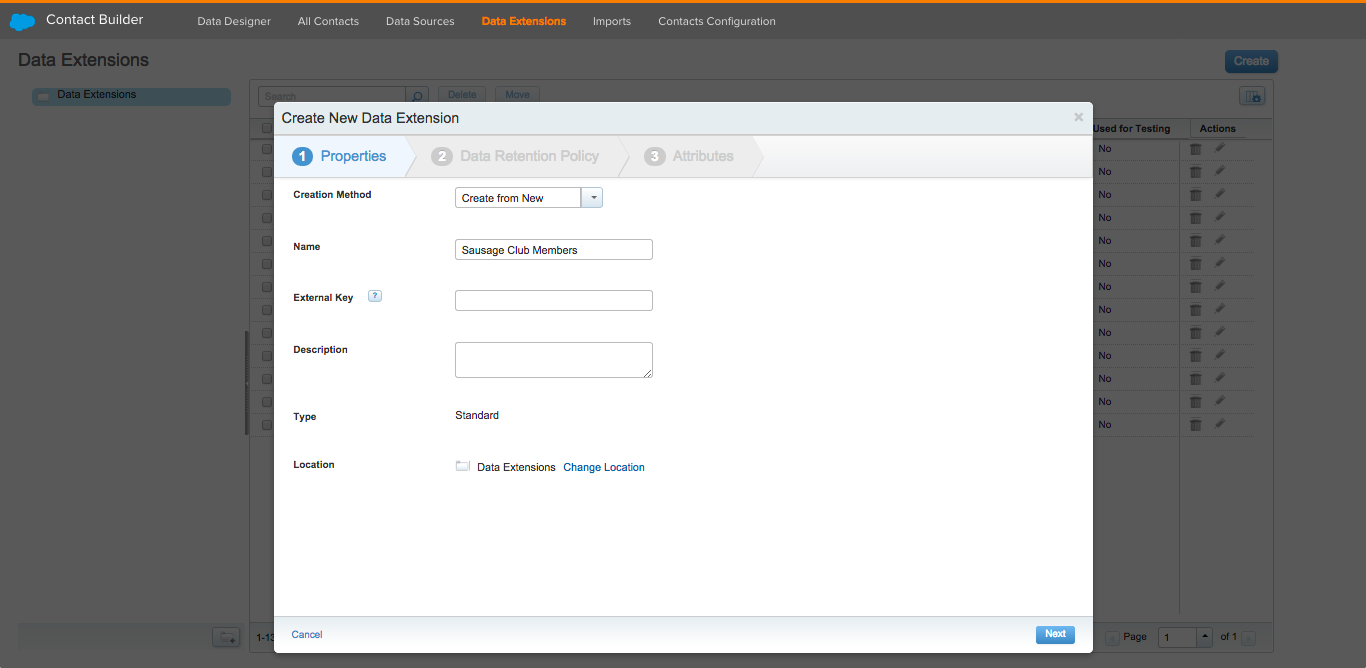 Creating a new Data Extension in Contact Builder
2. Click the Next button twice and in the Attributes step, add the following attributes. These attributes (or Data Extension fields) are for a fictitious customer member database.
| Primary Key | Name | Data Type | Data Sources | Required | Length | Default Value |
|---|---|---|---|---|---|---|
| Yes | EmailAddress | Email Address | Unassigned | Yes | 254 | |
| MemberID | Number | Unassigned | ||||
| FirstName | Text | Unassigned | 50 | |||
| LastName | Text | Unassigned | 50 | |||
| Updated | Boolean | Unassigned | False |
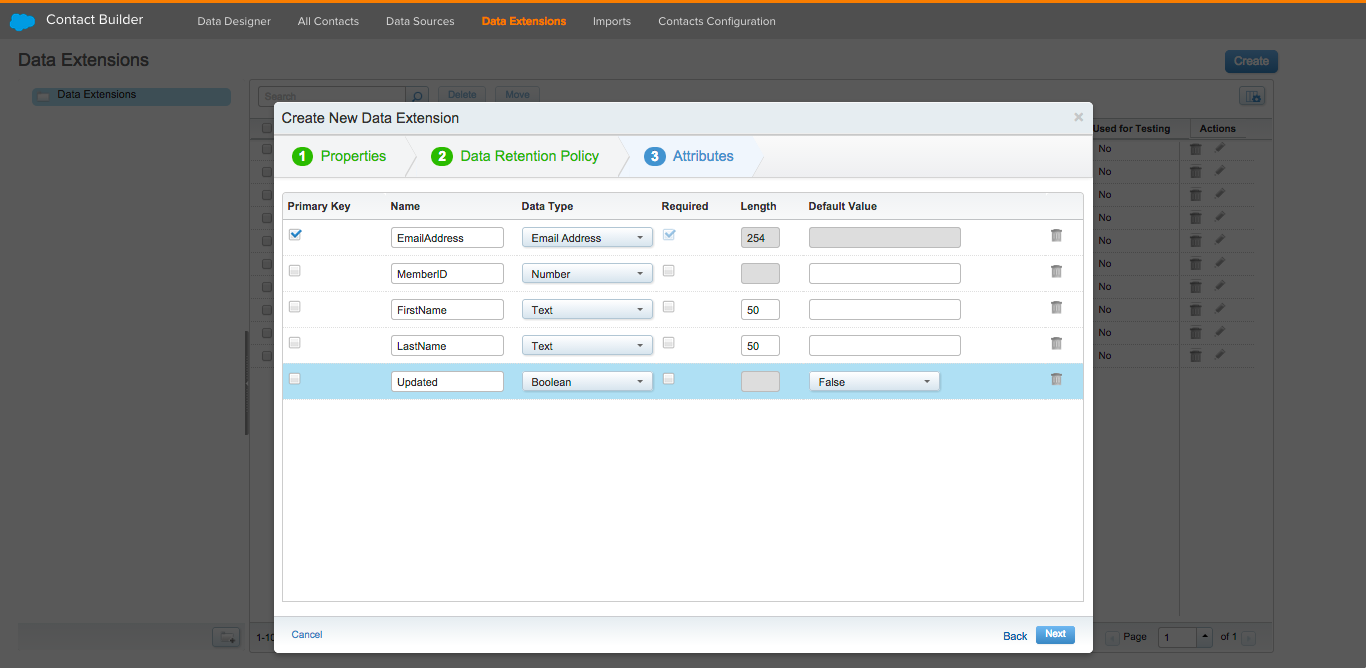 Adding Attributes to a Data Extension in Contact Builder
3. After completing all fields, click Next and OK to return to the Data Extensions page. Now add records to the Data Extension by clicking on the Data Extension name and click on the Records tab. Use the Add Record button to insert a record into the Data Extension. Complete all fields, leaving the Updated field set to 'False'. Repeat this step to add additional records to the Data Extension.
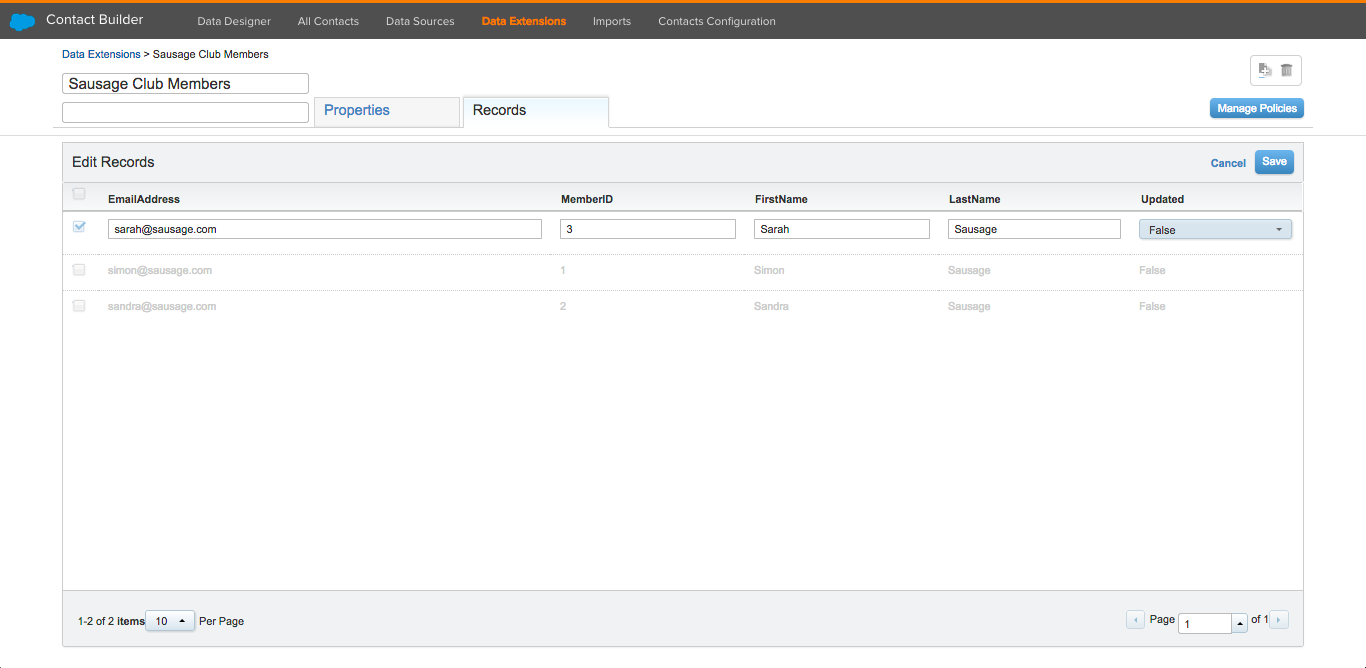 Adding records to a Data Extension in Contact Builder
4. Change the Data Extension Type to 'Sendable', as Data Extensions need to be 'Sendable' in order to be used as an Event Source in an Interaction Trigger. Select the Properties tab and under the Type selection click the Edit button. Click the 'Used For Sending' option, ensure that the 'EmailAddress' field is set to relate to the subscriber on 'Subscriber Key' and click Save.
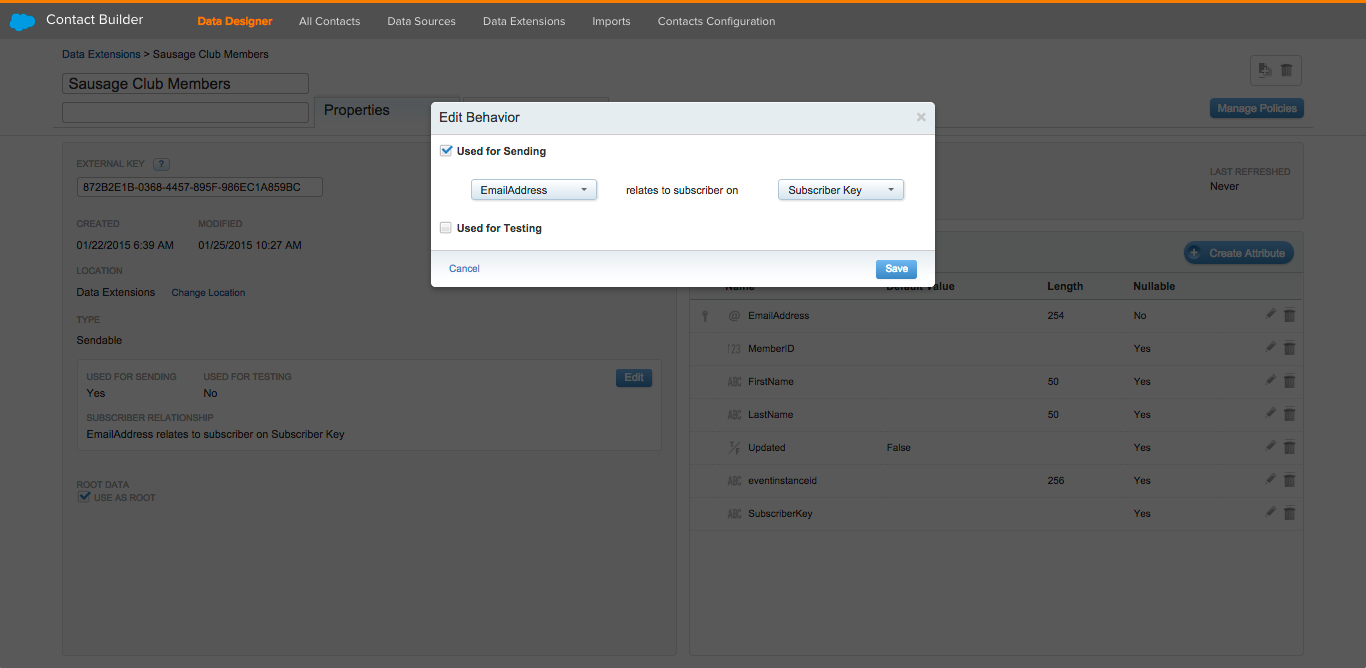 Updating a Data Extension Type in Contact Builder
Next you will need to define the relationship between a Contact Record and the Data Extension you have just created.
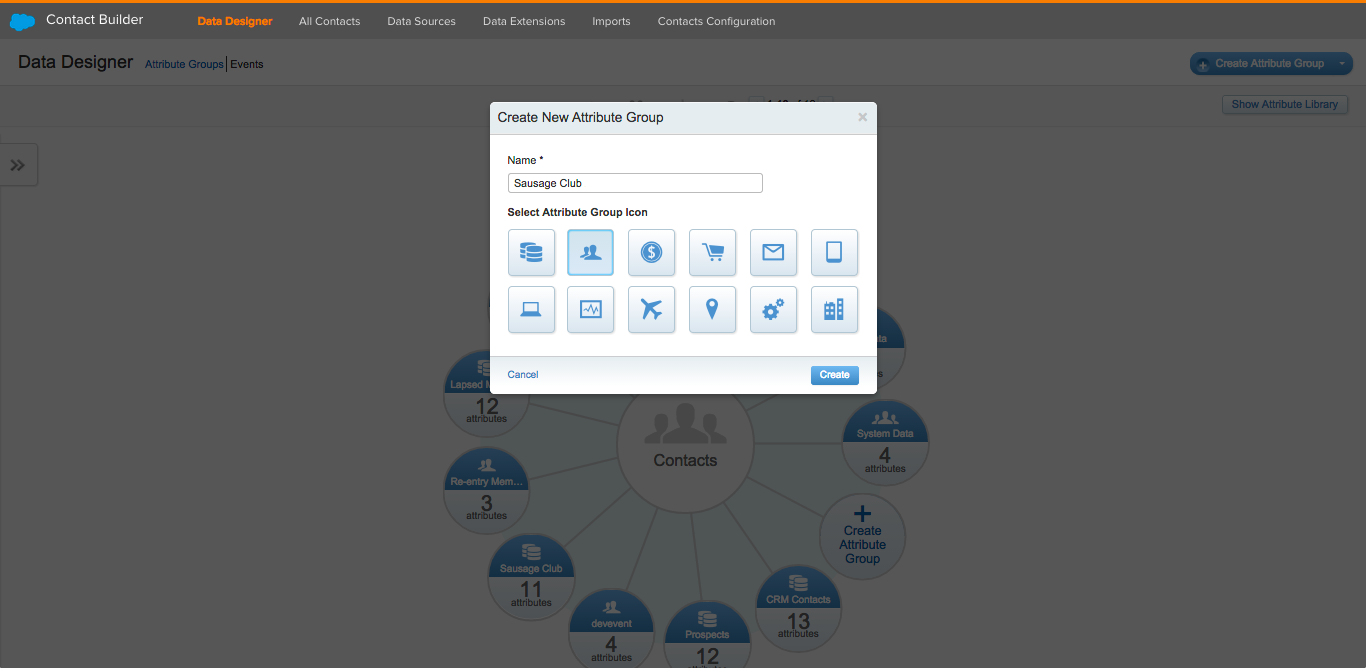
1. Select the Data Designer menu item in Contact Builder and click the Create Attribute Group button.
2. Name the Attribute Group, select an appropriate icon and click Create.
3. Link to the Data Extension that you created previously by selecting the Link Data Extensions button. This opens the Link Data Extension dialog. Select the Data Extension you created earlier in the right-side panel and link 'Contact Key' to 'Email Address' then set the relationship to a Root relationship by selecting One from the menu next to the Data Extension name and select the 'Use as root' option, then click Save.
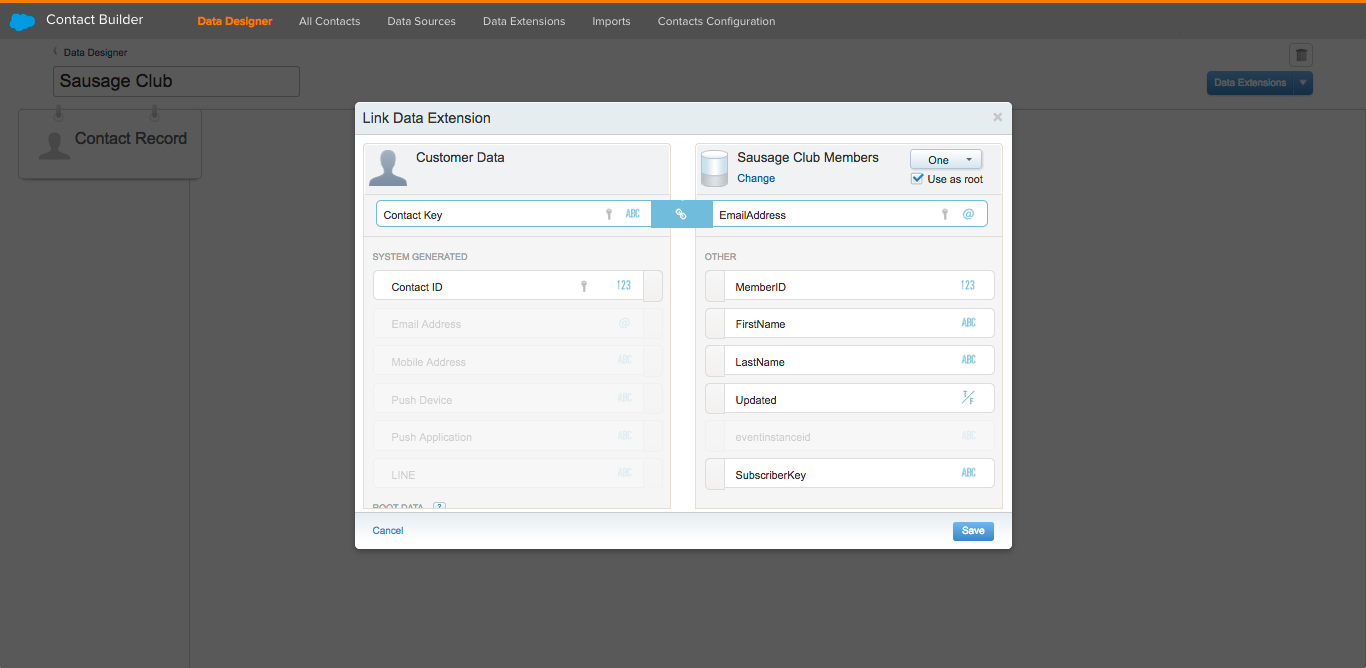 Creating a Root Relationship for an Attribute Group
4. You will now see the cardinal relationship that you created between the Contact Record an the Data Extension. You can preview the link between the Contact Record and Data Extension by moving your cursor over the link icon.
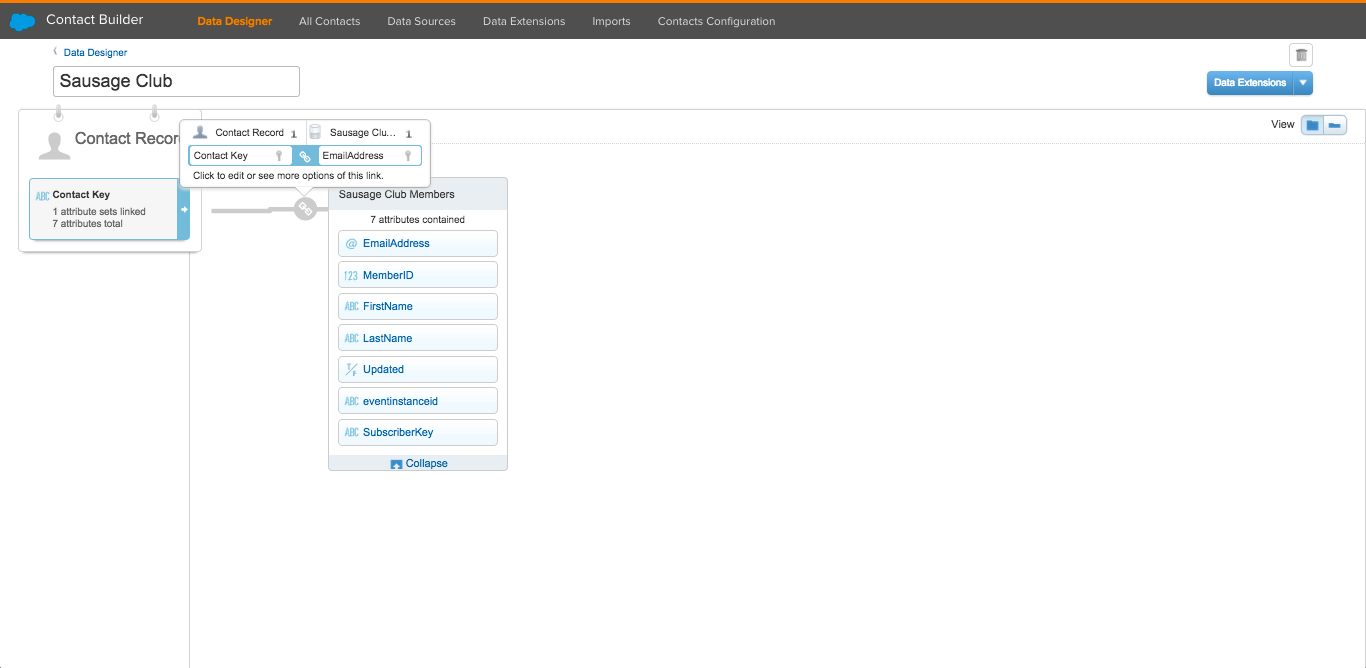 Relationship of an Attribute Group in Contact Builder
Now the Data Extension and Attribute Group has been created, you can create a new Interaction that uses the Attribute Group as the Event Source. This Interaction will change the 'Updated' Attribute to 'True' (in the Attribute Set) when a Contact moves through the Interaction.
1. Open Journey Builder from the Marketing Automation menu and click the New Interaction button in the top right corner of the Journey Builder dashboard to create a new Interaction in the Interaction Canvas.
2. Name the Interaction by selecting the 'Untitled Interaction' field in the top left corner, add a name and click Done.
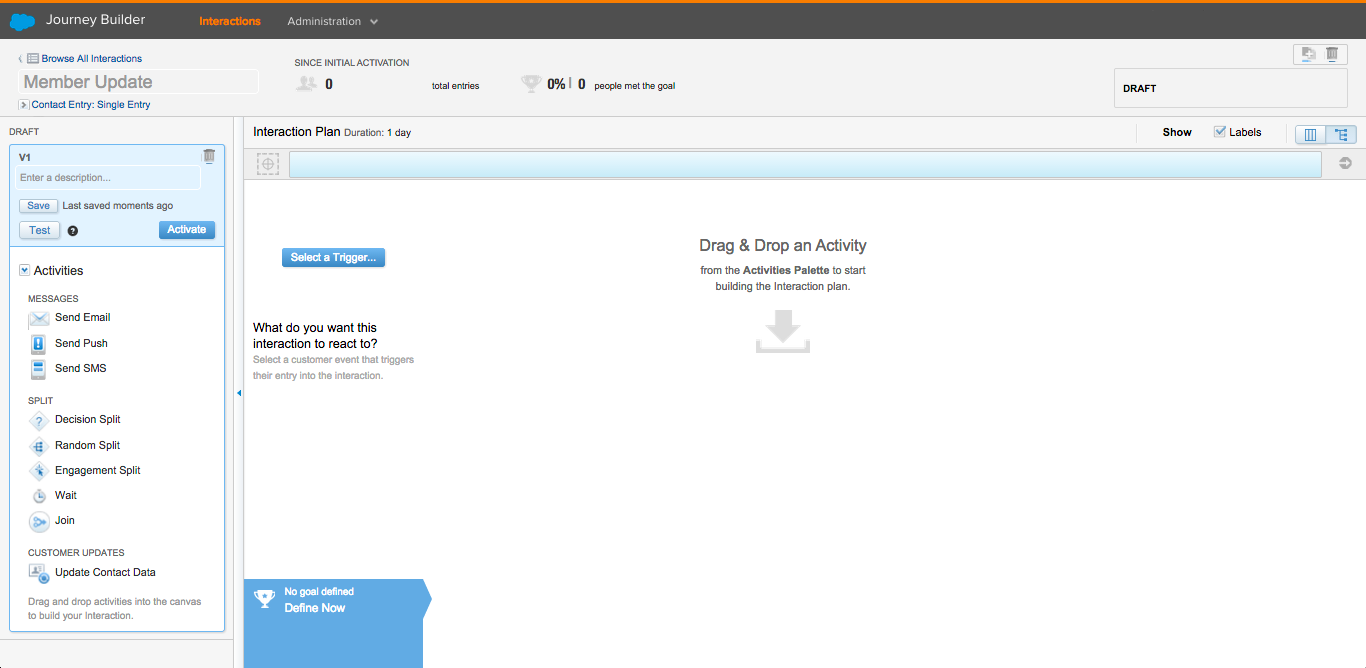 New Interaction in the Interaction Canvas
3. Create a new Trigger by clicking on the Select a Trigger… button, click the Create Trigger panel and click Next.
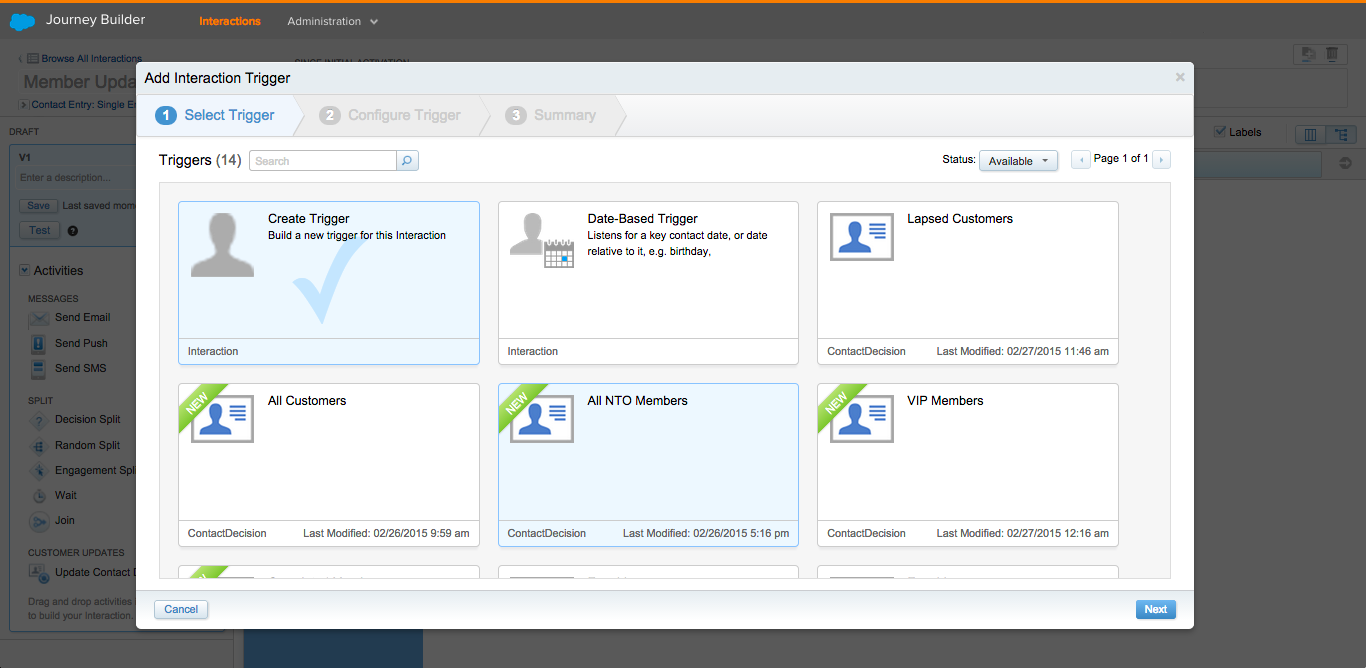 Adding a Trigger in the Interaction Canvas
4. Assign a name for the Trigger in the Add Name field.
5. Define the Event Source by clicking on the Choose Data Extension button and select the Data Extension you created earlier.
6. Select the Attribute Group from the Attributes list and drag the 'Updated' Attribute to the Expression Editor. Change the expression value to Is False.
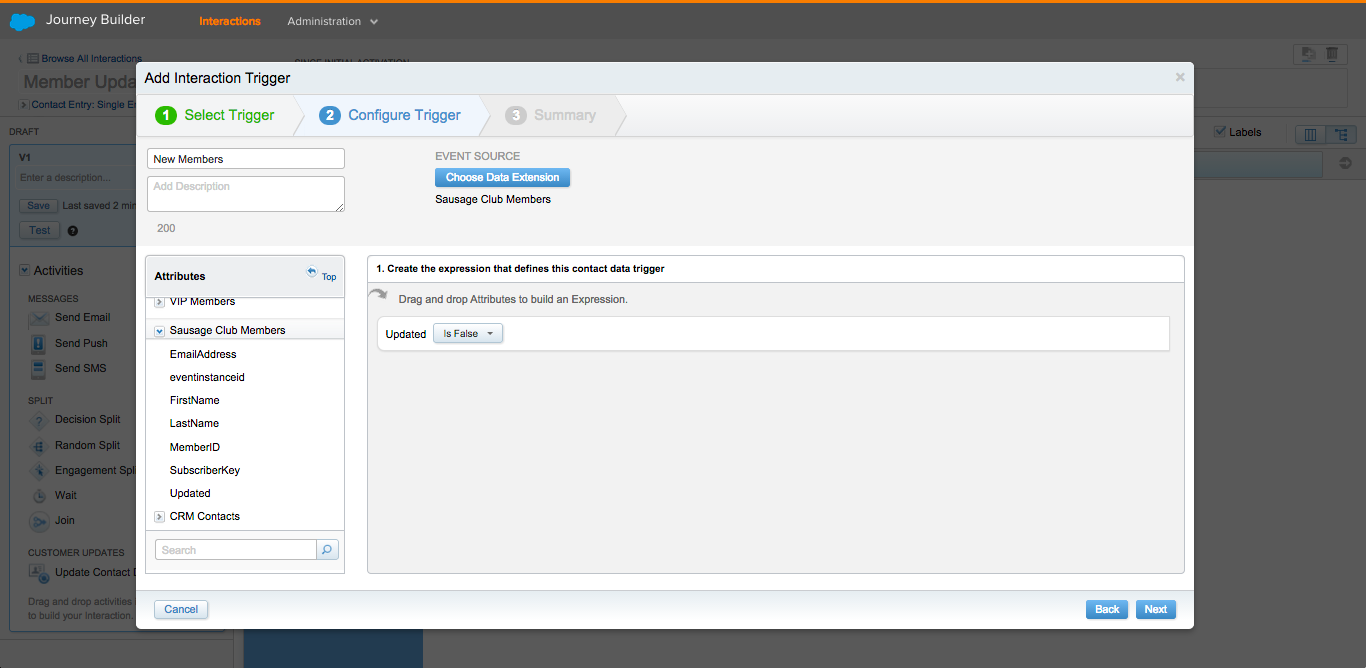 Configuring an Interaction Trigger in the Interaction Canvas
7. Click Next twice, then click Done to close the Interaction Trigger dialog.
8. Now you can add an Update Contact Data Activity so when a Contact enters the Interaction the 'Updated' field in the Data Extension will be changed.
Drag the Update Contact Data Activity from the Activities list to the left area in the Interaction Canvas (ensuring that a Wait Period is not added before the Activity), move your cursor over the Activity and click Configure.
9. In the Update Contact Data dialog, select the Data Extension that you created earlier and click Next.
10. Select the Updated Attribute from the Attribute Set menu and set the value to True, then click Done.
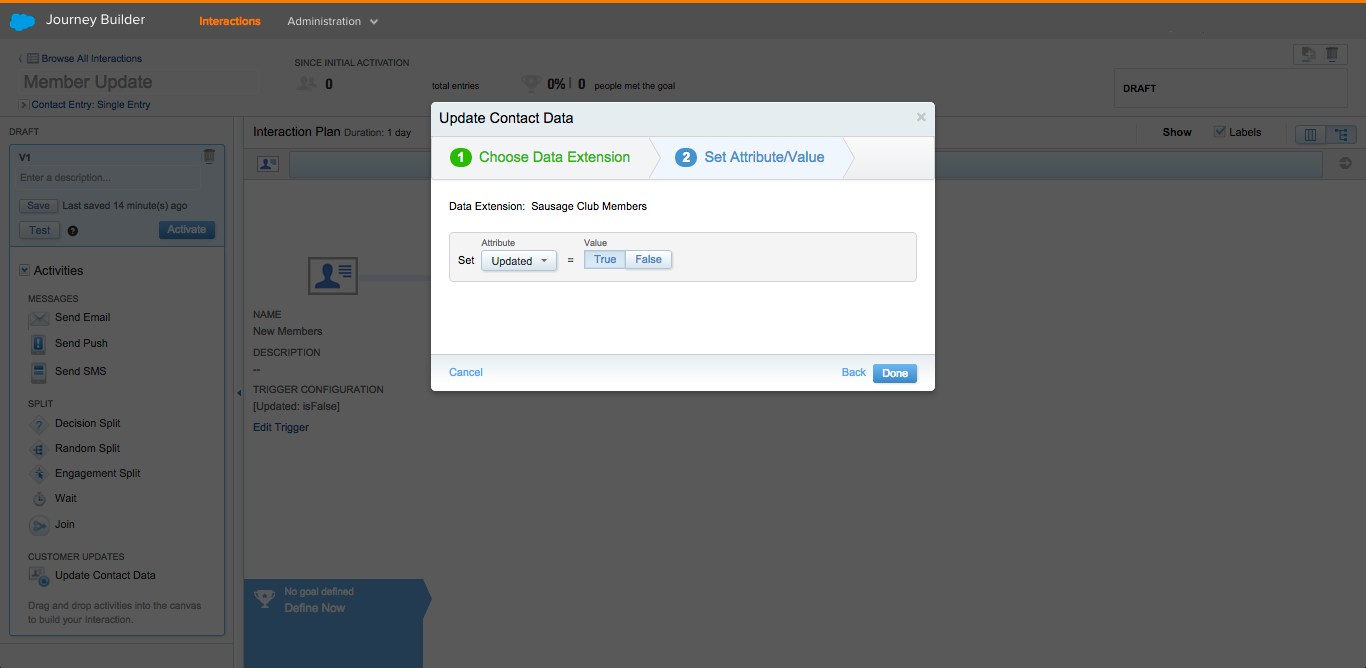 Setting an Attribute value for an Update Contact Data Activity
11. You are now ready to publish the Interaction. Click the Activate button in the version panel on the top left corner of the Interface, then click Activate in the Activate Interaction dialog. The Interaction will be saved, published and changed to a 'running' state.
Now that the Attribute Group has been created and the Interaction is running, you can fire an Event from Automation Studio to allow Contacts to enter the Interaction. When records are added to the Data Extension and the Automation runs, Interaction Triggers that use the Data Extension as the Event Source will listen for the Event and Contacts that meet the Contact Filter Criteria will enter the Interaction.
1. To create a new Automation in Automation Studio, select Automation Studio from the Marketing Automation menu in Marketing Cloud.
2. Click the Create Automation button in the top right corner of the Automation Studio Overview page, select the Scheduled type and click Ok.
3. Name the Automation by clicking on the 'Untitled Automation' field in the top left corner, enter a name and click Done.
4. Drag a Fire Event Activity from the Activities list onto the Automation Canvas.
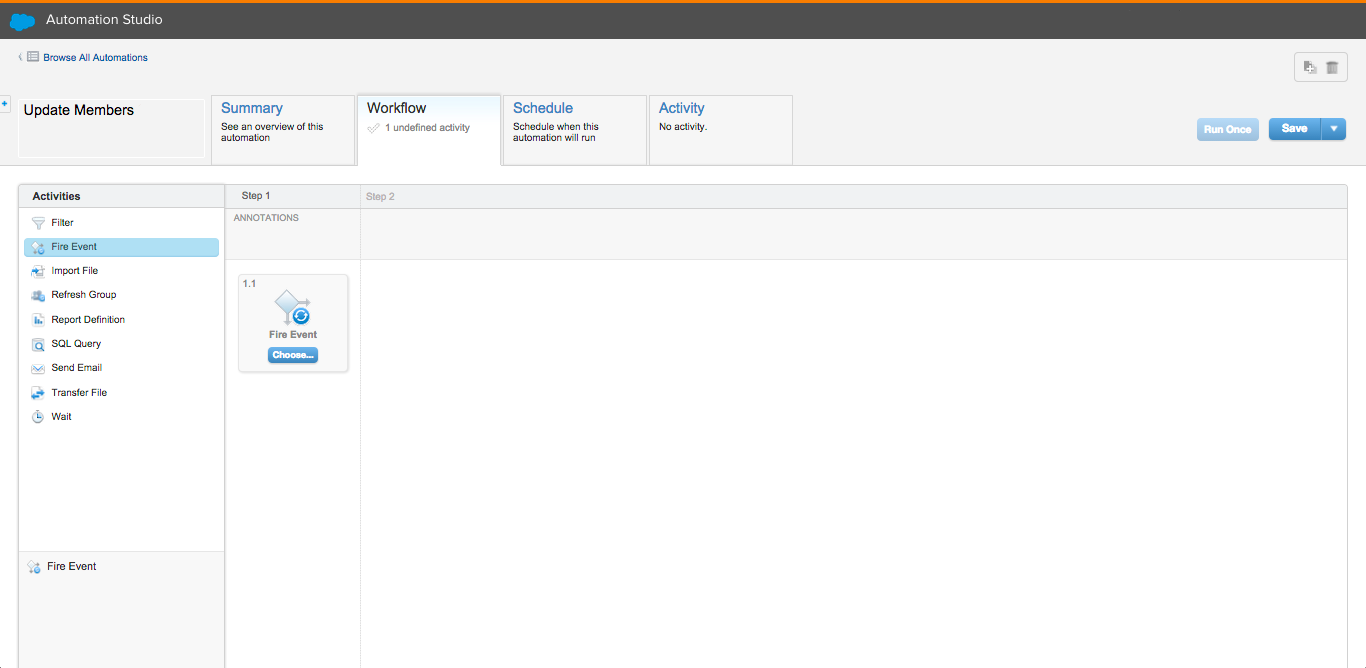 Adding a Fire Event Activity to the Automation Canvas
5. Click the Choose… button and select the Data Extension you created earlier in the Data Extensions directory, and click Done.
6. Save the Automation by clicking the Save button in the top right corner of the Automation interface.
7. Now you can fire the Event. Click the Run Once button (next to the Save button). The Automation task will start after a few seconds. You can view the progress from the Activity page by selecting the Activity tab.
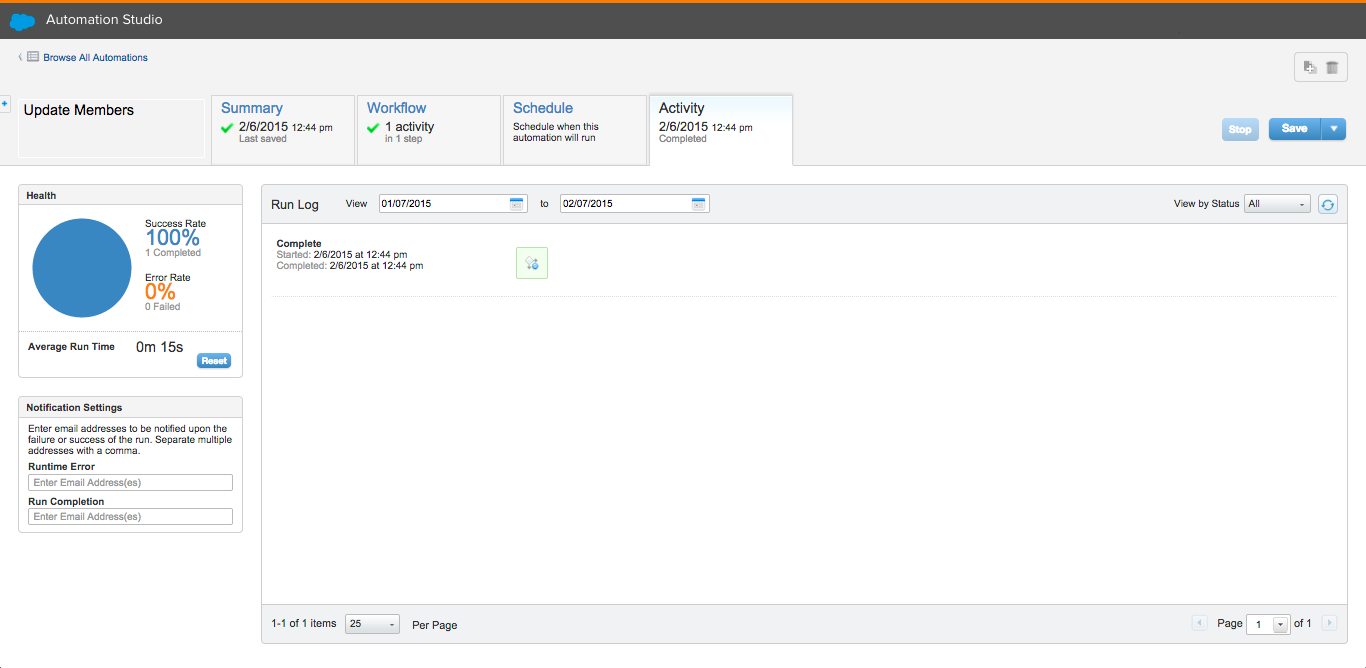 Review Activities for an Automation in Automation Studio
8. When the Activity has completed, check the Interaction completed successfully by selecting the Data Extensions menu item in Contact Builder, select the Data Extension and click on the Records tab. You should see that the 'Updated' value for the records has been set to 'True' by the Update Customer Data Activity in the Interaction. It may take a few minutes for the Interaction Trigger to hear the Event, so if the fields are not updated, check again later.
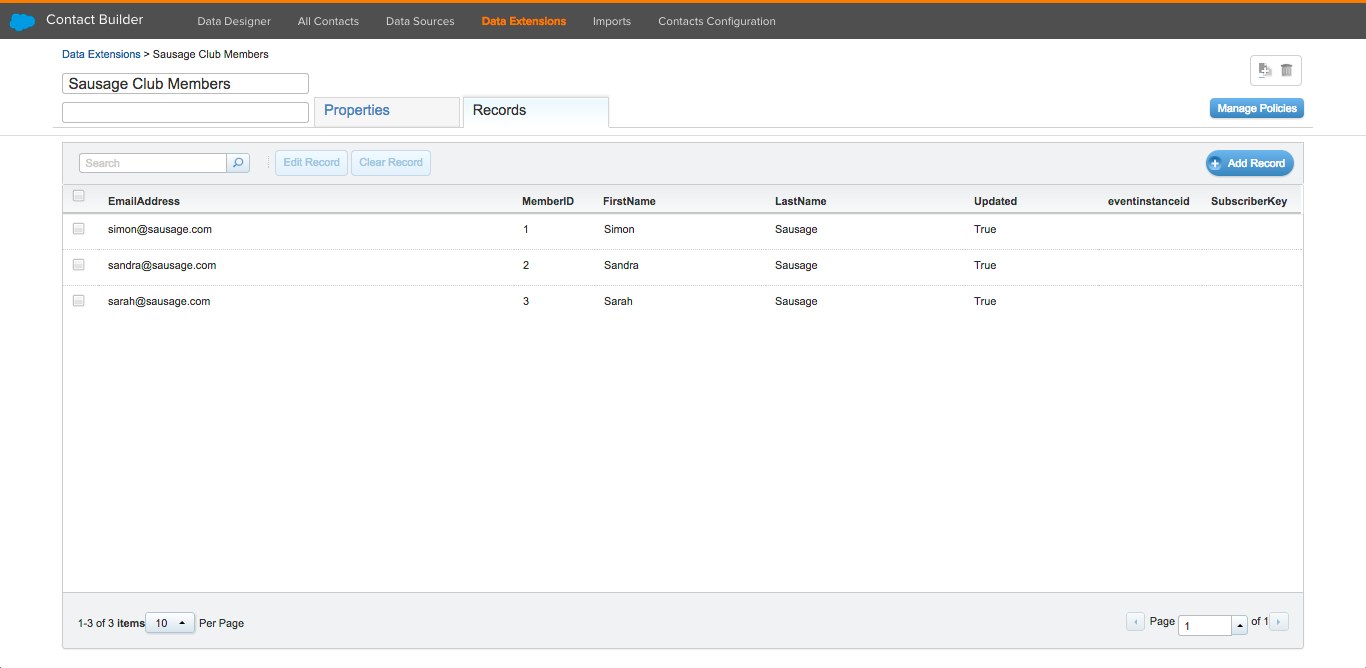 Data Extension records updated in Contact Builder
As an alternative to using an Automation to fire an Event, the contactEvents method from the Fuel REST API can be used to serialize Event data into a Data Extension and fire an Interaction for a defined Interaction Trigger.
An Event comprises of an Event Destination and a linked Data Extension. The Event Destination will be the Attribute Group you created earlier and you will add serialized Event Data to the linked Data Extension using the contactEvents method.
This scenario simulates the behavior when an existing Contact updates their preference data on an external platform, for example on a website. When this Event occurs, the Contact preference data will be serialized into a Data Extension and the Contact will enter an Interaction.
1. The first step is to retrieve the Event Definition Key (a unique identifier for an Interaction Trigger) that you will use to fire the Event. Open Journey Builder from the Marketing Automation menu, then select Triggers from the Administration menu.
2. Select the Trigger that you created in the Interaction Canvas and copy the Event Definition Key value.
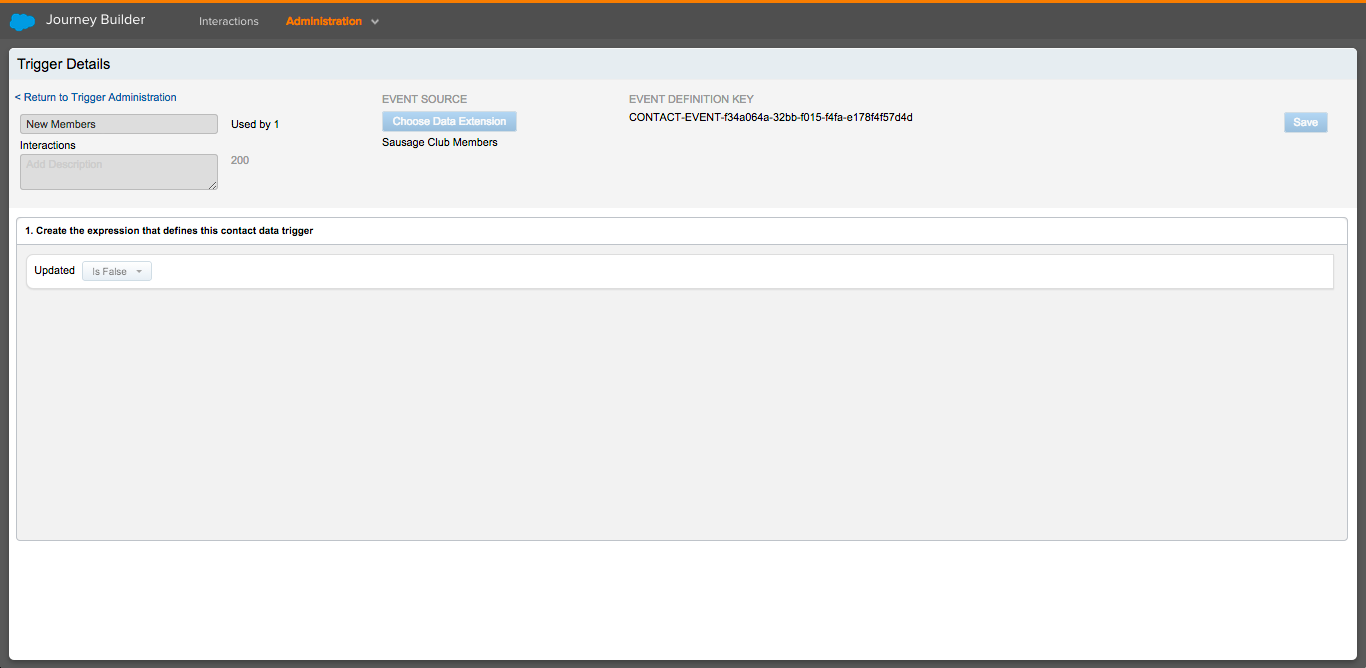 Retrieving the Event Definition Key for a Trigger in Journey Builder
3. Now you can create an Event. Events are created in Data Designer within the Contact Builder app. Open Contact Builder from the Data & Analytics menu, then from the dropdown menu on the Create Attribute Group button, select Create New Event.
4. In the Create New Event dialog, add a unique name in the Name field, paste the Event Definition Key value from the Interaction Trigger in the Event Key field and then select the Attribute Group you created earlier. This creates a cardinal relationship between the Event and Event Destination.
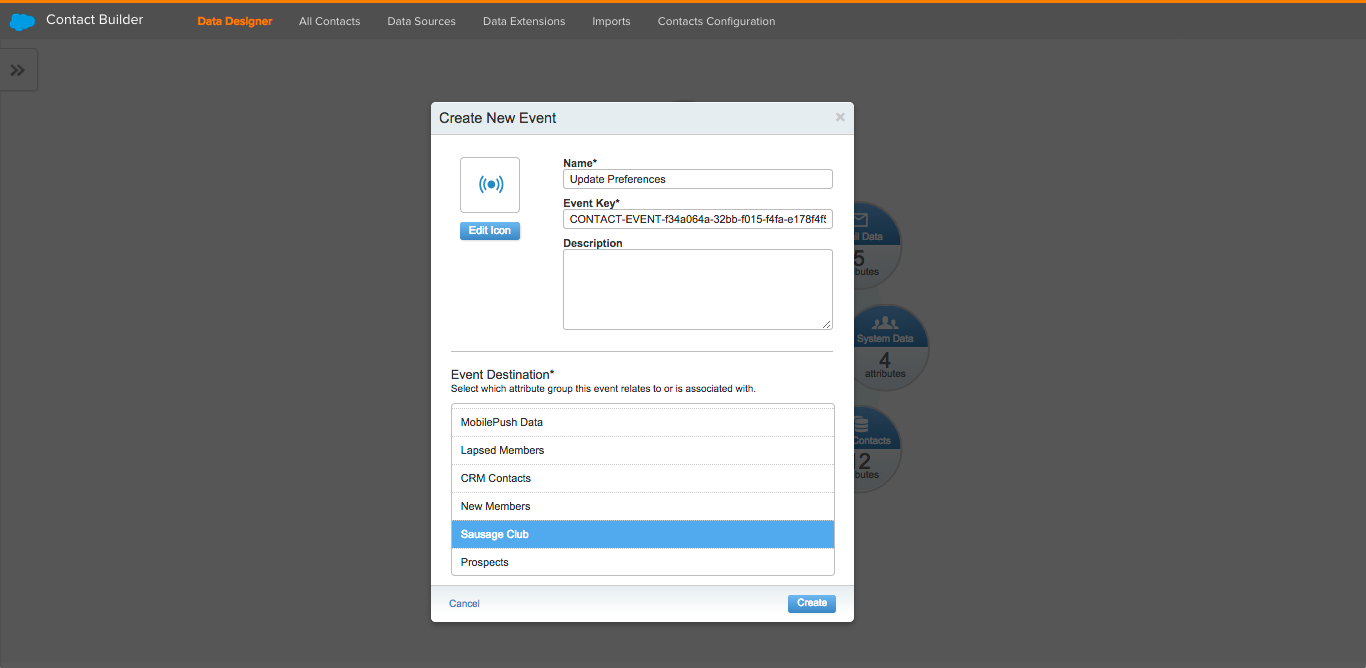 Creating a new Event in Contact Builder
5. Click Create and the Event will be displayed. Now you can create a new Data Extension to contain the serialized Event Data. Click on the Create New Data Extension button. This is the preferred method (rather than linking to an existing Data Extension), as Data Extensions that are linked to Events needs to contain additional fields and these are automatically added to a Data Extension when a new Data Extension is created from the Events interface.
6. In the Create New Data Extension dialog, assign a name to the Data Extension. You can optionally complete the additional fields in this step and change the location of the Data Extension.
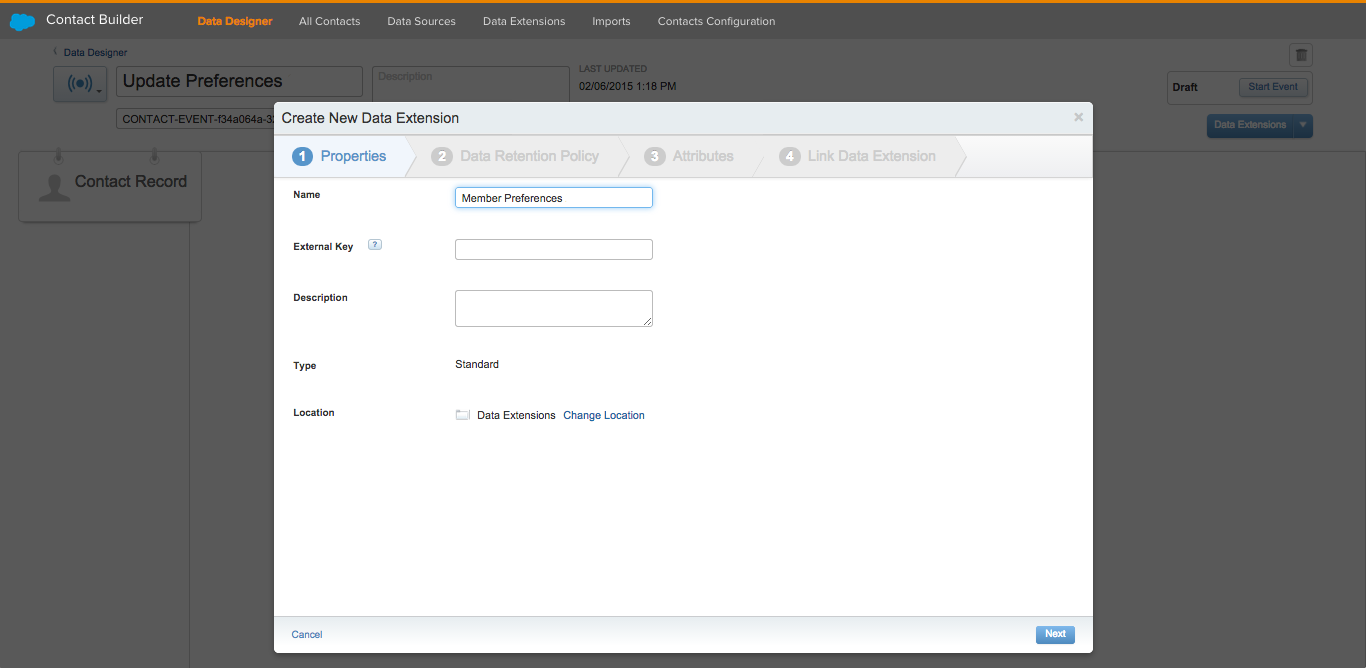 Creating a new Data Extension for an Event in Contact Builder
7. Click Next twice and add an Attribute (or Attributes) to store the member preference data. You will note that three required Attributes have automatically been added to the Data Extension.
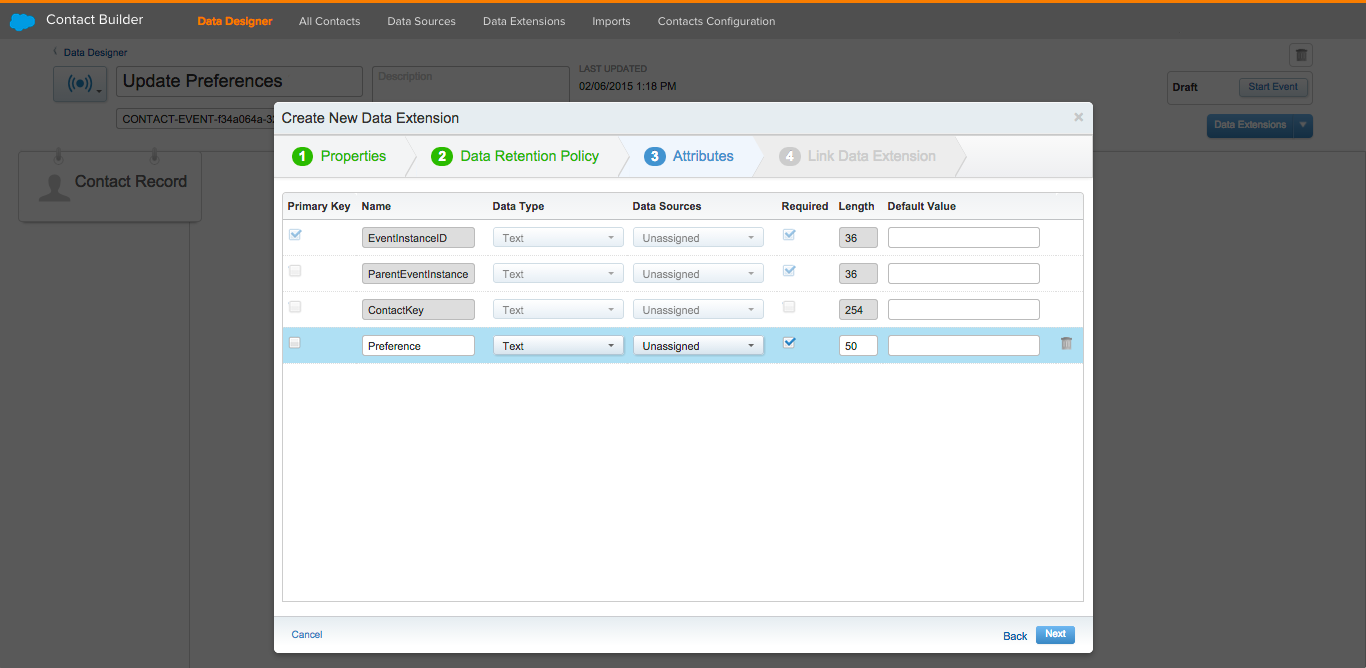 Creating Attributes for an Event in Contact Builder
8. Click Next and create the relationship between the Contact record and the new Data Extension. In this instance, link the two Contact Key system generated Attributes.
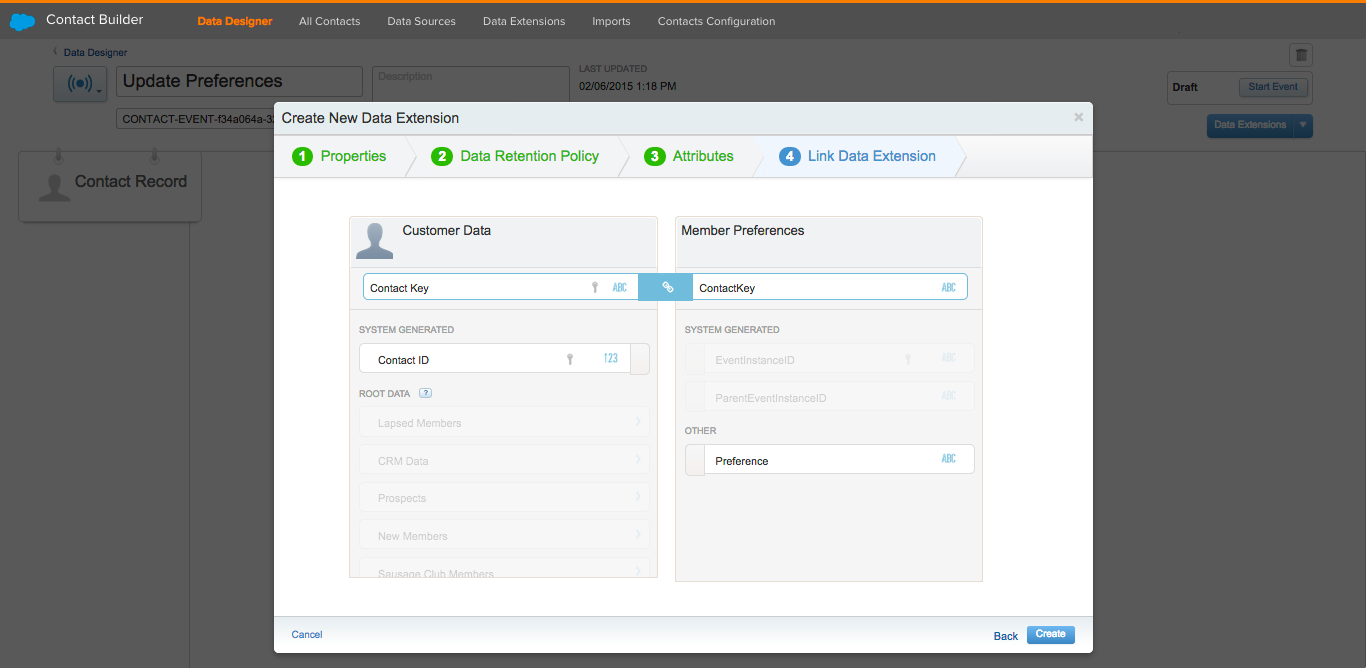 Creating relationships for an Event in Contact Builder
9. Click Create and click OK in the confirmation dialog. You will now see the relationship between the Contact Record and the linked Data Extension where the Event data will be serialized.
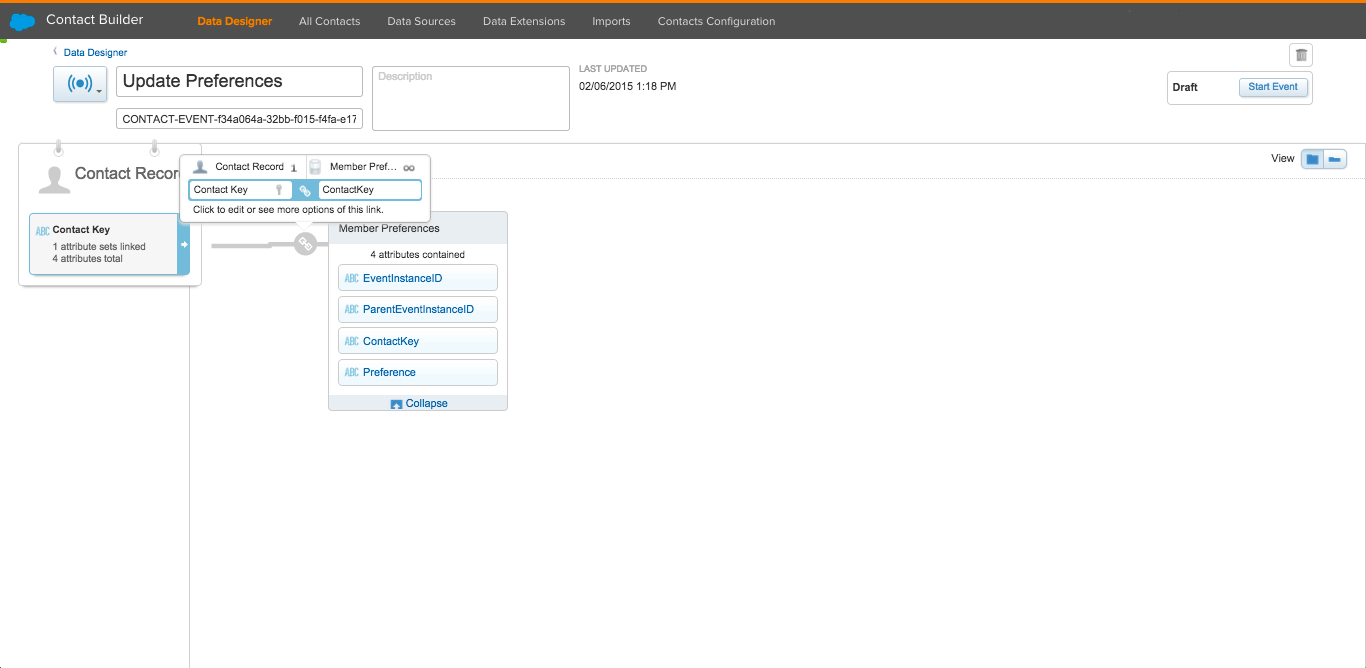 Data relationship for an Event in Contact Builder
10. Start the Event by selecting the Start Event button in the top right corner of the interface. Click Start in the confirmation dialog.
11. After you start an Event, the Data Designer interface will be displayed. Select the Attribute Group that you previously created and click OK if prompted to confirm changes. You will see that the relationship from the Contact Record has been updated to include the linked Data Extension used by the Event.
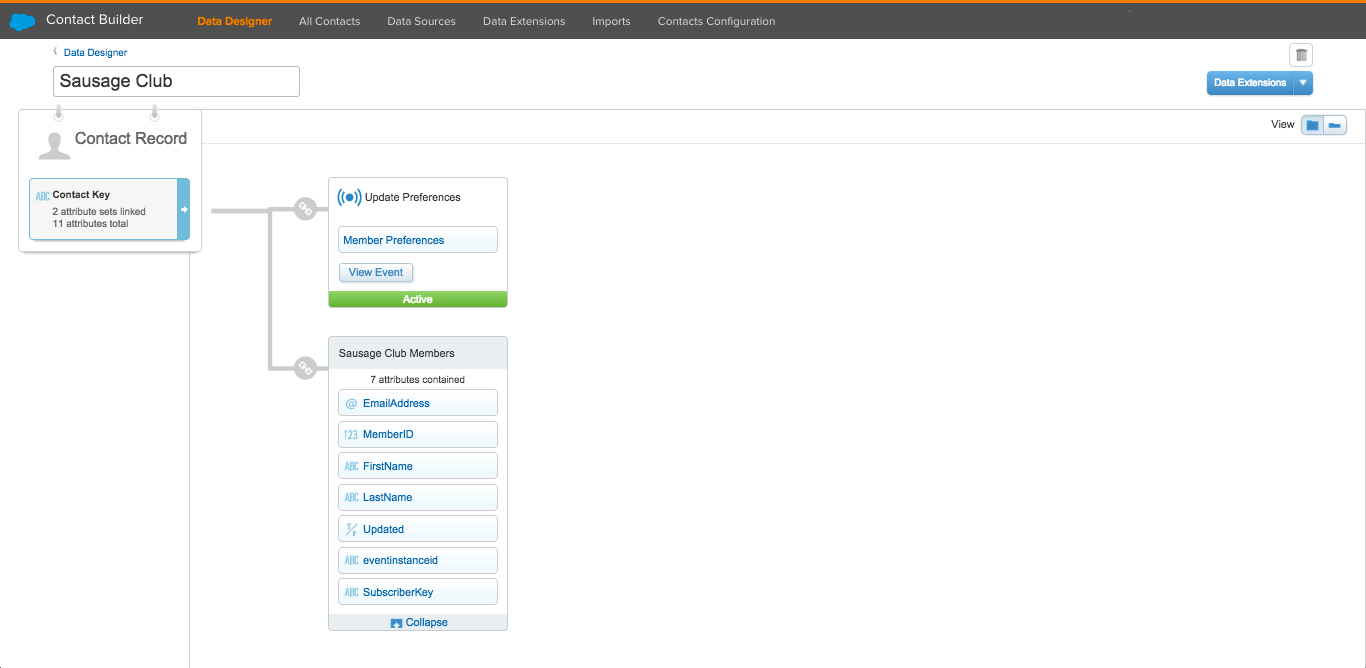 Data relationship of an Event in an Attribute Group
12. Before you can fire the Event, you will need to add a new record to the Event Destination, as the existing Contacts have already entered the Interaction (from the Automation run in Automation Studio) and will no longer meet the Contact Filter Criteria defined in the Interaction Trigger. Select the Data Extensions menu item in Contact Builder and then select the first Data Extension you created (used in the Attribute Group).
13. Click on the Records tab, then click the Add Record button and complete the fields. You will note that an 'eventinstanceid' field has automatically been added to the Data Extension. This is used internally, you do not need to add a value to this field. When you have added a new record click the Save button.
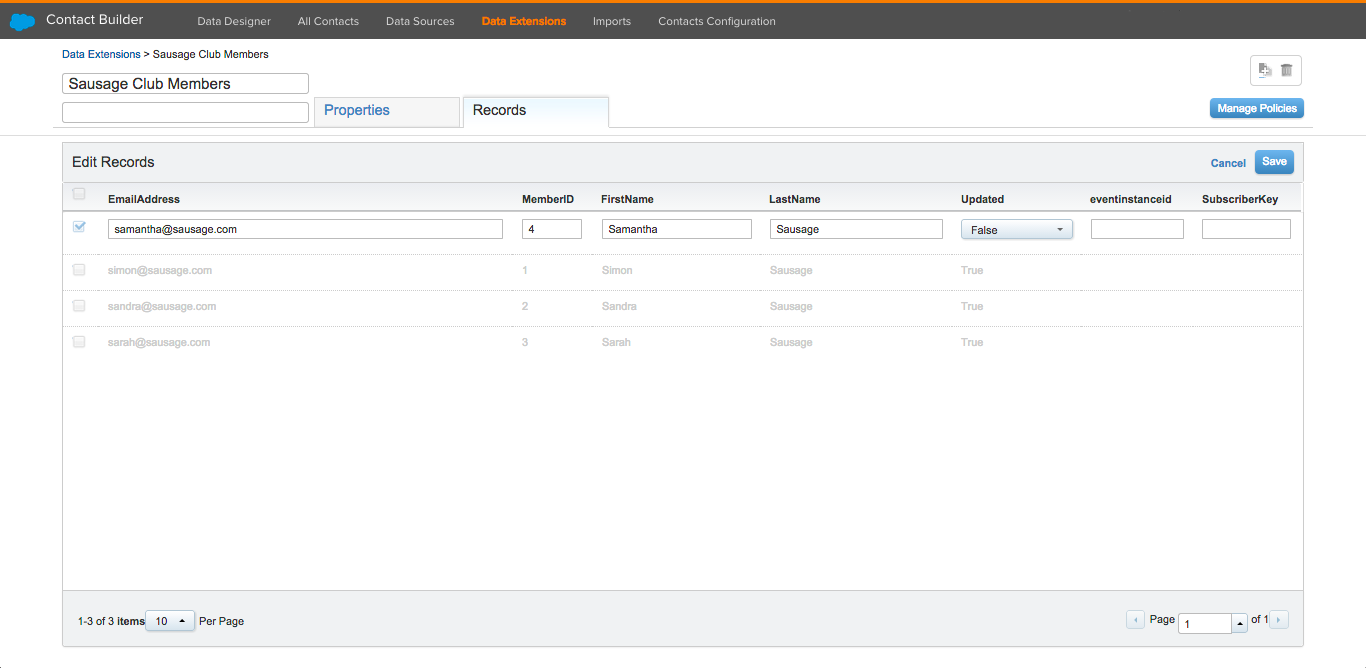 Adding a new record to a Data Extension in Contact Builder
14. Now you are almost ready to simulate posting Event data for this new record using the contactEvents method. The Event data will be serialized into the linked Data Extension associated with the Event and the Contact will enter the Interaction.
Click on the Data Extensions menu item in Contact Builder and locate the Data Extension that you will serialize the Event data into by opening the Data Extension that you created for the Event data. Copy the External Key, and paste it into a text file for later use.
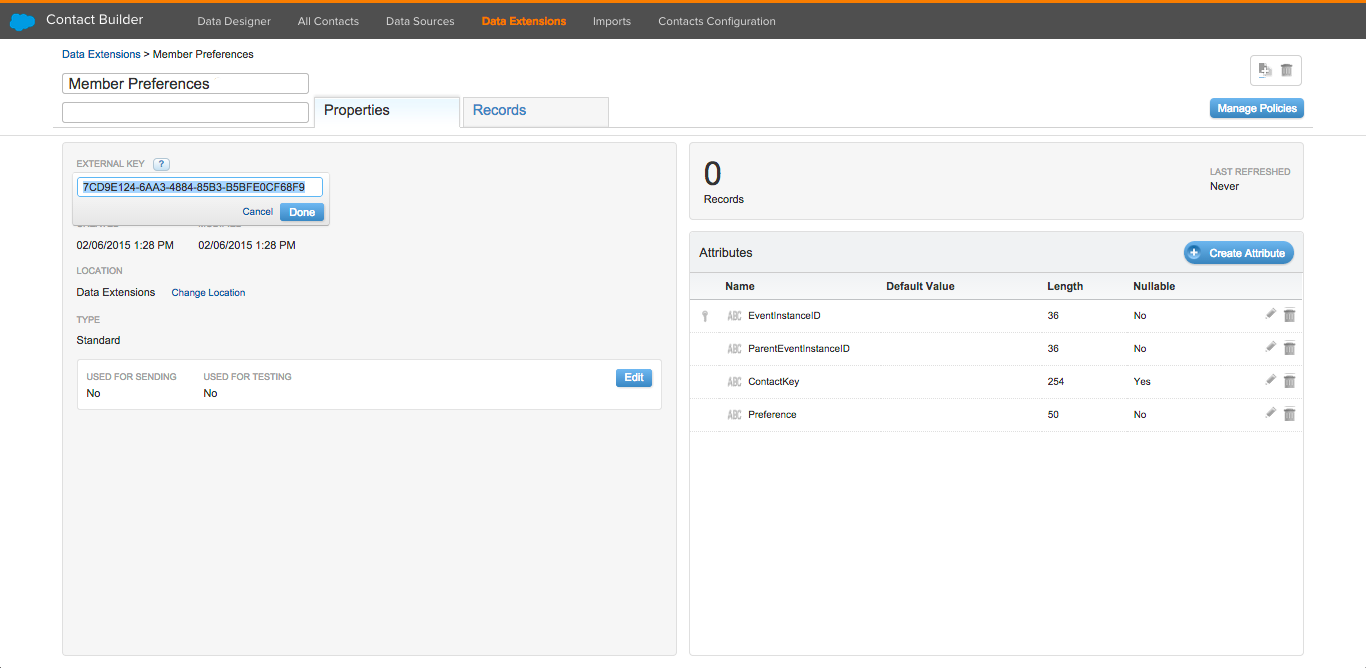 Locating the External Key for a Data Extension
15. Before you can make the contactEvents API request, you will need to create an app in App Center with the required permissions (or edit an existing app to include the permissions). Login to App Center at http://appcenter.exacttarget.com and click the Create New App button in the top right corner of the page.
16. Click the API Integration template.
17. Complete the Name and Package fields.
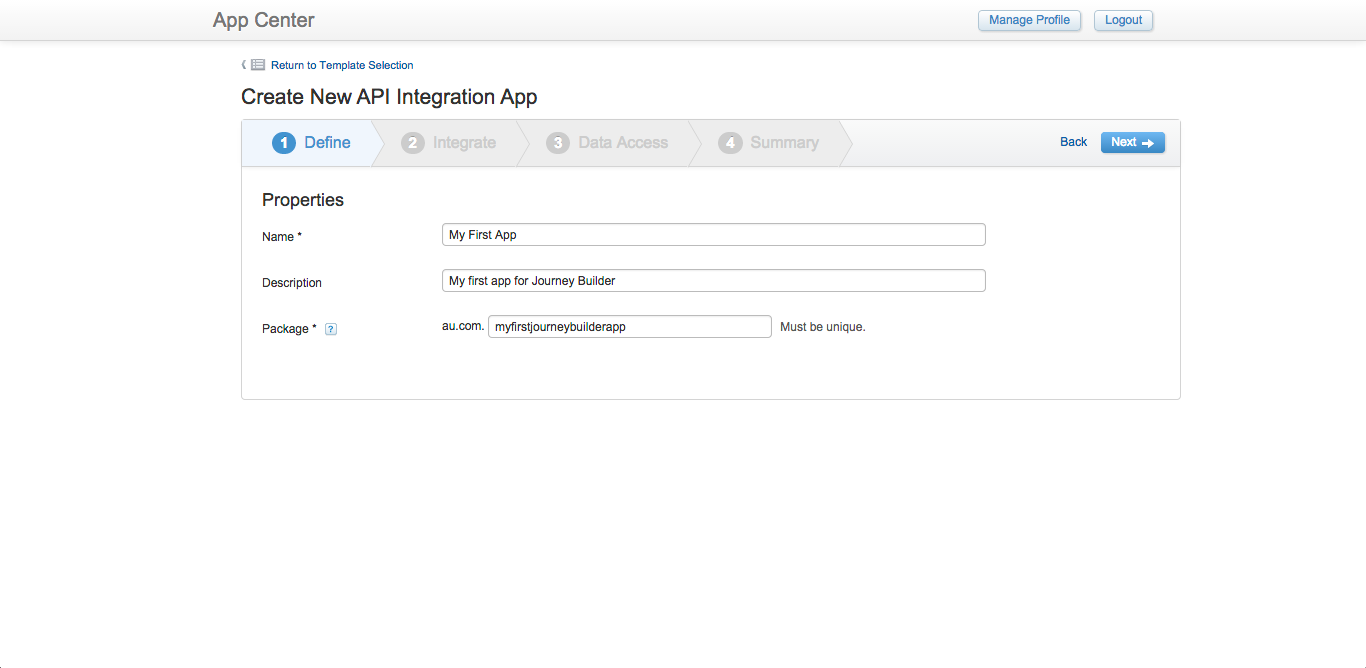 Defining app properties in App Center
18. Click Next and select a Marketing Cloud user account that the app will use when making API requests. Unless you have purchased a separate Sandbox Account license, select the Production Account option. The 'Link to Account' button opens a new window for defining Marketing Cloud account credentials that will be used by the app. If you have previously created an Account reference, you can select it from the Account menu.
19. Click Next and add the permissions required to use the app. You will need to enable the following permissions:
| Operation | Functional Area | Feature | Permissions |
|---|---|---|---|
| Data | Data Management | Data Extensions | Read, Write |
| Automation | Marketing Automation | Interactions | Execute, Read, Write |
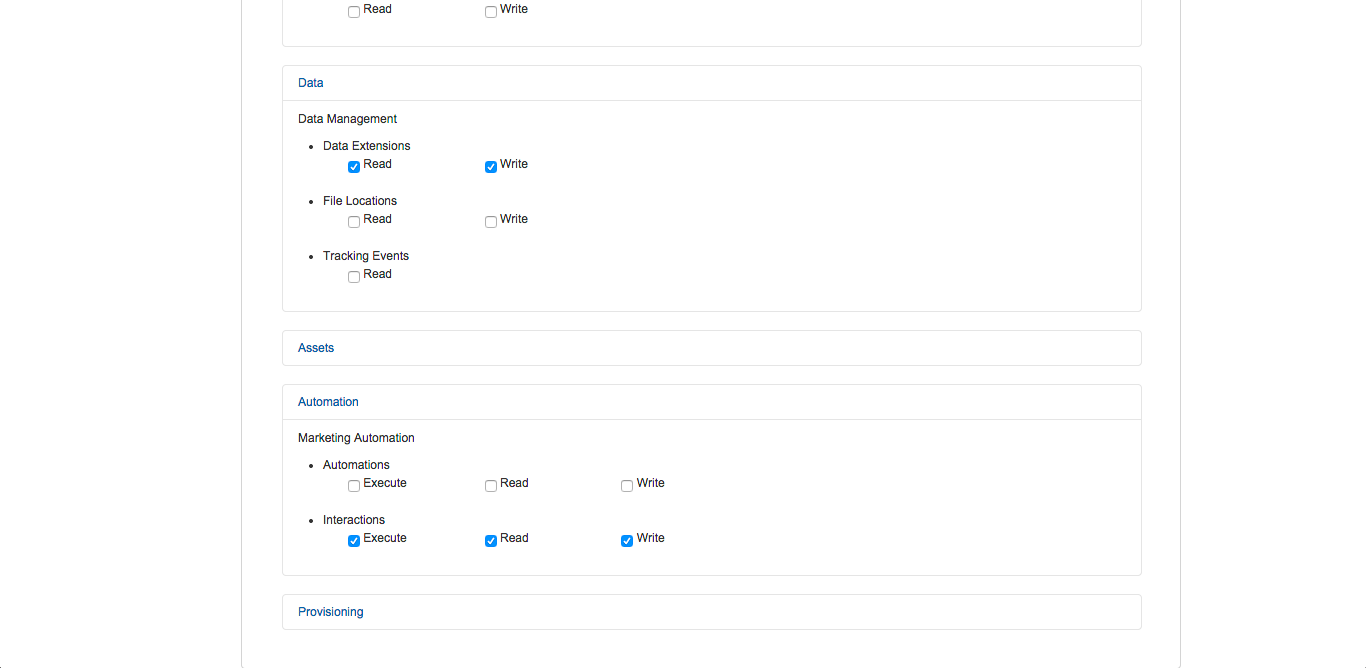 Defining app properties in App Center
20. Click the Next button to display the Summary page and then click the Finish button to save the app. Copy the OAuth Client ID and Client Secret on this page and paste into a text file.
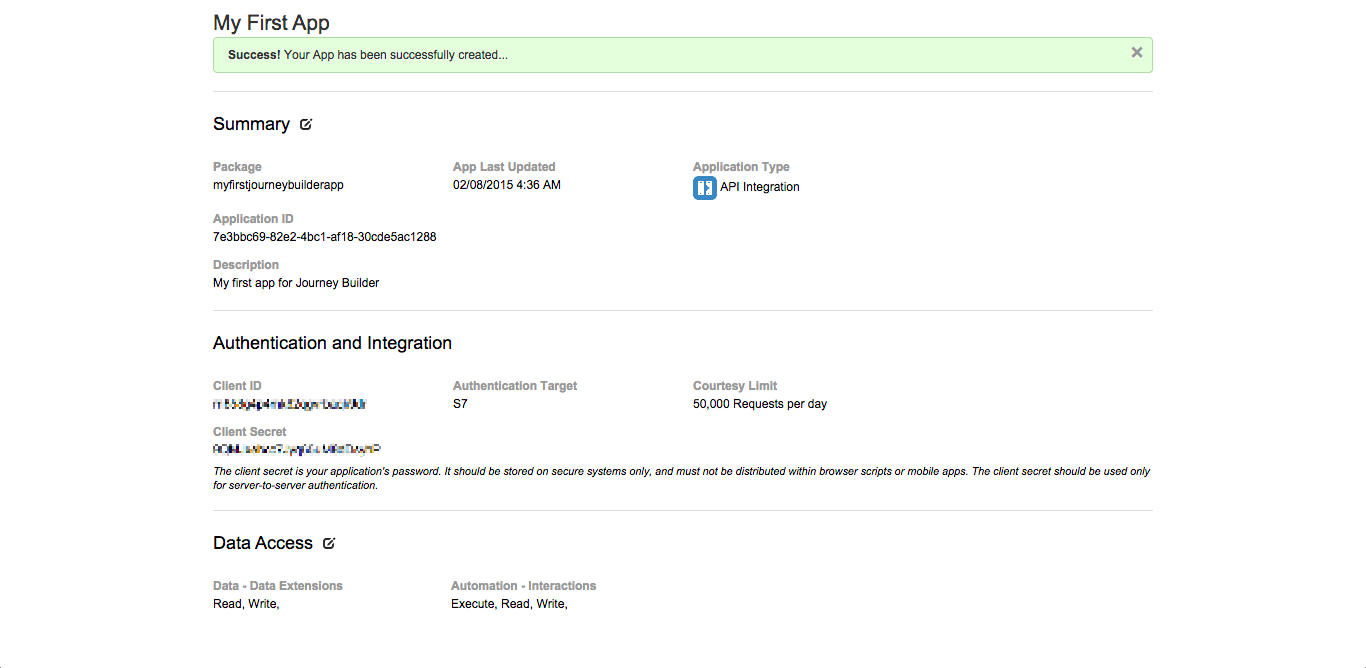 Details of an app in App Center
21. Obtain an OAuth token to use in the contactEvents method. Perform a HTTP POST request specifying your client ID and client secret for the app (obtained from App Center) in the payload. An example request is provided below.
POST https://auth.exacttargetapis.com/v1/requestToken
Content-Type: application/json
{
  "clientId": "gyjzvytv7ukqtfn3x2qdyfsn",
  "clientSecret": "SJbAEenSK2SVBK4d4vBV6NKT"
}
This HTTP POST request returns an accessToken which is the OAuth token used for subsequent API requests and an expiresIn value indicating the expiration period of the OAuth token in seconds. An example response is provided below.
{
  "accessToken": "4ae36paatp4mnwkhanyhajp4",
  "expiresIn": 3600
}
22. Use the contactEvents API method to serialize the Event data into the Data Extension linked to the Event and fire an Interaction using the Trigger eventDefinitionKey.
This method uses the following key value pairs:
| Key | Value |
|---|---|
contactKey |
The Contact Key for the Contact Record (that was created in the Attribute Group relationship) |
contactID |
The Contact ID for the Contact Record (if it was created in the Attribute Group relationship) |
eventDefinitionKey |
The Event Definition Key for the related Interaction Trigger (which is also used as the Event Key). |
data |
Any related data associated with the event. This object includes the following name/value pairs:key: An assigned key for the Data Extension used to receive the data.name: A human-readable identifier for the Data Extension used to receive the data (required).id: The External Key of the Data Extension used to receive the data.items: Name/value pairs containing information associated with the event |
Use the accessToken value obtained from the Fuel Authentication Service as an Authorization Bearer parameter as per the request header below.
The ContactKey value will be the ContactKey of the new record you created in the Event Destination Data Extension in step 13.
The Data Extension used to store the Event data is the linked Data Extension for the Event. Add the Data Extension name as the name value, external key as id value and create a unique key value.
An example request is provided below.
HOST: https://www.exacttargetapis.com
POST /contacts/v1/contactEvents
Content-Type: application/json
Authorization: Bearer insert-accessToken-here

{
    "contactKey": "susan@sausage.com",
    "eventDefinitionKey": "CONTACT-EVENT-f34a064a-32bb-f015-f4fa-e178f4f57d4d",
    "data": [{
        "id": "7CD9E124-6AA3-4884-85B3-B5BFE0CF68F9",
        "name": "Member Preferences",
        "items": [{
            "values": [{
                "name": "Preference",
                "value": "frankfurter"
            }]
        }]
    }]
}
This request returns the following response.
{
    "responseContext": {
        "operationStatus": "OK",
        "schemaType": "Contacts",
        "schemaVersionNumber": 192,
        "schemaContextId": "d6e57283-155b-e411-aea6-38eaa71427a1"
    },
    "eventInstanceID": "90083c3b-6258-4cab-ad67-362da997bfea",
    "asyncRequestID": 1446,
    "requestServiceMessageID": "633af5bb-8add-4bc6-a64f-4c8f0002bbd0",
    "serviceMessageID": "4bf8995e-0a92-45b3-8eea-61fd1b93d0c3"
}
As an alternative, you can omit the contactKey from the parent object tree of the request payload and include it as an item in the Event data object (as a ContactKey attribute was added to the Event Data Extension when it was created). This alternate request payload is indicated below.
HOST: https://www.exacttargetapis.com
POST /contacts/v1/contactEvents
Content-Type: application/json
Authorization: Bearer insert-accessToken-here

{
    "eventDefinitionKey": "CONTACT-EVENT-f34a064a-32bb-f015-f4fa-e178f4f57d4d",
    "data": [{
        "id": "7CD9E124-6AA3-4884-85B3-B5BFE0CF68F9",
        "name": "Member Preferences",
        "items": [{
            "values": [
                  {
                     "name":"ContactKey",
                     "value":"susan@sausage.com"
                  },
                  {
                     "name":"Preference",
                     "value":"frankfurter"
                  }
               ]
        }]
    }]
}
23. Using either of the above requests, Event data will be added to the Data Extension linked to the Event and the Contact will enter the Interaction. You can confirm that the Interaction completed by selecting the Data Extensions menu in Contact Builder, then select the Data Extension containing customer records and click on the Records tab. You should see that the 'Updated' value for the new record has been set to 'True' by the Update Customer Data Activity in the Interaction. Also, the serialized event data should appear in the Data Extension linked to the Event.
As an alternative to the contactEvents method, an 'events' method can be used insert data into the Event Source Data Extension used by the Interaction Trigger. This method differs from the contactEvents method, as it does use a Contact Builder Event.
Follow the procedural steps below to create a new Trigger for the existing Interaction you created earlier, which the events method will to insert new Contacts into the Event Source Data Extension.
1. Open the running Interaction you created earlier from the Journey Builder dashboard.
2. From the Current Version panel, select the New Draft button to create a new draft of the current Interaction version.
3. Select the Edit Trigger link from the Trigger column in the Interaction Canvas.
4. Click the Select Trigger step from the navigation ribbon in the dialog, select Create Trigger and click the Next button.
5. Assign a name for the Trigger in the Add Name field.
6. Define the Event Source by clicking on the Choose Data Extension button and select the Data Extension you initially created that contains the Member data.
7. Select the Attribute Group from the Attributes list and drag the 'Updated' Attribute to the Expression Editor. Change the expression value to Is False.
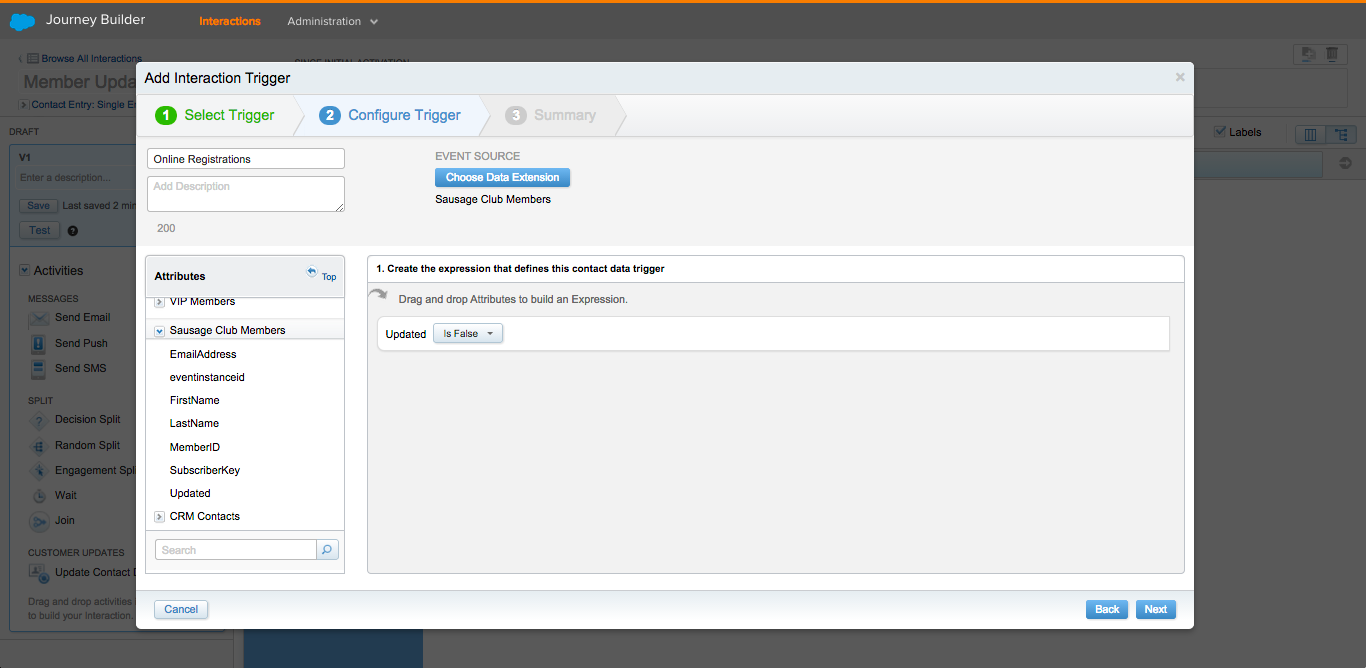 Configuring an Interaction Trigger in the Interaction Canvas
8. Click Next, then click Done to close the Interaction Trigger dialog.
9. Activate the new draft version by clicking the Activate button in the Draft version panel, then click Activate in the Activate Interaction dialog. The Interaction will be saved, published and changed to a 'running' state.
10. Retrieve the Event Definition Key by selecting Triggers from the Administration menu in Journey Buidler, select the Trigger that you just created in the Interaction Canvas and copy the Event Definition Key value.
11. Obtain an OAuth token to use in the events method. Perform a HTTP POST request specifying your client ID and client secret for the app (obtained from App Center) in the payload if the accessToken used previously has expired (for example, one hour has elapsed). An example request is provided below.
POST https://auth.exacttargetapis.com/v1/requestToken
Content-Type: application/json
{
  "clientId": "gyjzvytv7ukqtfn3x2qdyfsn",
  "clientSecret": "SJbAEenSK2SVBK4d4vBV6NKT"
}
This HTTP POST request returns an accessToken which is the OAuth token used for subsequent API requests and an expiresIn value indicating the expiration period of the OAuth token in seconds. An example response is provided below.
{
  "accessToken": "4ae36paatp4mnwkhanyhajp4",
  "expiresIn": 3600
}
11. Use the events API method to serialize data into the Event Source Data Extension.
This method uses the following name/value pairs:
| Name | Value |
|---|---|
contactKey |
The Contact Key for the Contact Record (that was created in the Attribute Group relationship) |
contactID |
The Contact ID for the Contact Record (if it was created in the Attribute Group relationship) |
eventDefinitionKey |
The Event Definition Key for the related Interaction Trigger. |
data |
Related Contact data associated to insert into the Event Source Data Extension. |
Use the accessToken value obtained from the Fuel Authentication Service as an Authorization Bearer parameter as per the request header below.
An example request is provided below.
HOST: https://www.exacttargetapis.com
POST /interaction-experimental/v1/events
Content-Type: application/json
Authorization: Bearer insert-accessToken-here

{
   "contactKey":"saskia@sausage.com",
   "eventDefinitionKey":"CONTACT-EVENT-eb0f4103-01f5-e729-8a27-465afcae3a1e",
   "data":{
      "EmailAddress":"saskia@sausage.com",
      "MemberID":5,
      "FirstName":"Saskia",
      "LastName":"Sausage"
   }
}
This request returns an Event Instance ID (a unique identifier for the request).
"{\ \ \"eventInstanceId\": \"4b1fd742-91a7-4a2f-bebb-dce3a22e5d43\"\ \ }"
If a required field is missing, a validation exception is returned in the response:
{
    "message": "Event Data contains errors:",
    "errorcode": 10006,
    "documentation": "",
    "validationErrors": [
        {
            "message": "Required Event Data fields are missing: emailaddress",
            "errorcode": 10000,
            "documentation": ""
        }
    ]
}
12. When a successful request is made, data defined in the request payload will be added to the Event Source Data Extension and the Contact will enter the Interaction. You can confirm that the Interaction completed by selecting the Data Extensions menu in Contact Builder, then select the Data Extension containing customer records and click on the Records tab. You should see the new record has been created and the 'Updated' value for the record has been set to 'True' by the Update Customer Data Activity in the Interaction.
Note: The events method is used to insert new records into the Event Source Data Extension. If a
contactKeyorcontactIDvalue (as defined in the Attribute Group relationship) already exists as a record in the Event Source Data Extension, the Contact will still enter the Interaction, but data defined in the request payload will not be inserted or updated for the existing record.
For more information on Journey Builder development, refer to the following resources:
