##Tutorial 7: Installing and Configuring the Hortonworks ODBC driver on Windows 7
This tutorial is from the Hortonworks Sandbox 2.0 - a single-node Hadoop cluster running in a virtual machine. Download the Hortonworks Sandbox to run this and other tutorials in the series.
This tutorial describes how to install and configure the Hortonworks ODBC driver on Windows 7.
The Hortonworks ODBC driver enables you to access data in the Hortonworks Data Platform from Business Intelligence (BI) applications such as Microsoft Excel, Tableau, Click View, Micro Strategy, Cognos, and Business Objects.
- Windows 7
- Hortonworks Sandbox 1.2 (installed and running)
The Hortonworks ODBC driver installation consists of the following steps:
- Download and install the Hortonworks ODBC driver.
- Configure the ODBC connection in Windows 7.
In order for ODBC to work we will have to add a private network between your laptop and the Sandbox Virtual Machine. If the Sandbox VM is running halt it.
Once the VM has been halted open the Virtual Box console. Select Preferences from the Menu bar at the very top of the screen.

The preferences window for Virtual Box will open up.

Select Network and click on the Add icon on the right. Then click on the screwdriver icon to configure the network. Virtual Box will assign an IPv4 Address and subnet.

Click on the DHCP Server tab and configure the DHCP server. When you are done click OK on this screen and OK on the Network screen. This will return you back to the Virtual Box console screen.

Now select your VM and cick on the Settings button. This will open the Setting screen for your VM. Select Network at the top.

Now select Adapter 2. Click on the Enable Network Adapter box. It should be filled in to attach on the Host-only Adapter you created in the Virtual Box preferences. Click OK to close the window.

Boot your VM. Once the Sandbox screen shows on the console hit Alt-F5 to get a login and login as root/hadoop. Type ifconfig and look for eth1. The IP address of Eth1 is the address you will use as the IP address when you configure the ODBC connection.

-
In Windows 7, open a web browser and navigate to http://hortonworks.com/download/. Click the Add-Ons link at the bottom of the Hortonworks Data Platform 1.2 box.

-
On the Add-Ons page, scroll down to Hortonworks Hive ODBC Driver (Windows + Mac) and select the driver that matches the version of Excel installed on your system (32-bit or 64-bit). For this tutorial, we will configure for Excel 2013 64-bit, so we’ll select Windows 64-bit (msi).

-
Review the Hortonworks license, then click Accept Agreement.

-
To start the download, click Save File on the pop-up message.

-
After the download is complete, double-click to open the downloaded HortonworksHiveODBC64.msi file, then click Run on the pop-up security message to open the setup wizard.

-
To start the installation, click Next on the Hortonworks Hive ODBC Driver Setup Wizard Welcome screen.

-
Review the license agreement, then select the checkbox to accept the license terms. Click Next to continue.

-
Click Next to accept the default installation folder.
You can also type in a different location, or click Change to select a different installation folder using a file browser.

-
To begin the installation, click Install.

-
If a reboot is required, a pop-up message will appear. Click OK to continue.

-
When the installation is complete, the setup wizard displays a confirmation message. Click Finish to close the setup wizard.

-
A pop-up message will appear. Close any open applications, then click Yes to restart your system.


Now that you have successfully installed the Hortonworks ODBC driver, the next step is to configure the driver.
-
In the Windows Control Panel, select Administrative Tools, then double-click Data Sources (ODBC) to open the ODBC Data Source Administrator.

-
Select the System DSN tab. The Sample Hortonworks Hive DSN should be selected by default; if not, select it. Click Configure to continue.

-
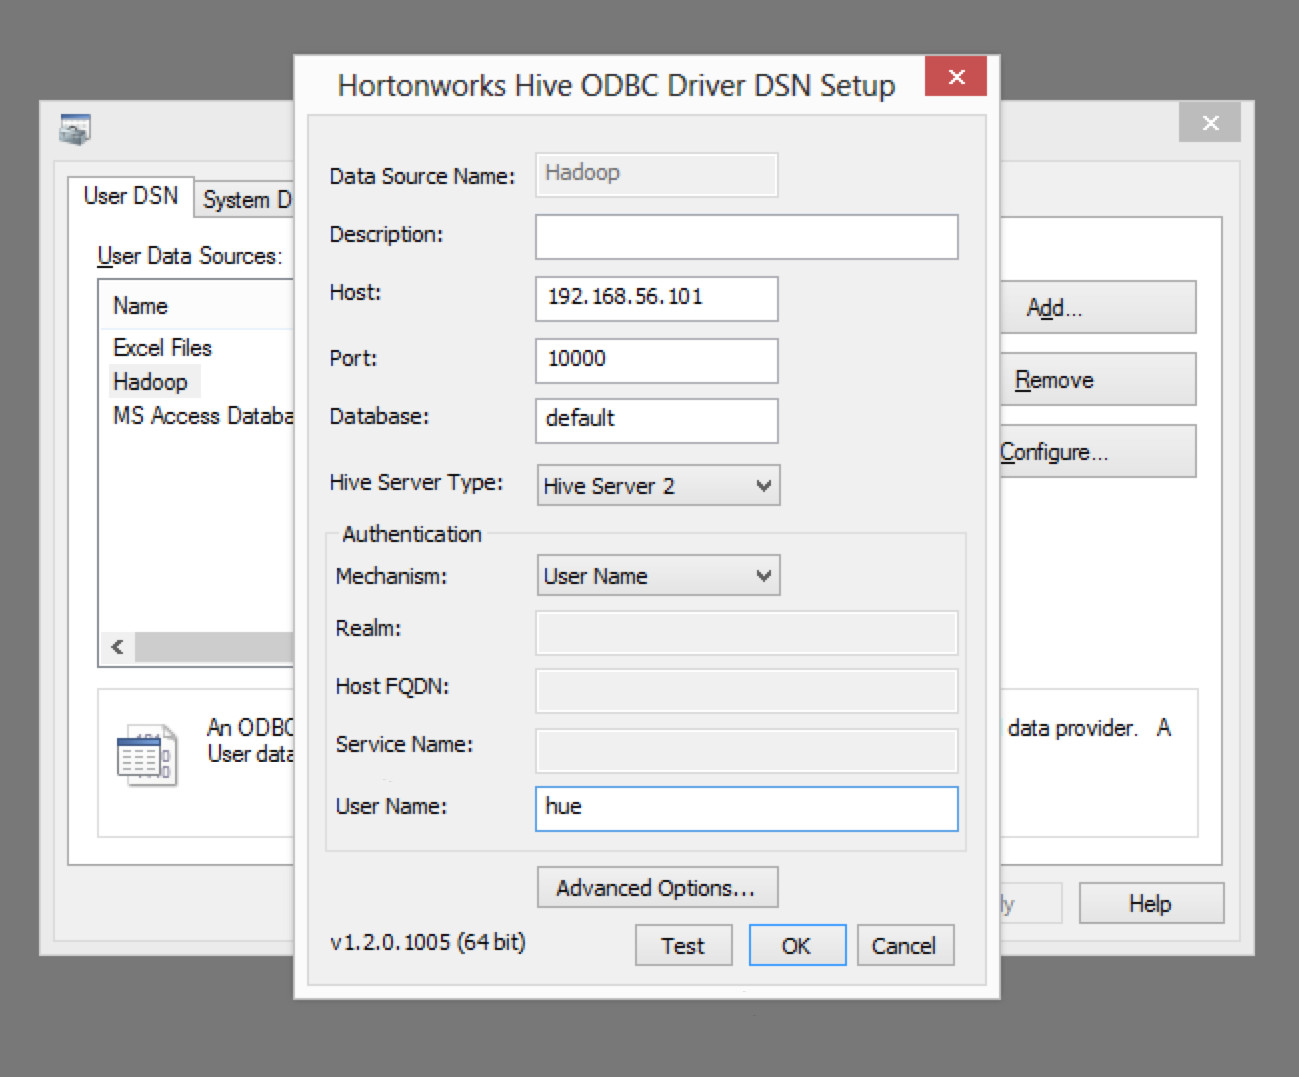
On the Hortonworks Hive ODBC Driver DSN Setup window, type in the settings as shown in the image below. Type the IP address of the Hortonworks sandbox in the Host box. The Authentication mechanism should be set to User Name, and the sandbox user name should be entered in the User Name box (in this case the default user name, “hue”).


Notes
-
The sandbox IP address is displayed in the command prompt window after the sandbox VM (Virtual Machine) starts, and also appears in the browser address box when you open the sandbox.
-
If you are running more than one VM, the last number of the IP address may vary depending on the order in which the sandbox VM was started relative to the other VMs. In this example, the sandbox VM was started first, and its IP address is 198.168.56.101. If the sandbox VM had been started second (after another VM), its IP address would then be 198.168.56.102.
-
The IP address provided in this tutorial is an example – your IP address may be different. Be sure to check the sandbox command prompt window after starting the VM for the IP address used for your sandbox installation.

-
Click Test to test the configuration settings. If the test is successful, a confirmation message appears. Click OK to close the message box.

-
On the Hortonworks Hive ODBC Driver DSN Setup window, click OK to save the driver configuration settings.

-
Click OK to close the ODBC Data Source Administrator window.


Now that you have configured the Hortonworks ODBC driver, you can enable ODBC connections in BI tools such as Microsoft Excel, then use those applications to access data in the Hortonworks Platform.
Feedback
We are eager to hear your feedback on this tutorial. Please let us know what you think. Click here to take survey