Walk Thru
This page takes you step by step thru adding a new proxy (aka WEBSITE) and a stump for that proxy. It assumes you already have stumps locally installed on your system. For instructions on how to install stumps, see the Setup section of the Stumps Usage Guide.
Terminology for this page:
- proxy == WEBSITE
- widget == one of the boxes on the stumps main page, representing a proxy, where you can see the proxy summary information and can perform actions
- bring up local stumps web site, ex: http://localhost:8888
- click on the ADD A NEW WEBSITE link in the YOUR WEBSITE HERE widget
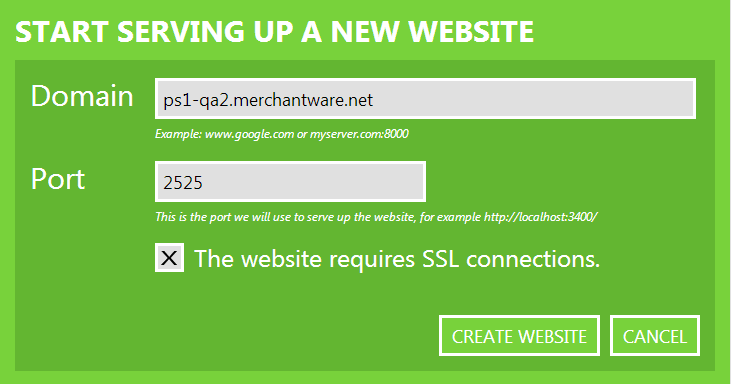
- enter your domain, ex ps1-qa2.merchantware.net, optionally specify port you want to use, if https check the SSL box
- click CREATE WEBSITE button
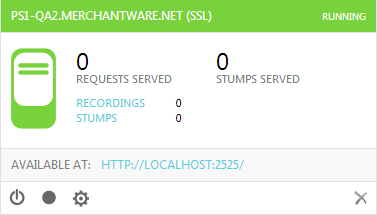
- new proxy widget is generated
- DONE!
#Creating Recordings
Before you can add a new stump, you must first get the request/response into your proxy by doing a recording. In order to record data for Merchant Warehouse applications, the web.config for the application must be updated so that the request/response passes thru your proxy. When the proxy is in record mode, all request/responses are passed thru the proxy and the application should work the same way it would if the proxy did not exist. Below are the steps you take to get your proxy recording specific requests/responses (you could do this to a generic site like google, but I thought an example of how we use it internally would be better):
- update iis web.config for application you want to record so it goes thru your proxy. For example, for LevelUpInternal edit \gwqa2app1\c$\Inetpub\mwareroot\MerchantWARE\ws\RetailTransaction\web.config and change:
<setting name="MWareRetailServices_LevelUpProcessing_LevelUpInternal" serializeAs="String">
  <value>https://ps1-curr.merchantware.net/Merchantware/ws/LevelUpInternal/LevelUpInternal.asmx</value>
</setting>
to:
<setting name="MWareRetailServices_LevelUpProcessing_LevelUpInternal" serializeAs="String">
  <value>https://your.ip.address:2525/Merchantware/ws/LevelUpInternal/LevelUpInternal.asmx</value>
</setting>
Where "your.ip.address" is the ip address of your machine, and "2525" is the port for the proxy you create.
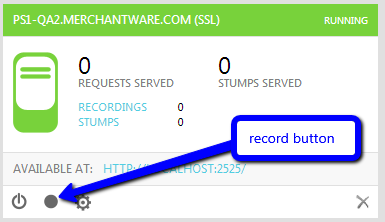
- in your proxy widget click the recordings button to put your proxy in recording mode:
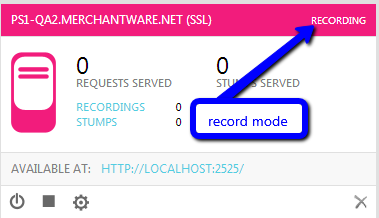
- do some levelup calls and watch the recordings count go up