ESP8266 offers a complete and self-contained Wi-Fi networking solution, allowing it to either host the application or to offload all Wi-Fi networking functions from another application processor.
When ESP8266 hosts the application, and when it is the only application processor in the device, it is able to boot up directly from an external flash. It has integrated cache to improve the performance of the system in such applications, and to minimize the memory requirements.
Alternately, serving as a Wi-Fi adapter, wireless internet access can be added to any microcontroller-based design with simple connectivity through UART interface or the CPU AHB bridge interface.
-
Check the pinout in the Arduino UNO module
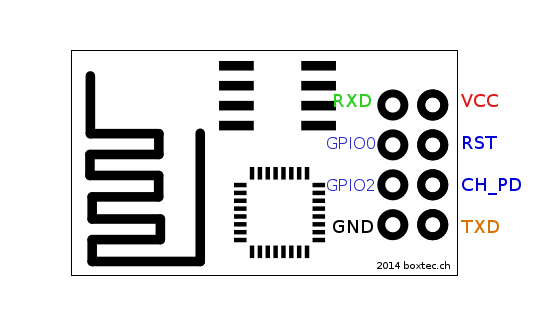
Arduino ------ ESP8266
- D2 --------> RXD
- D3 --------> TXD
- 3.3V --------> VCC
- 3.3V --------> CH_PD
- GND --------> GND
-
Download the UbidotsESP8266 library here
-
Go to the Arduino IDE, click on Sketch -> Include Library -> Add .ZIP Library
-
Select the .ZIP file of Ubidots_Arduino_GPRS.h and then "Accept" or "Choose"
-
Close the Arduino IDE and open it again.
To send a value to Ubidots, go to Sketch -> Examples -> UbidotsESP8266 library and select the "saveValue" example. Put your Ubidots token and variable ID where indicated, as well as the APN settings Upload the code, open the Serial monitor to check the results. If no response is seen, try unplugging your Arduino and then plugging it again. Make sure the baud rate of the Serial monitor is set to the same one specified in your code.
#include <UbidotsESP8266.h>
#include <SoftwareSerial.h>

#define SSID "Your_WiFi_SSID_here"
#define PASS "Your_WiFi_PASWORD_here"

#define TOKEN "Your_token_here"
#define ID "Your_ID_here"

Ubidots client(TOKEN);

void setup() {
  Serial.begin(9600);
  client.wifiConnection(SSID,PASS);
}

void loop() {
  float value = analogRead(A0);
  client.add(ID,value);
  client.sendAll();
}To get the last value of a variable from Ubidots, go to Sketch -> Examples -> UbidotsESP8266 library and select the "getValue" example. Put your Ubidots token and variable ID where indicated, as well as the APN settings Upload the code, open the Serial monitor to check the results. If no response is seen, try unplugging your Arduino and then plugging it again. Make sure the baud rate of the Serial monitor is set to the same one specified in your code.
#include <UbidotsESP8266.h>
#include <SoftwareSerial.h>

#define SSID "Your_WiFi_SSID_here"
#define PASS "Your_WiFi_PASWORD_here"

#define TOKEN "Your_token_here"
#define ID "Your_ID_here"

Ubidots client(TOKEN);

void setup() {
  Serial.begin(9600);
  client.wifiConnection(SSID,PASS);
}

void loop() {
  float value;
  value = client.getValue(ID);
} To send multiple values to Ubidots, go to Sketch -> Examples -> UbidotsESP8266 library and select the "saveValues" example. Put your Ubidots token and variable ID's where indicated, as well as the APN settings Upload the code, open the Serial monitor to check the results. If no response is seen, try unplugging your Arduino and then plugging it again. Make sure the baud rate of the Serial monitor is set to the same one specified in your code.
#include <UbidotsESP8266.h>
#include <SoftwareSerial.h>


#define SSID "Your_WiFi_SSID_here"
#define PASS "Your_WiFi_PASWORD_here"


#define TOKEN "Your_token_here"
#define ID "Your_id_here" // Replace it with your Ubidots' variable ID
#define ID2 "Your_id2_here"
#define ID3 "Your_id3_here"
#define ID4 "Your_id4_here"

Ubidots client(TOKEN);

void setup() {
  Serial.begin(9600);
  client.wifiConnection(SSID,PASS);
}
void loop() {
  float value = analogRead(A0);
  float value2 = analogRead(A1);
  float value3 = analogRead(A2);
  float value4 = analogRead(A3);
  client.add(ID,value);
  client.add(ID2,value2);
  client.add(ID3,value3);
  client.add(ID4,value4);
  client.sendAll();
}