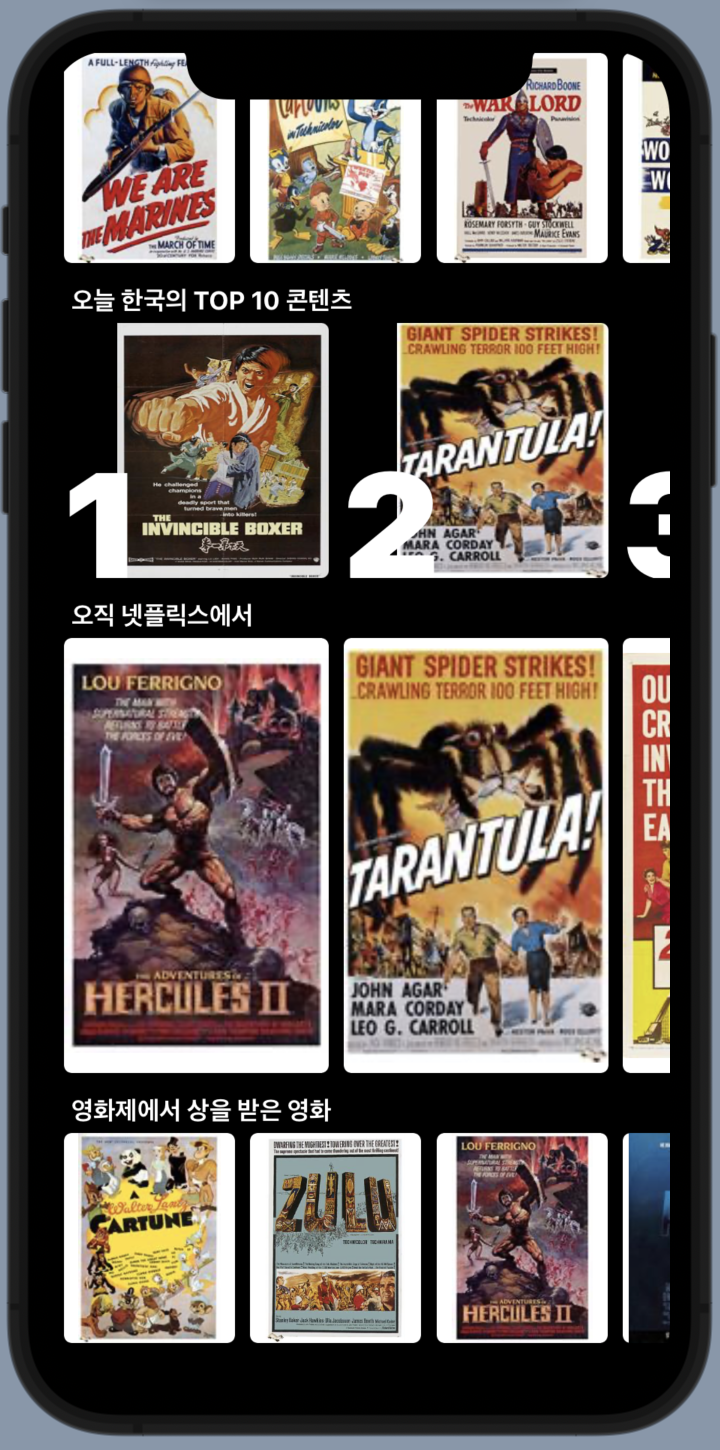
Nexflix 앱을 참고하여 영화 콘텐츠를 보여주는 샘플 앱을 제작하느 프로젝트이다.
UICollectionView를 이용하여 서로 다른 크기와 형태를 가진 셀을 세로 방향으로 컨셉을 나누고, 각각의 컨셉에 속한 콘텐츠들은 가로 방향 스크롤 리스트로 보여준다.

스토리보드를 사용하지 않고 코드로 작성하여 사용할 예정이기 때문에 이를 위한 초기 셋팅이 필요하다.
- 프로젝트 생성 시 기존에 만들어졌던 ViewController.swift와 Main.storyboard를 삭제한다.
- info.plist에 있는 두 항목을 삭제한다.


- UI를 쉽기 그리기 위해 SnapKit를추가한다.
File > Swift Packages > Add Package Dependency에서 설치https://github.com/SnapKit/SnapKit.git - 시뮬레이터를 실행시키지 않고 UI 개발을 하기 위해 메인이 되는 화면인 HomeViewController.swift에 Swift Preview Provider 추가
import SwiftUI

class HomeViewController: UICollectionViewController { ... }

struct HomeViewController_Preview: PreviewProvider {
    static var previews: some View {
        Container().edgesIgnoringSafeArea(.all)
    }

    struct Container: UIViewControllerRepresentable {
        func makeUIViewController(context: Context) -> UIViewController {
            let layout = UICollectionViewLayout()
            let homeViewController = HomeViewController(collectionViewLayout: layout)

            return UINavigationController(rootViewController: homeViewController)
        }

        func updateUIViewController(_ uiViewController: UIViewController, context: Context) {}

        typealias UIViewControllerType = UIViewController
    }
}
HomeViewController.swift
- 어플을 실행하면 가장 먼저 보여질 메인 화면
- Content.plist에 있는 정보를 가져온다.
var contents: [Content] = []

override func viewDidLoad() {
     super.viewDidLoad()
     ...
    // Data 설정, 가져오기
    contents = getContents()
    mainItem = contents.first?.contentItem.randomElement() // 첫번째 컨텐츠에서 랜덤으로 요소를 뽑아옴
     ...
}

func getContents() -> [Content] {
   guard let path = Bundle.main.path(forResource: "Content", ofType: "plist"), // 경로
         let data = FileManager.default.contents(atPath: path),
         let list = try? PropertyListDecoder().decode([Content].self, from: data) else { return [] }
   return list
}
- CollectionView Item(Cell)을 설정한다.
collectionView.register(ContentCollectionViewCell.self, forCellWithReuseIdentifier: "ContentCollectionViewCell")
collectionView.register(ContentCollectionViewHeader.self, forSupplementaryViewOfKind: UICollectionView.elementKindSectionHeader, withReuseIdentifier: "ContentCollectionViewHeader") // 헤더는 셀이 아니므로 SupplementaryView로 설정
collectionView.register(ContentCollectionViewRankCell.self, forCellWithReuseIdentifier: "ContentCollectionViewRankCell")
collectionView.register(ContentCollectionViewMainCell.self, forCellWithReuseIdentifier: "ContentCollectionViewMainCell")

// 생성한 layout을 CollectionView에 적용
collectionView.collectionViewLayout = layout()
- 섹션에 대한 레이아웃을 설정하고 각각의 섹션 타입에 대한 UICollectionViewLayout를 생성한다.
private func layout() -> UICollectionViewLayout {
    return UICollectionViewCompositionalLayout {[weak self] sectionNumber, environment -> NSCollectionLayoutSection? in
        guard let self = self else { return nil }

        switch self.contents[sectionNumber].sectionType {
        case .basic:
            return self.createBasicTypeSection()
        case .large:
            return self.createLargeTypeSection()
        case .rank:
            return self.createRankTypeSection()
        case .main:
            return self.createMainTypeSection()
        }
    }
}
ContentCollectionViewCell.swift
- basic 역할을 하는 셀을 만든다.
override func layoutSubviews() {
    super.layoutSubviews()

    // UICollectionViewCell의 경우 cell의 레이아웃을 표현할 때 contentView라는 기본 객체에 설정한다.
    contentView.backgroundColor = .white
    contentView.layer.cornerRadius = 5
    contentView.clipsToBounds = true

    imageView.contentMode = .scaleAspectFit

    contentView.addSubview(imageView)

    imageView.snp.makeConstraints {
        $0.edges.equalToSuperview() // imageView의 superview, 즉 contentView가 모든 엣지에 맞게 설정
    }
}
ContentCollectionViewHeader.swift
- 각각의 아이템 배열이 어떤 조합인지를 나타내는 섹션 이름을 만든다.
let sectionNameLabel = UILabel()

override func layoutSubviews() {
    super.layoutSubviews()

    sectionNameLabel.font = .systemFont(ofSize: 17, weight: .bold)
    sectionNameLabel.textColor = .white
    sectionNameLabel.sizeToFit()

    addSubview(sectionNameLabel)

    sectionNameLabel.snp.makeConstraints { // sectionLabel의 오토레이아웃
        $0.centerY.equalToSuperview()
        $0.top.bottom.leading.equalToSuperview().offset(10)
    }
}
ContentCollectionViewRankCell.swift
- 순위를 표시해주는 셀을 만든다.
rankLabel.font = .systemFont(ofSize: 100, weight: .black)
   rankLabel.textColor = .white
   contentView.addSubview(rankLabel) // rankLabel 추가
   rankLabel.snp.makeConstraints { // rankLabel의 오토레이아웃 설정
       $0.leading.equalToSuperview()
       $0.bottom.equalToSuperview().offset(25)
   }
ContentCollectionViewMainCell.swift
- 가장 상단에 위치한 가장 큰 셀을 만든다.
- 대부분의 콘텐츠를 포함하는 baseStackView와 상단에 메뉴를 보여주는 별도의 menuStackView를 만든다.
- baseStackView 설정
// baseStackView에 서브 요소 추가
[imageView, descriptionLabel, contentStackView].forEach {
       baseStackView.addArrangedSubview($0)
 }

// baseStackView의 서브 요소인 contentStackView에 버튼 추가
[btnPlus, btnPlay, btnInfo].forEach {
    contentStackView.addArrangedSubview($0)
}

// baseStackView autolayout
baseStackView.snp.makeConstraints {
    $0.edges.equalToSuperview().inset(30)
    $0.height.equalTo(60)
}
- menuStackView 설정
// menuStackView에 버튼 추가
[btnTV, btnMovie, btnCategory].forEach {
    menuStackView.addArrangedSubview($0)
    $0.setTitleColor(.white, for: .normal)
    $0.layer.shadowColor = UIColor.black.cgColor
    $0.layer.shadowOpacity = 1
    $0.layer.shadowRadius = 3
}

// menuStackView에 autolayout
menuStackView.snp.makeConstraints {
    $0.top.equalTo(baseStackView)
    $0.leading.trailing.equalToSuperview().inset(30)
}
Content.swift
- 배열의 형태를 가지고 있는 영화 데이터가 담긴 plist에 대한 정보를 가져오기 위한 구조체이다.
- Property list에 대한 decoding이 필요하므로 Decodable로 설정
struct Content: Decodable {
  let sectionType: SectionType
  let sectionName: String
  let contentItem: [Item]

  // basic, main, large, rank를 받더라도 똑같이 String으로 내뱉어 줌
  enum SectionType: String, Decodable {
      case basic
      case main
      case large
      case rank
    }
 }

struct Item: Decodable {
  let description: String
  let imageName: String

  var image: UIImage {
      return UIImage(named: imageName) ?? UIImage()
  }
}
UIButton.swift
- 모든 버튼의 이미지와 타이틀에 동일한 속성을 적용하기 위해 별도의 함수로 만든다.
func adjustVerticalLayout(_ spacing: CGFloat = 0) {
    let imageSize = self.imageView?.frame.size ?? .zero
    let titleLabelSize = self.titleLabel?.frame.size ?? .zero

    self.titleEdgeInsets = UIEdgeInsets(top: 0, left: -imageSize.width, bottom: -(imageSize.height + spacing), right: 0)
    self.imageEdgeInsets = UIEdgeInsets(top: -(titleLabelSize.height + spacing), left: 0, bottom: 0, right: -titleLabelSize.width)
}