- JavaScript의 모든 객체는 자신의 부모 역할을 담당하는 객체와 연결되어 있다
- 객체 지향의 상속 개념과 같이 부모 객체의 프로퍼티 또는 메소드를 상속받아 사용할 수 있게 한다.
- 이러한 부모 객체를 Prototype(프로토타입) 객체 또는 줄여서 Prototype(프로토타입)이라 한다.

-
[[Prototype]] property
- 함수를 포함한 모든 객체가 가지고 있는 property이다.
- 객체의 입장에서 자신의 부모 역할을 하는 프로토타입 객체을 가리키며 함수 객체의 경우 Function.prototype를 가리킨다.
console.log(Person.__proto__ === Function.prototype); -
prototype property
- 함수 객체만 가지고 있는 property이다.
- 함수 객체가 생성자로 사용될 때 이 함수를 통해 생성될 객체의 부모 역할을 하는 객체(프로토타입 객체)를 가리킨다.
console.log(Person.prototype === foo.__proto__);
- 프로토타입 객체는 constructor 프로퍼티를 갖는다.
- constructor 프로퍼티는 객체의 입장에서 자신을 생성한 객체를 가리킨다.
- 해당 객체에 접근하려는 프로퍼티 또는 메소드가 없다면 [[Prototype]] 프로퍼티가 가리키는 링크를 따라
자신의 부모 역할을 하는 프로토타입 객체의 프로퍼티나 메소드를 차례대로 검색한다.
var person = {
  name: 'Lee',
  gender: 'male',
  sayHello: function(){
    console.log('Hi! my name is ' + this.name);
  }
};

console.dir(person);

console.log(person.__proto__ === Object.prototype);   // ① true
console.log(Object.prototype.constructor === Object); // ② true
console.log(Object.__proto__ === Function.prototype); // ③ true
console.log(Function.prototype.__proto__ === Object.prototype); // ④ true
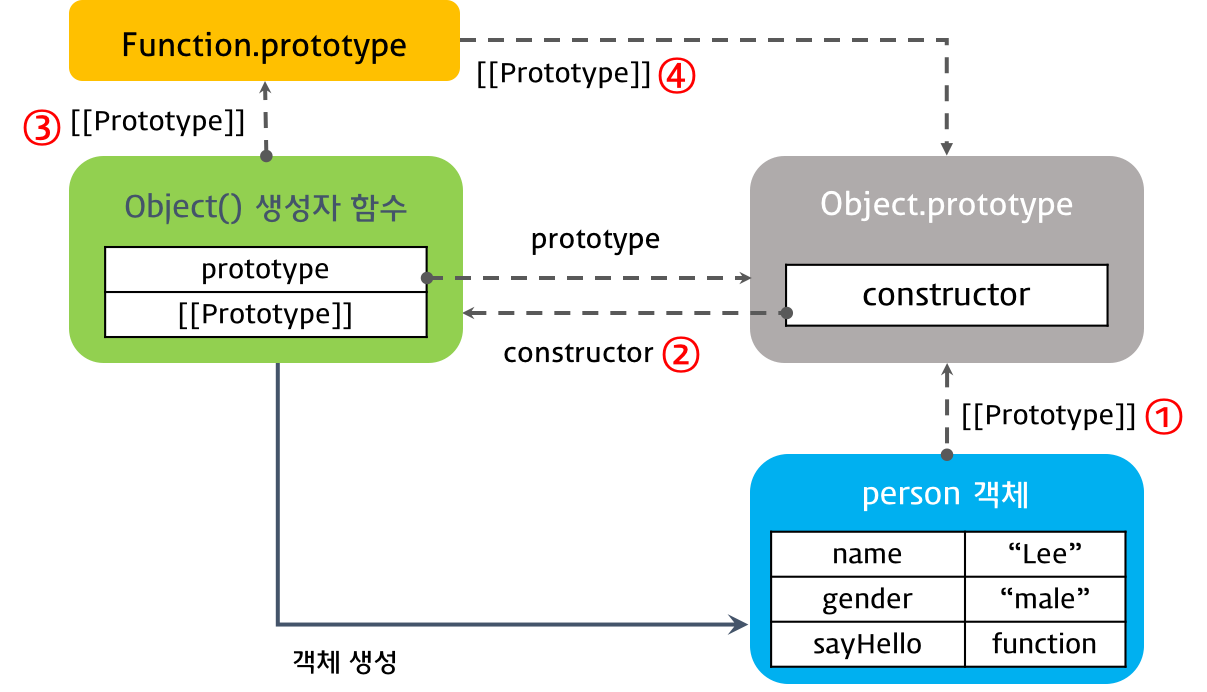

결론적으로 객체 리터럴을 사용하여 객체를 생성한 경우, 그 객체의 프로토타입 객체는 Object.prototype이다.
- 결국 함수선언식, 함수표현식 모두 함수 리터럴 방식을 사용한다. 함수 리터럴 방식은 Function() 생성자 함수로 함수를 생성하는 것을 단순화 시킨 것이다.
즉, 3가지 함수 정의 방식은 결국 Function() 생성자 함수를 통해 함수 객체를 생성한다, 따라서 어떠한 방식으로 함수 객체를 생성하여도 모든 함수 객체의 prototype 객체는 Function.prototype이다. 생성자 함수도 함수 객체이므로 생성자 함수의 prototype 객체는 Function.prototype이다.
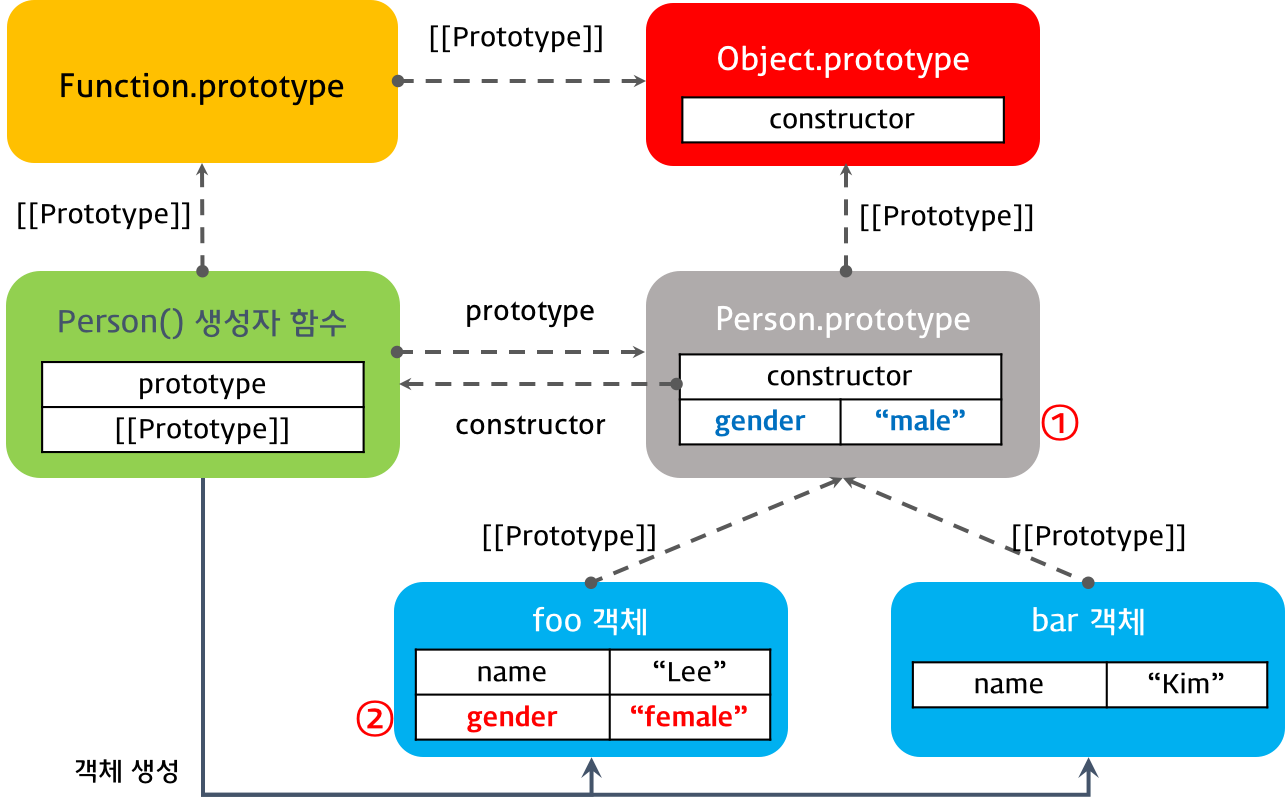
function Person(name, gender) {
  this.name = name;
  this.gender = gender;
  this.sayHello = function(){
    console.log('Hi! my name is ' + this.name);
  };
}

var foo = new Person('Lee', 'male');

console.dir(Person);
console.dir(foo);

console.log(foo.__proto__ === Person.prototype);                // ① true
console.log(Person.prototype.__proto__ === Object.prototype);   // ② true
console.log(Person.prototype.constructor === Person);           // ③ true
console.log(Person.__proto__ === Function.prototype);           // ④ true
console.log(Function.prototype.__proto__ === Object.prototype); // ⑤ true
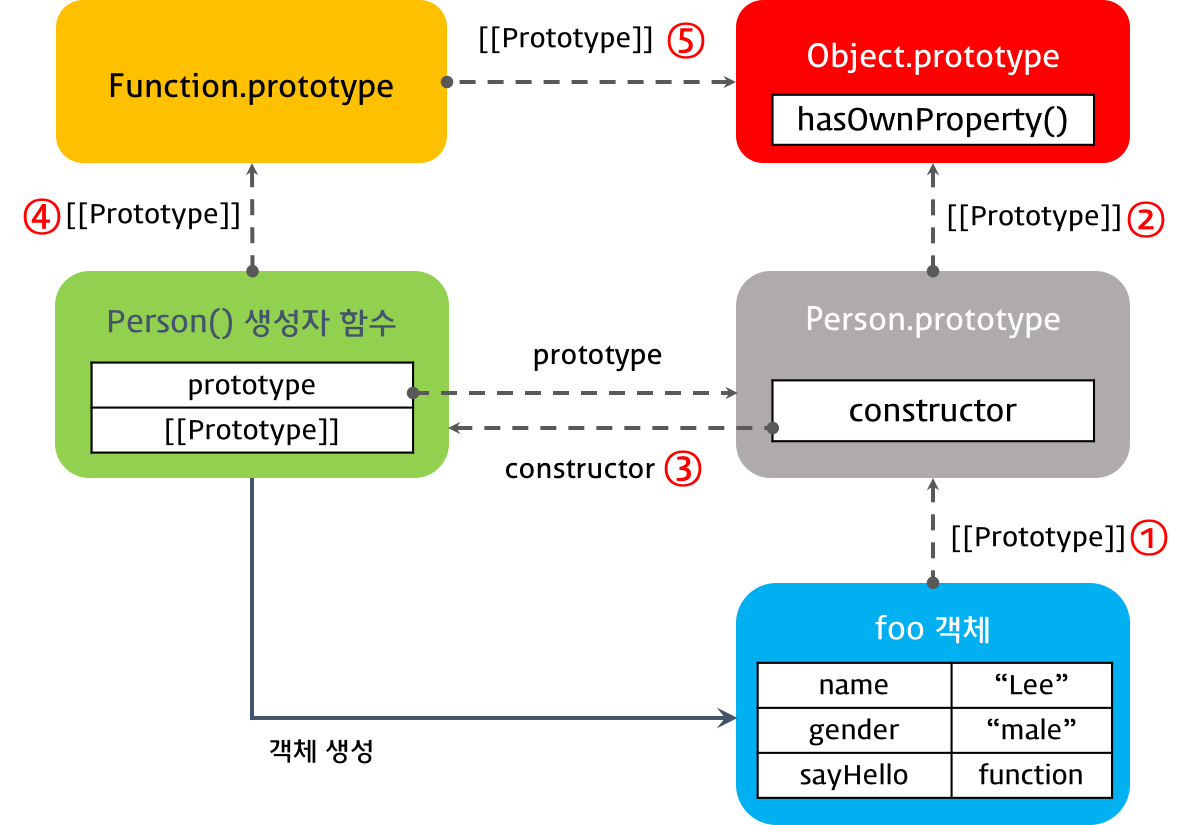
foo 객체의 프로토타입 객체 Person.prototype 객체와 Person() 생성자 함수의 프로토타입 객체인 Function.prototype의 프로토타입 객체는 Object.prototype 객체이다.
이는 객체 리터럴 방식이나 생성자 함수 방식이나 결국은 모든 객체의 부모 객체인 Object.prototype 객체에서 프로토타입 체인이 끝나기 때문이다.
"이때 Object.prototype 객체를 프로토타입 체인의 종점(End of prototype chain)이라 한다."
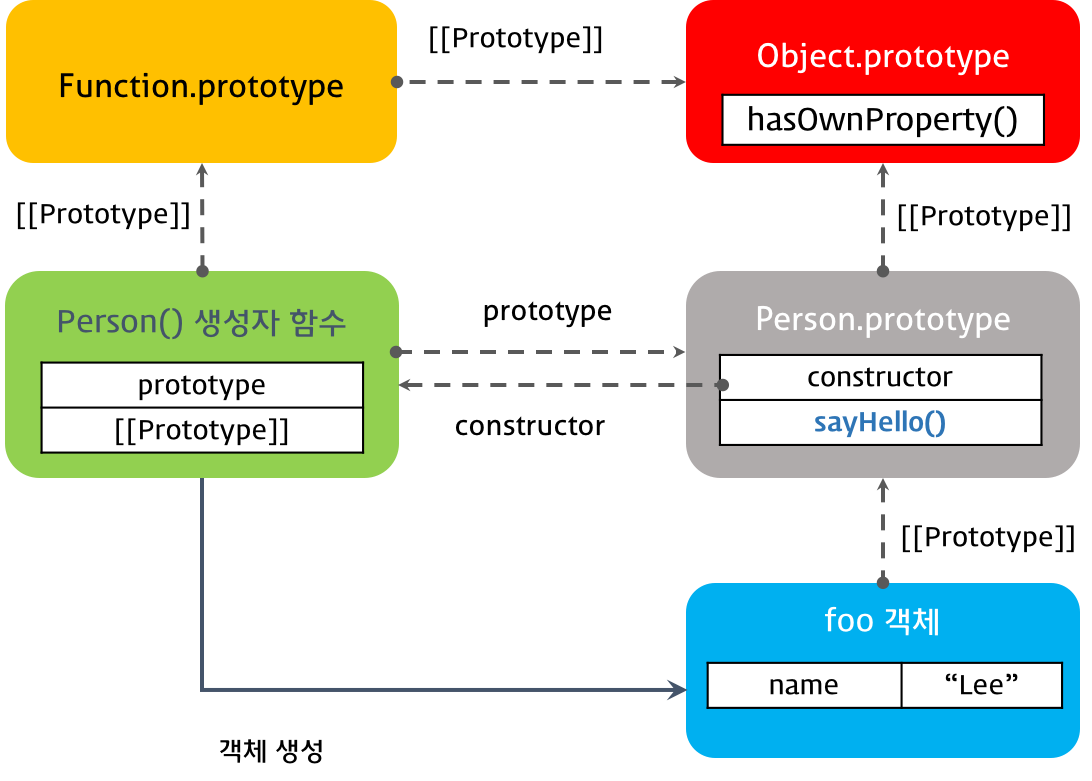
function Person(name) {
  this.name = name;
}

var foo = new Person('Lee');

Person.prototype.sayHello = function(){
  console.log('Hi! my name is ' + this.name);
};

foo.sayHello();
var str = 'test';
console.log(typeof str);                 // string
console.log(str.constructor === String); // true
console.dir(str);
기본자료형인 str을 . 을 통해서 순간 객체화되서 쓰인다. 이를 wrapper object라 한다.
기본자료형으로 프로퍼티나 메소드를 호출할 때 기본자료형과 연관된 객체로 일시적으로 변환되어 프로토타입 객체를 공유하게 된다.

위와 같이 기본적으로 String 이 . 을 통해서 객체화 wrapper 객체가 되면 위의 prototype들이 나타나면서
-
객체를 생성할 때 프로토타입은 결정된다. 결정된 프로토타입 객체는 다른 임의의 객체로 변경할 수 있다.
-
부모 객체인 프로토타입을 동적으로 변경할 수 있다는 것을 의미한다.
function Person(name) {
  this.name = name;
}

var foo = new Person('Lee');

// 프로토타입 객체의 변경
Person.prototype = { gender: 'male' };

var bar = new Person('Kim');

console.log(foo.gender); // undefined
console.log(bar.gender); // 'male'

console.log(foo.constructor); // ① Person(name)
console.log(bar.constructor); // ② Object()
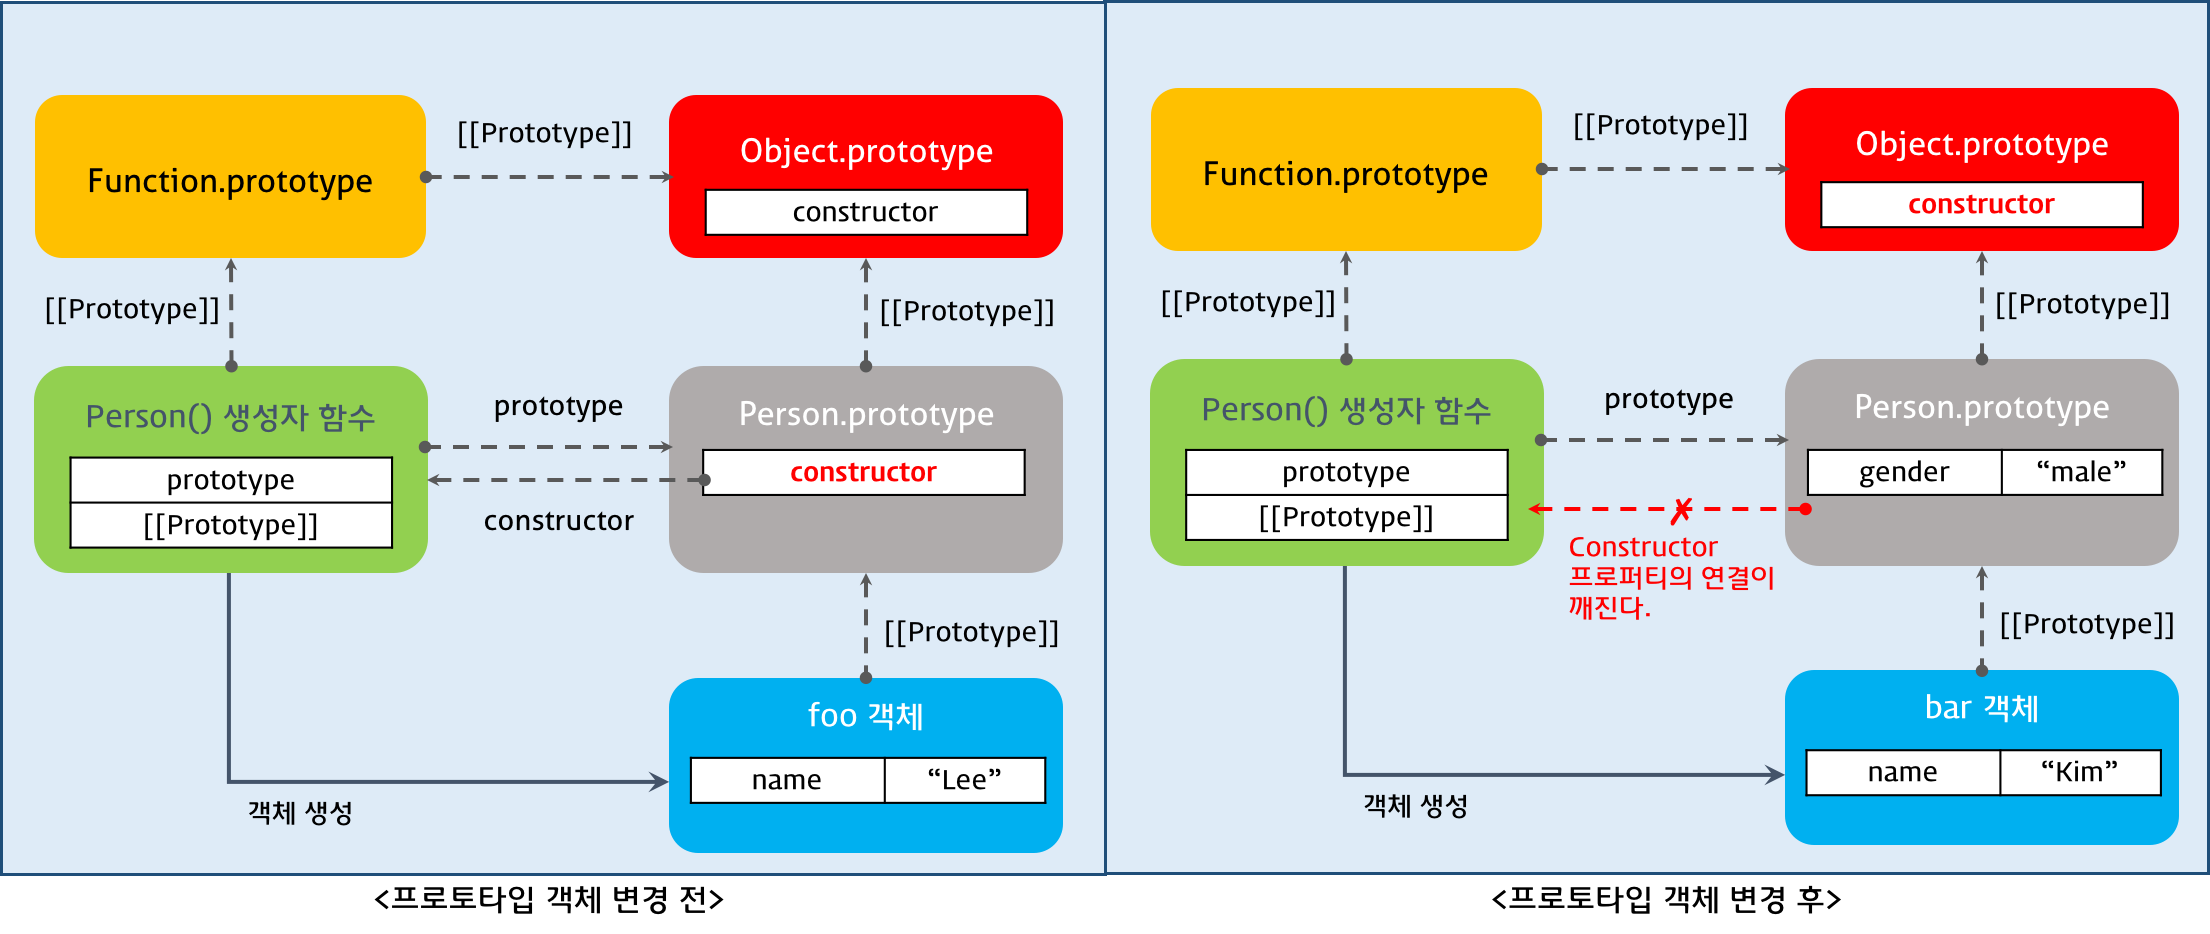
: 객체의 property를 참조하는 경우, 해당 객체의 property가 없는 경우, prototype chain이 동작한다.
function Person(name) {
  this.name = name;
}

Person.prototype.gender = 'male'; // ①

var foo = new Person('Lee');
var bar = new Person('Kim');

console.log(foo.gender); // ① 'male'
console.log(bar.gender); // ① 'male'

// 1. foo 객체에 gender 프로퍼티가 없으면 프로퍼티 동적 추가
// 2. foo 객체에 gender 프로퍼티가 있으면 해당 프로퍼티에 값 할당
foo.gender = 'female';   // ②

console.log(foo.gender); // ② 'female'
console.log(bar.gender); // ① 'male'
: 유효 범위라고 한다.
: 변수에서 접근성과 생존기간을 의미한다. 변수가 가지고 있는 참조 범위를 의미한다.
- 전역 Scope ( Global scope )
: 코드 어디에서든지 참조할 수 있다. - 지역 Scope ( Local scope or Function-level scope)
: 정의된 함수 내에서만 참조할 수 있다.
- 모든 변수는 Scope를 갖는다.
- 전역 변수
: 전역 Scope를 갖는 변수 - 지역 변수
: 지역 Scope를 갖는 변수
변수는 선언 위치(전역 또는 지역)에 의해 Scope를 가지게 된다.
전역 Scope를 갖는 전역 변수는 전역에서 참조할수 있고, 지역에서 선언된 지역변수는 그 지역과 그지역의 하부 지역에서만 참조할 수 있다.
: 글로벌 영역에 변수를 선언하면 이 변수는 어느 곳에서든지 참조할 수 있는 global scope를 갖는 전역 변수가 된다.
: 전역 변수는 전역 객채(Global Object) Window의 property이다.
생성자 함수에서 내부의 this로 선언된 property는 외부에서 접근이 가능한 public 이고, var로 선언한 property는 외부에서 접근이 불가능한 private이다.
if (true) {
  var x = 5; // The scope is inside the if-block
}
console.log(x);
function 밖에서 선언된 변수는 코드 블럭 내에서 선언되었다할지라도 모두 global scope을 갖게된다. 따라서 변수 x는 전역 변수이다.
var a = 10;     // 전역변수

(function () {
  var b = 20;   // 지역변수
})();

console.log(a); // 10
console.log(b); // "b" is not defined
함수 내에서 선언된 매개변수와 변수는 함수 외부에서는 유효하지 않다. 따라서 변수 b는 지역 변수이다.
var x = 'global';

function foo() {
  var x = 'local';
  console.log(x);
}

foo();          // local
console.log(x); // global
함수 내 지역 영역에서는 전역과 지역 변수 모두 참조 가능하나 위 예제와 같이 변수명이 중복된 경우, 지역변수를 우선하여 참조한다.
var x = 'global';

function foo() {
  var x = 'local';
  console.log(x);

  function bar() {  // 내부함수
    console.log(x); // ?
  }

  bar();
}
foo();
console.log(x); // ?
위에서는 scope chain에 의해서 'local'을 출력한다.
: 선언 없이 할당을 바로 사용하면 암묵적으로 전역변수로 선언한다.
: var keyword를 반드시 사용하자!!!
function foo() {
  x = 1;   // Throws a ReferenceError in "use strict" mode
  var y = 2;
}

foo();

console.log(x); // 1
console.log(y); // ReferenceError: y is not defined
var i = 5;

function foo() {
  var i = 10;
  bar();
}

function bar() { // 선언된 시점에서의 scope를 갖는다!
  console.log(i);
}

foo(); // ?
출력된 i 의 값은 전역으로 선언된 5가 출력된다. foo()가 bar()를 참조하였다 하더라도 bar()가 선언된 시점이 기준이 되게 때문에 전역변수 i=5 가 적용이 된다.
: 2개 파일로 분리된 JavaScript 코드가 있다고 가정한다.
: JavaScript는 파일 하나로 이어진다고 보면 된다. 그래서 2개 파일로 분리된 코드에 같은 명의 변수가 있다면 중복이 된다.
전역변수를 반드시 사용하여야 할 이유를 찾지 못한다면 지역변수를 사용하여야 한다. 변수의 범위인 스코프는 좁을수록 좋다.
: 전역변수 사용을 최소화하는 방법 중 하나는 애플리케이션에서 전역변수 사용을 위해 다음과 같이 전역변수 객체 하나를 만들어 사용하는 것이다.
var MYAPP = {};

MYAPP.student = {
  name: 'Lee',
  gender: 'male'
};

console.log(MYAPP.student.name);
: 즉시 실행 함수(IIFE, Immediately-Invoked Function Expression)를 사용할 수 있다.
: 즉시 실행 함수는 즉시 실행되고 그 후 전역에서 바로 사라진다.
(function () {
  var MYAPP = {};

  MYAPP.student = {
    name: 'Lee',
    gender: 'male'
  };

  console.log(MYAPP.student.name);
}());

console.log(MYAPP.student.name);
: 특별한 경우가 아닌 이상 this가 가리키는 객체는 전역객체이다.
: 함수가 생성될 때 암묵적으로 this가 생성된다고 보자.
: 주로 매개변수와 객체 자신이 가지고 있는 멤버변수명이 같을 경우 이를 구분하기 위해서 사용된다.
: this가 객체 자신에 대한 참조 값을 가지고 있다는 뜻이다.
: JavaScript의 함수는 호출될 때, 매개변수로 전달되는 인자값 이외에, arguments와 this를 암묵적으로 전달 받는다.
: 함수 호출 패턴에 따라 어떤 객체를 this에 바인딩할 지가 결정된다.
- 메소드 호출 패턴
- 함수 호출 패턴
- 생성자 호출 패턴
- apply 호출 패턴
: 이 메소드를 호출하는 객체를 가리킨다.
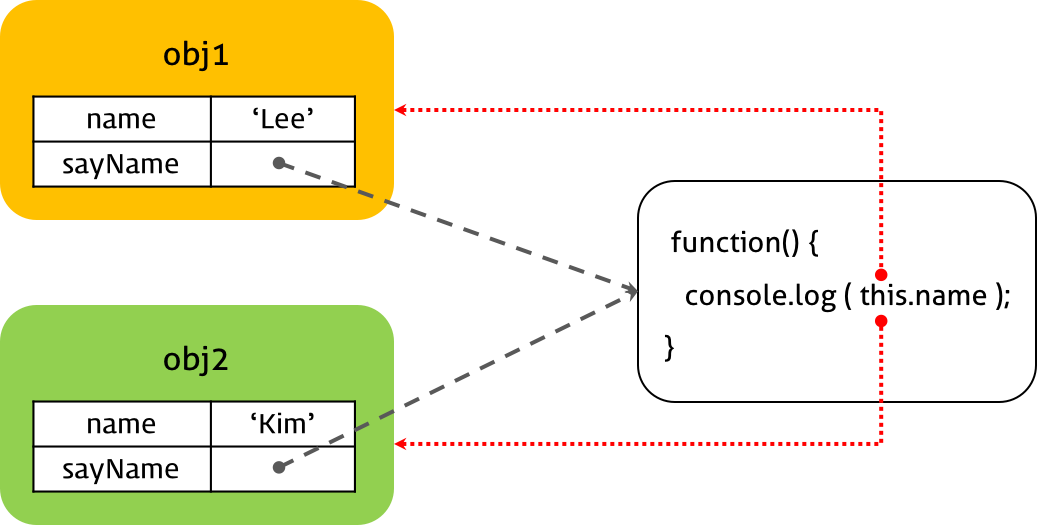
var obj1 = {
  name: 'Lee',
  sayName: function() {
    console.log(this.name);
  }
}
this는 sayName을 호출한 객체 obj를 가리킨다.
var obj1 = {
  name: 'Lee',
  sayName: function() {
    console.log(this.name);
  }
}

var obj2 = {
  name: 'Kim'
}

obj2.sayName = obj1.sayName;

obj1.sayName();
obj2.sayName();
위와 같은 경우는 obj1,obj2의 sayName method가 같은데 이 경우 호출한 객체에 따라 내부의 this는 호출한 객체를 가리킨다.
< 전역객체 >
Browser-side : window
Server-side(Node.js) : global// in browser console this === window // true // in Terminal node this === global // true
function foo() {
  console.log("foo's this: ",  this);  // window
  function bar() {
    console.log("bar's this: ", this); // window
  }
  bar();
}
foo();
전역함수는 물론이고 심지어 내부함수의 경우도 this는 외부함수가 아닌 전역객체에 바인딩된다.
var value = 1;

var obj = {
  value: 100,
  foo: function() {
    console.log("foo's this: ",  this);  // obj
    console.log("foo's this.value: ",  this.value); // 100
    function bar() {
      console.log("bar's this: ",  this); // window
      console.log("bar's this.value: ", this.value); // 1
    }
    bar();
  }
};

obj.foo();
var value = 1;

var obj = {
  value: 100,
  foo: function() {
    setTimeout(function() {
      console.log("callback's this: ",  this);  // window
      console.log("callback's this.value: ",  this.value); // 1
    }, 100);
  }
};

obj.foo();
위와 같은 함수 내의 내부함수가 전역으로 가는 것을 회피하는 방법 중 하나는 아래와 같다.
var value = 1;

var obj = {
  value: 100,
  foo: function() {
    var that = this;  // Workaround : this === obj

    console.log("foo's this: ",  this);  // obj
    console.log("foo's this.value: ",  this.value); // 100
    function bar() {
      console.log("bar's this: ",  this); // window
      console.log("bar's this.value: ", this.value); // 1

      console.log("bar's that: ",  that); // obj
      console.log("bar's that.value: ", that.value); // 100
    }
    bar();
  }
};

obj.foo();
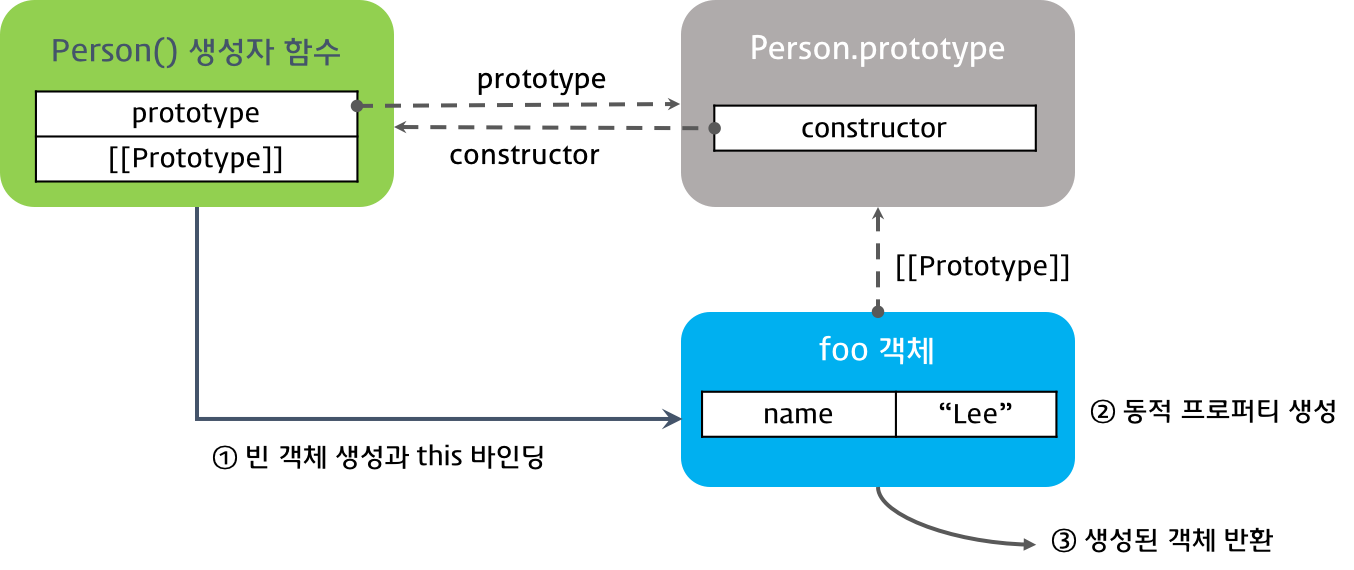
: new 연산자와 함께 생성자 함수를 호출하면 this 바인딩이 메소드나 함수 호출 때와는 다르게 동작한다.
- 빈 객체 생성 및 this 바인딩
- this를 통한 property 생성
- 생성된 객체 반환
var Person = function(name) {
  // 생성자 함수 코드 실행 전 -------- 1
  this.name = name;  // --------- 2
  // 생성된 함수 반환 -------------- 3
}

var me = new Person('Lee');
console.log(me.name);
// 객체 리터럴 방식
var foo = {
  name: 'foo',
  gender: 'male'
}

console.dir(foo);

// 생성자 함수 방식
var Person = function(name, gender) {
  this.name = name;
  this.gender = gender;
}

var me  = new Person('Lee', 'male');
console.dir(me);

var you = new Person('Kim', 'female');
console.dir(you);
-
객체 리터럴 방식 : 생성된 객체의 prototype 객체는 Object.prototype 이다.
-
생성자 함수 방식 : 생성된 객체의 prototype 객체는 Person.prototype이다.
var Person = function(name) {
  // 전역객체에 name 프로퍼티를 추가
  this.name = name;
};

// 일반 함수로서 호출되었기 때문에 객체를 생성하여 반환하지 않는다.
// 일반 함수의 this는 전역객체를 가리킨다.
var me = Person('Lee');

console.log(me); // undefined
console.log(window.name); // Lee
- 생성자 함수에
new를 붙이지 않고 호출할 경우는생성자 함수 내의 this가 전역이 되기 때문에원하는 결과가 나오지 않는다.
: 내부적인 바인딩 이외에 this를 특정 객체에 명시적으로 바인딩하는 방법도 제공된다.
func.apply(thisArg, [argsArray])

// thisArg: 함수 내부의 this에 바인딩할 객체
// argsArray: 함수에 전달할 인자 배열
var Person = function (name) {
  this.name = name;
};

var foo = {};

// apply 메소드는 생성자함수 Person을 호출한다. 이때 this에 객체 foo를 바인딩한다.
Person.apply(foo, ['name']);

console.log(foo); // { name: 'name' }
- Person에 this 대신 foo를 바인딩 하고 'name'을 인자로 써라 라는 뜻!!
function convertArgsToArray() {
  console.log(arguments);

  // arguments 객체를 배열로 변환
  // slice: 배열의 특정 부분에 대한 복사본을 생성한다.
  var arr = Array.prototype.slice.apply(arguments); // arguments.slice
  // var arr = [].slice.apply(arguments);

  console.log(arr);
  return arr;
}

convertArgsToArray(1, 2, 3);
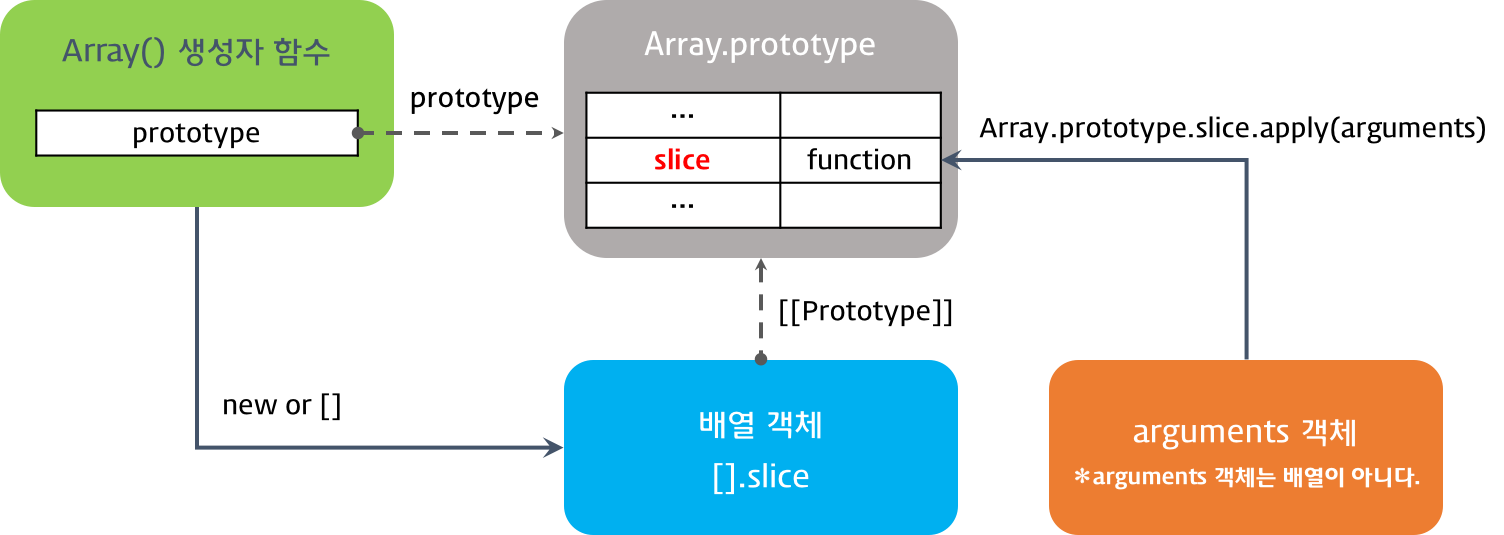
- 빈 함수객체에 암묵적으로 생성되는 arguments 객체를 Array.prototype.slice 메소드에 this 대신 arguments를 호출하란 뜻. 즉 arguments.slice()와 같은 형태로 호출하라는 것이다.
Person.apply(foo, [1, 2, 3]);

Person.call(foo, 1, 2, 3);
apply() 배열 형태로 넘긴것, call() 하나의 인자로 넘긴 것.
프로퍼티값으로 사용할 수 있는 값에는 각각의 자료형(Data Type)이 존재한다. SassScript가 제공하는 자료형은 7가지가 있다.
숫자형
e.g) 1.2, 13, 10px
문자열
CSS는 2종류의 문자열을 사용할 수 있다. 따옴표를 사용하는 경우(“Lucida Grande”, ‘http://sass-lang.com’)와 사용하지 않는 경우(bold, sans-serif)가 있다. Sass는 2종류의 문자열 모두를 인식할 수 있으며 컴파일 후의 CSS에는 Sass에서 사용한 문자열이 그대로 출력된다.
e.g. “Lucida Grande”, ‘http://sass-lang.com’, sans-serif
컬러
e.g. blue, #04a3f9, rgba(255, 0, 0, 0.5)
boolean
e.g. true, false
null
list
margin과 padding 프로퍼티값 지정에 사용되는 0 auto와 font-family 프로퍼티값 지정에 사용되는 Helvetica, Arial, sans-serif 등은 공백 또는 콤마 구분된 값의 list이다.
e.g. 1.5em 1em 0 2em, Helvetica, Arial, sans-serif
map
JSON과 유사한 방식으로 map-get 함수를 사용하여 원하는 값은 추출할 수 있다.
e.g. (key1: value1, key2: value2)
// map
$foundation-palette: (
  primary: #E44347,
  mars: #D7525C,
  saturn: #E4B884,
  neptune: #5147D7
);

.mars {
  color: map-get($foundation-palette, mars);
}

// => .mars { color: #D7525C; }Sass에서는 변수를 사용할 수 있다. 문자열, 숫자, 컬러(#aa443f) 등을 사전에 변수에 저장하고 필요할 때 불러 사용할 수 있다.
변수명은 $로 시작한다.
$width: 960px;

header {
  width: $width;
  margin: 0 auto;
}

#main {
  width: $width;
  margin: 20px auto;
}

footer {
  width: $width;
  margin: 0 auto;
}
어떤 것을 변수명으로 설정할지에 대한 설계가 필요하다. 변수명은 대체로 파일의 앞 쪽에 몰아서 선언해둔다.
$width: 960px; // global variable

header {
  width: $width;
  margin: 0 auto;
}

#main {
  $color: #333; // local variable
  width: $width;
  margin: 20px auto;
  section {
    p {
      color: $color;

      a:link {
        color: $color;
      }
    }
  }
}

footer {
  width: $width;
  margin: 0 auto;
  color: $color;
}
위 코드를 컴파일하면 Undefined variable: “$color”라는 에러가 발생한다. 이는 #main에서 선언한 $color는 #main 내에서만 유효한 지역변수이기 때문이다.
코드블럭 내에서 선언한 지역변수를 전역변수화하는 방법은 아래와 같다.
#main {
  $color: #333 !global; // global variable
  width: $width;
...| Operator | Description |
|---|---|
| + | 덧셈 |
| - | 뺄셈 |
| * | 곱셈 |
| / | 나눗셈 |
| % | 나머지 |
| == | 동등 |
| != | 부등 |
$width: 100px;

#foo {
  width: $width + 10; //110px
}

#bar {
  width: $width + 10in; //1060px
}
변수 $width의 값 100px에 10 또는 10em과 같이 다른 단위의 값을 연산하여도 에러없이 연산이 수행된다. 이때 연산자의 왼쪽 값을 기준으로 단위가 설정된다.
$width에 10em을 더하면 어떻게 될까?
$width: 100px;

#foo {
  width: $width + 10em; //NG: 100px + 10em
}
컴파일 결과 Incompatible units: 'em' and 'px'.이라는 에러를 출력한다. Scss 연산은 대상을 변환하여 연산할 수 없는 경우, 에러를 출력한다.
%,em,rem,vh,vw,vmin,vmax와 같이 상대적인 값을 Sass는 알지 못한다. 상대적인 값의 결과값은 브라우저만이 알 수 이기 때문이다. 따라서 상대적 값을 갖는 단위의 연산은 동일한 단위를 갖는 값과의 연산만이 유효하다.
CSS3의 calc함수는 이런 문제를 해결할 수 있다.
#foo {
  width: calc(25% - 5px);
}
CSS에서의 /는 나눗셈이 아니라 값을 분리하는 의미를 갖는다. 따라서 Sass의 / 연산자를 사용하기 위해서는 몇가지 조건이 필요하다.
- 변수에 대해 사용
- 괄호 내에서 사용
- 다른 연산의 일부로서 사용
p {
  // font와 border-radius의 '/'는 CSS문법에 맞는 표현이므로 연산되지 않는다.
  font: italic bold 12px/30px Georgia, serif;
  // 타원형 둥근 모서리
  border-radius: 10px 20px / 20px;

  $width: 1000px;
  width: $width / 2;            // 변수에 대해 사용 → width: 500px;
  height: (500px / 2);          // 괄호 내에서 사용 → height: 250px;
  margin-left: 5px + 8px / 2px; // 다른 연산의 일부로서 사용 → margin-left: 9px;
}
변수를 CSS의 /와 함께 사용하고자 하는 경우 #{}(Interpolation)를 사용한다.
p{
  $font-size: 12px;
  $line-height: 30px;
  font: #{$font-size} / #{$line-height}; // 12px/30px
}