Architecture and Deployment Guide
The grafeo application is split into two layers, a REST layer which serves the REST API and a service back-end which implements the service logic and database access. The application can be deployed either as a single node application where the REST layer and service back-end are combined in one application, or as a scalable multi-node environment where the REST layer and service back-end are separated into multiple nodes each. The first approach is sufficient for test environments and is significantly easier to set up and maintain. For production environments - especially where a large amount of data is expected - the multi-node approach is preferable because it allows to easily scale up the application when more processing power is needed and it offers redundancy in the case of node failures.
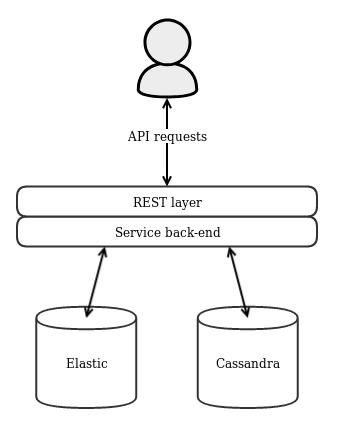
In such an environment only one single node containing both the REST layer and the service back-end is deployed and API requests are made directly towards this node. In addition, one Cassandra and one Elasticsearch cluster needs to be set up. The application uses Cassandra to store its data and Elasticsearch to search through it. In the single-node environment it should suffice to only configure single-node Cassandra and Elasticsearch clusters. This is the bare minimum to get started with grafeo but it is neither fault-tolerant nor scalable.
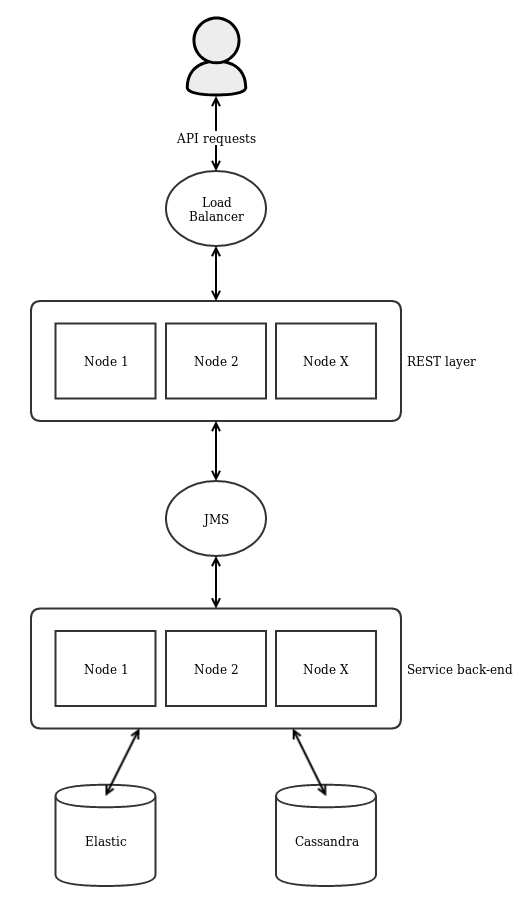
In a multi-node environment the application is split into the two REST and service layers which are deployed separately and can be scaled up as needed. The two layers are connected using JMS which load balances requests from the REST layer across all available service nodes. Any JMS implementation should work but it is recommended to use ActiveMQ as the internal messaging implementation has been extensively tested with ActiveMQ. In front of the REST nodes a load balancer such as the Apache HTTP Server or HAProxy should be installed which distributes the requests across all available REST nodes and are forwarded through JMS to the service nodes. Then API requests are made towards this load balancer. In this scenario only the service nodes are directly connected to Cassandra and Elasticsearch. It is recommended to configure multi-node clusters for ActiveMQ, Cassandra and Elasticsearch as well. If every deployment layer (REST -> JMS -> service -> database) is clustered the system becomes fault-tolerant and can be easily scaled up.
Optionally grafeo supports data centre replication with two or more data centres. Every data centre consists of a complete application instance with Cassandra, Elasticsearch, etc. and can operate independently of each other. The application supports an active/active configuration which means that clients can write to multiple data centres simultaneously and then the data is synchronized between the different data centres. A typical set-up consists of two data centres where one is the primary data centre and the other a secondary (standby) data centre. Clients are mainly communicating with the primary data centre. If the primary has issues clients can be failed over to the secondary data centre which continues normal operation (typically performed by DNS failover). This set-up is achieved by (a) configuring Cassandra using its built-in data centre replication functionality and (b) setting up a replication pipeline with Apache Kafka. The latter is required to synchronize data between the Elasticsearch clusters of the different data centres. Every data centre must have its dedicated Kafka topic such as Grafeo.DC1, Grafeo.DC2, Grafeo.DC3 etc. Those topics must be replicated between all data centres with Kafka's MirrorMaker. This means that all data centres hold a copy of all topics. The application code deployed in DC1 must be configured to write to Grafeo.DC1 (Kafka producer) and to read from Grafeo.DC2, Grafeo.DC3, ... (Kafka consumers). Basically the producer must write to its local topic and read from the other topics. When DC1 writes to Grafeo.DC1 the data is replicated to all other data centres by MirrorMaker where the data is processed and written to Elasticsearch using an internal engine component inside the application code (called esengine). With this mechanism the data is kept synchronized between all data centres.
The application code contains three deployment modules, deployment-combined for the single node application, deployment-rest for the REST-only nodes and deployment-service for the service-only nodes. When the code is compiled one tarball inside each deployment module will be created. Those tarballs contain everything (libraries, init script, example configurations, etc.) to execute the application. The application is configured using a properties file. See application.properties inside the examples folder of each deployment as an example. It is important that this configuration points to your Cassandra and Elasticsearch installations. In the multi-node environment the connection to your ActiveMQ cluster must also be configured correctly and the configured message queue must be available in the cluster. For data centre replication Kafka with one topic per data centre plus replication of all topics between the different data centres must be available as well. The producers and consumers defined in the configuration file must point to the correct topics for each data centre. Additionally, access control including users and organizations is defined in another properties file. See acl.properties as an example and the specification for more details. Make sure that your application configuration points to this properties file as well. The example access control configuration should be sufficient to test out the application but should be adapted for production set-ups.
The bin folder of each deployment package contains an init script used to start and stop the application. Execute bin/init.sh start to start the application and bin/init.sh stop to stop it again. The init script reads several environment variables in order to customize its behaviour:
-
GRAFEO_CONFDIR: Directory where the configuration files are located (defaults to
conf). -
GRAFEO_LOGDIR: Directory where the log files are located (defaults to
logs). - GRAFEO_JAVA_OPTS: Used to pass additional options to the Java process. Usually not required to be changed.
To quickly test grafeo simply extract the tarball from the deployment-combined/target folder and execute bin/init.sh start. On first start-up the example configuration files from the examples folder will be copied into the configuration folder. Adjust the configuration to your needs, make sure that Cassandra and Elasticsearch are running and that the configuration points to them correctly. If everything is configured correctly running the init script will start up the whole application stack and the API server will start listening for requests on the port specified in the configuration. Check the log files for any error messages.
Head over to the REST API usage guideline to learn how to interact with the REST API.