 |
 |
 |
 |
 |
 |
 |
 |
Chatty App backend server is an interesting real-time social network application. It is developed using node.js, typescript, redis and mongodb.
You can find the repo for the frontend built with react here.
- Signup and signin authentication
- Forgot password and reset password
- Change password when logged in
- Create, read, update and delete posts
- Post reactions
- Comments
- Followers, following, block and unblock
- Private chat messaging with text, images, gifs, and reactions
- Image upload
- In-app notification and email notification
- Node.js
- Typescript
- MongoDB
- Mongoose
- Redis
- Express
- Bull
- PM2
- AWS
- Terraform
- Nodemailer
- Sendgrid mail
- Cloudinary
- Jest
- Lodash
- Socket.io
- Node 16.x or higher
- Redis (https://redis.io/download/)
- MongoDB (https://www.mongodb.com/docs/manual/administration/install-community/)
- Typescript
- API key, secret and cloud name from cloudinary https://cloudinary.com/
- Local email sender and password https://ethereal.email/
You'll need to copy the contents of .env.development.example, add to .env file and update with the necessary information.
- There are three different branches develop, staging and main. The develop branch is the default branch.
git clone -b develop https://github.com/uzochukwueddie/chatty-backend.git
cd chatty-backend
npm install- To start the server after installation, run
npm run dev- Inside the
setupServer.tsfile, comment the linesameSite: 'none'. - You'll need to uncomment that line again before you deploy to AWS.
Make sure mongodb and redis are both running on your local machine.
- You can run the command
npm run testto execute the unit tests added to the features controllers.
- The actual endpoints for the application can be found inside the folder named
endpointshttps://github.com/uzochukwueddie/chatty-backend/tree/develop/endpoints. - The endpoint files all have a
.httpextension. - To use this files to make api calls, install the extension called rest client on vscode.
- Update the endpoints http files before using.
- The files inside the endpoints folder contains APIs for
- Authentication
- Chat
- Comments
- Followers, following, block and unblock
- Health
- Images
- Notification
- Posts
- Reactions
- User
- You can view the contents of your redis cache by using a tool called redis-commander.
- Download mongodb compass to view data. https://www.mongodb.com/try/download/compass.
- You can create an account on AWS if you don't have one already.
- Download and install aws cli.
- On AWS, create an IAM user. You'll get a key and secret.
- Use aws configure command to add your iam secret and key to your local machine.
- To deploy the backend server on AWS, it is required you have a domain to use.
- With that domain, manually create a route53 hosted zone on AWS.
- Copy the hosted zone NS properties and add to the nameservers section of your domain on the dashboard of your domain name provider. e.g: godaddy, namecheap etc.
- For example, on namecheap.com


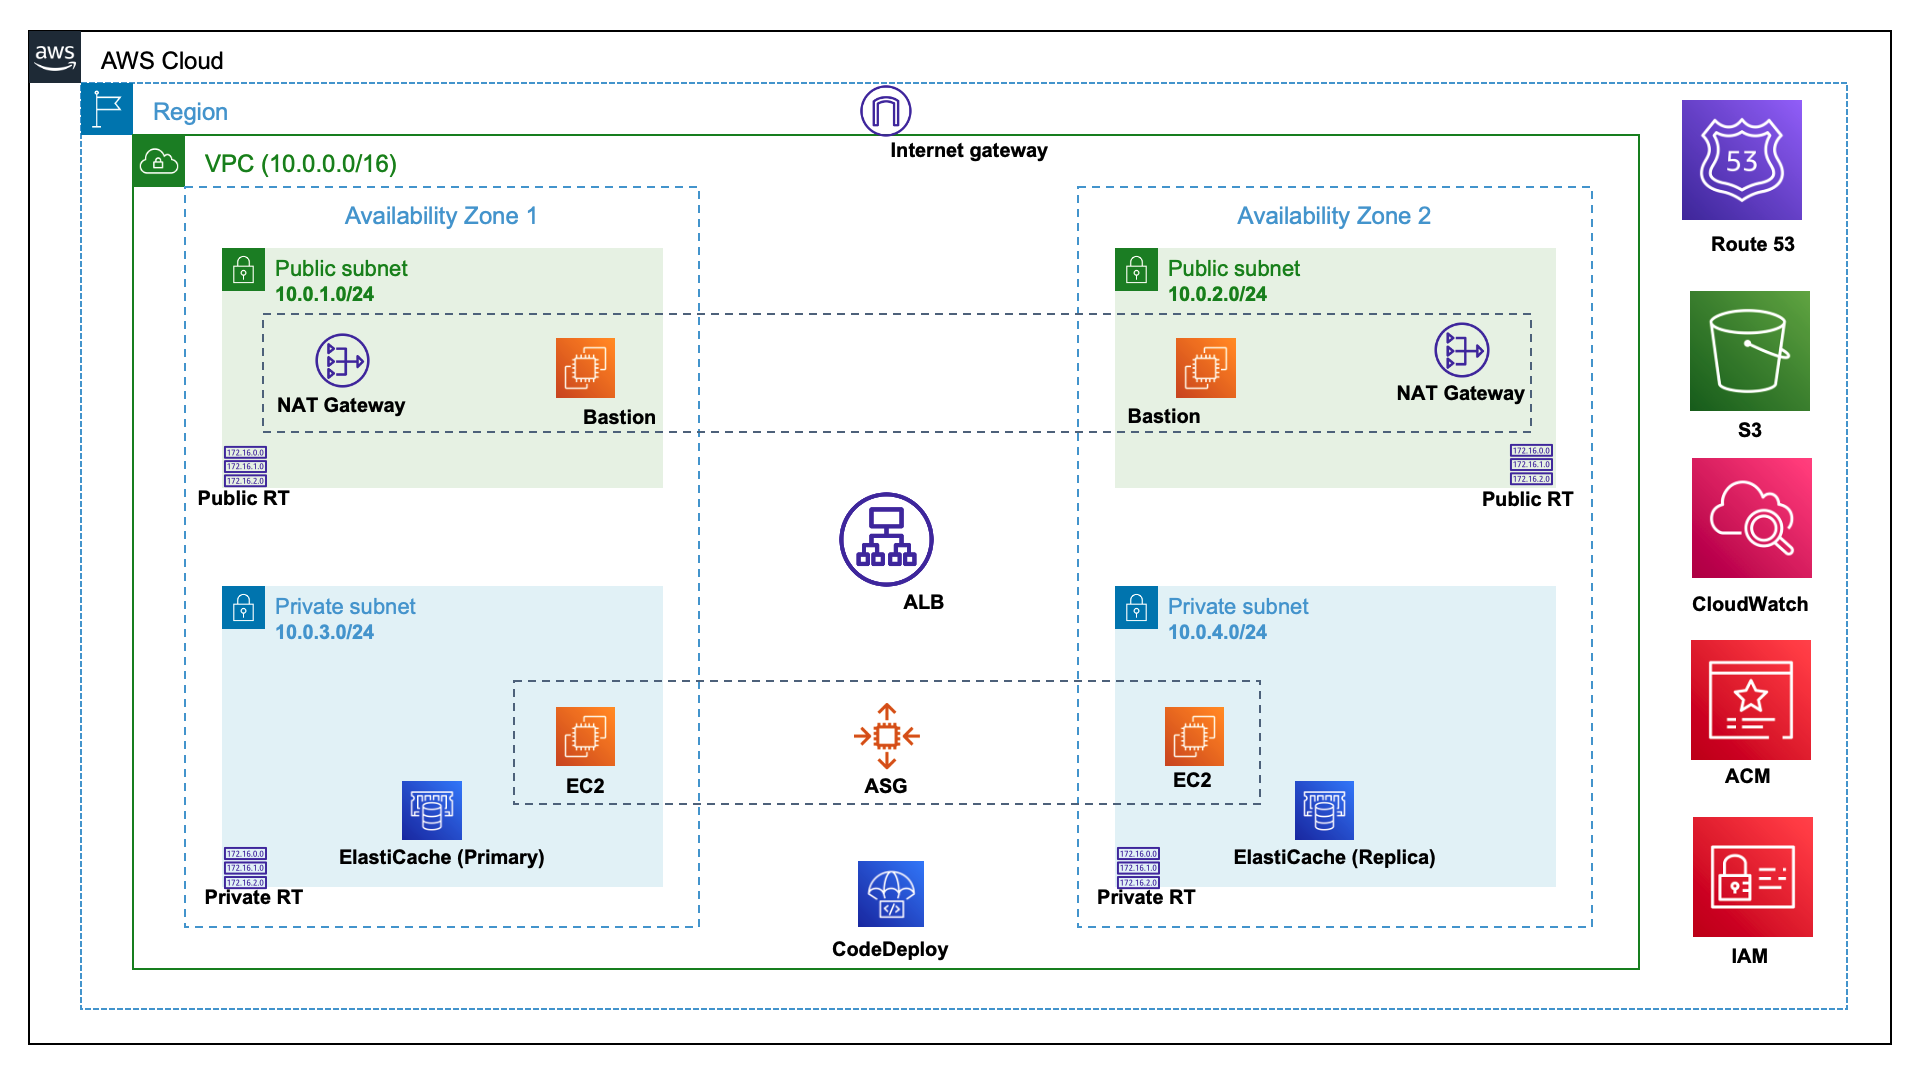
- VPC
- Subnets
- Internet gateways
- Route tables
- Elastic ips
- Nat gateways
- Security groups
- ALB target groups
- Route53
- AWS Certificate Manager
- Application load balancers
- IAM roles
- Elasticache
- EC2 launch config
- EC2 instances
- Autoscaling group
- S3
- Code deploy
- Cloudwatch
- Make sure to uncomment this line
sameSite: 'none'insidesetupServer.tsfile. - Install terraform
- Terraform stores state about your managed infrastructure and configuration. This state is used by Terraform to map real world resources to your configuration, keep track of metadata, and to improve performance for large infrastructures.
- This state is stored by default in a local file named "terraform.tfstate", but it can also be stored remotely, which works better in a team environment.
- Update the
variables.tffile with the correct data. Update the properties with comments. - To store your terraform remote state on AWS, first create a unique S3 bucket with a sub-folder name called
develop. - Add that S3 bucket name to
main.tffile. Also add your region to the file. - Create a keyPair on AWS. Keep the key safe on your local machine and add the name of the keyPair to
ec2_launch_config.tfandbastion_hosts.tffiles. - Before running the terraform apply command to your resources, you need to
- create a new s3 bucket to store env files
- inside the created s3 bucket, add a sub-folder called backend and inside the backend folder another sub-folder called develop. Bucket path should be something like
<your-s3-bucket>/backend/develop - in your project, create a
.env.developfile. Add the contents of.envto the new file. - the contents of
.env.developneeds to be properties that will be used when deployedDATABASE_URLshould be an actual mongodb url. You can create an account on mongodb atlas and create a new database.NODE_ENVcan be set to productionCLIENT_URLcan be set to the frontend application local url or actual domainAPI_URLshould behttps://api.dev.<your-backend-domain>that you specified inside your terraformvariables.tffile.SENDGRID_API_KEYandSENDGRID_SENDERshould be created from sendgrid dashboard. Create an account.
- after updating the
.env.developfile, you can zip it and upload it to the new s3 bucket you created to store env files. Upload using aws clizip env-file.zip .env.develop. The file must be calledenv-file.zip.aws --region <your-region> s3 cp env-file.zip s3://<your-s3-bucket>/backend/develop/
- Go into the
user-data.shandupdate-env-file.shfiles and update. - Once the
env-file.ziphas been added to your s3 bucket, you can execute inside thedeploymentfolder, the commands:terraform initterraform validateterraform fmtterraform planterraform apply -auto-approve
- It will take sometime to create the resources. If everything works well, you should be able to access the backend dev api endpoints.
- To destroy all created resources, run
terraform destroy
- Create an account on circleci.
- Signup or login with the github or bitbucket account where you stored your code.
- Setup your project.
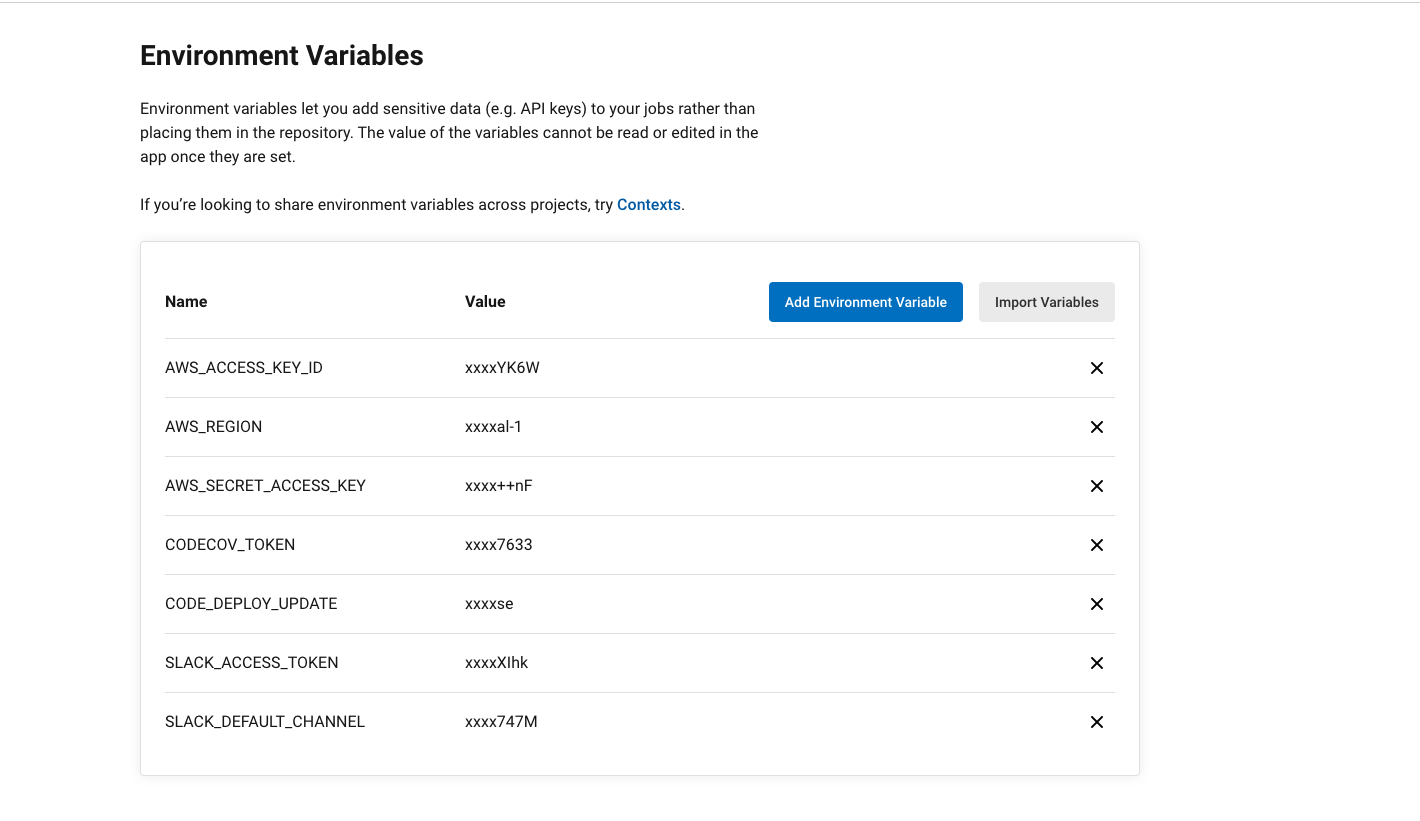
- Add the environment variables you see on the screenshot to circleci.
- For
CODECOV_TOKEN, visit CodeCov and signup or login with the same account where you have your project stored.- Once you login and setup your project, you will receive a token. Add that token to circleci.
- For
CODE_DEPLOY_UPDATE, the default value is false. That is the first time you are setting up your pipeline and infrastructure. Once everything is setup and running, if you need to update your backend code, then you can change the property to true. SLACK_ACCESS_TOKENandSLACK_DEFAULT_CHANNELcan be obtained by following this documentation.
- Inside the
circleci.ymlfile, you need to make some updates. - There are some properties named
<variable-prefix>that you need to replace with theprefixvalue from your terraformvariables.tf. Search the config.yml file and replace<variable-prefix>.