Scholarly publishing has evolved from the clunky days of typewriters and snail mail, to the digital age of electronic word documents. The next step of the evolution takes root from a GitHub repository behold the NeuroLibre Reproducible Preprints (NRP)!
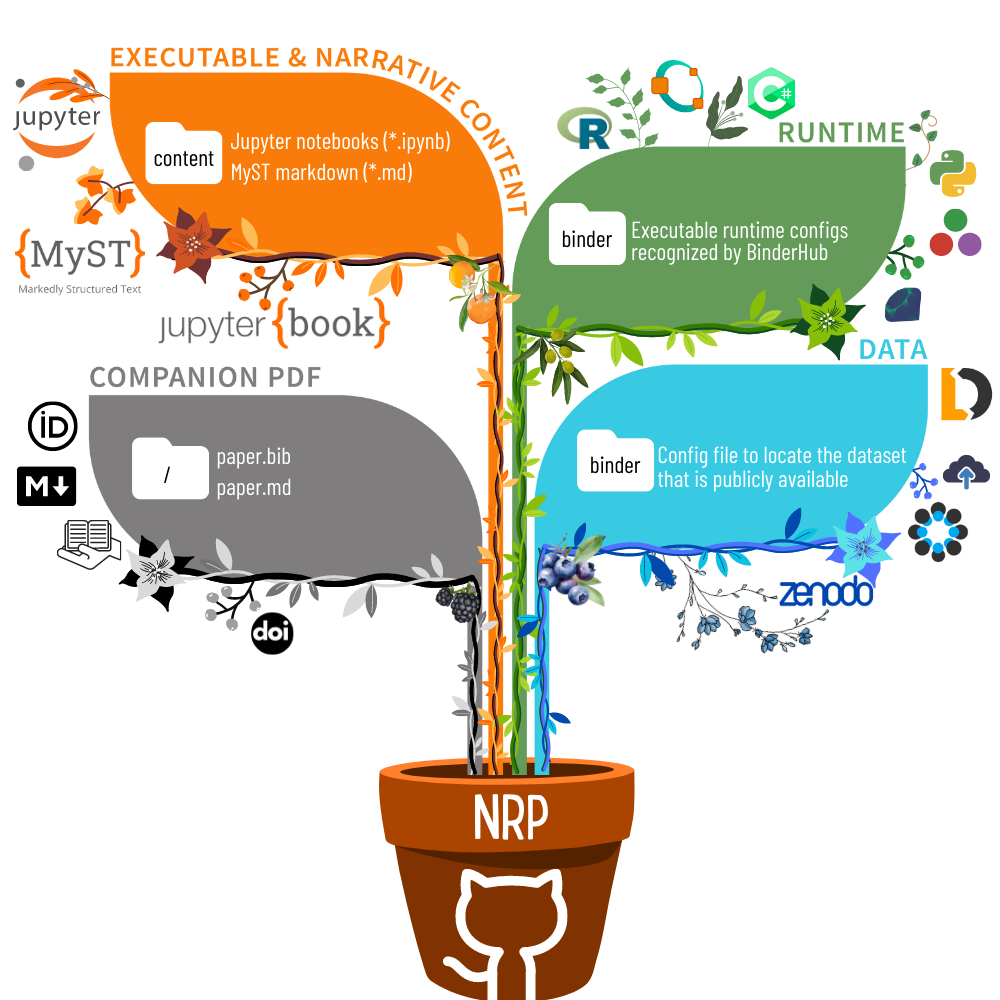
The illustration above is a concise overview of the key components required to bring an NRP to life from a public GitHub repository.
Prepare your NRP
The following sections provide details on the expected layout of an NRP repository that lives on GitHub.
To provide a powerful, flexible, and interactive way to create your preprint, NRPs are based on the Jupyter Book.
When building the Jupyter Book for an NRP (which is a compact website), NeuroLibre expects locating your Jupyter Notebooks and/or MyST Markdown files within a folder named content.
📑 Reference documentations
Inside the content directory, you have the freedom to organize the SOURCE files as per your preference:
root/
├─ content/
│  ├─ _toc.yml                  [REQUIRED]
│  ├─ _config.yml               [REQUIRED]
│  ├─ _neurolibre.yml           [OPTIONAL]
│  ├─ my_notebook.ipynb         [SOURCE]
│  ├─ my_myst.md                [SOURCE]
│  ├─ MY FOLDER
│  │  ├─ another_notebook.ipynb [SOURCE]
ℹ️ The relationship between the source files and the table of contents of your NRP must be defined in the content/_toc.yml file, as it is a REQUIRED component.
ℹ️ Another REQUIRED component is the content/_config.yml to customize the appearance and behavior of your Jupyter Book.
💻 Supported programming languages
NRPs, being part of the Jupyter ecosystem, offer the flexibility to utilize a wide range of programming languages, provided they do not require a license (e.g., MATLAB is not supported yet, but you can use Octave).
You can take advantage of any language that has a compatible kernel listed in the Jupyter kernels for writing the executable content of your NRP.
Another important consideration is to ensure that BinderHub configurations support the language of your choice, or you know how to create a Dockerfile to establish a reproducible runtime environment. Further detail on this matter is provided in the following (green) section.
📝 Managing citations and bibliography in your reproducible preprint
To cite articles in your reproducible preprint, include your bibtex formatted bibliographic entries in a paper.bib file located at the root of your repository, which is the same bibliography used by the companion PDF.
To point the Jupyter Book build to the relevant bibliography, add the following to the content/_config.yml file:
bibtex_bibfiles:
   - ../paper.bib
sphinx:
   config:
      bibtex_reference_style: author_year
For further details regarding the management of citations and bibliography in Jupyter Book, please see the reference docs.
➕ Reproducible preprint in disguise (traditional article layout)
If you prefer your reproducible preprint to have a layout resembling a traditional article — single page and without sidebars — you can achieve this by creating your content in a single Notebook or MyST markdown file. Additionally, include a content/_neurolibre.yml file with the following content:
book_layout: traditional
single_page: index.ipynb # The notebook/MyST that creates the whole preprint.
See an example of an NRP that combines the appearance of a traditional article with the powerful features of a Jupyter Book.
❗️Compatibility of this format with citations and bibliography has not been tested yet.
🎚 Make the most of your NRP with interactive visualizations
We strongly recommend incorporating interactive visualizations, such as those offered by plotly, to enhance the value of your NRP.
By utilizing interactive visualizations, you can fully leverage the potential of your figures and present your data in a more engaging and insightful manner.
You can visit the reference JupyterBook documentation to have your interactive outputs rendered in your NRP.
🟢 The binder folder (runtime) :::::::::::::::::
One of the essential features of NRPs is the provision of dedicated BinderHub instances for the published preprints. This empowers readers and researchers to interactively explore and reproduce the findings presented in the NRP through a web browser, without installing anything to their computers.
By leveraging NeuroLibre's BinderHub, each NRP receives its isolated computing environment, ensuring that the code, data, and interactive elements remain fully functional and accessible.
The NRP repository's binder folder contains all the essential runtime descriptions to tailor such isolated computing environments for each reproducible preprint.
⚙️ How to setup your runtime
To specify your runtime and set up the necessary configuration files for your runtime environment, please refer to the binderhub configuration files documentation.
To implement this in your NRP repository, create a binder folder and place the appropriate configuration files inside it according to your runtime requirements. These configuration files will define the environment in which your preprint's code and interactive elements will run when accessed through NeuroLibre's BinderHub.
As we build a Jupyter Book for your NRP in the exact same runtime you defined, we need the following Python dependencies to be present. For example, in a binder/_requirements.txt file:
repo2data>=2.6.0
jupyter-book==0.14.0
❗️We recommend not using jupyter-book versions newer than 0.14.0 as of July 2023.
Currently, we are using repo2data to download the dataset needed to run your executable content. For details, please see the following (blue) section.
🔗 Example runtime environments
You can explore the binder-examples GitHub organization to find useful examples of configuration files.
Moreover, for additional insights and inspiration, you can visit the roboneurolibre GitHub organization to explore various NRP repositories. Observe how each preprint defines its runtimes and customizes the Binder environment to suit their research needs.
🔋 Ensuring reproducibility and resource allocation in NRPs
As of July 2023, each NRP Jupyter Book build is allocated the following resources:
- 8 hours of execution time
- 1 or 2 CPUs at 3GHz
- 6GB of RAM
Please note that the Jupyter Book build (book build) occurs only after a successful runtime build (BinderHub). The resource allocations mentioned above apply specifically to the book build.
Understanding the distinction between the runtime build and book build is crucial for adhering to reproducible practices.
It is strongly advised NOT to download external dependencies during the book build, as NeuroLibre cannot guarantee their long-term preservation. As a best practice, all runtime dependencies should be handled during the runtime build using the BinderHub configuration files.
🔵 The binder folder (data) :::::::::::::::::
NeuroLibre Reproducible Preprints (NRPs) aim to distill your analysis into reproducible insights. One of the core requirements for achieving this goal is to have access to the dataset used in the analysis.
Currently, we utilize a work-in-progress tool called repo2data to facilitate the downloading of your dataset to our servers and to associate it with the NRP you are building. To locate the necessary information, NeuroLibre searches for the binder/data_requirement.json file.
💽 Content of the data_requirement.json
Currently, repo2data is compatible with public download URIs from the following providers:
- Google Drive
- Amazon S3
- OSF
- Zenodo
- Datalad
❗️Data will not be downloaded if the URL is not from one of the providers above.
{ "src": "https://download/url/of/the/dataset",
 "dst": "/location/of/the/data/relative/to/the/binder/folder",
 "projectName": "unique_project_name"}
❗️The dst field above is not considered when your data is downloaded to the NeuroLibre servers. On the server-side, data is set to be available at the data/unique_project_name directory, where the data folder is (read-only) mounted to the root of your repository, i.e. next to the binder and content folders.
❗️Therefore, the dst key is only important when you are testing your notebook locally. For example, if your data_requirement.json is the following
{ "src": "https://...",
 "dst": "../../",
 "projectName": "my_nrp_data"}
then repo2data will download the data in a folder named data/my_nrp_data that is next to the folder that contains your repository, as two upper directories correspond to that location.
⭐️ Nevertheless, you don't have to manually identify the folder location. Instead, you can use the following pattern in Python:
from repo2data.repo2data import Repo2Data
import os
data_req_path = os.path.join("..","..", "binder", "data_requirement.json") # Change with respect to the location of your notebook
repo2data = Repo2Data(data_req_path)
data_path = repo2data.install()[0]
my_data = os.path.join(data_path,'my_data.nii.gz')
In the example above, the notebook that uses repo2data is under the content/00/my_notebook.ipybn. Consequently, the data_requirement.json was located in two directories above.
After being downloaded to the server, any subsequent attempts to re-download the data will be disregarded unless modifications are made to the data_requirement.json file.
📀 Data allocation
As of July 2023, each NRP is allowed to:
- use up to 10GB of data (to be downloaded from a trusted source)
- around 8GB of runtime storage (derivatives generated after executing your book)
🗜 If you are sharing a compressed file archive (e.g., zip)
Please ensure that the parent directory is not included in the archive. Otherwise, when the data is automatically extracted, repo2data will not be able to locate the actual content.
To achieve this on osx:
cd /to/your/data/directory
zip -r my_data.zip . -x ".*" -x "__MACOSX"
Similarly on Ubuntu:
cd /to/your/data/directory && zip -r ../my_data.zip .⬇️ Using Google Drive to share your NRP data
Please make sure that your Drive folder (or the zip file) is publicly available, then locate your project ID (a complex array of 33 characters that you can find on the url).
Then you can construct the download url with that ID: https://drive.google.com/uc?id=${PROJECT_ID}
Example data_requirement.json:
{ "src": "https://drive.google.com/uc?id=1_zeJqQP8umrTk-evSAt3wCLxAkTKo0lC",
"dst": "./data",
"projectName": "my_data_in_gdrive"}
⬇️ Using Datalad to share your NRP data
If the src is provided with a URI that ends in .git, Repo2Data will then use the datalad to download the data.
{ "src": "https://github.com/OpenNeuroDatasets/ds000005.git",
"dst": "./data",
"projectName": "repo2data_datalad"}
⬇️ Using S3 to share your NRP data
If the src url starts with s3://, Repo2Data will use aws s3 sync --no-sign-request to download your data.
{ "src": "s3://openneuro.org/ds000005",
"dst": "./data",
"projectName": "repo2data_s3"}
⬇️ Using OSF to share your NRP data
Repo2Data uses osfclient osf -p PROJECT_ID clone command. You will need to provide the link to the public project containing your data https://osf.io/.../:
{ "src": "https://osf.io/fuqsk/",
"dst": "./data",
"projectName": "repo2data_osf"}
If you need to download subsets from a larger a project, you can achieve this using the remote_filepath field which runs osf -p PROJECT_ID fetch -f file command. For example:
{ "src": "https://osf.io/fuqsk/",
"remote_filepath": ["hello.txt", "test-subfolder/hello-from-subfolder.txt"],
"dst": "./data",
"projectName": "repo2data_osf_multiple"}
⬇️ Using Zenodo to share your NRP data
We also support the use of the public data repository Zenodo through "zenodo_get." Ensure that your project is public and has a DOI with the form "10.5281/zenodo.XXXXXXX."
{ "src": "10.5281/zenodo.6482995",
"dst": "./data",
"projectName": "repo2data_zenodo"}
❗️If this is the case, please indicate dutring the submission that you already have a DOI for your dataset, so that the NeuroLibre publication workflow skips the data archival step.
⚫️ The companion PDF :::::::::::::::::
To publish your NRP as a preprint, a PDF is necessary. Our PDF template integrates all the reproducibility assets created at the end of a successful book build as part of the publication.
To create a PDF, two files are required: paper.md and paper.bib at the root of your NRP repository.
✍️ Authors and affiliations
The front matter of paper.md is used to collect meta-information about your preprint:
---
title: 'White matter integrity of developing brain in everlasting childhood'
tags:
   - Tag1
   - Tag2
authors:
   - name: Peter Pan
     orcid: 0000-0000-0000-0000
     affiliation: "1, 2"
   - name: Tinker Bell
     affiliation: 2
affiliations:
- name: Fairy dust research lab, Everyoung state university, Nevermind, Neverland
   index: 1
- name: Captain Hook's lantern, Pirate academy, Nevermind, Neverland
   index: 2
date: 08 September 1991
bibliography: paper.bib
---
❗️Please pay careful attention when editing this section as the author names, ORCID IDs, and affiliations specified here will be used for the archival of the reproducibility assets, as well as for the published preprint. Ensuring the accuracy of this information is crucial, as any inaccuracies may result in researchers not being properly attributed for their contributions.
The corpus of this static document (paper.md) is intended for a big picture summary of the preprint generated by the executable and narrative content you provided (in the content) folder. You can include citations to this document from an accompanying BibTex bibliography file paper.bib.
📝 Testing the PDF compilation
Contrary to what publishing giants may lead you to believe, creating a PDF is a relatively straightforward process.
In fact, we have simplified it by utilizing GitHub actions to compile your draft PDF automatically within just a few minutes after each commit you push to your repository. This streamlined approach ensures that you can focus on your work while effortlessly generating the PDF without any manual hassle.
Add a file .github/workflows/draft-pdf.yml to your repository with the following content (also available in the template repository):
on: [push]

jobs:
paper:
   runs-on: ubuntu-latest
   name: Paper Draft
   steps:
      - name: Checkout
      uses: actions/checkout@v3
      - name: Build draft PDF
      uses: neurolibre/neurolibre-draft-action@master
      with:
         journal: neurolibre
         # This should be the path to the paper within your repo.
         paper-path: paper.md
      - name: Upload
      uses: actions/upload-artifact@v1
      with:
         name: paper
         # This is the output path where Pandoc will write the compiled
         # PDF. Note, this should be the same directory as the input
         # paper.md
         path: paper.pdf
After a successful build, the draft PDF will be available as an artifact Your Repo -> Actions -> Latest Run -> Artifacts -> paper.zip