- Run the following code snippet to install Chrome and Botasaurus:
! apt-get update
! wget https://dl.google.com/linux/direct/google-chrome-stable_current_amd64.deb
! apt-get install -y lsof wget gnupg2 apt-transport-https ca-certificates software-properties-common adwaita-icon-theme alsa-topology-conf alsa-ucm-conf at-spi2-core dbus-user-session dconf-gsettings-backend dconf-service fontconfig fonts-liberation glib-networking glib-networking-common glib-networking-services gsettings-desktop-schemas gtk-update-icon-cache hicolor-icon-theme libasound2 libasound2-data libatk-bridge2.0-0 libatk1.0-0 libatk1.0-data libatspi2.0-0 libauthen-sasl-perl libavahi-client3 libavahi-common-data libavahi-common3 libcairo-gobject2 libcairo2 libclone-perl libcolord2 libcups2 libdata-dump-perl libdatrie1 libdconf1 libdrm-amdgpu1 libdrm-common libdrm-intel1 libdrm-nouveau2 libdrm-radeon1 libdrm2 libencode-locale-perl libepoxy0 libfile-basedir-perl libfile-desktopentry-perl libfile-listing-perl libfile-mimeinfo-perl libfont-afm-perl libfontenc1 libgbm1 libgdk-pixbuf-2.0-0 libgdk-pixbuf2.0-bin libgdk-pixbuf2.0-common libgl1 libgl1-mesa-dri libglapi-mesa libglvnd0 libglx-mesa0 libglx0 libgraphite2-3 libgtk-3-0 libgtk-3-bin libgtk-3-common libharfbuzz0b libhtml-form-perl libhtml-format-perl libhtml-parser-perl libhtml-tagset-perl libhtml-tree-perl libhttp-cookies-perl libhttp-daemon-perl libhttp-date-perl libhttp-message-perl libhttp-negotiate-perl libice6 libio-html-perl libio-socket-ssl-perl libio-stringy-perl libipc-system-simple-perl libjson-glib-1.0-0 libjson-glib-1.0-common liblcms2-2 libllvm11 liblwp-mediatypes-perl liblwp-protocol-https-perl libmailtools-perl libnet-dbus-perl libnet-http-perl libnet-smtp-ssl-perl libnet-ssleay-perl libnspr4 libnss3 libpango-1.0-0 libpangocairo-1.0-0 libpangoft2-1.0-0 libpciaccess0 libpixman-1-0 libproxy1v5 librest-0.7-0 librsvg2-2 librsvg2-common libsensors-config libsensors5 libsm6 libsoup-gnome2.4-1 libsoup2.4-1 libtext-iconv-perl libthai-data libthai0 libtie-ixhash-perl libtimedate-perl libtry-tiny-perl libu2f-udev liburi-perl libvte-2.91-0 libvte-2.91-common libvulkan1 libwayland-client0 libwayland-cursor0 libwayland-egl1 libwayland-server0 libwww-perl libwww-robotrules-perl libx11-protocol-perl libx11-xcb1 libxaw7 libxcb-dri2-0 libxcb-dri3-0 libxcb-glx0 libxcb-present0 libxcb-randr0 libxcb-render0 libxcb-shape0 libxcb-shm0 libxcb-sync1 libxcb-xfixes0 libxcomposite1 libxcursor1 libxdamage1 libxext6 libxfixes3 libxft2 libxi6 libxinerama1 libxkbcommon0 libxkbfile1 libxml-parser-perl libxml-twig-perl libxml-xpathengine-perl libxmu6 libxmuu1 libxrandr2 libxrender1 libxshmfence1 libxt6 libxtst6 libxv1 libxxf86dga1 libxxf86vm1 libz3-4 mesa-vulkan-drivers perl-openssl-defaults shared-mime-info termit x11-common x11-utils xdg-utils xvfb
! dpkg -i google-chrome-stable_current_amd64.deb
! python -m pip install botasaurus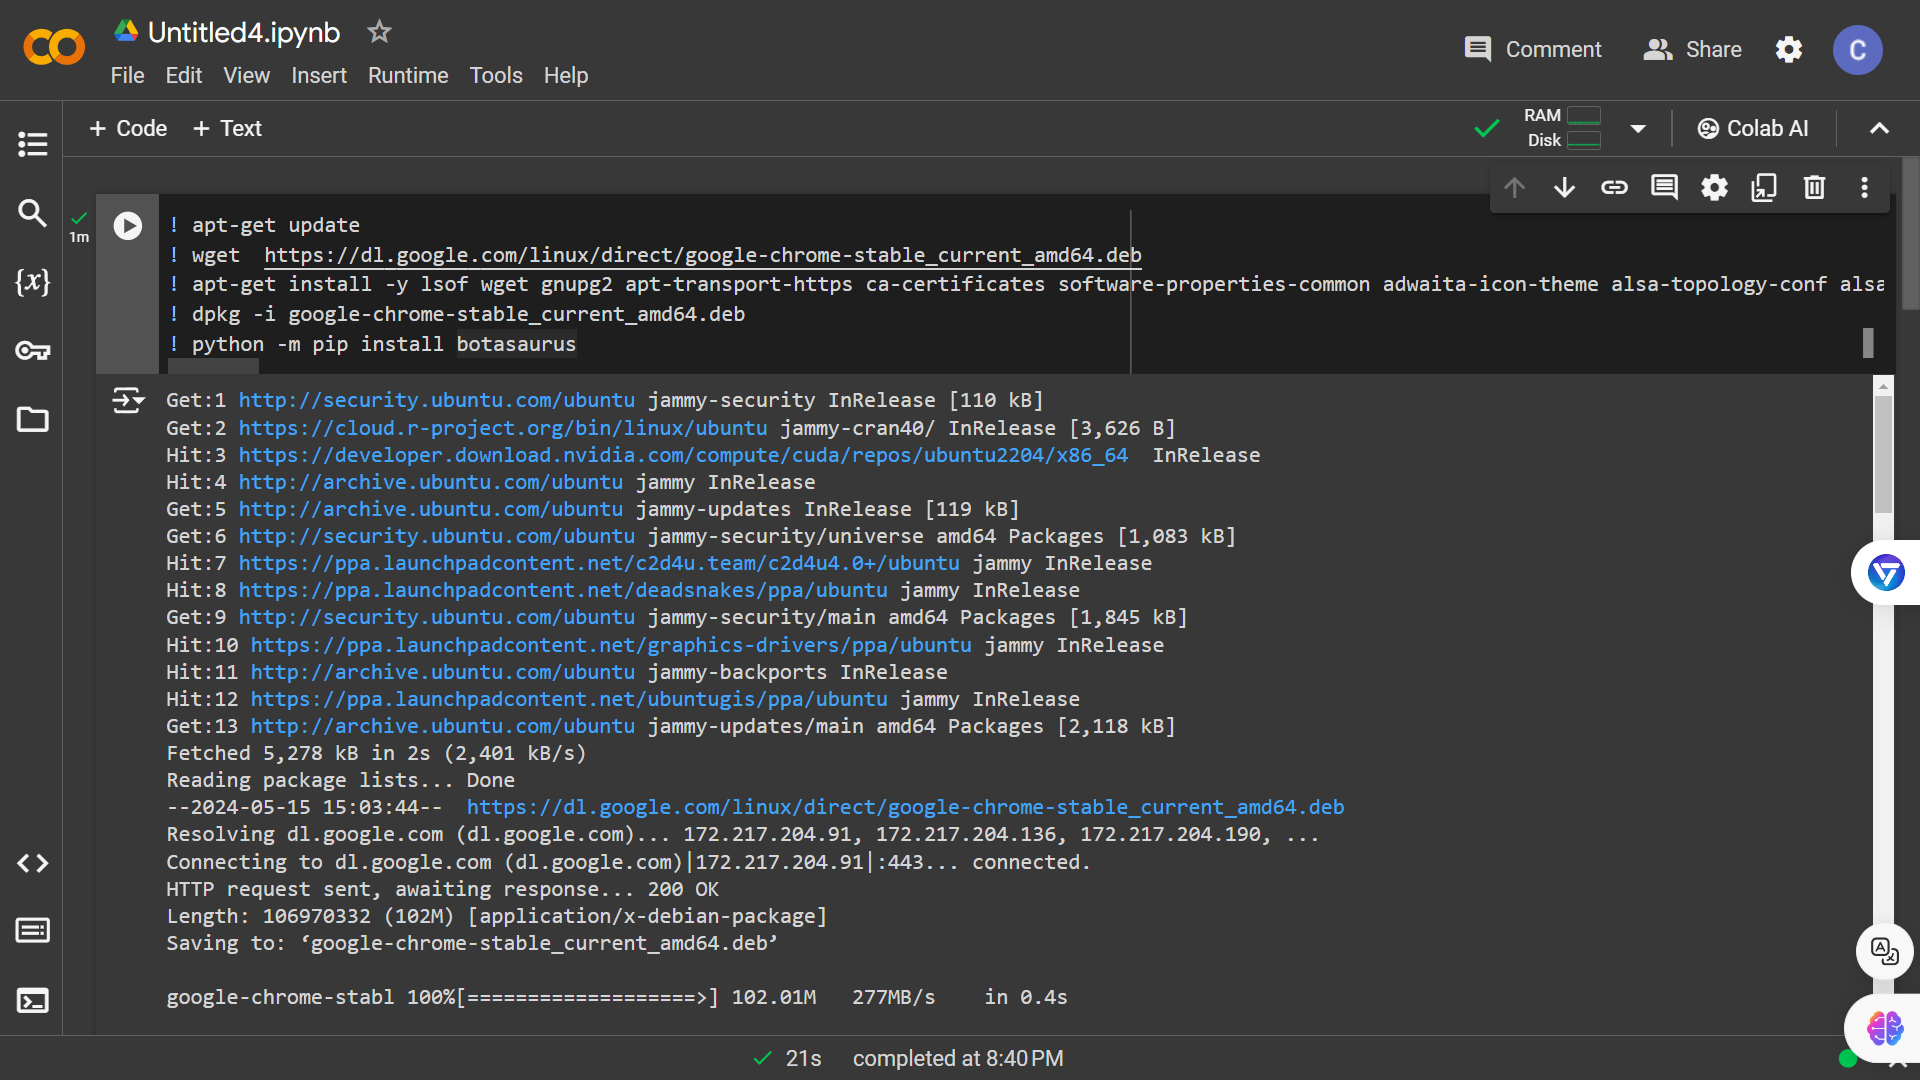
- Next, test Botasaurus by running this code snippet:
from botasaurus.browser import browser, Driver

@browser
def scrape_heading_task(driver: Driver, data):
    driver.google_get("https://www.g2.com/products/jenkins/reviews?page=5", bypass_cloudflare=True)
    heading = driver.get_text('.product-head__title [itemprop="name"]')
    driver.save_screenshot()
    return heading

scrape_heading_task()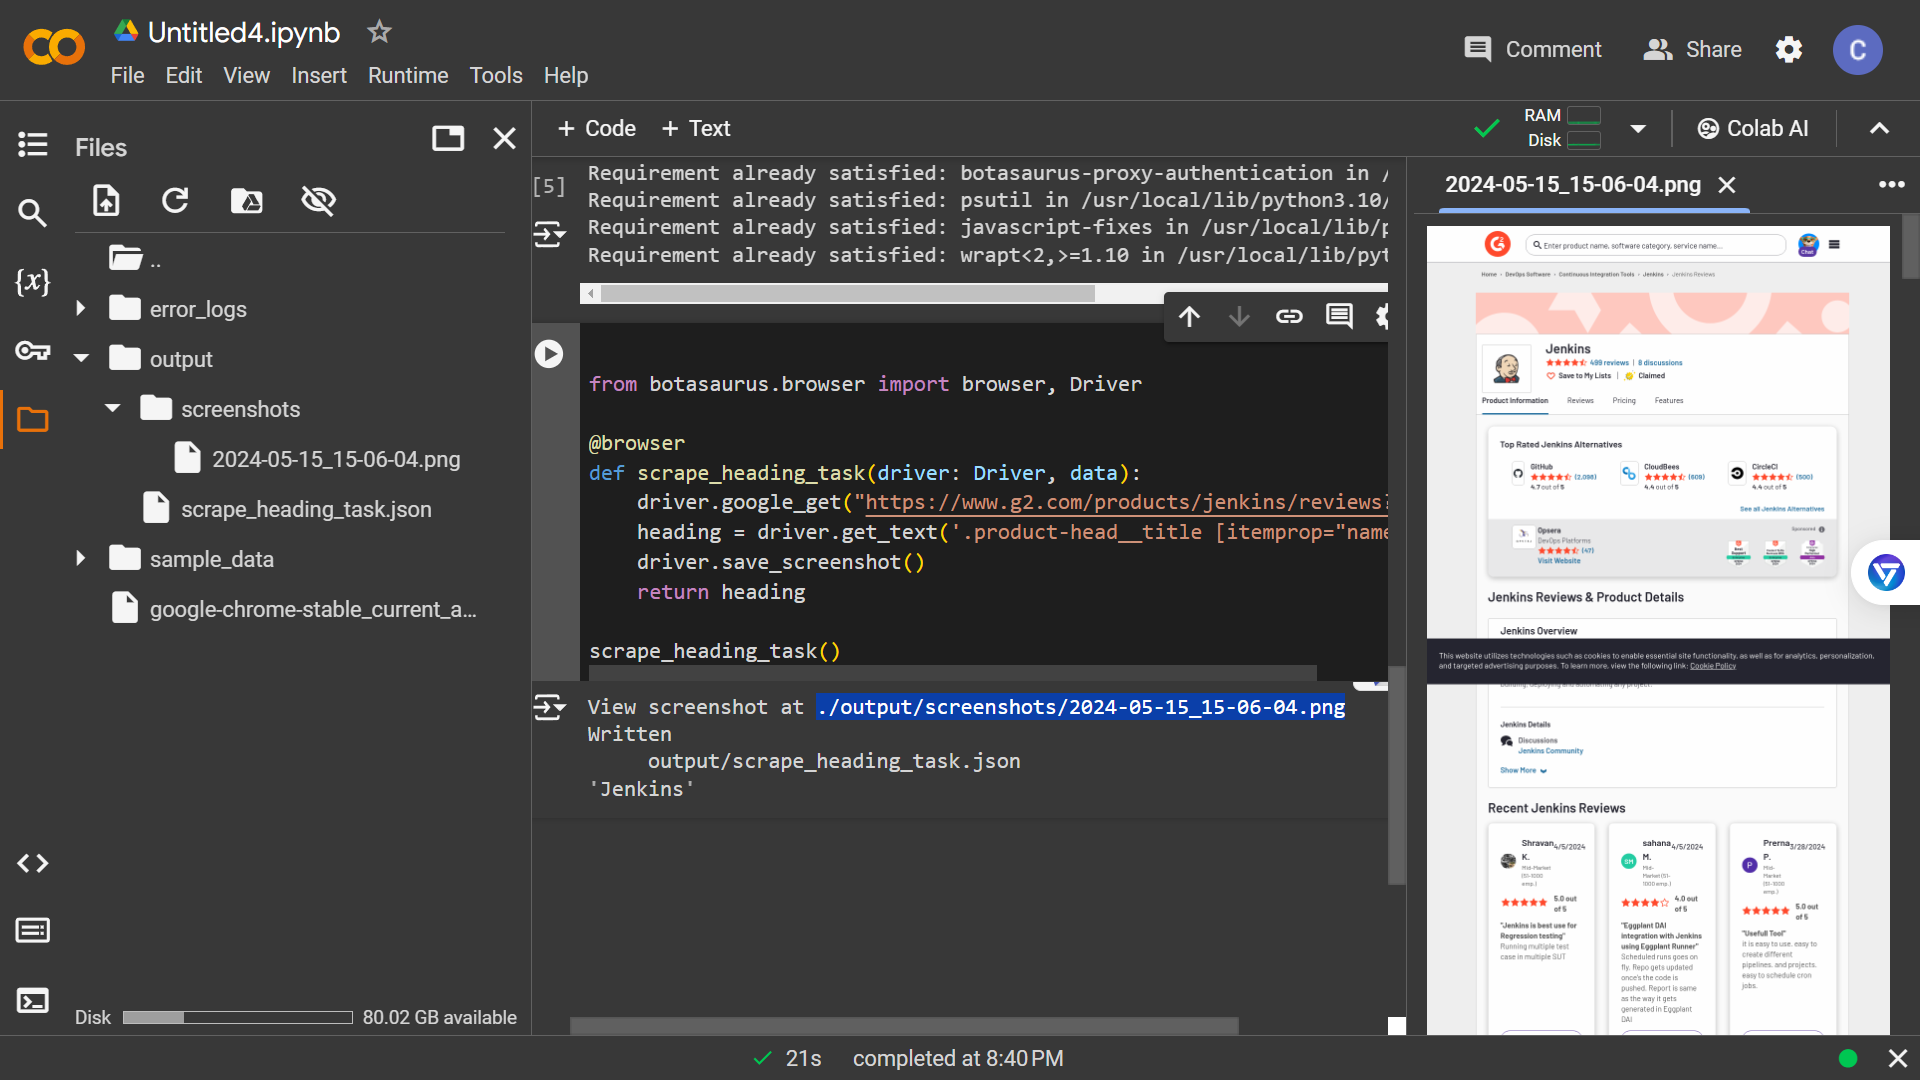
Let's say your scraping function returns data in the following format:
from botasaurus.task import task
@task
def scrape_product_data(data):
return [
{
"id": 1,
"name": "T-Shirt",
"price": 16, # in US Dollar
"reviews": 1000,
"is_available": True,
"category": "apparel",
"tags": ["cotton", "casual"]
},
{
"id": 2,
"name": "Laptop",
"price": 700,
"reviews": 500,
"is_available": False,
"category": "electronics",
"tags": ["computer", "portable"]
}
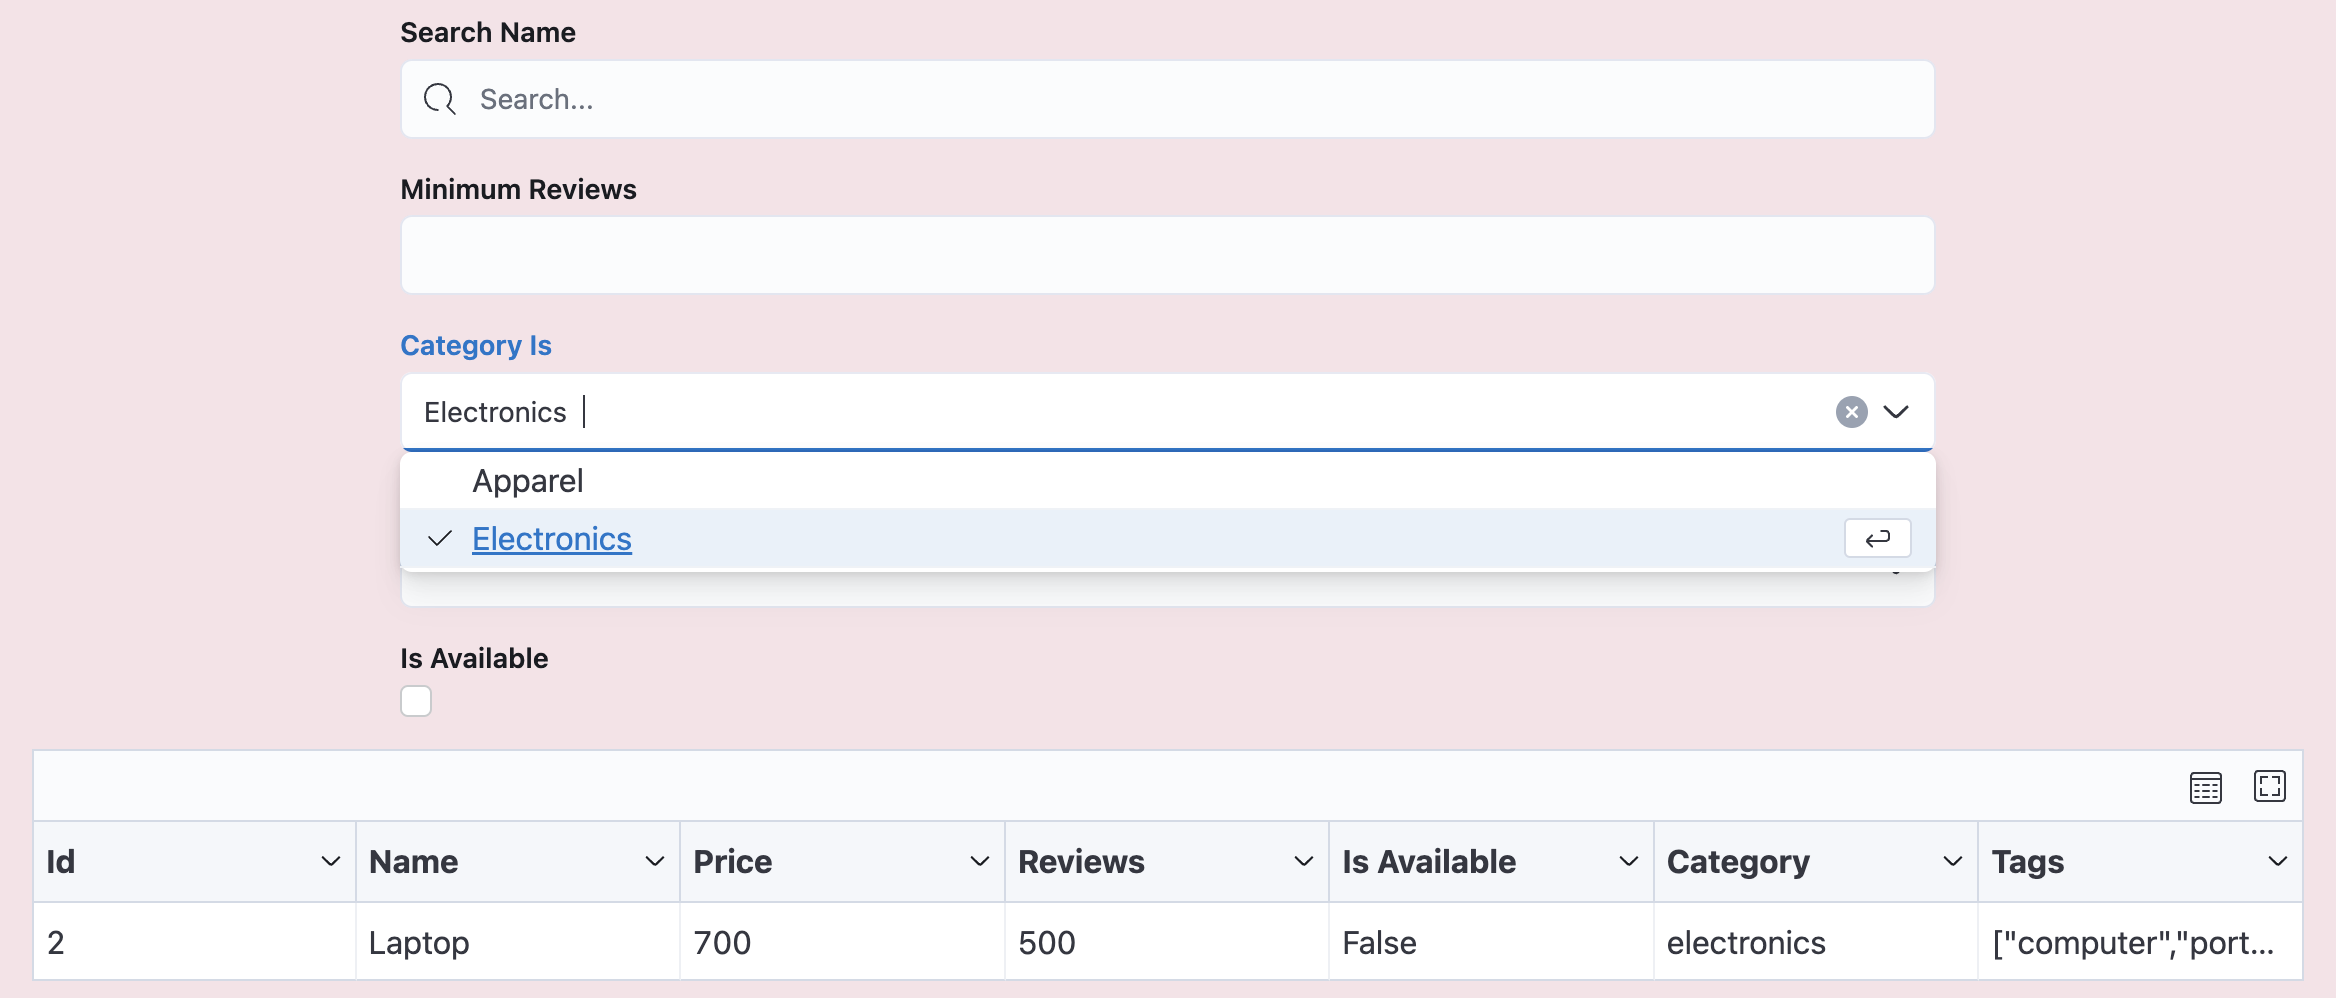
]Now, let's say you want to add filters to allow users to:
- Search for products by name
- Filter by minimum number of reviews
- Filter by product category
- Filter by product tags
- Filter by product availability
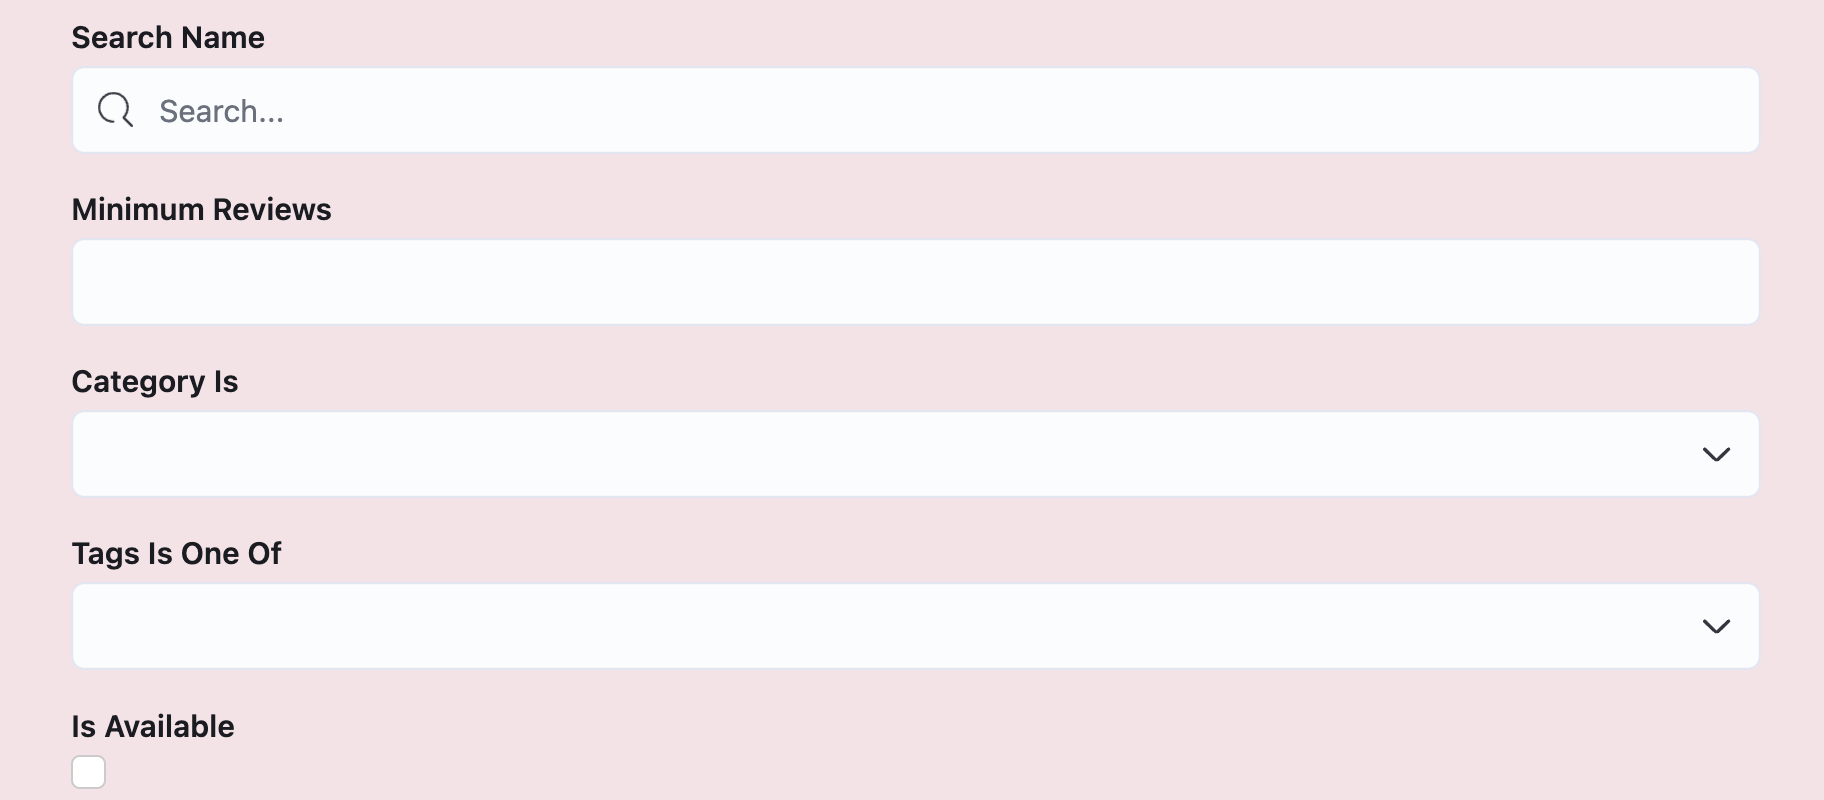
To add these filters, simply open backend/scrapers.py and specify the filters when adding the Scraper, like this:
from botasaurus_server.server import Server
from botasaurus_server.ui import filters
from src.scrape_product_data import scrape_product_data

all_filters = [
    filters.SearchTextInput("name"),
    filters.MinNumberInput("reviews", label="Minimum Reviews"),
    filters.SingleSelectDropdown(
        "category",
        options=[
            {"value": "apparel", "label": "Apparel"},
            {"value": "electronics", "label": "Electronics"}
        ]
    ),
    filters.MultiSelectDropdown(
        "tags",
        options=[
            {"value": "cotton", "label": "Cotton"},
            {"value": "casual", "label": "Casual"},
            {"value": "computer", "label": "Computer"},
            {"value": "portable", "label": "Portable"}
        ]
    ),
    filters.IsTrueCheckbox("is_available", label="Is Available")
]

Server.add_scraper(
    scrape_product_data,
    filters=all_filters,
)
With these filters added, you'll see them in the UI Scraper, allowing users to filter the scraped data based on their preferences.
Also, you can add a lot of other filters as shown below:
- MinNumberInput: Show items where target field is greater than or equal to the specified value.
filters.MinNumberInput("price")
- MaxNumberInput: Show items where target field is less than or equal to the specified value.
filters.MaxNumberInput("price")
- IsTrueCheckbox: Show items where target field is
True.filters.IsTrueCheckbox("is_available")
- IsFalseCheckbox: Show items where target field is
False.filters.IsFalseCheckbox("is_available")
- IsNullCheckbox: Show items where target field is
None.filters.IsNullCheckbox("description")
- IsNotNullCheckbox: Show items where target field is not
None.filters.IsNotNullCheckbox("description")
- SingleSelectDropdown: Allows the user to select a single option from a dropdown list.
The selected option is matched against the target field, which can be:
- a string
- or a list of strings
If the target field is a list of strings, it checks if the selected option is one of the values in that list.
filters.SingleSelectDropdown(
    "category",
    options=[
        {"value": "apparel", "label": "Apparel"},
        {"value": "electronics", "label": "Electronics"}
    ]
)- MultiSelectDropdown: Exactly same as SingleSelectDropdown but allows user to select multiple options from a dropdown list.
filters.MultiSelectDropdown(
    "tags",
    options=[
        {"value": "cotton", "label": "Cotton"},
        {"value": "casual", "label": "Casual"},
        {"value": "computer", "label": "Computer"},
        {"value": "portable", "label": "Portable"}
    ]
)
- SearchTextInput: Show items where the target field contains the
searchterm.filters.SearchTextInput("name")
Note: When you make any changes to the filters, sorts, or views, you need to stop the application by pressing Ctrl+C in the terminal, and then restart the application to see the changes take effect.
To do so, similar to filters, you need to specify sorts when adding the Scraper in backend/scrapers.py.
Below is an example illustrating how to add the following sorts:
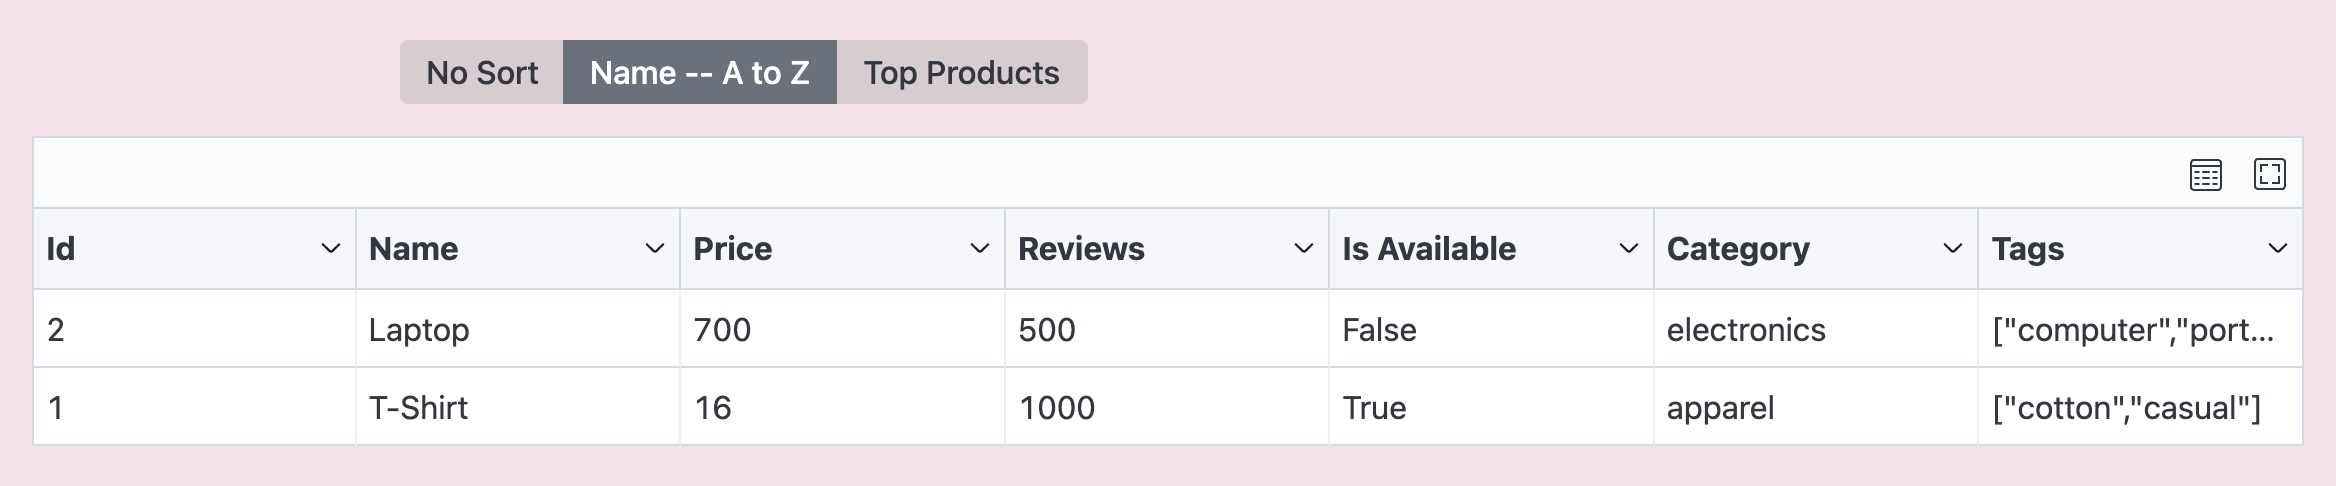
- Sort by name in ascending order
- Sort by name in ascending order, reviews in descending order, and availability by true first, and making this sort to be applied by default
from botasaurus_server.server import Server
from botasaurus_server.ui import sorts
from src.scrape_product_data import scrape_product_data

all_sorts = [
    sorts.AlphabeticAscendingSort("name"),
    sorts.Sort(
        label="Top Products",
        is_default=True,
        sorts=[
            sorts.AlphabeticAscendingSort("name"),
            sorts.NumericDescendingSort("reviews"),
            sorts.TrueFirstSort("is_available")
        ]
    )
]

Server.add_scraper(
    scrape_product_data,
    sorts=all_sorts,
)
Result
Also, you can add a lot of other sorts as shown below:
-
NumericAscendingSort: Sorts items by target field in ascending order.
sorts.NumericAscendingSort("price")
-
NumericDescendingSort: Sorts items by target field in descending order.
sorts.NumericDescendingSort("price")
-
TrueFirstSort: Sorts items where target field is
Truefirst.sorts.TrueFirstSort("is_available")
-
FalseFirstSort: Sorts items where target field is
Falsefirst.sorts.FalseFirstSort("discounted")
-
TruthyFirstSort: Sorts items where target field has a
truthyvalue first.sorts.TruthyFirstSort("description")
-
FalsyFirstSort: Sorts items where target field has a
falsyvalue first.sorts.FalsyFirstSort("description")
-
NullsFirstSort: Sorts items where target field is
Nonefirst.sorts.NullsFirstSort("end_date")
-
NullsLastSort: Sorts items where target field is
Nonelast.sorts.NullsLastSort("end_date")
-
NewestDateFirstSort: Sorts items by a date field in descending order (newest first).
sorts.NewestDateFirstSort("created_at")
-
OldestDateFirstSort: Sorts items by a date field in ascending order (oldest first).
sorts.OldestDateFirstSort("created_at")
-
AlphabeticAscendingSort: Sorts items by target field in ascending alphabetical order.
sorts.AlphabeticAscendingSort("name")
-
AlphabeticDescendingSort: Sorts items by target field in descending alphabetical order.
sorts.AlphabeticDescendingSort("name")
-
Sort: Allows sorting based on multiple sorting criteria. (Really Awesome 😎)
Example:
sorts.Sort(
  label="Top Products",
  sorts=[
      sorts.AlphabeticAscendingSort("name"),
      sorts.NumericDescendingSort("reviews"),
      sorts.TrueFirstSort("is_available")
  ]
)
Let's say your scraping function returns data in the following format:
from botasaurus.task import task

@task
def scrape_product_data(data):
    return [
        {
            "id": 1,
            "name": "T-Shirt",
            "price": 16, # in US Dollar
            "reviews": 1000,
            "reviews_per_rating": {
                "1": 0,
                "2": 0,
                "3": 0,
                "4": 100,
                "5": 900
            },
            "featured_reviews": [
                {
                    "id": 1,
                    "rating": 5,
                    "content": "Awesome t-shirt!",
                },
                {
                    "id": 2,
                    "rating": 5,
                    "content": "Amazing t-shirt!"
                }
            ],
        },
        {
            "id": 2,
            "name": "Laptop",
            "price": 700,
            "reviews": 500,
            "reviews_per_rating": {
                 "1": 0,
                "2": 0,
                "3": 0,
                "4": 100,
                "5": 400
            },
            "featured_reviews": [
                {
                    "id": 1,
                    "rating": 5,
                    "content": "Best laptop ever!",
                },
                {
                    "id": 2,
                    "rating": 5,
                    "content": "Great laptop!"
                }
            ],
        }
    ]
Now, To provide your Customer with the best experience, you should present this data in multiple views like:
- "Overview" view shows the most important fields:
- id
- name
- price
- reviews
- average_rating
- rating_1
- rating_2
- rating_3
- rating_4
- rating_5

- "Reviews" view shows:
- id (aliased as product_id for clarity)
- name (aliased as product_name for clarity)
- rating
- content
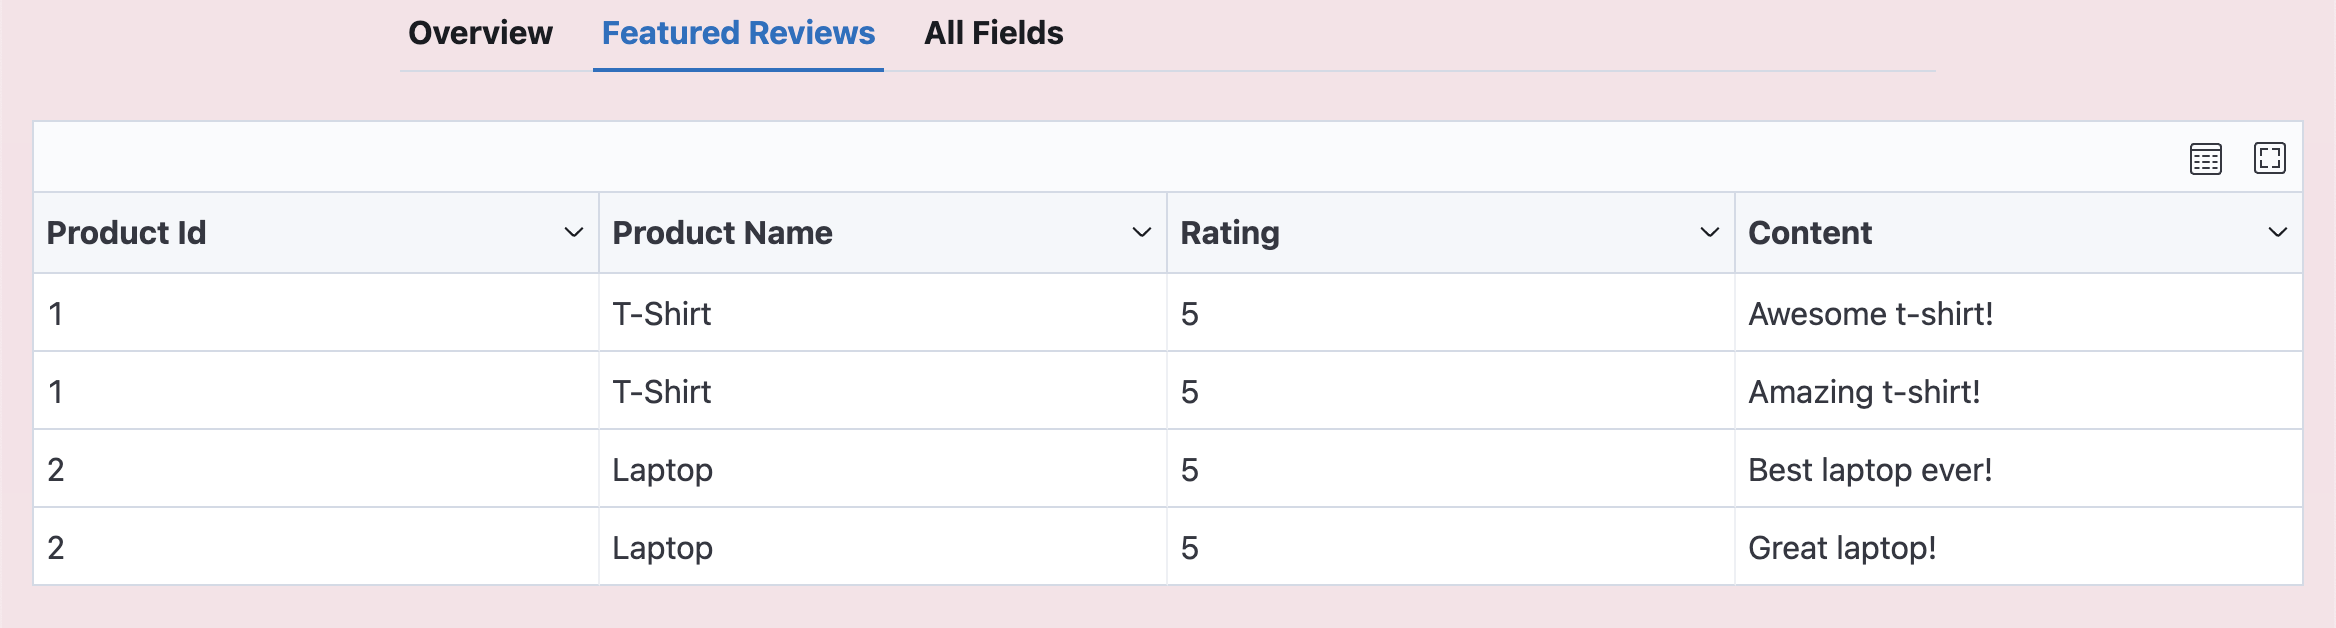
To create these views, you need to specify them when adding the Scraper in backend/scrapers.py as follows:
from botasaurus_server.server import Server
from botasaurus_server.ui import View, Field, ExpandDictField, ExpandListField
from src.scrape_product_data import scrape_product_data

# value is the reviews_per_rating dictionary
# record is the entire product record
def calculate_average_rating(value, record):
    total_reviews = sum(value.values())
    if total_reviews == 0:
        return 0

    rating_sum = 0
    for rating, count in value.items():
        rating_sum += int(rating) * count

    return rating_sum / total_reviews

# Define the "Overview" view
overview_view = View(
    "Overview",
    fields=[
        Field("id"),
        Field("name"),
        Field("price"),
        Field("reviews"),
        Field("reviews_per_rating", output_key="average_rating", map=calculate_average_rating),
        ExpandDictField(
            "reviews_per_rating",
            fields=[
                Field("1", output_key="rating_1"),
                Field("2", output_key="rating_2"),
                Field("3", output_key="rating_3"),
                Field("4", output_key="rating_4"),
                Field("5", output_key="rating_5"),
            ],
        ),
    ]
)

# Define the "Featured Reviews" view
featured_reviews_view = View(
    "Featured Reviews",
    fields=[
        Field("id", output_key="product_id"),
        Field("name", output_key="product_name"),
        ExpandListField(
            "featured_reviews",
            fields=[
                Field("rating"),
                Field("content"),
            ],
        ),
    ],
)

Server.add_scraper(
    scrape_product_data,
    views=[
        overview_view,
        featured_reviews_view,
    ]
)
Result
Each View requires a list of fields. The available field types are:
- Field: Used to display a single field from the data.
- You can provide an
output_keyto alias the field name. - You can provide a
mapfunction to calculate a new field based on the existing field value and record.
- You can provide an
# value is the reviews_per_rating dictionary
# record is the entire product record
def calculate_average_rating(value, record):
    total_reviews = sum(value.values())
    # ...

Field("average_rating", map=calculate_average_rating) # Calculates the average rating using the provided map function- CustomField: Use this field to derive a new field from multiple existing fields in a record.
CustomField("full_name", map=lambda record: f"{record['first_name']} {record['last_name']}") # Combines 'first_name' and 'last_name' into 'full_name'- ExpandDictField: This field is used expand a dictionary into separate fields.
- You can provide a
mapfunction to transform the values. - You can provide an
output_keyto alias the field name.
- You can provide a
ExpandDictField(
    "reviews_per_rating",
    fields=[
        Field("1", output_key="rating_1"),
        Field("2", output_key="rating_2"),
        Field("3", output_key="rating_3"),
        Field("4", output_key="rating_4"),
        Field("5", output_key="rating_5"),
    ],
)  # Expands the 'reviews_per_rating' dictionary into separate fields
- ExpandListField: This field is used to display all the items in a list as separate rows.
- You can provide a
mapfunction to transform the values. - You can provide an
output_keyto alias the field name.
- You can provide a
ExpandListField(
    "featured_reviews",
    fields=[
        Field("rating"),
        Field("content"),
    ],
)  # Expands the 'featured_reviews' list into separate rows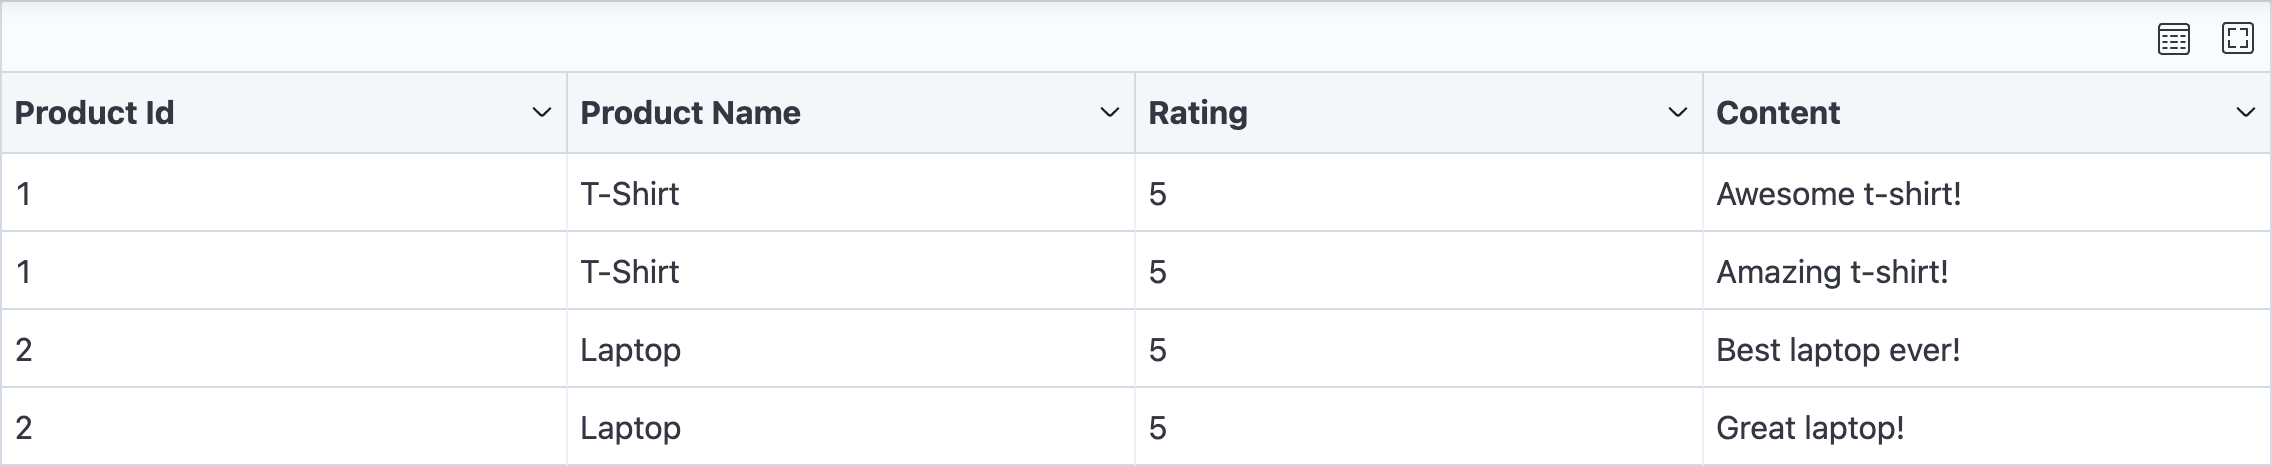
When creating large datasets, customers often request data in different formats like overview and review. How can I do that?
When building big datasets, customers will likely request the data in different formats, such as an overview view or a review view.
Now to meet this requirement, instead of manually picking and flattening fields, you can apply pre-defined views to the data. Here's an example:
from botasaurus_server.ui import View, Field, ExpandDictField
from botasaurus.task import task
from botasaurus import bt

products = [
    {
        "id": 1,
        "name": "T-Shirt",
        "price": 16,  # in US Dollar
        "reviews": 1000,
        "reviews_per_rating": {
            "1": 0,
            "2": 0,
            "3": 0,
            "4": 100,
            "5": 900,
        },
        "featured_reviews": [
            {
                "id": 1,
                "rating": 5,
                "content": "Awesome t-shirt!",
            },
            {
                "id": 2,
                "rating": 5,
                "content": "Amazing t-shirt!",
            },
        ],
    },
    {
        "id": 2,
        "name": "Laptop",
        "price": 700,
        "reviews": 500,
        "reviews_per_rating": {
            "1": 0,
            "2": 0,
            "3": 0,
            "4": 100,
            "5": 400,
        },
        "featured_reviews": [
            {
                "id": 1,
                "rating": 5,
                "content": "Best laptop ever!",
            },
            {
                "id": 2,
                "rating": 5,
                "content": "Great laptop!",
            },
        ],
    },
]

# Function to calculate the average rating
def calculate_average_rating(value, record):
    total_reviews = sum(value.values())
    if total_reviews == 0:
        return 0
    rating_sum = 0
    for rating, count in value.items():
        rating_sum += int(rating) * count
    return rating_sum / total_reviews

# Define the "Overview" view
overview_view = View(
    "Overview",
    fields=[
        Field("id"),
        Field("name"),
        Field("price"),
        Field("reviews"),
        Field(
            "reviews_per_rating",
            output_key="average_rating",
            map=calculate_average_rating,
        ),
        ExpandDictField(
            "reviews_per_rating",
            fields=[
                Field("1", output_key="rating_1"),
                Field("2", output_key="rating_2"),
                Field("3", output_key="rating_3"),
                Field("4", output_key="rating_4"),
                Field("5", output_key="rating_5"),
            ],
        ),
    ],
)

def write_output(input_data, result):
    # Apply the "Overview" view to the data
    bt.write_excel(overview_view.apply(result), 'overview')
    bt.write_json(result, 'products')

@task(output=write_output)
def scrape_product_data(data):
    return products

scrape_product_data()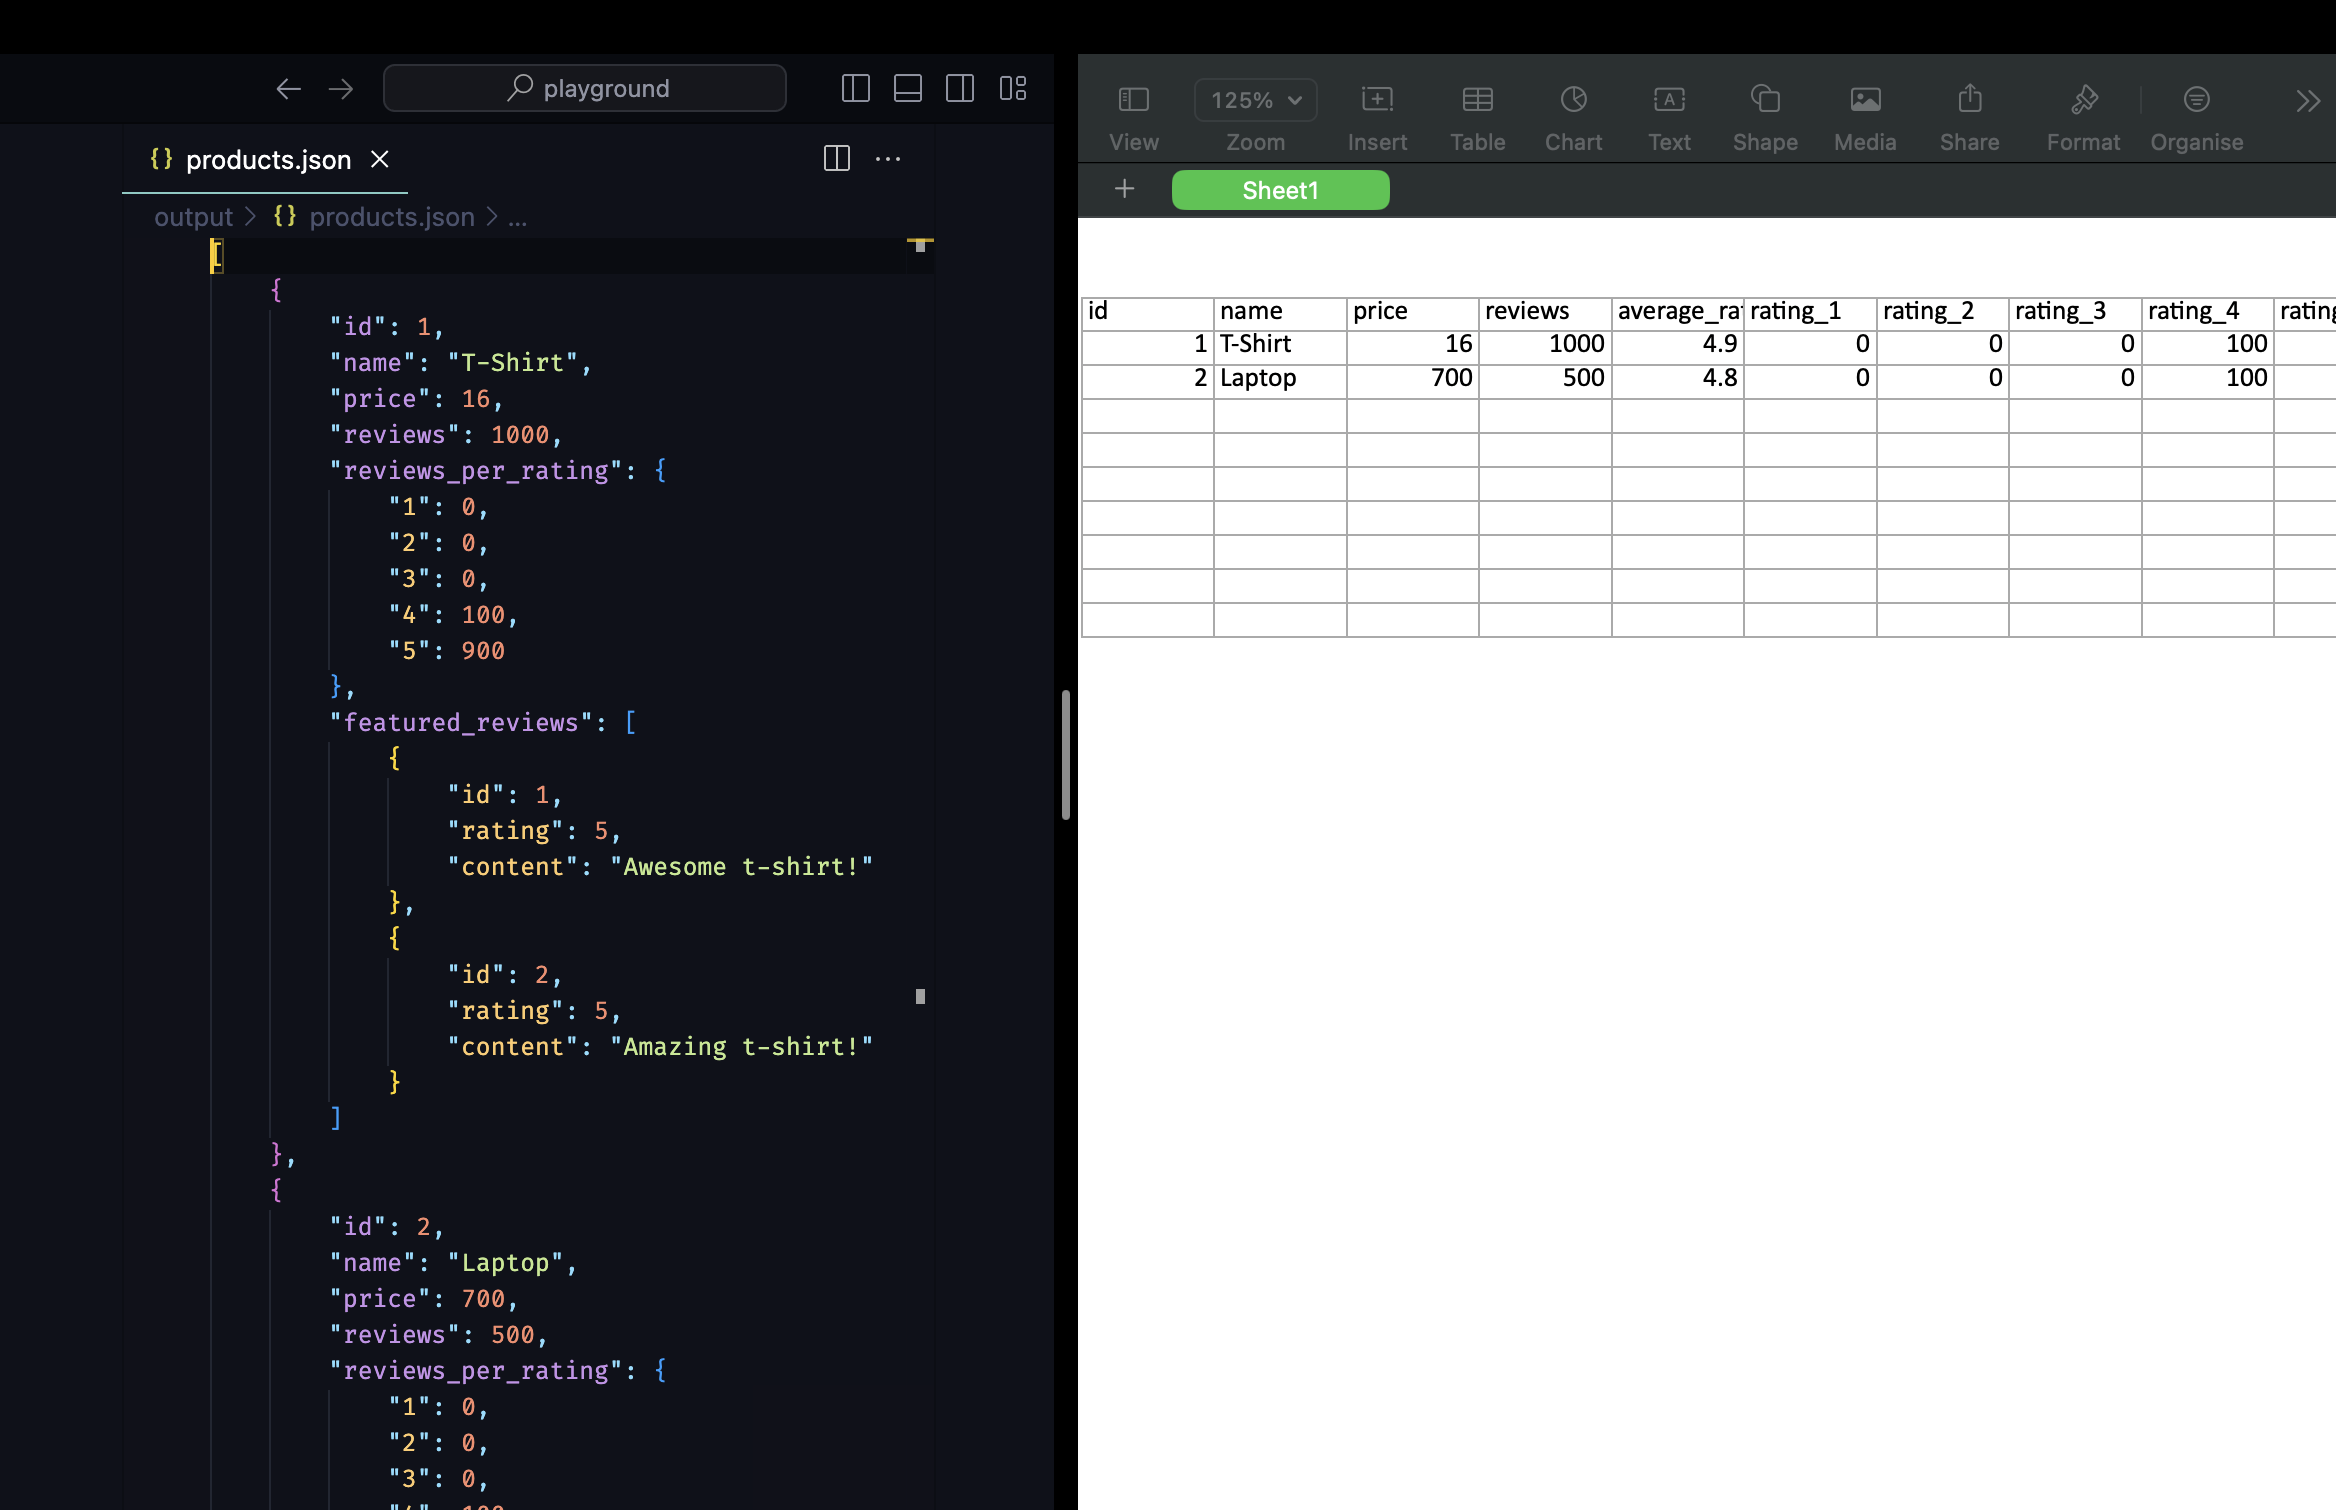
Similarly, you can apply sorting to the data as follows:
from botasaurus_server.ui import sorts
from botasaurus.task import task
from botasaurus import bt

products = [
    {
        "id": 1,
        "name": "T-Shirt",
        "price": 16,  # in US Dollar
        "reviews": 1000,
        "reviews_per_rating": {
            "1": 0,
            "2": 0,
            "3": 0,
            "4": 100,
            "5": 900,
        },
        "featured_reviews": [
            {
                "id": 1,
                "rating": 5,
                "content": "Awesome t-shirt!",
            },
            {
                "id": 2,
                "rating": 5,
                "content": "Amazing t-shirt!",
            },
        ],
    },
    {
        "id": 2,
        "name": "Laptop",
        "price": 700,
        "reviews": 500,
        "reviews_per_rating": {
            "1": 0,
            "2": 0,
            "3": 0,
            "4": 100,
            "5": 400,
        },
        "featured_reviews": [
            {
                "id": 1,
                "rating": 5,
                "content": "Best laptop ever!",
            },
            {
                "id": 2,
                "rating": 5,
                "content": "Great laptop!",
            },
        ],
    },
]

def write_output(input_data, result):
    sort = sorts.AlphabeticAscendingSort("name")

    # Sort the data by the "name" field in alphabetical ascending order
    bt.write_json(sort.apply(result), 'sorted')
    bt.write_json(result, 'products')

@task(output=write_output)
def scrape_product_data(data):
    return products

scrape_product_data()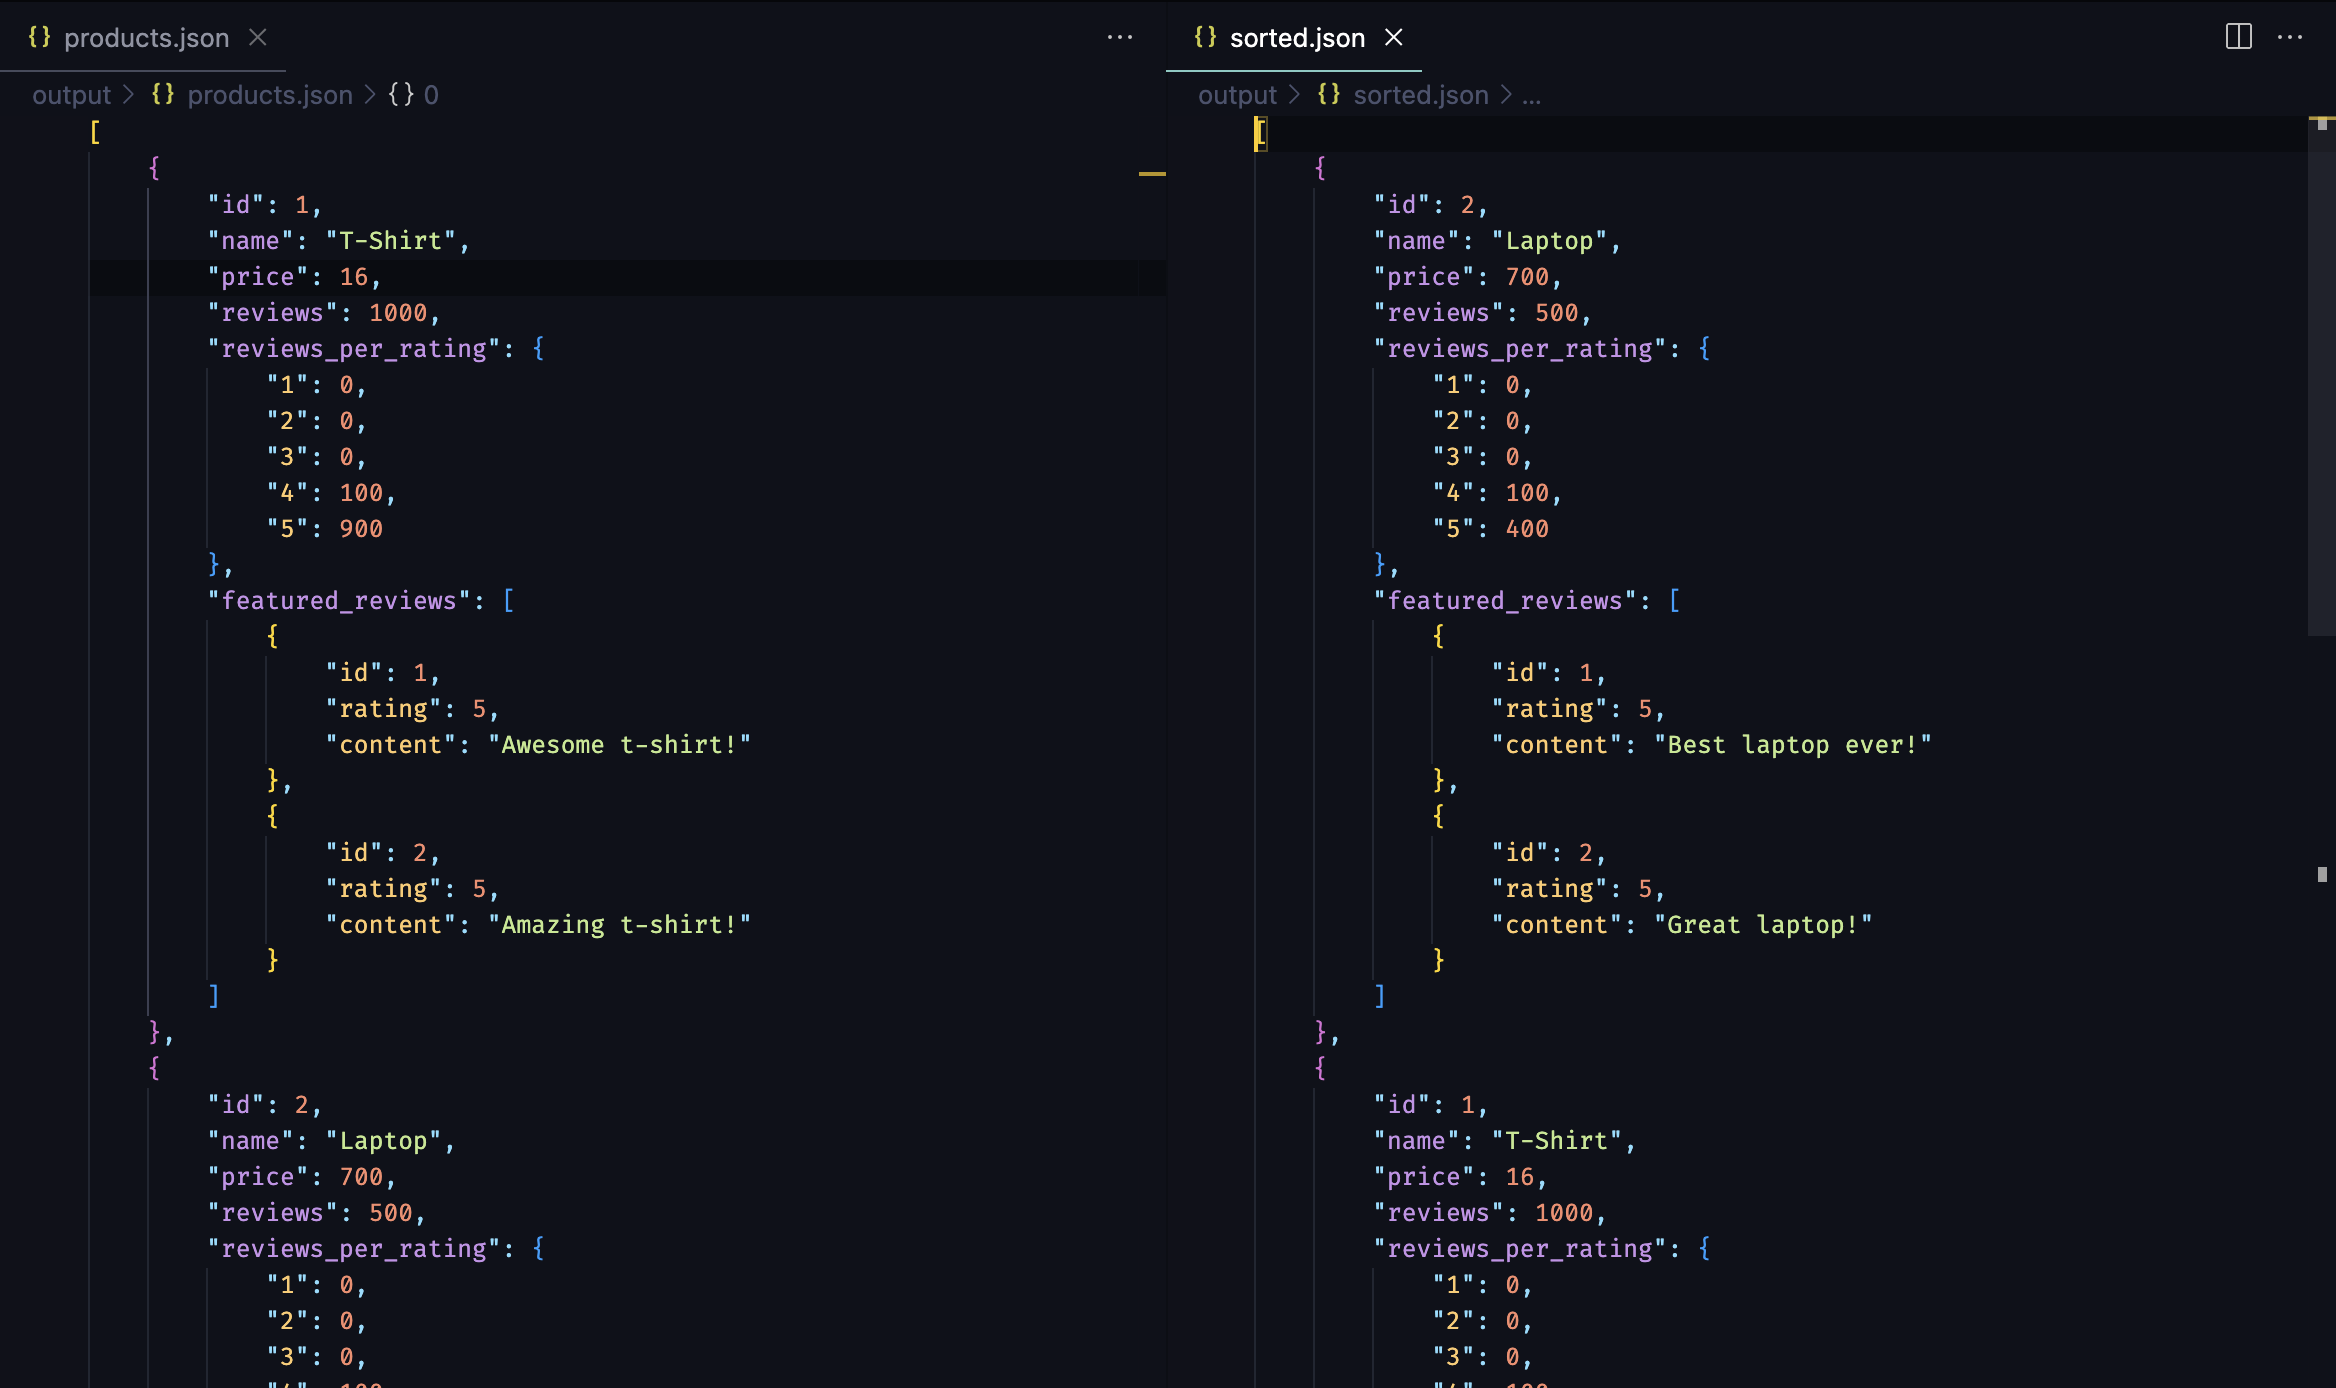
You can further customize your scraper with the following options:
get_task_namecreate_all_tasksplit_task
Let's explore each of these options in detail:
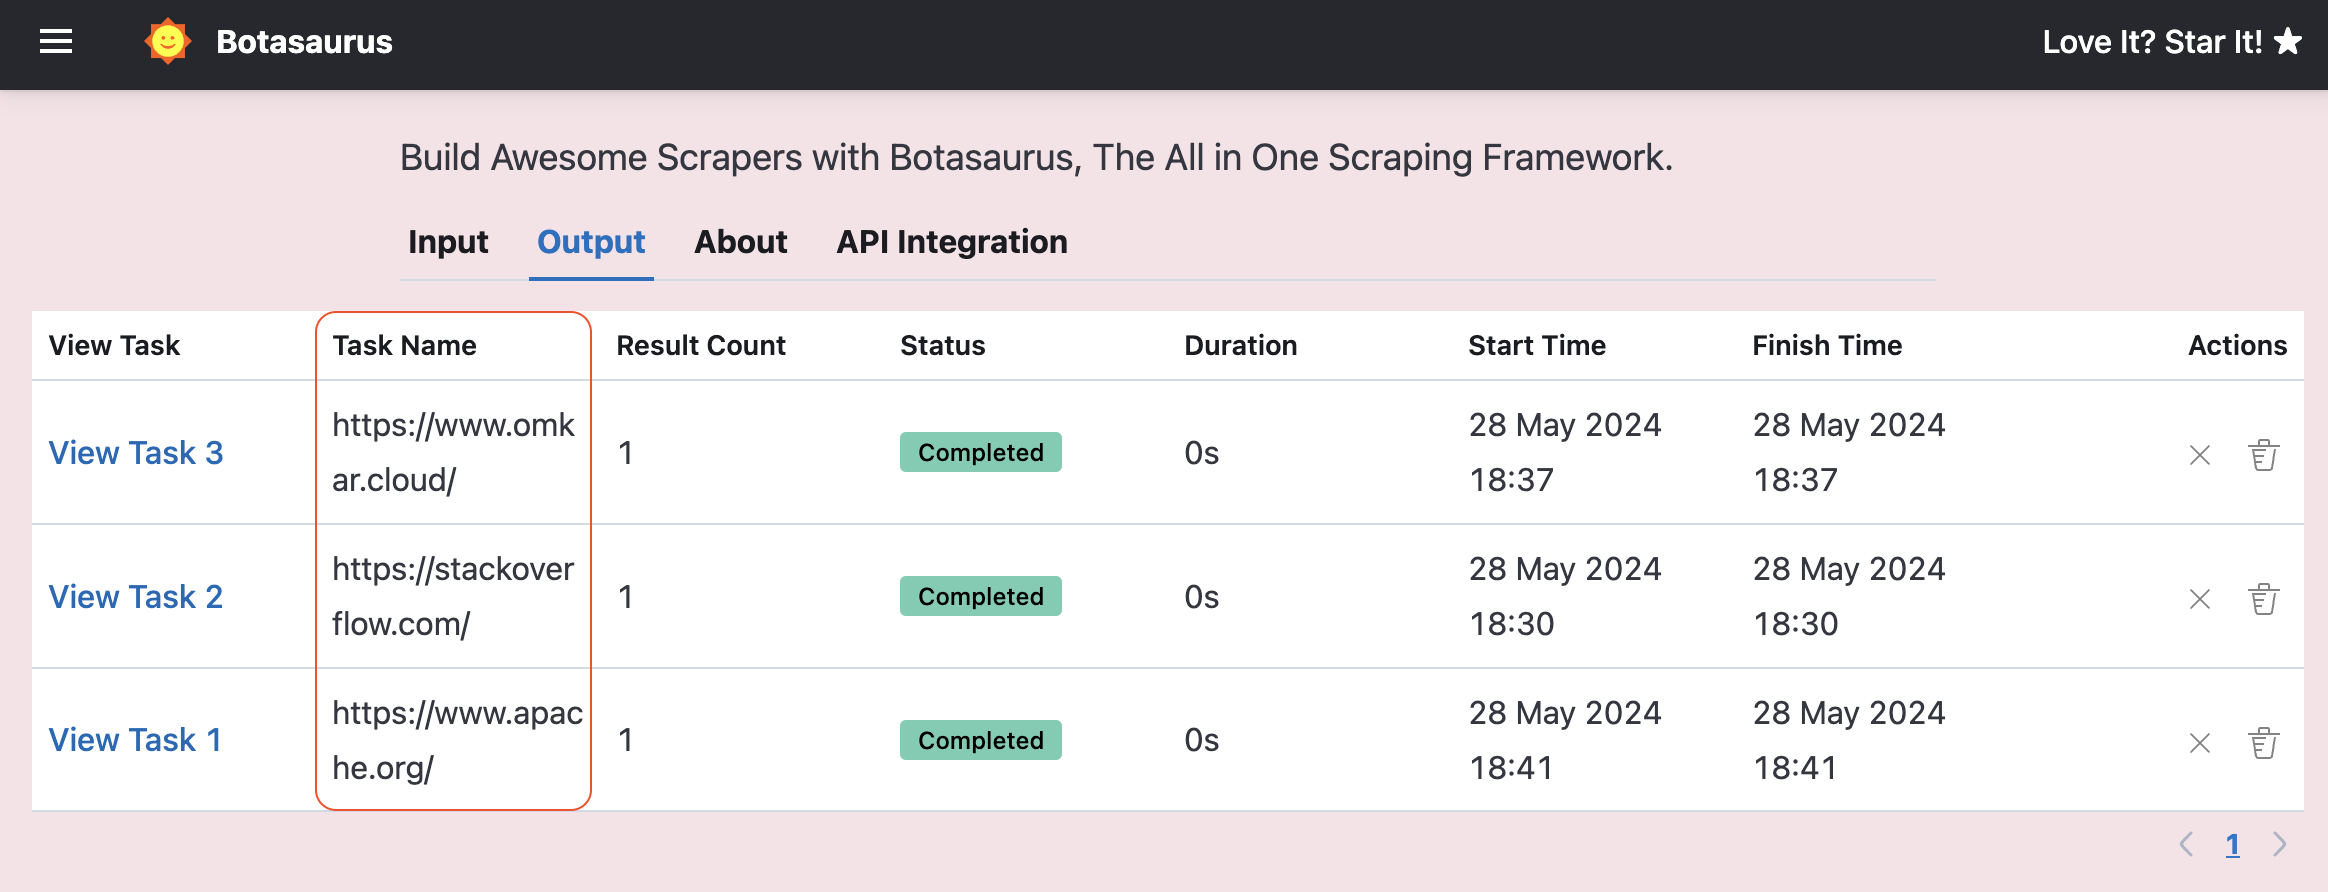
By default, the task name shown on the output page is generated based on the task id.

However, you can use get_task_name to generate a custom task name based on your input data as follows:
from botasaurus_server.server import Server

def get_task_name(data):
    return data["link"]

Server.add_scraper(
    scrape_product_data,
    get_task_name=get_task_name,
)
Result
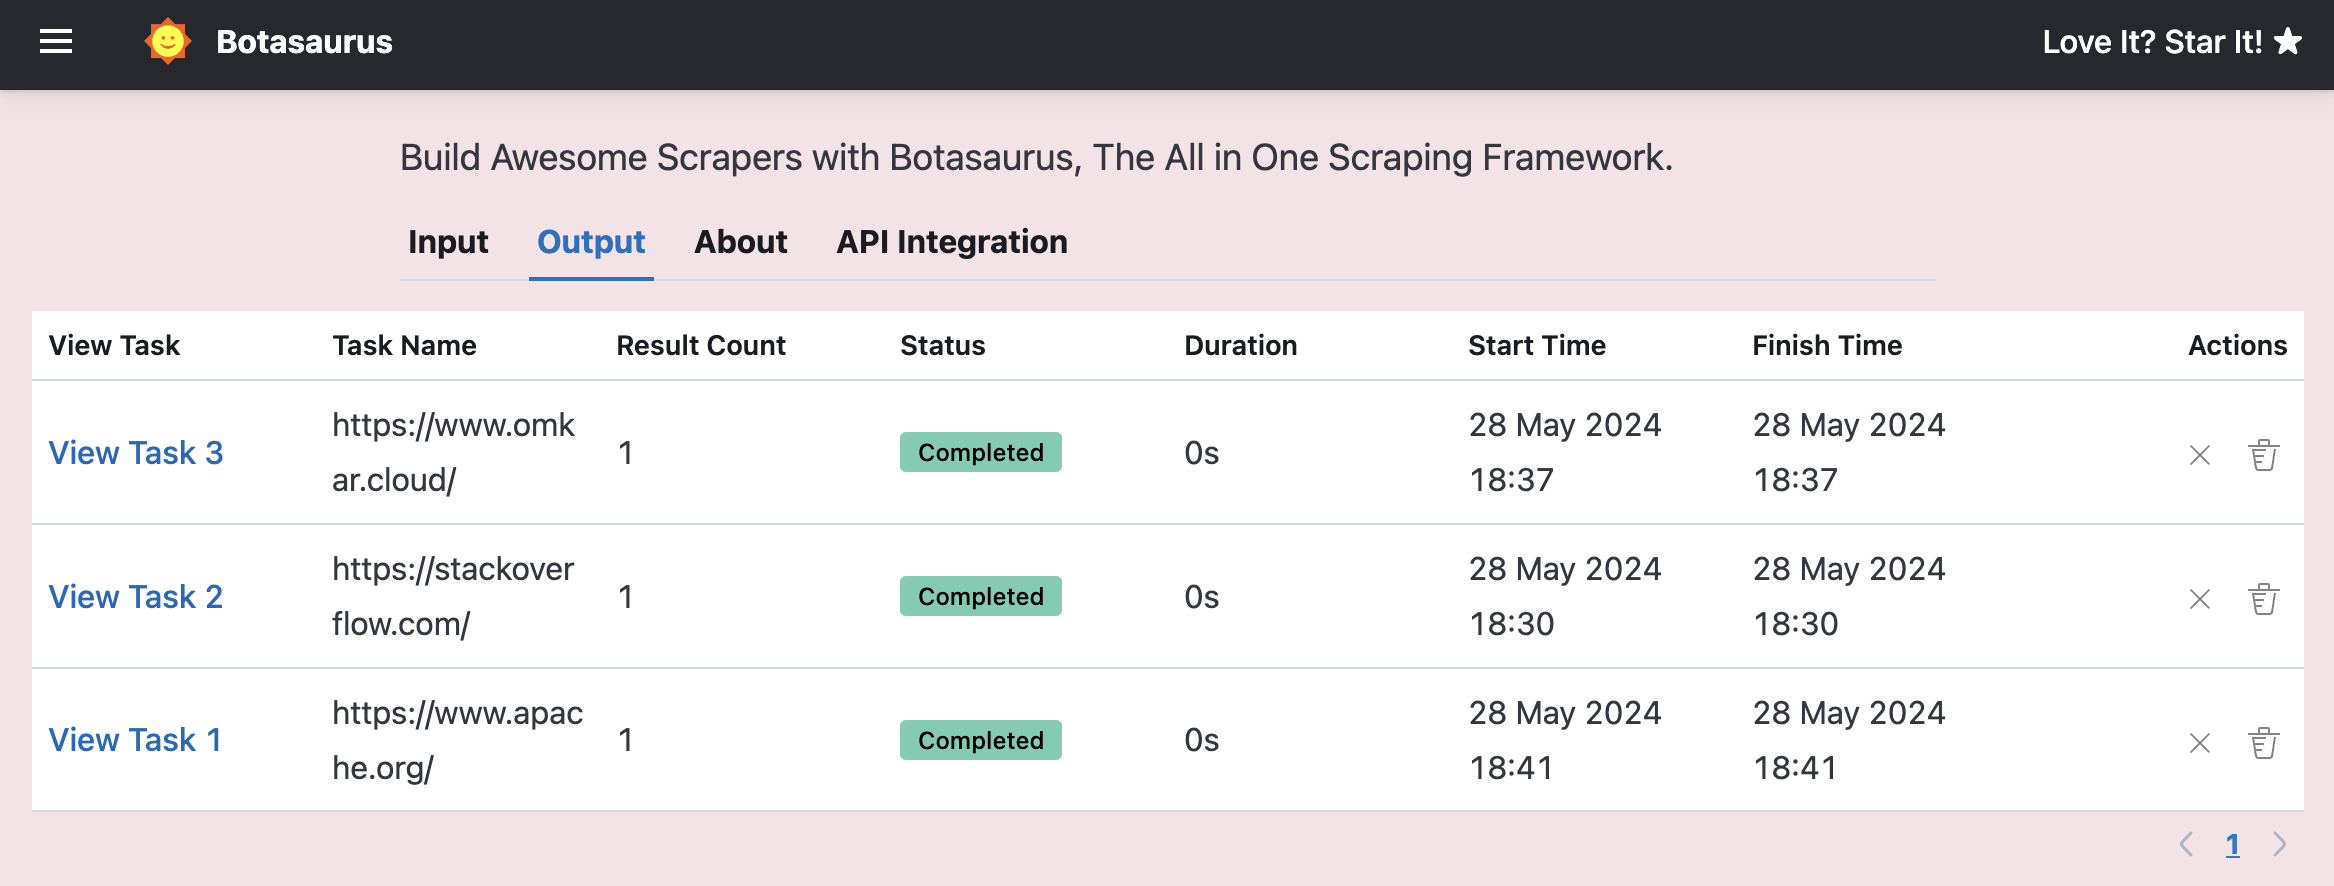
Suppose your input data accepts a list of URLs.
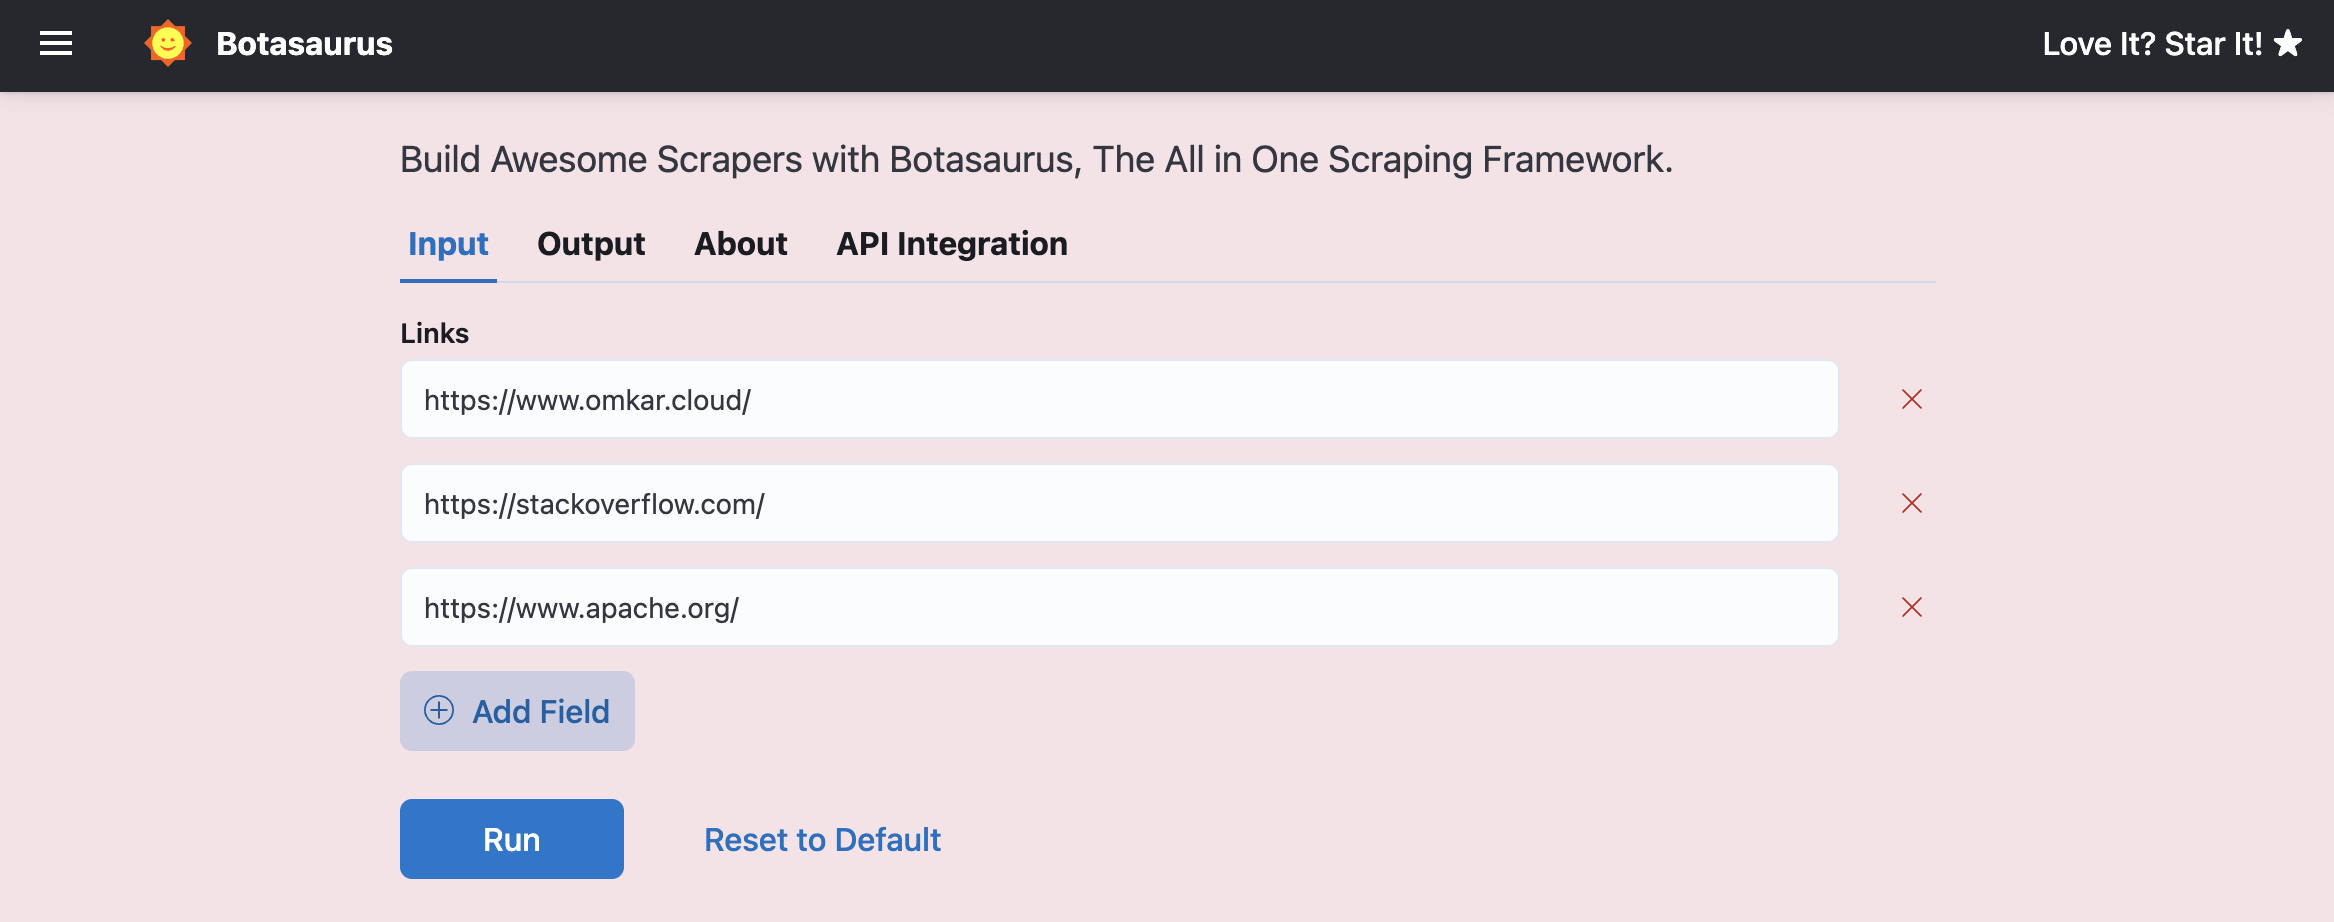
In such cases, you can use split_task to divide the task into multiple tasks, with each task processing a single URL as follows:
from botasaurus_server.server import Server

# split_task accepts a data dictionary and returns a list of URLs for each task.
def split_task(data):
    links = data["links"]
    return links

Server.add_scraper(
    scrape_product_data,
    split_task=split_task,
)
Result
Suppose you not only want to split URLs into different tasks, but also create a new task called All Task that contains the combined results of all the tasks.
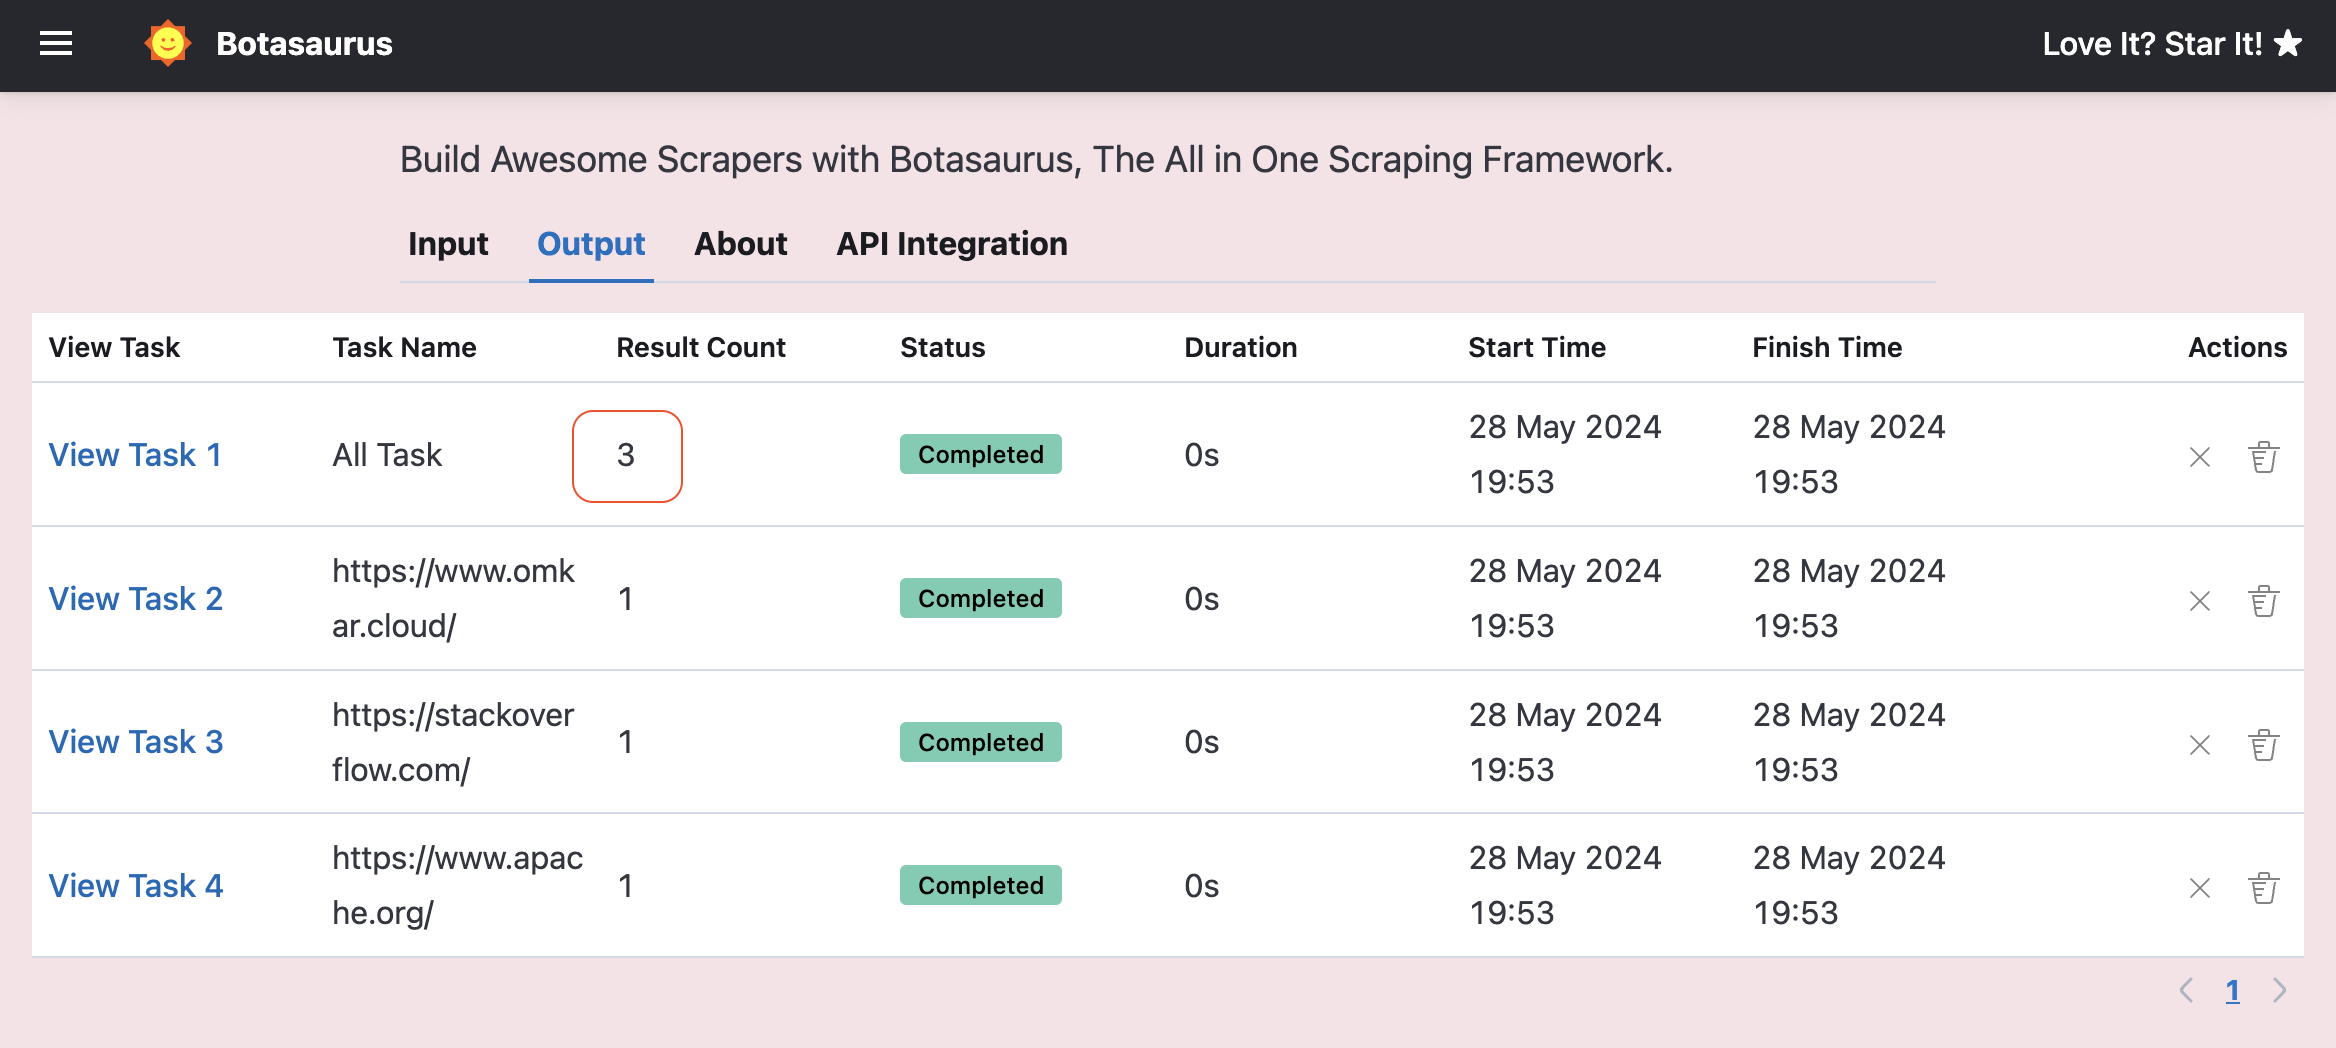 For this, you can set
 create_all_task to True:
from botasaurus_server.server import Server

def split_task(data):
    return data["urls"]

Server.add_scraper(
    scrape_product_data,
    split_task=split_task,
    create_all_task=True,
)To control the maximum number of browsers and requests running simultaneously, open backend/scrapers.py and call the Server.set_rate_limit method as follows:
Server.set_rate_limit(browsers=1, requests=30) # Allows 1 browser and 30 requests at any point of timeAlso, If there are more scraping tasks than the specified limit, the extra tasks will be queued and processed in the order they were received.
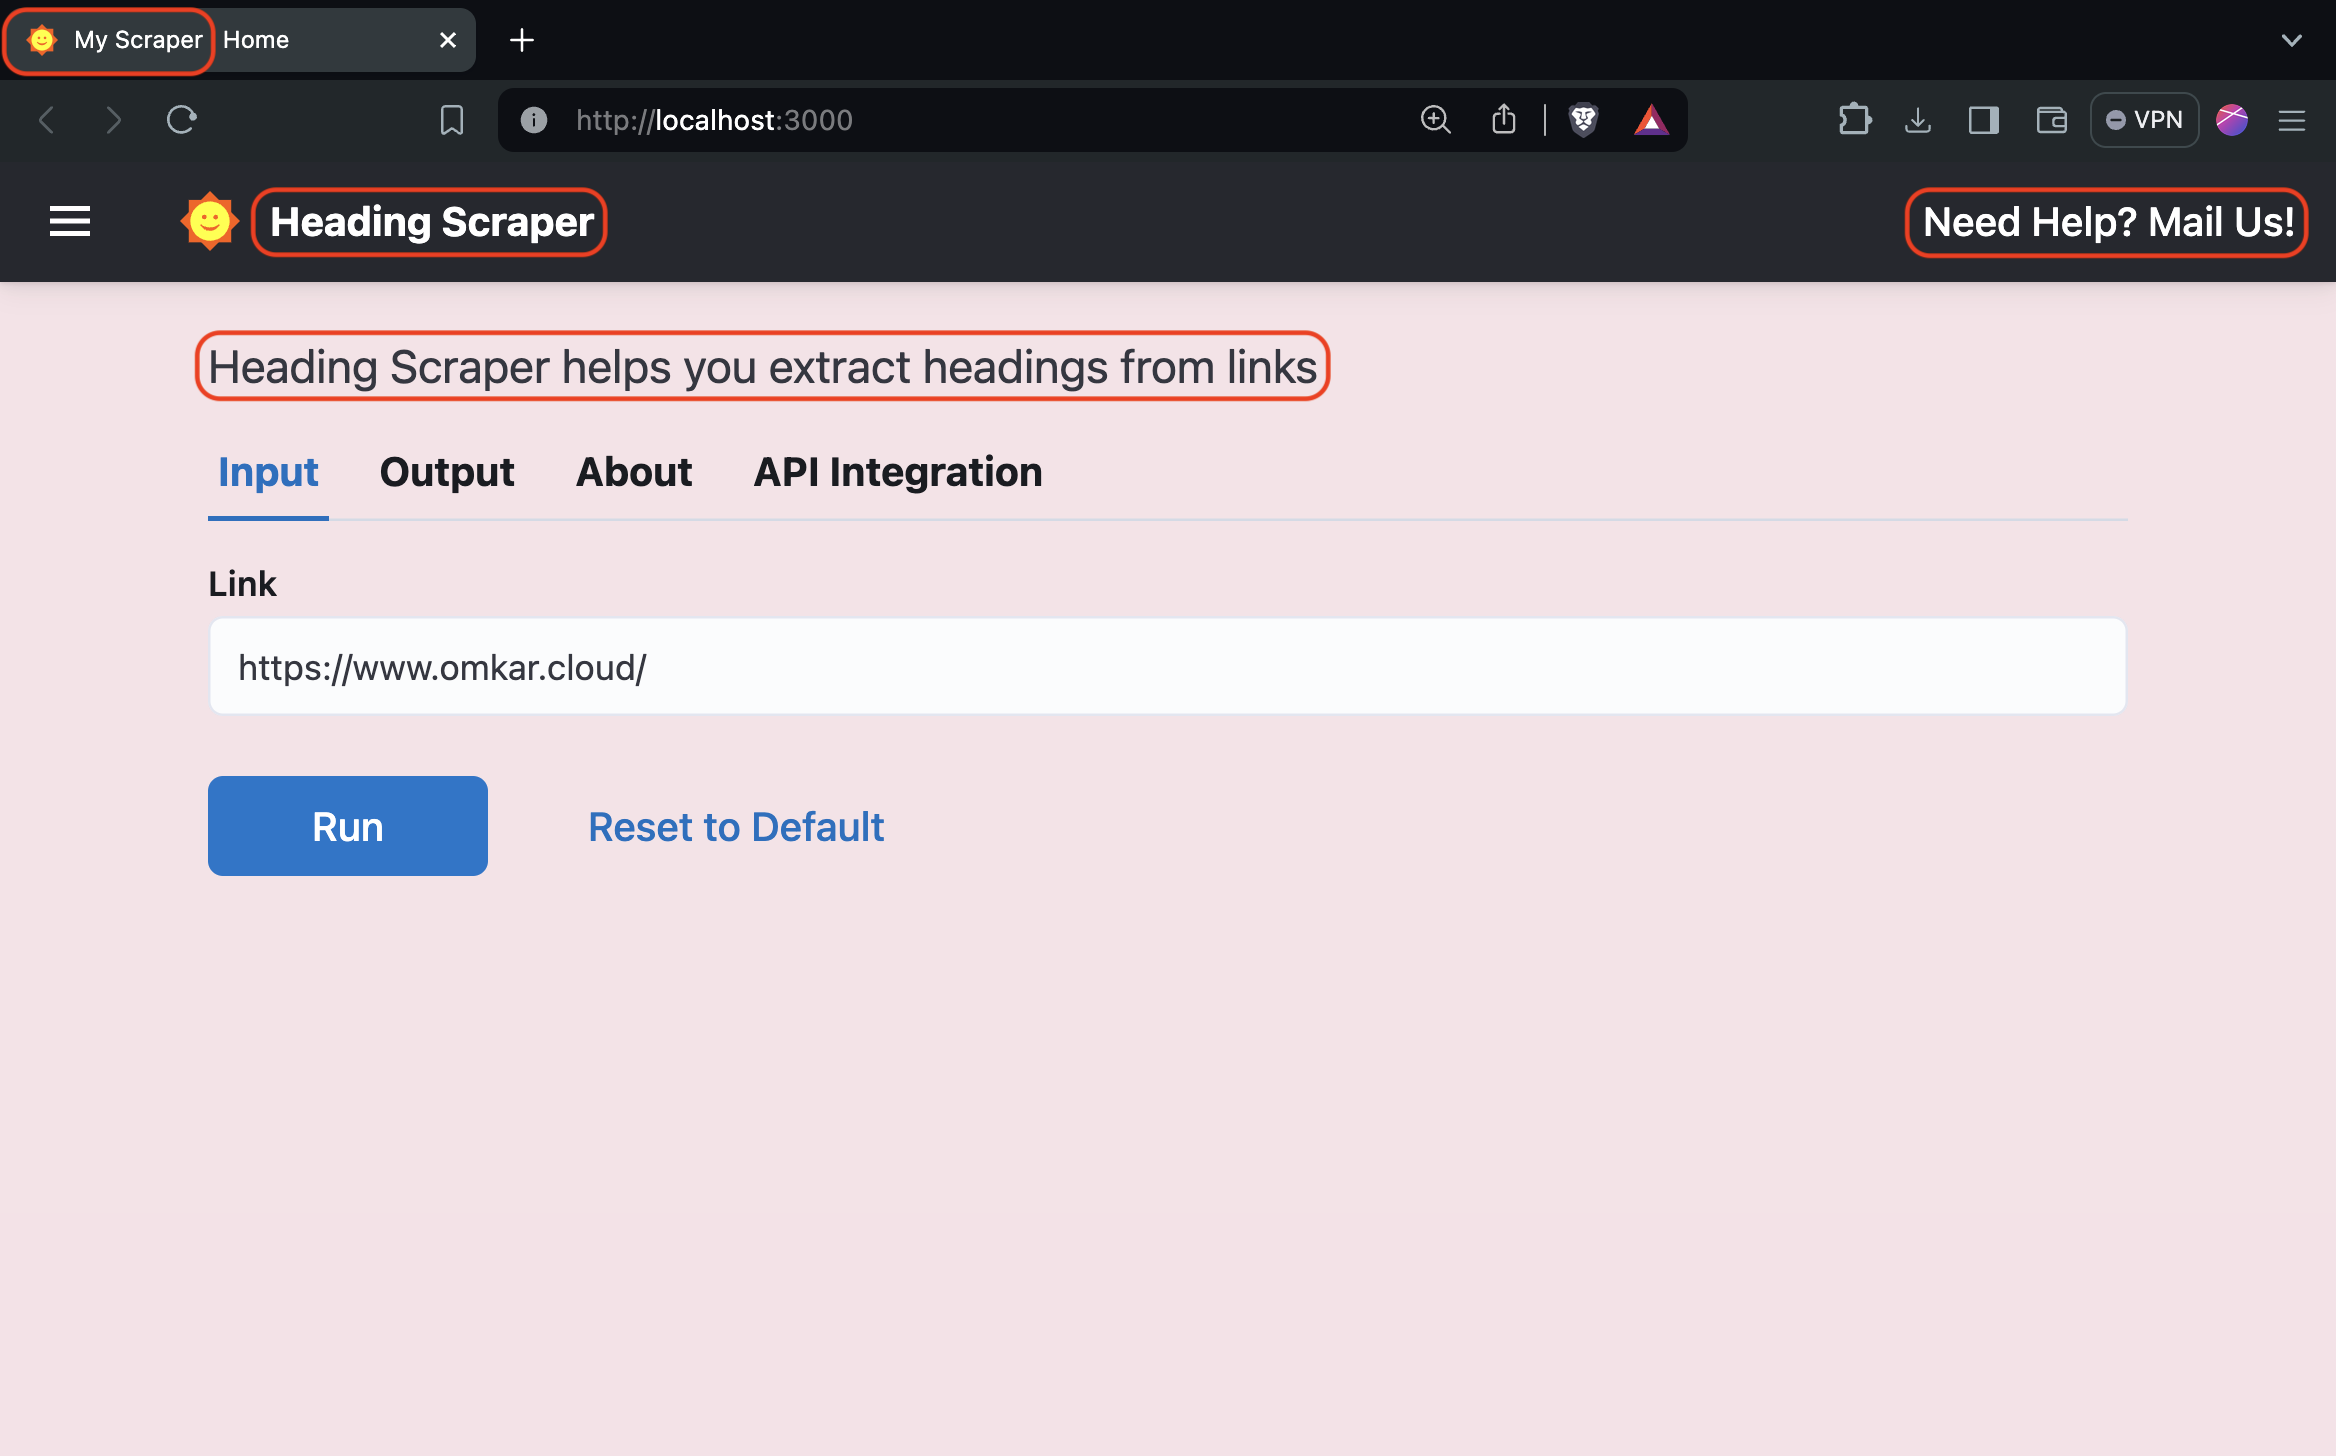
To change the title, header title, and description of the scraper, open backend/scrapers.py and call the Server.configure method as follows:
Server.configure(
    title="My Scraper",
    header_title="Heading Scraper",
    description="Heading Scraper helps you extract headings from links",
    right_header={
        "text": "Need Help? Mail Us!",
        "link": "mailto:chetan@chetan.com",
    },
)
By default, UI Scraper uses an SQLite database, which is suitable for small applications and running the scraper locally.
However, for applications that store large datasets and handle concurrency, it is recommended to use PostgreSQL.
Follow these steps, to use PostgreSQL with UI Scraper:
- Open the
backend/scrapers.pyfile. - Locate the
Server.set_database_urlmethod. - Call the method with the PostgreSQL connection string as an argument.
Here's an example:
Server.set_database_url('postgresql://user:password@localhost:5432/dbname')To save you time on research and comparison, we have analyzed several PostgreSQL providers. Here is our TLDR recommendation:
For Local Development:
For local development, we highly recommend using the free tier of Supabase because:
- It is super easy to set up.
- most importantly, it offers a free tier with 0.5 GB of storage, which is enough for local development purposes.
However, don't use Supabase for production web scraping because even the Pro Plan, costing $24/month, only provides 8 GB of storage, which is really really less for web scraping projects.
For Production Use:
For production environments, we recommend using Google Cloud SQL for the following reasons:
- You can get a database for as low as $10 per month, which includes 10 GB of storage, 1 shared vCPU, and 0.6 GB of RAM which is enough for most web scraping projects.
- Google Cloud SQL offers pay-as-you-go pricing (thankfully not plan-based!), allowing you to customize your RAM, CPU, and storage ($0.2/GB per month) as needed.
- You can enable automatic storage increases, meaning that you only pay for the storage you actually need. (an awesome feature!)
Note: We are not affiliated with any of the above providers. The above recommendation is based on our research and experience.
Visit this link to learn how to create a PostgreSQL database on Supabase.
Visit this link to learn how to create a PostgreSQL database on Google Cloud.
Yes, You should because:
- Botasaurus is the most humane driver in both the JavaScript and Python universe, allowing your viewers to access A-N-Y website.
- Botasaurus and its utilities make it quick and easy to create production-ready web scrapers.
- And, The best part is that scrapers can be easily accessed via a user-friendly interface, making it easy for your viewer's non-technical customers to use the scraper.
Also, We would be happy to help you by:
- Providing awesome suggestions for interesting and engaging web scraping videos.
- In some cases, we can provide complete code examples, which can reduce your workloadby 50%. Additionally, we can feature your video in the Botasaurus documentation, helping you gain the initial traction.
If you're interested in creating videos about Botasaurus, feel free to reach out to us via WhatsApp

Love It? Star It! ⭐
Become one of our amazing stargazers by giving us a star ⭐ on GitHub!
It's just one click, but it means the world to me.