| author | date | language | license | source |
|---|---|---|---|---|
Mitchell Anicas |
2015-01-22 |
en |
cc by-nc-sa |
One way to send and receive email through your own custom domain is to use a third-party mail service, such as the mail service included with Google Apps (Gmail) or Zoho. The main benefit of using a third-party mail service, as opposed to managing your own mail server, is that you can avoid performing the ongoing maintenance that running a mail server entails. The biggest trade off with using Google Apps is that it has a monthly fee of $5-$10 a month per user.
This tutorial will show you how to set up Gmail with your own domain that is managed by DigitalOcean’s Domain Name Servers. Also, we will show you how to use the Google Apps mail setup to send mail from your applications using your custom domain.
Before proceeding, you should own the domain name that you want to use as your mail domain. This guide also assumes that you are using the DigitalOcean DNS to manage your domain.
If you do not already own a domain, you may purchase one from any of the various domain registrars. Once you have a domain to use, you may use this guide to set it up under the DigitalOcean DNS:
You may also want to point the domain to one of your droplets, such as one that hosts your web server. This link will help you set that up:
Once you have a domain, and it’s managed by DigitalOcean’s DNS, you are ready to proceed!
In a web browser, go to the Google Apps Signup page.
For the first step, you must enter information about your business. Fill in the forms then click the Continue button.
In step two, select the Use a domain I already own option, and enter your domain name into the input box. Click the Continue button.

In step three, you will create a new Google Apps account by submitting details such as your name, username (which, with your domain name, will determine your email address), and password. After completing the form, and agreeing to the Google Apps agreement, click the Create your account button.
At this point, you will have the opportunity to enter your billing information. For this tutorial, we will click the Set up billing later , as Google offers a free 30-day trial—you may also set up billing now, if you wish.
Before setting up Gmail with your custom domain, Google must verify that you own the domain.
Under the Set up on your own box, click the Continue button.
Near the top of the Google Apps Admin console, click the Setup Google Apps button. Then click the Verify Domain button that appears.
You should be taken to the Domain Setup page. Click the Get started button that appears.
At the Verify your domain ownership step, click the Choose a different method dropdown and select Add a domain host record (TXT or CNAME). You should see the following page:

Tick the I have successfully logged in checkbox.
Now tick the I have opened the control panel for my domain checkbox.
You should now see a screen that looks like the following:
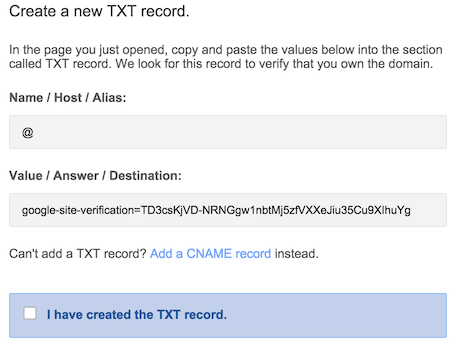
Copy the text under the Value / Answer / Destination header. This will be used to create a TXT record for your domain, in the DigitalOcean DNS manager.
In a different browser tab, log into the DigitalOcean Control Panel and go to the DigitalOcean Networking page. Click on your domain name to view and edit the associated records:

Next, select the TXT record type. Enter @ into the HOSTNAME field, and paste the “Value” provided by Google into the VALUE field

Click the Create Record button to add the new record.
Now go back to the Google Apps Admin Console browser tab, and tick the I have created the TXT record box.
Tick the I have saved the TXT record box, then click the Verify button.
You will see a page that says your domain ownership is processing. Once it is complete, you will see a message that looks like this:
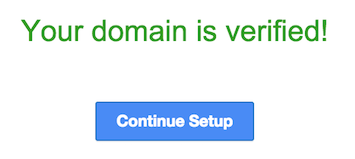
Click the Continue Setup button to move on to the next step.
Note: After you have verified ownership of your domain, you may delete the TXT record that you created via the DigitalOcean DNS manager. Click the red X to the right of the record and click the OK button in the confirmation prompt.
At this point, you must log into the Google Admin Console using the credentials you created earlier.
Near the top of the admin console, you will see this:
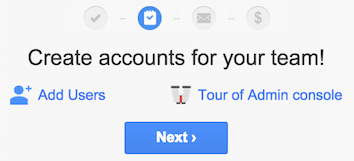
We will click the Next button to proceed to the next step in the setup. This is assuming that you only need one mail user or that you will set up additional users later.
Click the Set up Gmail button to go to the Domain Setup page.
At the Domain Setup page, click the Set up email button.
Next, tick the I have successfully logged in checkbox.
Tick the I have opened the control panel for my domain checkbox.
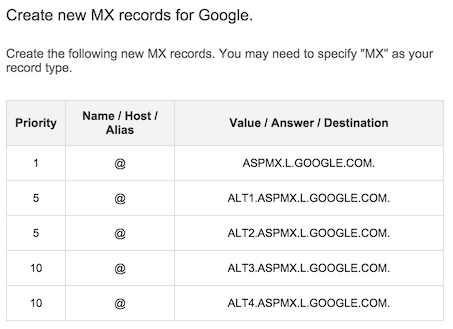
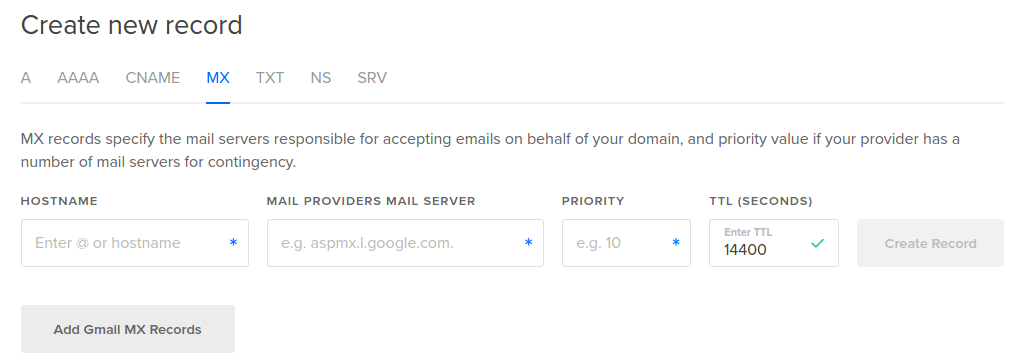
Now the Domain Setup page will ask you to create new MX records, and you will see this:
Go back to the DigitalOcean DNS management page, and ensure you have the desired domain selected.
Select the MX record type up top. Next, click the Add GMail MX Records button. This button will automatically add the Google MX records for your domain:
Note: You do not have to fill in any of the other fields when using the Gmail button.
Go back to the Google Domain Setup. Tick the I have saved the MX records checkbox, then click the Verify button.
Once the MX records are verified, click the Continue Setup button.
Your Google Apps mail with a custom domain setup is now complete! Make sure to update your billing information if you want to continue using the service past the trial period.
If you want to use your new mail setup to send mail from one of your application, using Gmail’s SMTP (Simple Mail Transfer Protocol) server, it is very easy to set up.
You may want to create a new user for this purpose, or use the one that you created initially.
The actual configuration of your application’s mail settings will vary, depending on the software, but the details that you will need to set up working outgoing mail are generally the same.
With this Gmail setup, you will need to specify the following details when configuring your application to send email. Obviously, some of your details will differ from the example, so substitute them as is appropriate:
- SMTP Host :
smtp.gmail.com - SMTP Port :
465 - Use SSL Encryption : Yes, use SSL encryption
- SMTP Authentication : Yes, use SMTP authentication
- Email Address or Username : The email address under your domain that you want to use
- Email Name : The name associated with the email address
- Email Password : The password associated with the email address
Once you configure your application with these settings, your application should be able to send mail through custom domain.
Now you should be able to send and receive mail with your custom domain—test it out by sending and receiving mail via your new Gmail account. Now is a good time to add additional mail users, and configure other mail settings, if you need to. You may access your mail accounts through Gmail, and you may perform Google Apps administration through the Google Apps Admin Console.
Good luck!