[ English | 中文 ]
Based on the open source project scrcpy, it provides a simple interactive interface.
- Programming Language
C# - Development Tools
Visual Studio 2022 - Runtime
.NET Framework 4.7.2
https://github.com/pdone/FreeControl/releases/latest/download/FreeControl.exe
https://cdn.awaw.cc/gh/pdone/FreeControl/releases/latest/download/FreeControl.exe
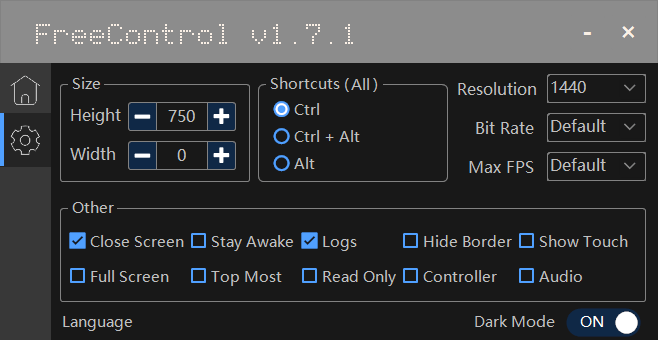
v1.7.1 and later versions, the PowerOffOnClose parameter is added to control whether the mobile phone will be locked after the control window is closed. It is not enabled by default. You can change the value of the PowerOffOnClose parameter to true in the configuration file %AppData%\FreeControl\config.json to enable it.
Workflows have been added to this repository for continuous integration. You can view the latest code build status through GitHub Action. If Workflows is successfully built but cannot be compiled after being pulled locally, you can try to manually add project dependencies or retry by referring to the build process configured in Workflows.
v1.7.0 and later versions, the UHID keyboard feature of scrcpy is enabled by default to optimize the Chinese input experience.
And if you run into any problems along the way, you can try to open the configuration file %AppData%\FreeControl\config.json,change the value of CustomArgs from --keyboard=uhid to --keyboard=sdk.
More information can be found in scrcpy-doc-keyboard.
Obsolete
My personal testing found that currently the phone input method apps that support cross-screen input are as follows:
- Sogou IME
- QQ IME
- Google Pinyin IME
- Gboard
- WeChat IME
This feature requires input method apps to be adapted. If you have any better suggestions, please feel free to recommend them in the comments.
Automatic input method switching is disabled by default. If you want it, close program first, then open the configuration file
%AppData%\FreeControl\config.json, change theEnableSwitchIMEfield value totrue, save and start the program.
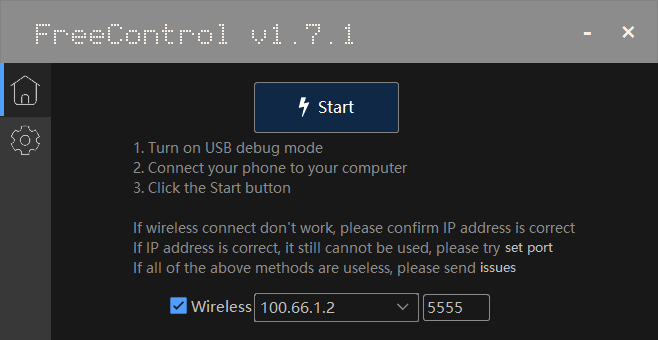
USB connection normal use adb by the need to ensure that:
-
Hardware status is normal.
Including Android devices in the normal power state, USB cable and interface intact.
-
Android devices and USB debugging mode is on.
You can go to the "Settings" - "Developer options" - "Android Debug" view.
If you can not find the developer options in the settings, it needs to make it through an egg is displayed: In the "Settings" - "About phone" continuous click "version number" 7 times.
-
The device driver is normal.
It seems to worry about the Linux and Mac OS X, the Windows likely to be encountered in the case of the need to install drivers, this can be confirmed right "Computer" - "Properties", the "Device Manager" in view on related equipment Is there a yellow exclamation point or question mark, if not explain the driving state has been good. Otherwise, you can download a mobile assistant class program to install the driver first.
-
Status after confirmation via USB cable connected computers and devices.
adb devices
If you can see
6d56e83a device
Description Connection successful.
In addition to the USB connection to the computer to use adb, can also be a wireless connection - although the connection process is also step using USB needs, but after a successful connection to your device can get rid of the limit of the USB cable within a certain range it !
Steps:
-
Connect Android device to run adb computer connected to the same local area network, such as connected to the same WiFi.
-
The device connected to the computer via a USB cable.
Make sure the connection is successful (you can run
adb devicessee if you can list the device). -
Allow the device listens on port 5555 TCP / IP connections:
adb tcpip 5555
-
Disconnect the USB connection.
-
Find the IP address of the device.
Generally the 'Settings' in - "About phone" - "state information" - "IP address" is found.
-
Connect the device via IP address.
adb connect <device-ip-address>
Here
<device-ip-address>is the IP address of the device found in the previous step. -
Confirm the connection status.
adb devices
If you can see
<device-ip-address>:5555 device
Description Connection successful.
If you can not connect, verify that Android devices and the computer is connected to the same WiFi, then execute adb connect <device-ip-address> that step again;
If that does not work, by adb kill-server restart the adb and then try it all over again.
Hidden
Android 11 and higher support deploying and debugging your app wirelessly from your workstation using Android Debug Bridge (adb). For example, you can deploy your debuggable app to multiple remote devices without physically connecting your device via USB. This eliminates the need to deal with common USB connection issues, such as driver installation.
To use wireless debugging, you need to pair your device to your workstation using a pairing code. Your workstation and device must be connected to the same wireless network. To connect to your device, follow these steps:
-
Update to the latest version of the SDK Platform-Tools.
-
Connect Android device to run adb computer connected to the same local area network, such as connected to the same WiFi.
-
Enable the Wireless debugging option.
-
On the dialog that asks Allow wireless debugging on this network?, click Allow.
-
Select Pair device with pairing code. Take note of the pairing code, IP address, and port number displayed on the device.
-
On your workstation, open a terminal and navigate to
android_sdk/platform-tools. -
Run
adb pair ipaddr:port. Use the IP address and port number from step 5. -
When prompted, enter the pairing code that you received in step 5. A message indicates that your device has been successfully paired.
none
Enter pairing code: xxxxxx
Successfully paired to ...
-
(For Linux or Microsoft Windows only) Run
adb connect ipaddr:port. Use the IP address and port under Wireless debugging.
Need root privileges, not detailed here, see more click here。
Only works when the phone is charging.
Audio forwarding is supported on devices using 'Android 11 'or higher and is enabled by default:
- For
Android 12or higher, it works out of the box. - For
Android 11, you need to make sure that the device screen is unlocked when starting scrcpy. The fake pop-up window will appear briefly, making the system think that the shell application is in the foreground. Without this, audio capture will fail. - For
Android 10or earlier, audio cannot be captured and is automatically disabled.
If you think this project is helpful, please invite the author to have a cup of coffee.☕
