This document describes software design patterns that are specific to PhET, and PhET-specific applications of standard design patterns. For general information on many standard design patterns, see Learning JavaScript Design Patterns by Addy Osmani.
This document has a bunch of different patterns in alphabetical order. They are not all equally important. Below is a list of the patterns in the order in which they should be read. At the top of the list are patterns that are central to the development process and necessary for pretty much every sim. Below that are patterns that may be useful at some point, but aren't in every sim, so they can be skimmed and referenced when needed.
- Patterns that every PhET developer should know well:
- Module
- Namespace
- Model-View-Controller (MVC)
- Model-View Transform
- Observer
- Options (TypeScript)
- Dispose
- Enumeration
- Patterns to be aware of and reference when needed:
- Mixin and Trait
- Singleton
- Dependency Injection
- Creator (with Drag Forwarding)
- Scenes
- Strategy
- State Machine
- Options and Config (JavaScript)
- Creator (with Drag Forwarding)
- Dependency Injection
- Dispose
- Enumeration
- Mixin and Trait
- Model-View-Controller (MVC)
- Model-View Transform
- Module
- Namespace
- Observer
- Options and Config (JavaScript)
- Options (TypeScript)
- Scenes
- Singleton
- State Machine
- Strategy
(formerly known as the Model Element Creator Pattern)
Author: @samreid
Simulations may allocate all of the objects during startup, or may dynamically create new instances while the simulation is running. In the case where the dynamically created instances are created by dragging an icon in a toolbox or panel, there is the additional complexity of making sure the drag event that began on the icon continues on the newly created item. This issue was originally identified and explored in phetsims/scenery-phet#214.
This pattern is also described in equality-explorer/doc/implementation-notes.md "Creator Pattern"
Generally speaking, the pattern for creating a new item by dragging from the control panel works like so:
- The user drags an icon in a toolbox or control panel
- This triggers a new model element to be created (usually positioned above the icon, so it is not occluded by touch)
- The view receives a message from the model that a new element has been created, and the view creates the corresponding view node.
- The drag event is forwarded to the listener for the view node.
For disposal:
- The item is dropped back into the toolbox or otherwise deleted/removed/erased.
- This triggers the model to remove the model element
- The view receives a message that the model element has been removed, and removes the corresponding view node.
A simple, working example of this pattern is implemented in scenery/examples/creator-pattern.html
Examples of simulations that use DragListener.createForwardingListener (recommended pattern)
- Energy Skate Park (Measuring tape)
- Equality Explorer (Terms)
- Fractions Suite (Pieces, fraction elements and containers)
- Wave Interference (Tools)
Examples of simulations that use SimpleDragHandler.createForwardingListener (similar to recommended pattern)
- Capacitor Lab Basics (Voltmeter)
- Fluid Pressure and Flow (sensors, barometer)
- Masses and Springs (Ruler and timer)
Deprecated solutions to this same problem:
- Bending Light uses handleForwardedStartEvent, handleForwardedDragEvent, handleForwardedEndEvent
Simulations with other strategies:
- Charges and Fields uses
hookDragHandler, see ChargesAndSensorsPanel.js - Balancing Act uses:
Variants or Alternate problems:
- It is possible to use the drag forwarding pattern without dynamically creating instances. For instance, in Wave Interference, there is only one Wave Meter Node, so dragging the icon displays the view and forwards the event without creating a new one.
- A subtle and challenging error can occur when you forward from NodeA to NodeB. If
using
DragListener.positionPropertyand these Nodes do not share the same parent, then you should specifytargetNode: NodeBto avoid an unexpected translation offset. - Forces and Motion: Basics doesn't dynamically create elements. The real elements are already in the toolbox, hence no creation or forwarding takes place.
Author: @mbarlow12
Some background reading for those interested:
- https://martinfowler.com/articles/injection.html
- https://en.wikipedia.org/wiki/Dependency_injection
- https://www.jamesshore.com/Blog/Dependency-Injection-Demystified.html
SR was an advocate of this in phetsims/tasks#952. Clarify which form of dependency injection (probably constructor-based injection), and some examples of where it's currently used in PhET sims.
The main goal of dependency injection (DI) is to decouple the implementation of a required object instance from where it’s used. While there are a few different ways to accomplish this, the basic idea is to provide the wrapping class with its required instance variables instead of allowing it to instantiate them itself. For example,
class MyClass {
  constructor() {
    this.otherObject = new OtherObject();
  }
}
Here, MyClass is tightly coupled to the specific implementation of OtherObject making it rather inflexible. With DI,
you instantiate the object elsewhere and add it to a class via its constructor (Constructor Injection) or through a
setter (Setter Injection)
class MyClass {
  constructor( otherObject ) {
    this.otherObject = otherObject;
  }
}
class MyClass {
_setOtherObject( otherObject ) {
this.otherObject = otherObject;
}
set otherObject( otherObject ) {
this._setOtherObject( otherObject );
}
}There are other forms of DI using interfaces or service locators, but they're not really applicable for the vast
majority of PhET use cases. In JavaScript, since everything is an Object, you could say that any assignment to
class/object properties from a constructor/method is DI since they all extend Object's methods.
class MyClass {
  constructor( aString, anArray, otherObject ) {
    super();
    this.aString = aString;
    this.anArray = anArray;
    this.otherObject = otherObject;
  }

  myClassToString() {
    return this.aString.toString() + this.anArray.toString() + this.otherObject.toString();
  }
}

const myClassInstance = new MyClass( 'hello', [ 'there', 'world' ], new DifferentOtherObjectImplementation() );
myClassInstance.myClassToString();
This takes advantage of the fact that while each argument has a toString method, their implementations can be wildly
different (provided the implementation still returns a string).
We already see a lot of straightforward DI at PhET such as passing model or Property instances as constructor
arguments or in our options and config objects. How PhET handles DI is largely up to the developer and we can find
instances of each flavor in our codebase; however, we most commonly see dependencies passed either as constructor
arguments or within our options/config objects. When deciding what approach to take, it's generally a good idea to
examine the those objects for their complexity. Large, heavily nested options objects are a relatively good indicator
that DI may simplify your implementation.
To start, Molecules and Light employs setter injection in how it handles absorption of various wavelengths of light for different molecules.
In Molecule.js
, the constructor initializes this.mapWavelengthToAbsorptionStrategy = {}. Then on ln 212, we have the following
method allows any object inheriting Molecule to dynamically set the necessary PhotonAbsorptionStrategy
class X {

  setPhotonAbsorptionStrategy( wavelength, strategy ) {
    this.mapWavelengthToAbsorptionStrategy[ wavelength ] = strategy;
  }
}
An example of DI through the options object can be found
in Slider.js. There are a series of options that allow the
client to alter the appearance of the Slider’s thumb, but the client can also pass an instance of a SliderThumb in the
options that will override
the defaults.
var thumb = options.thumbNode || new SliderThumb( {

  // propagate options that are specific to SliderThumb
  size: options.thumbSize,
  fill: options.thumbFill,
  fillHighlighted: options.thumbFillHighlighted,
  stroke: options.thumbStroke,
  lineWidth: options.thumbLineWidth,
  centerLineStroke: options.thumbCenterLineStroke,
  tandem: options.tandem.createTandem( 'thumb' )
} );
This is useful if the requirements go beyond the provided defaults (e.g. registering a custom input listener on the thumb).
Author: @zepumph
Disposal is the process of freeing up memory so that it can be garbage collected. In general, JavaScript will garbage
collect. A memory leak is when an Object in the sim keeps a reference to something that should be garbage collected.
This reference inhibits garbage collection from happening. The dispose pattern helps to prevent. An instance needs to be
disposed if any code outside that Type has a reference to it. For example a Type needs to be disposed if a listener is
added to an AXON/Emitter that was passed into that Type's constructor. You do not need to dispose an instance if
references are only between type and its children. Because it is self contained, it can be garbage collected as a whole.
For more information about the general pattern, see https://en.wikipedia.org/wiki/Dispose_pattern
A leak often happens due to the Observer pattern. If you own the observable and ALL of its observers (and there is no chance of outside observers being added), then you don't need to dispose. if you own only the observable or the observers, then you need to dispose by cutting those references.
Note: when use SCENERY/Node that need disposal, be careful about disposing when using DAG (directed acyclic graph)
features.
Here is a helpful list of actions that likely need doing while disposing:
- remove observers from things (Property, Emitter, Events) that were provided by the client
- dispose of any subcomponents that require disposal
- de-register from tandem (data collection)
Once establishing that you need to dispose a type, add the dispose method to the prototype. This method should be
@public and is likely an @override. The dispose method on the prototype, when called, should completely release
this object from any references that would otherwise keep it from being garbage collected. Make sure that this method
calls its parent and mixin disposals as well. In the view a type will likely extend from {{Node}} and, as such, you
will call Node.prototype.dispose.call( this ); (for es5). In general call this type's dispose before the parent's
call to tear down code in the opposite order of construction.
Below are a few methods to implement disposal specifics. They are listed in order of preference, and the first should be used unless it can't, the same for the next, and so on.
The preferred approach in implementing disposal for PhET code is to create a private member function in the constructor
called this.dispose{{TypeName}} (see issue), and then to call that
method from the dispose method (on the prototype). With disposal order in mind, the generally safest order of disposal
within this.dispose is to call this.dispose{{TypeName}} before calling for the parent. Within
this.dispose{{TypeName}}, the generally safest order of disposal is the opposite order of component creation.
Here is an example of using this disposal method. Note that the Property is unlinked before the child is removed from
the Node.
class MyAddChildAndLinkNode extends Node {

  private readonly disposeMyAddChildAndLinkNode: () => void;

  public constructor( aNode: Node, aProperty: Property<...> ) {

    super();

    const aNewNode = new Node();
    aNode.addChild( aNewNode );

    const aFunction = () => { console.log( 'I love this Property.' )};
    aProperty.link( aFunction );

    this.disposeMyAddChildAndLinkNode = () => {
      aProperty.unlink( aFunction );

      // Because aNewNode has a reference back to its parent (aNode).
      // Note there are many ways that this reference could be removed.
      aNode.removeChild( aNewNode );
    }
  }

  public override dispose(): void {
    super.dispose();
    this.disposeMyAddChildAndLinkNode();
  }
}
If performance is an important consideration for a type, then the above pattern is less desirable because it creates a
closure for each instance. That method can be adapted, and the constructor closure removed. Instead promote any local
variables that would be needed for disposal to @private instance fields and move that logic directly to the dispose
method, like below.
class MyAddChildAndLinkNode extends Node {

  private readonly aProperty: Property<...>;
  private readonly aFunction: () => void;

  public constructor( aProperty: Property<...> ) {

    super();

    this.aProperty = aProperty;

    this.aFunction = () => { console.log( 'I love this Property.' )};
    this.aProperty.link( this.aFunction );
  }

  public override dispose(): void {
    super.dispose();
    this.aProperty.unlink( this.aFunction );
  }
}
Sometimes the above, preferred patterns won't work. For example sometimes components are conditionally created, and
therefore are only conditionally disposed. If there are these sorts of complex disposal constraints, then create an
AXON/Emitter to manage disposal tasks, and add a listener to the Emitter for each disposal task.
- Name the emitter like
disposeEmitter{{TypeName}} - Add listeners to the Emitter, recognizing that listener order is not guaranteed.
- In the
disposemethod, emit the dispose emitter, and call the parent dispose (super.dispose()) in the appropriate order.
See issue for details on the "dispose emitter" pattern.
A deprecated pattern once used for disposal involves creating an array to keep track of items to dispose. Often this
array is called disposeActions, and is of type {Array.<function>}. For example see use of this.disposeActions
here
Here are some issues that have investigated trying to bring creation and disposal closer together:
Author: @pixelzoom and @zepumph
This is a standard pattern described in https://en.wikipedia.org/wiki/Enumerated_type.
PhET’s preferred implementation of this pattern is by declaring a class that extends
EnumerationValue.ts, and declaring
an Enumeration.ts member on it called
enumeration. It was developed in TypeScript, but can be used in JavaScript as well.
class MyEnumeration extends EnumerationValue {

  public static readonly VALUE1 = new MyEnumeration();
  public static readonly static VALUE2 = new MyEnumeration();

  // Make sure this is last, once all EnumerationValues have been declared statically.
  public static readonly enumeration = new Enumeration( MyEnumeration );
}
To adapt the pattern to be a rich enumeration, add prototype or static methods as needed to the class.
Another Enumeration strategy is to create a TypeScript string union type. In general, this strategy is less explicit, doesn't have as much runtime-safety, and doesn't support refactoring quite as well. That said, it is useful when strings are the best values for your enumeration:
type LayoutType = 'upward' | 'downward';
type MyComponentOptions = {
  layout: LayoutType
};

// . . .

const component = new MyComponent( {
  layout: 'upward'
} );
More examples and coding conventions for enumerations can be found in WilderEnumerationPatterns.ts.
In some old enumeration patterns, null was an acceptable enumeration value. This is no longer the case. Those older
cases should be treated as type EnumerationValue | null when converted to the new pattern.
You’ll find a couple of other patterns commonly used in PhET code. These are good to be aware of, but generally
shouldn't be used in new code. EnumerationDeprecated is PhET's primary old pattern; please do not use it is new code.
Previous pattern documentation based on `EnumerationDeprecated`
Author: @pixelzoom
This is a standard pattern described in https://en.wikipedia.org/wiki/Enumerated_type.
PhET’s preferred implementation of this pattern can be found in EnumerationDeprecated.js. Examples and coding conventions are in the comment header of that file. See the wave-interference repository for exemplars of EnumerationDeprecated use. Rich enumerations are not currently supported, but may be supported in the future (see phetsims/phet-core#50).
You’ll find a couple of other patterns commonly used in PhET code. These are good to know, but should be avoided in new code.
(1) A set of string values. For example, Slider.js uses
’horizontal’ and ’vertical’ as the values for its orientation option. This approach results in the duplication of
string literals throughout the code.
(2) Idiomatic JavaScript implementation, as described
in StackOverflow
. The typical implementation associates named keys with numeric values. PhET’s implementation uses string values (to
facilitate debugging) and Object.freeze to prevent unintentional modification. See for example
SolutionType.js.
Author: @jessegreenberg
Descriptions for each standard pattern can be found here:
- Mixin: https://en.wikipedia.org/wiki/Mixin
- Trait: https://en.wikipedia.org/wiki/Trait_(computer_programming)
More information about traits can be found here: http://scg.unibe.ch/archive/papers/Scha03aTraits.pdf
Notes on PhET's decisions regarding mixin vs trait can be found in:
Summarizing the above, traits and mixins allow the code reuse benefits of multiple inheritance without using actual multiple inheritance.
PhET's definition of mixin and trait does not perfectly align with standard definitions. By standard definition, the differences are:
- A trait requires methods from the class it is mixed into, a mixin doesn't.
- A trait can be composed by combining existing traits, a mixin can't.
- A trait can't specify or access state variables, a mixin can.
PhET defines the difference between mixin and trait as:
- A trait can require methods and properties from the class it is mixed into, a mixin cannot.
It is OK for the type mixing in the mixin or trait to reference properties and methods defined by the mixin or trait. However, only traits can use properties or methods from the type using the trait. Mixins cannot use anything from the class it is mixed into.
The general pattern for using Mixins in TypeScript is described in https://www.typescriptlang.org/docs/handbook/mixins.html
In general, composition should be favored over inheritance and inheritance should be favored over mixins. If the composition pattern produces lots of forwarding calls, it is an indication that you should be using inheritance or mixin instead. The mixin pattern should only be used as a substitute for multiple inheritance only if single inheritance is not desirable or is difficult to use.
Please refer to the following:
- SCENERY/Paintable
- SCENERY/Imageable
- SCENERY/Voicing
- SUN/AccessibleValueHandler
Since we are generating d.ts files, we must specify the return type of the mixin. This also means we cannot export protected
members. For methods that we want to be protected, but have to be public due to this constraint, we annotate them via
// @mixin-protected - made public for use in the mixin only. For more, please see phetsims/tasks#1132 (comment)
Author: @jessegreenberg
Model-View-Controller is a software pattern for applications where the developer separates the implementation into three distinct categories. Model code is responsible for the application data and logic. View code is responsible for the presentation of data to the user. The controller is responsible for handling user input and updating the model. The separation between model and view is important, the model should be completely unaware of the view. Benefits of this pattern include
- Modifications to the view do not impact application behavior.
- You can support multiple view representations for a single model.
- Improved maintainability with more compartmentalized code.
For more information about this pattern, please see Model-View-Controller.
One way PhET uses model-view separation is in our simulation specific code. Simulation code is organized into directories that separate the model and view like this:
   my-sim/
      js/
         my-screen/
            MyScreen.js
            model/
              // <-- Model JavaScript here
            view/
              // <-- View JavaScript here
Code under the "model" directory is responsible for simulation physics, state, component visibility, and so on. Code under the "view" directory is responsible for the presentation of this information. The model and view are applied to create a simulation screen by a class called Screen.js, which may be used like
  const myScreen = new Screen(
  () => { return new MyModel(); },
  myModel => { return new MyView( myModel ); }
);
In this example you can see that MyModel is oblivious to the view, while the view has a reference to the model to inform the representation.
Controller code at PhET is generally in input and event handling which is done through Node.addInputListener.
Communication from the model to the view is facilitated by classes in axon such as Property and Emitter. These are
Observables which contain model state information and broadcast changes to the view so that it can update accordingly.
The "Model" in this pattern doesn't need to be the "domain" model for a simulation. It can contain any logic for application behavior for any context. Model-View separation can be found at other tiers of PhET's implementation. Scenery (which is used extensively in simulation view code) is implemented with model-view separation. For example, a scenery Node acts as a model which is responsible for state information such as visibility, transformation, bounds and other things. Meanwhile, other view code in scenery is responsible for rendering this state information for the user. You will find "model-view" separation in the sun button implementation as well.
There are several variations on the Model-View-Controller pattern. Please see this article for more information. PhET's usage is most similar to the Model-View-Delegate pattern used by Java in the implementation of Swing. In this pattern, the controller code is generally packaged with view code. A diagram of this pattern would look like
    +---------------+       Axon        +-------------------+                +-----------+
    |               | +---------------> |                   |   User Input   |           |
    |     Model     |                   |  View/Controller  | <------------+ |   User    |
    |               | <---------------+ |                   |                |           |
    +---------------+  Input Listeners  +-------------------+                +-----------+
Author: @chrisklus
At PhET, since we use the model-view controller pattern, we often have separate coordinate systems for the model and view. This is because units - like meters, for example - are desirable to use in the model, but the simulation view uses view coordinates, and the simulation's display always needs to fit within the layout bounds (ScreenView.layoutBounds). To support any size model coordinate system and have it sized correctly in the view, we need two separate coordinate systems and the ability to transform between the two.
Since the majority of our simulations take place in a 2-dimensional coordinate frame, we often use
ModelViewTransform2.js to achieve these transformations. It allows you to create an instance of a transform that suits
your scaling, translational, and rotational specifications - and then you can call methods on that instance to switch
between coordinate systems. Here's an example of what a modelViewTransform instantiation could look like in the view.
It's the most typical case where you're positioning Nodes relative to the ScreenView's coordinate frame:
const modelViewTransform = ModelViewTransform2.createSinglePointScaleInvertedYMapping(
  Vector2.ZERO, // map (0, 0) in the model...
  this.layoutBounds.center // ...to be at the center of the sim's layout
10 // set the scale factor to adjust for big or small models in comparison to pixels
)
;
The modelViewTransform instance can be used to position model things correctly in the view. For example, updating the
view position of a model element could look like this:
model.modelElement.positionProperty.link( position => {
  modelElementNode.translation = modelViewTransform.modelToViewPosition( position );
} );
But the general model-view transform case is where you're specifying the transform of some Node relative to the coordinate frame of where it occurs in the scene graph. ModelViewTransform2 doesn't necessarily need to be used to achieve a transform. For a couple examples of less common usages, see YawPitchModelTransform3.js and EnvironmentModelViewTransform.js.
If positions and dimensions are not important to the model, then it's likely not necessary to use a model-view transform, but instead develop a sim only in view coordinates. Function Builder and Circuit Construction Kit are a couple examples of sims that do not use model-view transforms.
It's also important to know about the different coordinate frames in a scene graph. For Scenery specifically, that means understanding the difference between local, parent, and global coordinate frames. That's beyond the scope of this section, see Node.js for details. For a simple introduction to some of the methods that Node has for transforming between its coordinate systems, see #133.
Author: @Denz1994
A module is a program unit that contains declarations which formulate the classes and objects in a system. Modularity is a property of a system whose modules can be compiled independently, but have connections with other modules. A module has two core components: its interface and its implementation. JavaScript modules are useful to define a unit of code and how to register a value for the module. Additionally, modules allow units of code to reference other units of code.
More background reading:
- Modular Programming wiki
- Object-Oriented Programming with Applications by Grady Booch
- Effective JavaScript by David Herman
Modules operate as independent pieces of code and are used throughout the whole PhET project. Take a look at some examples in sim code , common code, and code for build tools.
PhET uses ES6 modules for simulation code, directly loaded in the browser, and built using webpack. We use default imports and exports, so import statements will generally look like:
  import Vector2 from '../../../dot/js/Vector2.js';
  import Touch from '../input/Touch.js';
The shortest possible relative path should be used, and the imports should be sorted lexicographically by the import path (what Webstorm does by default). Additionally, the imports should all be in one block near the top of the file ( after the copyright and file-description comments).
It's possible to declare circular dependencies, but directly invoking and running code from both parts of the circular dependency at load time will not work.
Some code is loaded in our "preloads" section, and is available through the global phet object,
like phet.chipper.queryParameters. These do not need any import statements to work, and should be available for all
module-based code.
The PhET codebase follows a similar pattern for module structure as outlined below:
- Top level documentation: General purpose, authorship, and copyright
- Imports: whatever import statements are required, in one single block
- Class/etc.: Houses the main body of our module (attributes and elements)
- NameSpace: Register our module to avoid conflicts ( see Namespace section)
- Export default: exports the main object from the module
Putting it all together modules will usually follow this format:
// Copyright 2019, University of Colorado Boulder

/**
 * Example Node used for demonstrating typical module formatting in the PhET project.
 *
 * @author Denzell Barnett (PhET Interactive Simulations)
 */

import { Node } from '../../../scenery/js/imports.js';
import Vector2 from '../../../dot/js/Vector2.js';
import fooRepo from '../fooRepo.js';

class FooNode {
  constructor( fooArgument ) {
    // ...
  }
}

fooRepo.register( 'FooNode', FooNode ); // Namespace registration to repository.
export default fooRepo;
It is important to note that 'using strict' should be enforced throughout the PhET codebase for preloads or non-module files. Strict mode is NOT needed for ES6 module files, and should not be used in them. Strict mode has the unique property of limiting certain JavaScript functionalities that may not be backward compatible between versions. To avoid this there are three general solutions:
- Never concatenate strict files and nonstrict files.
- Concatenate files by wrapping their bodies in immediately invoked function expressions.
- Write your files so that they behave the same in either mode.
Here are some things to do and to avoid when creating modules for use in PhET's code base:
- Include a default export, placed at the end of the .js or .ts file, e.g.
export default NumberControl; - Group all
importsat the top of the .js file, immediately after the overview comment block, organized à la WebStorm "Organize Imports". - Rename on import only if you have a name collision between imports, e.g.
  import { Line as SceneryLine } from '../../../../scenery/js/imports.js';
  import Line from '../model/Line.js';
- Use existing modules as examples to be followed, and gravitate towards more recent ones, since these are most likely have been implemented using the most up-to-date practices.
- Discuss exceptions to best practices on Slack, as they are encountered. Modify the best practices if necessary, and/or document (at the call site) why you needed to diverge from the best practices.
- Do not use property notation for imports, e.g.
import * as lib from 'lib'; - Do not rename on export, e.g.
export { MY_CONST as THE_CONST }; - Do not rename on import, e.g.
import { named1 as myNamed1 } from 'src/mylib';See exception above, for name collisions. - Do not re-export, e.g.
export { foo } from 'src/other_module';
Author: @jonathanolson
This describes the PhET-specific conventions for the pattern described by https://en.wikipedia.org/wiki/Namespace.
Namespaces allow runtime (dev tools) access to arbitrary namespaced objects. For example, if running in a simulation,
window.phet is available, and has a number of other namespaces below it (e.g. window.phet.scenery), so that while
debugging, the type phet.scenery.Node can be directly accessed. In other contexts, namespaces may be directly
available on window (e.g. built forms of dot/kite/scenery and other related utilities). This is instead of a
"global" namespace (where every object is in one namespace), which would prevent any two types in any repositories from
having the same name (name collision). In addition another "alternative" would be to not give access to runtime objects,
but this would make debugging much more difficult.
In addition, namespaces can be used as a workaround for circular dependencies. Occasionally this is needed when modules run into circular dependency issues.
For our uses, each repository generally has one namespace at the top level, e.g.
molecule-shapes/js/moleculeShapes.js (generally camel-cased) would contain:
import Namespace from '../../phet-core/js/Namespace.js';

export default new Namespace( 'moleculeShapes' );
Thus the namespace object would be available under phet.moleculeShapes in simulations.
To add an object to a namespace, use the register method, e.g.:
moleculeShapes.register( 'Bond', Bond );For example, now phet.moleculeShapes.Bond will point to the value of Bond above.
There is a somewhat-unused feature to call register with dot-separated path-like values in the string portion (for
handling things like inner classes, see phetsims/phet-core#52), however there is some
uncertainty about the usefulness. It's @jonathanolson's opinion that this can be scrapped, and if references are desired
then they can be set directly on the main type/object for the module (e.g. Bond.Something = Something). It is
allowed (but not required) to namespace inner classes.
Another unused feature is to nest namespaces. It should be possible to register one namespace as an object on another namespace.
There are some cases where more information/shortcuts are put on a namespace object, e.g. dot.js makes dot.v2()
available.
Interested developers: JG, DB, CK
Author: @brandonLi8
PhET widely uses the observer pattern described in https://en.wikipedia.org/wiki/Observer_pattern throughout its entire code base.
Property is our most basic and simplest form of the Observer pattern. It is used as a wrapper of a JavaScript field,
called its value. Observers are notified when its value is set to a different value. Observers add listeners through
the link and lazyLink methods and remove listeners through the unlink method.
In general, with PhET simulation code, it is encouraged to use the many subtypes of Property, which depend on the type
of its internal value (i.e. the values of NumberProperty are numbers). Some other common sub-types that are used
are StringProperty, BooleanProperty, Vector2Property, etc.
Please see the Model-View-Controller (MVC) section of this document for context.
In short, the observer pattern acts as a key communicator within the model-view hierarchy of PhET simulations. The model is oblivious to the view, so the view uses the observer pattern for the model to observe the state of the model and correctly render a mirrored view representation.
See for example:
// model
class Ball {
constructor( ... ) {
...

  // @public {Vector2Property} - the position (coordinates) of the Ball, in meters.
  this.positionProperty = new Vector2Property( new Vector2( ... ) );
}
}

// view
class BallNode extends Node {

constructor( ball, ... ) {
...

  // Observe when the ball's position changes through the Property API.
  ball.positionProperty.link( position => {
    this.center = modelViewTransform.modelToViewPosition( position );
  } );
}
}
In this example you can see a how the Ball view updates itself by observing the positionProperty of the ball model. If
you were to call
ball.positionProperty.value = new Vector( ... );or
ball.positionProperty.set( new Vector( ... ) );its listeners will be invoked.
- Ensure that you aren't causing any memory leaks. Property holds references to its listeners, so, in the case above, if
you were to dispose
BallNodeit would be kept by the Property and wouldn't be garbage collected. Reference the Dispose section. - Generally, listeners don't normally set the Property that it is listening too. This is called a reentrant:
If, however, it is absolutely necessary to set the property value, you can pass the
const massProperty = new NumberProperty( 4 );

massProperty.lazyLink( mass => {
  massProperty.value = 5; // Reentrant, would cause an assertion error.
} );
reentrant: trueoption to the Property instance. - In the examples above, the names of Properties are suffixed with
Property(ie.massProperty,positionProperty, etc.). We try to be verbose with this practice to emphasize a distinction between a normal JavaScript field and a wrapped Property.
DerivedProperty is another Property sub-type, but unlike other subtypes (which are mostly for type-specific values), DerivedProperty is a generic Property whose value is determined based on other Properties, called its dependencies.
It is best to explain with an example:
this.forceProperty = new DerivedProperty(
[ this.massProperty, this.accelerationProperty ],
( mass, acceleration ) => mass * acceleration // F = m*a
);
In this example, [ this.massProperty, this.accelerationProperty ] is the dependencies of the DerivedProperty, and the
second parameter (the lambda) is the derivation function.
If the massProperty OR the accelerationProperty is set to a different value, then its value is recomputed based on
what the derivation function returns, which is passed the values of the dependencies in corresponding order.
DerivedProperty usually has the same role in the MVC pattern, as
outlined above. It
is still a subtype of Property, so observers are notified when its value changes and observers are added through link
and lazyLink methods. However, note that the value of a DerivedProperty instance cannot be set externally.
-
All Properties and its subclasses use validate, meaning the Validation options are apart of its API.
For type-specific subclasses like
NumberProperty, these are set for you. However, this is needed for DerivedProperty. So for the example above, the declaration should look likethis.forceProperty = new DerivedProperty( [ this.massProperty, this.accelerationProperty ], ( mass, acceleration ) => mass * acceleration, // F = m*a { ... valueType: 'number', isValidValue: value => value >= 0 // force must be positive } );
Multilink is a convenience class that is used to observe multiple Properties with the same observer functionality. Similar to DerivedProperty, it has its "dependencies" of Properties, and when any dependency's value changes, the observer is invoked with the values of the dependencies in corresponding order. However, it is not a subclass of Property and doesn't conform to the Property API.
- In some use cases of
MultilinkandDerivedProperty, the observer needs to know which Property caused the notification. One solution is to add independent listeners to each dependency and turn the DerivedProperty into a Property that is modified by each listener. Please reference phetsims/axon#259.
ObservableArrayDef is another common iteration of the Observer pattern. ObservableArrayDefs are created via createObservableArray, and are a Proxy wrapper over an Array that notifies observers when items are added or removed from the Array.
Like Property, ObservableArrayDef can act as a key communicator within the model-view hierarchy of PhET simulations.
One common pattern is:
// model
// @public {ObservableArrayDef.<Cart>}
this.carts = createObservableArray();

// view
this.carts.elementAddedEmitter.addListener( cart => this.addChild( new CartNode( cart ) ) );
Then, wherever this.carts.push( new Cart() ) is called, a new CartNode is added through the observer.
As a reminder from above, observers are referenced as a listener in the ObservableArrayDef, so be sure to
call elementAddedEmitter.removeListener to release listeners when needed.
You may see Emitters used in the common code shared between simulations. Emitters are a generic event-based class that
follows the observer pattern to allow clients to subscribe (through the addListener method) to a single specific
event.
Another form of PhET's version of the Observer pattern is through user-triggered events, such as dragging, clicking ( pressing), etc. This is all done through the scenery input system.
Scenery Nodes support FireListener, DragListener, PressListener, etc. Listeners subscribe to when the user does a
specified event, which may alter the simulation. Listeners are often passed
a SceneryEvent.
View classes observing scenery input events are a key communicator in the model-view hierarchy. For instance, user input may propagate and affect model properties or may create new model objects, as described in the Creator pattern section.
As a reminder from above, Input Listeners (such as DragListener) are internally referenced in Node, so be sure to
call removeInputListener() to release listeners if needed.
Author: @pixelzoom, @denz1994
Note: This is an obsolete pattern used in legacy JavaScript code. It's still recommended to read this section, especially since the subsection on Nesting still applies for TypeScript. For TypeScript code, see Options (TypeScript) .
This pattern is used for parameterizing classes and methods, which we use to avoid an explosion of parameters. options
and config are the two implementations of that pattern that PhET typically uses. If all properties in the argument are
optional, then the parameter should be called options. If one or more properties of the argument are required, then
the parameter should be called config. Some elements of the config parameter can be optional, but each one must be
documented accordingly. See "Required Fields" below for documentation.
Use merge to overwrite default option values. For example, this Node subclass has defaults that are different from
Node's defaults:
class MyNode extends Node {
  constructor( options ) {
    options = merge( {
      visible: false,
      pickable: false
    }, options );
  ...
    super( options );
  }
}
We do not filter child options out before passing them a parent class or subcomponent. With this in mind, please be mindful of the option naming to make sure that you don't cause name collisions. See phetsims/tasks#934.
Try to keep related options groups together, both for instantiation and merge statements. For examples, if you have
several options related to a11y, keep them together, don't interleave them with other options.
In some cases, it is important to keep track of whether an option was passed in (and hence externally managed) or not passed in (and hence locally managed). Locally managed components may require disposal, etc. For example, see NumberProperty and its usage of whether RangeProperty is passed in as an option.
If using composition for your class, and you want to pass options into a subcomponent, you can nest those options in a
single property, named according to the subcomponent you are passing the options to. In this example,
options.hSliderOptions is the nested options that will be passed to HSlider:
class MyNode extends Node {
  constructor( options ) {

    options = merge( {
      visible: false,
      pickable: false,
      hsliderOptions: {
        endDrag: function() { console.log( 'Drag Ended' ) },
        startDrag: function() { console.log( 'Drag Started' ) }
      }
    }, options );

    var slider = new HSlider( new Property(), new Range(), options.hsliderOptions );
  ...
    super( options );
  }

...
}
In some cases, dependency injection is an appropriate alternative, see phetsims/tasks#952. In
the above example, this would mean creating the HSlider externally then passing it in to the MyNode
constructor.
If one or more of the fields in options is required, then options should be renamed to config.
See phetsims/tasks#930
In the merge call, PhET-Core/required.js should be used to indicate that the field is required and other
non-required fields are assumed optional. Following the merge call, any further validations should be provided. For
example:
/**
 * @param {string} name - the full name of the Person
 * @param {Object} config
 * @constructor
 */
function Person( name, config ) {
  config = merge( {

    // {number} height in centimeters
    height: required( config.height ),

    // {number} age in years
    age: required( config.age ),

    favoriteColor: null, // {Color|null} favorite Color, if any
    favoriteCar: null // {Car|null} favorite Car, if any
  }, config );

  // Any further validations should be handled after the config object
  assert && assert( config.height !== null, 'height is required' );
  assert && assert( config.age !== null, 'age is required' );
}
In some cases, it may be better to only indicate the required properties or only indicate the optional properties,
or to group them -- use your judgment. Note that documentation is above the required config field and within the config
object. The required() function is enough indication that this is a required field in the config object and no further
distinction is required in the documentation.
(1) Don't modify an options object that you don't own. If you own the options object, then direct assignment to an
options field is OK. If you don't own the options object, use merge, to assign a field value, which creates a new
object that you then own.
class Shelf extends Node {
  constructor( content, options ) {
    options = merge( {
      material: 'wood',
    }, options );
  }
}
(2) In some cases, options should be specified within the constructor or method itself, and not overrideable by the client. In those cases, use an assertion to verify that the client did not specify a value for that option. Don't silently override what the client provided.
// Create two containers
this.blueContainerNode = new ContainerNode( height, width, blueContainerOptions );
this.redContainerNode = new ContainerNode( height, width, redContainerOptions );

// Explicitly set the blue container's label
assert && assert( blueContainerOptions.label === undefined, 'label was not previously set' );
blueContainerOptions.label = 'Books';
Please see #128 for a discussion of acceptable approaches for checking that a client did not provide an option, and how the option can be specified.
(3) To check whether a field exists in options or config, the expressions that you have available are:
options.someField === undefined- checks ifsomeFielddoes not exist as a property!options.hasOwnProperty( 'someField' )- checks ifsomeFieldis a non-inherited property!option.someField- checks ifsomeFieldhas a falsy value. Don't use this for boolean or number fields!
(4) When overriding options or config using merge, arguments should be ordered from least to most specific. For
example:
// Incorrect
class MyPanel extends Panel {
  constructor( options ) {
    options = merge( options, {
      fill: 'yellow'
      ...
    }, MyConstants.PANEL_OPTIONS );
  ...
  }
}

// Correct
class MyPanel extends Panel {
  constructor( options ) {
    options = merge( {}, MyConstants.PANEL_OPTIONS, {
      fill: 'yellow'
      ...
    }, options );
  ...
  }
}
(5) Use config judiciously and appropriately. If your API has too many parameters, don't immediately reach
for config as the solution. Review your API to understand why it has too many parameters, and possibly redesign.
Author: @pixelzoom
Disclaimer: The description of this pattern is not complete -- it’s a start. The examples are terse, and significant
familiarity with optionize is needed to get the most out of the examples.
Similar to the pattern described in Options and Config (JavaScript) , this pattern is used to parameterize methods (most typically constructors) without having a large number of method parameters. It provides the additional benefit of type-checking.
The method parameter differs from the JavaScript options or config parameter in the following ways:
- the parameter is named
providedOptions providedOptionsmay be optional or requiredprovidedOptionsfields may be optional or required- optionize is used to merge
providedOptionswith default values
See WilderOptionsPattern.ts for additional description and examples.
Additional guidelines:
(1) Create your options type by intersecting SelfOptions and the parent class’s options type. SelfOptions will
contain options that are specific to your class. Document options in the Type, and not in the defaults in the
constructor
// Our parent class is Path, whose options type is PathOptions.
class MyPath extends Path {
  // ...
}

// incorrect, duplicates fields defined in PathOptions
type SelfOptions = {
  fill?: IPaint;
  stroke?: IPaint;
  tandem: Tandem;
  // ...
};
type MyPathOptions = SelfOptions;

// correct, intersects with PathOptions
type SelfOptions = {
  aSelfOption?: boolean // documentation goes here about aSelfOption
  // ...
};
// Tandem needs to become required, but should not be repeated
type MyPathOptions = SelfOptions & PathOptions & PickRequired<PathOptions, 'tandem'>;
(2) If your class does not have any class-specific options, it's still recommended to
use type SelfOptions = EmptySelfOptions. This makes it very easy to add class-specific options later, by replacing 1
occurrence of EmptySelfOptions with {…}. Otherwise you have to remember to change to SelfOptions in 3 places.
Here's the general pattern:
type SelfOptions = EmptySelfOptions;
type MyClassOptions = SelfOptions & SuperclassOptions;

class MyClass extends Superclass {
  constructor( ..., providedOptions?: MyClassOptions ) {
    const options = optionize<MyClassOptions, SelfOptions, SuperclassOptions>()( {
       ... // set defaults
    }, providedOptions );
    ...
  }
}
(3) Use StrictOmit , PickRequired, and PickOptional to narrow the API provided by your options type.
// In this example, MyNode is responsible for setting the children option.
// StrictOmit is used to prevent clients from being able to set options.children.

type SelfOptions = {
  // ...
};
type MyNodeOptions = SelfOptions & StrictOmit<NodeOptions, 'children'>;

class MyNode extends Node {
  constructor( …, providedOptions?: MyNodeOptions ) {
    const options = optionize<MyNodeOptions, SelfOptions, NodeOptions>()( {
      // ...
    }, providedOptions );
   // ..
   options.children = ...
   // ...
  }
}
// In this example, we want to exclude the parent class’s options from our API, and make tandem required.
// PickRequired is used to pick tandem from NodeOptions.
type SelfOptions = {
// ...
};
type MyNodeOptions = SelfOptions & PickRequired<NodeOptions, 'tandem'>;
class MyNode extends Node {
constructor( providedOptions?: MyNodeOptions ) {
const options = optionize<MyNodeOptions, SelfOptions, NodeOptions>()( {
// ...
}, providedOptions );
// ...
}
}// In this example, we want to exclude the parent class’s options from our API, and make tandem required,
// and make phetioDocumentation optional. We use PickRequired and PickOptional respectively.
type SelfOptions = {
// ...
};
type MyNodeOptions = SelfOptions &
PickRequired<NodeOptions, 'tandem'> &
PickOptional<NodeOptions, 'phetioDocumentation'>;
class MyNode extends Node {
constructor( ..., providedOptions?: MyNodeOptions ) {
const options = optionize<MyNodeOptions, SelfOptions, NodeOptions>()( {
// ...
}, providedOptions );
// ...
}
}(4) Use PickRequired and PickOptional to change whether parent options are required or optional. Note that when
intersecting type aliases, PickRequired and PickOptional must come after other occurrences of the parent class’s
options type.
// In this example, we make options fill and stroke required for our subclass.

type SelfOptions = {
  // ...
};
type MyPathOptions = SelfOptions & PathOptions & PickRequired<PathOptions, 'fill' | 'stroke'>;

class MyPath extends Path {
  // ...
}
// In this example, we make numberOfAtoms optional for our subclass.
// Atomizer.ts ---------------------
type SelfOptions = {
numberOfAtoms: number;
};
type AtomizerOptions = SelfOptions;
class Atomizer {
constructor( providedOptions: AtomizerOptions ) {
// ...
}
}
// MyAtomizer.ts ---------------------
type SelfOptions = EmptySelfOptions;
// Make numberOfAtoms optional. Note that it must be omitted, then made required.
type MyAtomizerOptions = SelfOptions &
StrictOmit<AtomizerOptions, 'numberOfAtoms'> &
PickOptional<AtomizerOptions, 'numberOfAtoms'>;
class MyAtomizer extends Atomizer {
constructor( providedOptions?: MyAtomizerOptions ) {
const options = optionize<MyAtomizerOptions, SelfOptions, AtomizerOptions>()( {
numberOfAtoms: 10,
// ...
}, providedOptions );
// ...
}
}(5) To narrow an API, pick fields from the parent class’s options, rather than duplicate the definitions of those fields.
// Our parent class is Path, whose options type is PathOptions.
class MyPath extends Path {
  // ...
}

// incorrect, definition of Path.fill is duplicated
type SelfOptions = {
  fill?: IPaint;
  // ...
};
type MyPathOptions = SelfOptions;

// correct, definition of fill is picked from PathOptions
type SelfOptions = {
  // ...
};
type MyPathOptions = SelfOptions & PickOptional<PathOptions, 'fill'>;
(6) If a class has no parent class, pick a field from the type that defines that field, rather than duplicating that field’s definition.
// Our class has no parent class.
class MyClass {
  // ...
}

// incorrect, SelfOptions should not duplicate the definition of PhetioObjectOptions.tandem.
type SelfOptions = {
  tandem: Tandem;
  // ...
};
type MyClassOptions = SelfOptions;

// correct, MyClassOptions gets the definition of tandem from PhetioObjectOptions, which is where tandem is defined.
type SelfOptions = { ... };
type MyClassOptions = SelfOptions & PickRequired<PhetioObjectOptions, 'tandem'>;
(7) Pick fields from the parent class’s options. Do not “reach up” the type hierarchy.
// Our parent class is Path, whose options type is PathOptions.
class MyPath extends Path {
  // ...
}

// incorrect, picks tandem from ancestor class PhetioObjectOptions
type MyClassOptions = SelfOptions & PickRequired<PhetioObjectOptions, 'tandem'>;

// correct, picks tandem from parent class PathOptions
type MyClassOptions = SelfOptions & PickRequired<PathOptions, 'tandem'>;
(8) An exception to (6) is when you want to narrow the API of NodeOptions. You can do this
using NodeTranslationOptions, NodeTransformOptions, or NodeBoundsBasedTranslationOptions.
// Limit the API to include only the parent options related to translation.
// In this case, it is acceptable to assume that Path is a subclass of Node.

type SelfOptions = {
  // ...
};
type MyNodeOptions = SelfOptions & NodeTranslationOptions;

class MyNode extends Path {
  // ...
}
(9) The tandem option for PhET-iO is a little tricky, and requires different patterns for common code versus
sim-specific code.
For common code, tandem should be optional, with a default of tandem: Tandem.REQUIRED provided. A missing tandem
will not be identified until runtime with PhET-iO enabled. But this approach is still necessary in common code in order
to support PhET’s uninstrumented sims. If tandem were required option in common code, then it would be difficult to
convert a sim to TypeScript without also PhET-iO instrumenting it.
type SelfOptions = {
  // ...
};
type MyCommonCodeNodeOptions = SelfOptions & NodeOptions;

class MyCommonNode extends Node {

  // If MyCommonCodeNodeOptions has no other required fields, then
  // providedOptions can be an optional param because tandem is optional
  constructor( providedOptions?: MyCommonCodeNodeOptions ) {
    const options = optionize<MyCommonCodeNodeOptions, SelfOptions, NodeOptions>()( {

      // Provide a tandem default here, because it's optional, and we want MyCommonNode to be instrumented.
      tandem: Tandem.REQUIRED
    }, providedOptions );
  }
  // ...
  super( options );
  // ...
}
For sim-specific code (in sims that are PhET-iO instrumented), tandem should be required, with no default value
needed. This ensures that a missing tandem is identified by the type checker.
type SelfOptions = {
  // ...
};

// this makes tandem a required option
type MySimNodeOptions = SelfOptions & NodeOptions & PickRequired<NodeOptions, 'tandem'>;

class MySimNode extends Node {

  // providedOptions is a required param because tandem is required
  constructor( ..., providedOptions: MySimNodeOptions ) {
    const options = optionize<MyNodeOptions, SelfOptions, NodeOptions>()( {
      // ...
      // No need for tandem default here, because it's a required option.
    }, providedOptions );
  }
  // ...
  super( options );
  // ...
}
(10) For nested options, use StrictOmit to avoid having to provide {} or null as a default value.
In the parameters to optionize, omit 'helloButtonOptions' from SelfOptions so that a default value is not needed:
type SelfOptions = {
  helloButtonOptions?: RectangularPushButtonOptions;
  // ...
};
type MyNodeOptions = SelfOptions & NodeOptions;

export default class MyNode extends Node {
  constructor( providedOptions?: MyNodeOptions ) {

    // omit helloButtonOptions from SelfOptions
    const options = optionize<MyNodeOptions, StrictOmit<SelfOptions, 'helloButtonOptions'>, NodeOptions>()( {
      // no default for helloButtonOptions is needed
      ...
    }, providedOptions );
    super( options );
  }
}
Avoid providing a default value of {}, like this:
type SelfOptions = {
  helloButtonOptions?: RectangularPushButtonOptions;
  // ...
};
type MyNodeOptions = SelfOptions & NodeOptions;

export default class MyNode extends Node {
  constructor( providedOptions?: MyNodeOptions ) {
    const options = optionize<MyNodeOptions, SelfOptions, NodeOptions>()( {
      helloButtonOptions: {},  // don't do this!
      // ...
    }, providedOptions );
    super( options );
  }
}
Avoid using null in the definition and default value, like this:
type SelfOptions = {
  helloButtonOptions?: RectangularPushButtonOptions | null;  // don't do this!
  // ...
};
type MyNodeOptions = SelfOptions & NodeOptions;

export default class MyNode extends Node {
  constructor( providedOptions?: MyNodeOptions ) {
    const options = optionize<MyNodeOptions, SelfOptions, NodeOptions>()( {
      helloButtonOptions: null, // don't do this!
      // ...
    }, providedOptions );
    super( options );
  }
}
(11) If your class has responsibility for one or more fields in nested options, those fields should be omitted so that they cannot be provided by the caller. There are 2 patterns for accomplishing this.
The first pattern omits the fields from SelfOptions. Then, when the subcomponent is instantiated, combineOptions is
used to add the options that are the responsibility of the class.
type SelfOptions = {

  // omit nested options that are the responsibility of MyNode, and are therefore not part of the API
  helloButtonOptions?: StrictOmit<RectangularPushButtonOptions, 'content' | 'listener'>;
  // ...
};
type MyNodeOptions = SelfOptions & NodeOptions;

export default class MyNode extends Node {

  constructor( providedOptions?: MyNodeOptions ) {

    const options = optionize<MyNodeOptions, StrictOmit<SelfOptions, 'helloButtonOptions'>, NodeOptions>()( {
      // ...
    }, providedOptions );

    super( options );

    // add values for nested options that are the responsibility of MyNode
    const helloButton = new RectangularPushButton( combineOptions<RectangularPushButtonOptions>( {
      content: new Text( 'hello' ),
      listener: () => console.log( 'hello' )
    }, options.helloButtonOptions ) );
    this.addChild( helloButton );

    // ...
  }
}
The second pattern adds options that are the responsibility of the class in the main optionize call. Note that this
requires a less straightforward type definition. If you find that your type definition is getting unwieldy, clever, or
difficult to understand, then consider using the first pattern above.
// Do not omit options here, so that we can provide defaults in the optionize call.
type SelfOptions = {
  helloButtonOptions?: RectangularPushButtonOptions;
  // ...
};

// Omit nested options here that are not part of the API.
type MyNodeOptions = SelfOptions & {
  helloButtonOptions?: StrictOmit<RectangularPushButtonOptions, 'content' | 'listener'>;
} & NodeOptions;

export default class MyNode extends Node {

  constructor( providedOptions?: MyNodeOptions ) {
    const options = optionize<MyNodeOptions, SelfOptions, NodeOptions>()( {
      helloButtonOptions: {

        // Provide defaults for nested options that are the responsibility of MyNode.
        content: new Text( 'hello' ),
        listener: () => console.log( 'hello' )
      }
    }, providedOptions );

    super( options );

    const helloButton = new RectangularPushButton( options.helloButtonOptions );
    this.addChild( helloButton );

    // ...
  }
}
(12) When applying
a mixin or trait
, defining options types gets a little more complicated. Options must be included for both the mixin/trait and the
class that the mixin/trait is applied to. This is when you should explicitly define type ParentOptions.
In this example, trait Voicing with options VoicingOptions is applied to Checkbox. (The pattern is identical for
mixins.)
// Options that are specific to MyCheckbox go here.
type SelfOptions = { ... };

// Define ParentOptions, which is composed of both the trait's options (VoicingOptions),
// and the options for the class that the trait is applied to (CheckboxOptions).
// Take care not to duplicate VoicingOptions & CheckboxOptions elsewhere.
type ParentOptions = VoicingOptions & CheckboxOptions;

// Combine options that are specific to this class (SelfOptions) and ParentOptions.
export type MyCheckboxOptions = SelfOptions & ParentOptions;

// Note that Voicing is applied to Checkbox.
class MyCheckbox extends Voicing( Checkbox ) {

  constructor( ..., providedOptions?: MyCheckboxOptions ) {

    // Use ParentOptions for the 3rd parameter to optionize --
    // not VoicingOptions, CheckboxOptions, or (duplicated) VoicingOptions & CheckboxOptions.
    const options = optionize<MyCheckboxOptions, SelfOptions, ParentOptions>()( {
      ...
    } );
    ...
  }
}Author: @jessegreenberg
A "Scene" in a PhET simulation is a collection of elements presented to the user. When a new scene is selected, elements of the previous scene will be swapped out for elements in the new scene. A single simulation Screen may have multiple Scenes. The implementation of a Scene should adhere to the Model-View-Controller (MVC) pattern and be implemented like any other component in a simulation. There is no base class called Scene which combines a SceneModel and a SceneView. Instead, model information for a Scene should exist with the rest of the simulation model and view code for a scene should exist with the rest of the simulation view code.
Author: @chrisklus
This is a standard pattern described in https://en.wikipedia.org/wiki/Singleton_pattern.
When using JavaScript and a module loading system (like ES6 modules), there are two patterns that we use for Singletons.
The first is to create a class and then return a single instance of the class instead of returning the class itself.
import namespaceName from '../namespaceName.js';

class Singleton {

  constructor( x ) {
    this.x = x;
    this.initialized = false
  }

  getX() {
    assert && assert( this.initialized, 'this should only be called after initialization' );
    return this.x;
  }

  setX( x ) {
    assert && assert( this.initialized, 'this should only be called after initialization' );
    this.x = x;
  }

  initialize( x ) {
    assert && assert( !this.initialized, 'this should only be initialized once' );
    this.initialized = true;
    this.setX( x );
  }
};

const singleton = new Singleton( 0 );

namespaceName.register( 'singleton', singleton );
export default singleton;
A class should be used whenever keeping track of state is desired. The convention for naming a singleton class file is to start with a lowercase letter since an instance of the class is imported.
If initial state information is needed, then we can use an initialize pattern like what's written above. This is preferable to the getInstance pattern because it is simpler and does not expose the constructor. Also, since a single instance is being registered, the module loading system is basically doing getInstance for us.
phetioEngine.js is an example of this pattern in PhET code.
The second pattern is to create a static object literal. These cannot be instantiated, but instead are loaded at runtime.
import namespaceName from '../namespaceName.js';

console.log( 'I\'m only going to say this once.' );

const ExampleConstants = {

  printMessage() {
    console.log( 'I\'ll say this as many times as you\'d like.' );
  },

  CONSTANT_NUMBER_ONE: 1,
  CONSTANT_NUMBER_ONE: 2,
};

namespaceName.register( 'ExampleConstants', ExampleConstants );
export default ExampleConstants;
An object literal should be used when keeping track of state is not needed. If one counter variable needs to be tracked (or something very simple like that), then the dev team thinks that it could still be appropriate to use an object literal. A class should be used for anything more substantial than that. The convention for naming a singleton object literal file is to start with an uppercase letter since a singleton object literal is not an instance of a class.
Simulation constant files are a common example of this pattern in PhET code (e.g. WaveInterferenceConstants.js).
To use a singleton, simply import it to your file and invoke methods directly on it.
import singleton from '../singleton.js';
import ExampleConstants from '../ExampleConstants.js';

console.log( singleton.getX() );

ExampleConstants.printMessage();Author: @jbphet
In general, a state machine, also known as a Finite-State Machine (FSM), is an abstract machine that can be in one and only one of a finite number of states at any one time and takes actions and changes its state in response to inputs, aka stimuli. In the book "Design Patterns: Elements of Reusable Object-Oriented Software" by Gamma, Helm, Johnson, and Vlissides, the pattern is simply referred to as "State". In the book "Head First Design Patterns" by Freeman & Freeman, the pattern is defined as follows:
The State Pattern allows an object to alter its behavior when its internal state changes. The object will appear to change its class.
There are tons of references on line for this pattern. Here are some that seem reasonably good:
- Wikipedia: https://en.wikipedia.org/wiki/State_pattern
- GeeksForGeeks: https://www.geeksforgeeks.org/state-design-pattern/
- Game Programming Patterns: http://gameprogrammingpatterns.com/state.html
The most ubiquitous use of this pattern for PhET is in the quiz-style games found in Build an Atom, Area Model, Expression Exchange, Area Model, and a number of other sims. It was also used extensively to control the behavior of the biomolecules in Gene Expression Essentials. If you're in search of examples, these would be good places to start.
The states which a state machine will support should be defined in an Enum. Here is an example (this is from the Arithmetic sim, but has been "modernized" to meet our latest standards):
import EnumerationDeprecated from '../../../phet-core/js/EnumerationDeprecated.js';
import arithmetic from '../../arithmetic.js';

// @public
const GameState = EnumerationDeprecated.byKeys( [
  'SELECTING_LEVEL',
  'AWAITING_USER_INPUT',
  'DISPLAYING_CORRECT_ANSWER_FEEDBACK',
  'DISPLAYING_INCORRECT_ANSWER_FEEDBACK',
  'SHOWING_LEVEL_COMPLETED_DIALOG',
  'LEVEL_COMPLETED'
] );

arithmetic.register( 'GameState', GameState );
export default GameState;
There are many different possible ways to implement a state machine in code, and PhET has not standardized on a single approach. One method is to use the pattern described in "Design Patterns: Elements of Reusable Object-Oriented Software", where each state of the state machine is represented by an instance of an abstract "state" base class, and the methods defined in this base class specify all of the stimuli that can be received by the state machine. A transition from one state to another is done by switching the instance of the state from one of these subclasses to another. This was the approach taken in the Build an Atom game (and several other game implementations), and the base class for all states can be seen at [BAAGameState.js] (https://github.com/phetsims/build-an-atom/blob/main/js/game/model/BAAGameState.js).
Another approach is to use a switch statement that switches on the current state, and the code under each switch statement handles the incoming event. This approach hasn't been used much in PhET code (at least not at the time of this writing), so here is an example that was found on line at https://24ways.org/2018/state-machines-in-user-interfaces/.
function loginMachine( state, event ) {
  switch( state ) {
    case 'start':
      if ( event === 'SUBMIT' ) {
        return 'loading';
      }
      break;
    case 'loading':
      if ( event === 'RESOLVE' ) {
        return 'success';
      }
      else if ( event === 'REJECT' ) {
        return 'error';
      }
      break;
    case 'success':
      // Accept no further events
      break;
    case 'error':
      if ( event === 'SUBMIT' ) {
        return 'loading';
      }
      break;
    default:
      // This should never occur
      return undefined;
  }
}
Yet another approach is to use a function table, where one axis represents the states and the other represents the stimuli or events that can occur. The benefit of this approach is that it forces the implementation to explicitly handle all combinations of states and stimuli. There is an article with an explanation and some good diagrams at https://en.wikipedia.org/wiki/State_transition_table. There is a decent stack overflow article that shows an example of that here: https://stackoverflow.com/questions/133214/is-there-a-typical-state-machine-implementation-pattern
One of the tricky things about software-based state machines is that it is often difficult for someone who is tasked with maintaining the code to understand the big picture of how the state machine operates based on examination of the source code. Due to this, it is a strongly recommended practice for PhET developers that the state machine be documented in diagrammatic form in either a GitHub issue, a JPG or PNG in the doc folder, or in the design document. Also, there are tools such as http://asciiflow.com/ that can be useful for creating "ascii art" representations of the state diagram.
There are some standard ways to diagram state machine behavior, so when documenting one, please investigate UML State Diagrams. A quick search on this turned up a link that has a pretty good explanation and some examples .
In most cases it will likely be important that state transitions are visible within a PhET-iO instrumented sim. For this reason, an Axon Property should generally be used for the state value so that it can easily be instrumented. Setting state values via the PhET-iO API is less likely to be supported, since it would be difficult to make the code able to handle arbitrarily state transitions. If this were ever done, it would require thorough documentation to describe the valid state transitions that can be triggered via this API.
Author: @jbphet
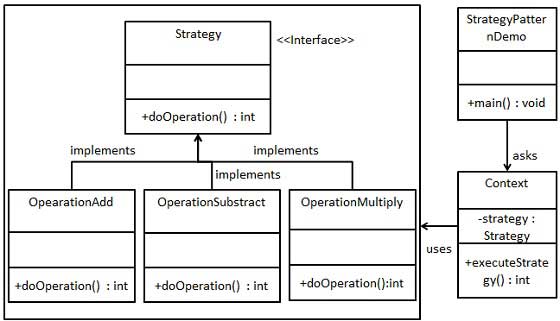
The intent of the "Strategy" design pattern is to define a family of algorithms and encapsulate each one behind a common interface, and then let clients used them interchangeably to vary some aspect of the clients' behavior. This pattern is used fairly commonly in PhET code, and a reasonably good explanation can be found at https://en.wikipedia.org/wiki/Strategy_pattern. There are many other decent descriptions on the web, and if you're thinking of applying this pattern or needing to perform maintenance on an existing implementation of it, it's worth doing some searching and reading.
In UML diagrams, the strategy pattern is usually depicted as an abstract base class or interface with multiple concrete subclasses. Here are a couple of examples that were live at this time of this writing:
- https://upload.wikimedia.org/wikipedia/commons/3/39/Strategy_Pattern_in_UML.png
- https://cdncontribute.geeksforgeeks.org/wp-content/uploads/classinh.jpg
- https://www.tutorialspoint.com/design_pattern/images/strategy_pattern_uml_diagram.jpg
This pattern is useful in situations where the behavior of an object needs to change at run time based on state
information and there is some benefit in encapsulating that behavior. If the state information is limited and there are
not many variations in behavior, a simple if statement will often suffice (and is generally easier to read), for
example:
class X {
  step( dt ) {
    if ( this.isAboveWater ) {
      this.fall( dt );
    }
    else {
      this.float( dt );
    }
  }
}
However, if the state and behaviors start to get more complex, a strategy pattern may help to simplify the code and/or help to avoid duplication of code where similar behavioral changes are needed in other related classes, for instance:
class X {
  step( dt ) {
    if ( this.isAboveWater ) {
      this.fall( dt );
    }
    else if ( this.isBelowWater ) {
      this.floatTowardsSurface( dt );
    }
    else if ( this.onSurface && this.waterModel.isWindy ) {
      this.bobOnSurface( dt );
    }
    else {
      this.sitCalmlyOnSurface( dt );
    }
  }
}
versus:
class X {
  step( dt ) {
    this.waterInteractionStrategy.step( dt );
  }
}
In short, here are some rules of thumb for when a strategy pattern might be helpful:
- there is complex if/switch logic that is being used to decide between different algorithms/behavior
- there is duplication of conditional logic (especially when slightly altered) in a number of related classes/types that is being used to implement different behavior
- there are states in a state machine that are logically similar but have different behaviors
It should be noted that, because functions JavaScript are first-class object (meaning that they can be treated as objects), this pattern could be implemented using only functions if the strategy objects do not need to maintain internal state.
One of the most effective ways to learn a pattern is to study examples of its usage. One PhET simulation that makes extensive use of the strategy pattern is Gene Expression Essentials. This simulation depicts the basic process of DNA transcriptions by showing how various biomolecules interact to transcribe and translate the information encoded in DNA molecules into proteins needed by the cells. The strategy pattern was used in several places in this sim, but the most extensive use was for controlling how the biomolecules moved. In some cases, biomolecules need to move around randomly. In other situations, they need to move directly to a particular location. In other cases, biomolecules need to appear that they are moving somewhat randomly while ultimately arriving at a destination. This was accomplished by having the biomolecules use a set of "motion strategies" that were switched when the motion behavior of the biomolecule needed to change.
In this case, there is an abstract base class called MotionStrategy (in Java, this would probably be an interface). A
method in this class is intended to be overridden in all subclasses, and its purpose is to determine the next position
of the client element. The code looks like this:
const x = {

  /**
   * get the next position given the current position, bounds, and amount of time
   * @param {Vector2} currentPosition
   * @param {Bounds2} bounds - allowed motion bounds of the controlled item, used in detecting whether the item would go
   * outside of the motion bounds.
   * @param {number} dt - delta time
   * @public
   */
  getNextPosition: function( currentPosition, bounds, dt ) {
    // figure out the next position
  }
}
The various concrete subclasses of the MotionStrategy class implement the desired movement behavior, and are switched
into place based on the state of the biomolecule.
Below is a list of some other examples of strategy pattern usage in PhET sims. This list is not exhaustive. It includes the name of the base class for the strategy followed by the name of the simulation in which it is used.
MotionStrategy(neuron)FadeStrategy(neuron)PhotonAbsorptionStrategy(molecules-and-light)VibrationStrategy(molecules-and-light)
see Mixin and Trait