BlocksCodingGuide
Blocks coding guide table of contents
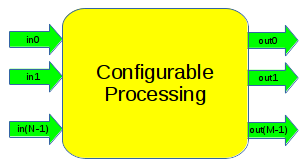
- Block - a customizable worker unit that processes data
- Source block - a block that only produces data
- Sink block - a block that only consumes data
- Connection - a path of data flow from producer to consumer
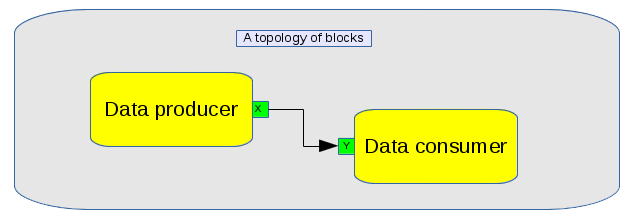
- Topology - a collection of blocks and connections that perform useful work
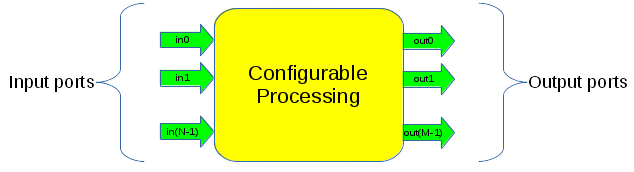
- Input port - an endpoint on a block that accepts data from connections
- Output port - an endpoint on a block that provides data to connections
- Stream - a flow of data elements that is continuous (without bounds)
- Buffer - a pointer to memory and length that composes part of a stream
- Label - a decoration or metadata associated with a particular stream element
- Message - aribtrary and discontinuous data that is asynchronous to a stream
A block is an object that contains a processing routing to consume input, perform processing, and produce output. The following skeleton code contains all of the basics for writing a block and registering it into the system. A block is nothing more than a class that inherits from Pothos::Block with a custom work() function to perform the processing. In addition, this block has a factory function to register into the Block registry. Registration allows users to programatically create blocks given a registry path.
MyBlock.cpp
#include <Pothos/Framework.hpp>

class MyBlock : public Pothos::Block
{
public:
    MyBlock(args...)
    {
        //a constructor can initialize the block's settings, ports, etc...
    }

    static Block *make(args...)
    {
        //a factory function to create an instance of MyBlock
        return new MyBlock(args...);
    }

    void work(void)
    {
        //implement custom processing here...
    }
};

//register MyBlock into the block registry
static Pothos::BlockRegistry registerMyBlock(
    "/path/to/my_block", &MyBlock::make);
Notes about factory functions and the block registry:
- A factory function takes the form of a function that returns a Block*
- A factory function can have any number of arguments
- A factory function can be declared in a class as a static method or outside of the class as a normal function -- its up to the user
- Constructors cannot be passed to the BlockRegistry, a function must be used
Other notes:
This is just an oversimplified example of a block class. A real block can be significantly more complicated: it may require splitting the code into multiple headers and cpp sources, including external headers, external libraries. All of the facilities of C++ are at the user's discretion.
To actuall use this block, the user will need to compile MyBlock.cpp into a library, link the library against libPothos, and install the library into the Pothos modules directory. Fortunately, Pothos provides a CMake utility function to exclude most of the complication. The following is an boilerplate CMakeLists.txt that builds MyBlock.cpp into a library and installs it. Include paths, linker flags, install directories are all configured appropriately by POTHOS_MODULE_UTIL().
CMakeLists.txt
########################################################################
# Project setup
########################################################################
cmake_minimum_required(VERSION 2.8)
project(MyBlock)
enable_language(CXX)

find_package(Pothos CONFIG REQUIRE)

########################################################################
# Module setup
########################################################################
POTHOS_MODULE_UTIL(
    TARGET MyBlock                #a unique name for this module
    SOURCES MyBlock.cpp           #sources used in this project
    DESTINATION MyCustomBlocks    #a subdirectory for installed modules
    ENABLE_DOCS                   #scanning for documentation markup
)
Notes:
- Read the documentation for POTHOS_MODULE_UTIL() for additional details
To use the new block within the GUI a special markup can be used to describe additional details about the block. This markup will be parsed automatically by the POTHOS_MODULE_UTIL() and installed into the plugin registry. The GUI will be able to use the extracted information to render a graphical block that can be interacted with.
The block description markup comes in the form of an inline comment block. The POTHOS_MODULE_UTIL() will search all the sources for this special code comment block. The comment block can technically be located anywhere in the source; however, for consistency, we recommend that the comment block be located right before the class definition.
/***********************************************************************
 * |PothosDoc My Block
 *
 * My custom block does the following things.
 *
 * |category /My/Category
 * -------- please read BlockDescriptionMarkup for more details --------
 **********************************************************************/
class MyBlock : public Pothos::Block
{
    //...
};
Notes:
- Read the block description markup wiki page for additional details
Use the CMake utilities to configure, build, and install the new block. CMake works on all sorts of platforms, and can be used with various GUI and command line tools. Below is a simple example of calling into CMake from the terminal in a UNIX-like environment.
Example:
mkdir my_build_directory
cd my_build_directory
cmake path_to_source_directory
make
sudo make install
Example instantiation of MyBlock:
#include <Pothos/Framework.hpp>
#include <Pothos/Proxy.hpp>

int main(void)
{
    auto env = Pothos::ProxyEnvironment::make("managed")
    auto registry = env->findProxy("Pothos/BlockRegistry");
    auto myBlock = registry.callProxy("/path/to/my_block", args...);

    //myBlock is now an object that can be connected into a topology
}
Notes: Whats all this proxy and environment stuff? We can ignore this for now and just assume its boilerplate. The registry takes the path in the block registry as a string, and the rest of the arguments are passed into the registered factory function. The resulting object is an opaque object representing an instantiated MyBlock. This opaque object can be configured with function calls and connected into a topology. More on making calls in the call registry section...

The call registry allows a block to register its public class methods into the system. Once registered, these methods can be accessed in a programtic way. Which is important because doing so enables the following:
- Blocks can be treated as generic/opaque objects
- Blocks can be configured as a remote object
- Blocks can be configured in a language binding
- Calls are thread safe with respect to the work() function
Example:
class MyBlock : public Pothos::Block
{
public:
    MyBlock(args...)
    {
        this->registerCall(this, POTHOS_FCN_TUPLE(MyBlock, getFoo));
        this->registerCall(this, POTHOS_FCN_TUPLE(MyBlock, setBar));
        this->registerCall(this, POTHOS_FCN_TUPLE(MyBlock, doBaz));
    }

    int getFoo(void) const;
    void setBar(bool bar);
    bool doBaz(const std::string &what, unsigned arg);
};
Note: POTHOS_FCN_TUPLE() is a convenience macro. Using POTHOS_FCN_TUPLE(MyClass, myMethod) is equivalent to "myMethod", &MyClass::myMethod.
Example:
#include <Pothos/Framework.hpp>
#include <Pothos/Proxy.hpp>
#include <iostream>

int main(void)
{
    auto env = Pothos::ProxyEnvironment::make("managed")
    auto registry = env->findProxy("Pothos/BlockRegistry");
    auto myBlock = registry.callProxy("/path/to/my_block", args...);

    std::cout << "foo " << myBlock->call<int>("getFoo") << std::endl;
    myBlock->callVoid("setBar", true");
    std::cout << "baz result " << myBlock->call<bool>("doBaz", "hello", 123) << std::endl;
}
Notes:
- The first argument to call() is the string name of the registered call
- call<Type>(...) is the templated variant for calls with return types
- callVoid(...) is the void return variant for calls with no return
The InputPort and OutputPort objects are the interfaces to the input and output data. The following examples show how a user can create ports at initialization time, and how these ports can be accessed later at execution time.
Create ports only at constructor time: Input and output ports are allocated by the setupInput() and setupOutput() calls. The setupInput() and setupOutput() calls should only be called at constructor time.
Integer port names identical to indexed port: Ports can be named, or referred to via an integer index. A port string name which is parsable to an unsigned integer is identical to using that unsigned integer. Therefore 0 and "0" refer to the same port.
Separate name pools for inputs and outputs: The names of input and output ports do not overlap. Therfore an input port named "x" is in no way related to an output port of the same name.
Streaming elements and port data types: The second argument to setupInput() and setupOutput() is the data type descriptor for a stream element. When not specified, this defaults to "unknown" with a size of 1 byte per element. Ports that are not intended for streaming data can ignore this data type argument.
Example:
class MyBlock : public Pothos::Block
{
public:
    MyBlock(args...)
    {
        this->setupInput(0, typeid(float));
        this->setupInput("msg0");
        this->setupOutput("0", "int");
    }
};
There are several ways to get access to the port objects. A port can be accessed by string name or by index. The user can also query for an array of indexed ports, or a map of all named ports. What works best is up to the user and the implementation of the Block.
Examples:
void work(void)
{
    auto inputPort0 = this->input(0); //access by index
    auto outputPort0 = this->output(0); //access by index

    auto inputPort1 = this->input("1"); //access by name
    auto outputPort1 = this->output("1"); //access by name

    auto inputPorts = this->inputs(); //vector of indexed ports
    auto outputPorts = this->outputs(); //vector of indexed ports

    auto allInputPorts = this->allInputs(); //map of port name to ports
    auto allOutputPorts = this->allOutputs(); //map of port name to ports
}
Notes:
- All port access API calls return a pointer type
- The port pointers are the same for each call
- The port pointers can be stored to avoid lookup cost

The streaming API provides access to contiguous arrays of input and output elements. Input elements can be read from memory and consumed from the input ports. Output elements can be written into memory and produced to the output ports.
void work(void)
{
    //get a pointer to the input port object
    auto inputPort0 = this->input(0);

    //get a pointer to the input buffer as floats
    auto inputBuffer0 = inputPort0->buffer.as<const float *>();

    //how many elements are in this buffer?
    const size_t numElems = inputPort0->elements();

    //read from the input buffer...
    //inputBuffer0[0] through inputBuffer0[numElems-1] can be read

    //consume the input buffer -- removes elements from the input port
    inputPort0->consume(numElems);
}
Notes:
- The input buffer can be casted to any type -- its recommended that:
- The type be identical to the DType that the port was created with
- Or that the user be careful with the element sizes and pointer sizes
- Up to numElems are valid and can be read, however:
- Not all elements have to be read or consumed in this call to work
- Elements can be read and not consumed -- Example: a convolution operation
void work(void)
{
    //get a pointer to the output port object
    auto outputPort0 = this->output(0);

    //get a pointer to the output buffer as floats
    auto outputBuffer0 = outputPort0->buffer.as<float *>();

    //how many elements are in this buffer?
    const size_t numElems = outputPort0->elements();

    //write to the output buffer...
    //outputBuffer0[0] through outputBuffer0[numElems-1] can be read

    //produce to the output buffer --
    //removes memory from the output port and sends it downstream
    outputPort0->produce(numElems);
}
Notes:
- The output buffer can be casted to any type -- its recommended that:
- The type be identical to the DType that the port was created with
- Or that the user be careful with the element sizes and pointer sizes
- Up to numElems are valid and can be written, however:
- Not all elements have to be written or produced in this call to work
- The number of elements produced is related to the input and output resources available
The WorkInfo structure gives us access to work related information calculated by the scheduler. This information is provided to save the user from iterating through the ports, and duplicating commonly used functionality.
Examples:
void work(void)
{
    const auto &workInfo = this->workInfo;

    //need a vector of pointers, one per port?
    auto inputPointers = workInfo.inputPointers;

    //the minimum number of elements across all input ports?
    size_t minInElements = workInfo.minInElements;

    //the minimum number of elements across all ports?
    size_t minElements = workInfo.minElements;
}
- Read more here: https://github.com/pothosware/pothos-library/blob/master/include/Pothos/Framework/WorkInfo.hpp
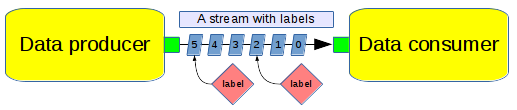
The labels API provides access to the inline metadata that can be used to decorate an element in a stream. Labels can be used for a variety of purposes, for example: associating an event with a specific element in a stream. With the labels API users can read labels associated with input streams, create new labels to be associated with output streams, and to passively forward labels from input to output ports.
Examples:
void work(void)
{
    auto inputPort0 = this->input(0);
    auto numElems = this->workInfo().minElements;

    for (const auto &label : inputPort0->labels())
    {
        label.index; //an element offset into inputPort0->buffer()
        label.id;    //a string name to identify the type of label
        label.data;  //a Pothos::Object containing the metadata

        //Is the label within the range of input elements we care about?
        if (label.index < numElems)
        {
            //remove a label from the input, it wont propagate
            inputPort0->removeLabel(label);

            //removeLabel invalidates the iterator, so we have to leave this loop
            break;
        }
    }
}
Notes:
- Labels have an relative index which is an offset in elements into the buffer
- Labels have a string ID which is user-defined to identify the label's purpose
- Label data is an Opaque object that can hold anything
- Check the data.type(), and data.convert<Type>() to access the contents
- Remove label is an optional way to remove the label from the input port
- Removing a label invalidates the iterator, break the loop, or grab a new iterator
- A removed label will not appear in the iterator again nor propagateLabels()
Examples:
def work(void)
{
    auto outputPort0 = this->output(0);

    //post a label "hello" to element0
    outputPort0->postLabel(Pothos::Label("testLabel", "hello", 0));

    //post a label "world" to element1
    Pothos::Label label1("testLabel", "world", 1);
    outputPort0->postLabel(label1);

    //post a label with number 42 to element2
    Pothos::Label label2;
    label2.id = "testLabel";
    label2.index = 2;
    label2.data = Pothos::Object(42);
    outputPort0->postLabel(label2);

    //TODO load the buffer elements
    outputPort0->produce(numElems);
}
Notes:
- There is more than one way to create a label
- Label constructor vs field access
- The index of the label is an element offset into the buffer
- The ID a string that identifies the purpose of the label
- The data is a Pothos::Object that can contain a variety of types
- Elements from the buffer associated with the labels are produced
By default, when an input element is consumed, any associated labels will be propagated to all output ports. This default behaviour assumes that 1) we want to propagate all labels to all output ports and 2) the output label indexes are 1:1 with the input index. When the default behaviour is not appropate, the user can overload the propagateLabels() Block API call to customize the behaviour.
Example propagateLabels() inside class inherited from Block:
void propagateLabels(const InputPort *input)
{
    auto output = this->output(0);
    for (const auto &label : input->labels())
    {
        auto newLabel = label;

        //calculate for a 1:2 ratio between this input and output0
        newLabel.index *= 2;

        output->postLabel(newLabel);
    }
}
Notes:
- The input->labels() iterator contains only labels associated with consumed elements
- The index calculation performs a multiplication into the output port domain
- The output port is accessed through a conventional Block API call
- A label is posted to the output port though the same postLabel() API call
- If labels are not posted to outputs, then they are dropped entirely in this block

The messaging API provides access to arbitrary messages that may be passed through the topology. Messages are asynchronous to streaming data, so if a port consumes both messages and streams, the messages will not be backpressured in any way by the streaming data.
Messages contain arbitrary contents and therefore may be used for any number of purposes: A message can contain bounded data like a network packet, or perhaps a status notification of some sort.
Examples:
void work(void)
{
    auto inputPort0 = this->input(0);

    //check if a message is available on this port
    if (inputPort0->hasMessage())
    {
        //retrieve the message and remove it from the port
        auto msg = inputPort0->popMessage();

        //is the msg of the expected type?
        if (msg.type() == typeid(std::string))
        {
            //extract the contents of the message
            auto contents = msg.extract<std::string>();

            std::cout << contents << std::endl;
        }
    }
}
Notes:
- The hasMessage() InputPort API call allows us to check for the presence of a message
- The popMessage() InputPort API call lets us access the message as a Pothos::Object
- The message will be removed from the input port when popMessage() is called
- The message can then be inspected for type and its information extracted
Examples:
void work(void)
{
    auto outputPort0 = this->output(0);

    //posting an arbitrary message
    outputPort0->postMessage("Hello World");

    //posting an arbitrary message
    std::string msg1("Hello World");
    outputPort0->postMessage(msg1);

    //posting an opaque object
    Pothos::Object msg2("Hello World");
    outputPort0->postMessage(msg2);
}
Notes:
- These examples demonstrate the various ways to create and post an output message
- In all cases, the downstream block will see a Pothos::Object with the contents "Hello World"
The topology API allows the user to create and execute a design of interconnected blocks.
Example instantiation of blocks, topology, connections, and execution of design:
#include <Pothos/Framework.hpp>
#include <Pothos/Proxy.hpp>

int main(void)
{
    auto env = Pothos::ProxyEnvironment::make("managed")
    auto registry = env->findProxy("Pothos/BlockRegistry");
    auto myDataConsumer = registry.callProxy("/path/to/my_data_consumer", args...);
    auto myDataProducer = registry.callProxy("/path/to/my_data_producer", args...);

    //instantiate a topology
    Pothos::Topology topology;

    //connect the producer to the consumer
    topology.connect(myDataProducer, "X", myDataConsumer, "Y");

    //execute the topology to perform useful work
    topology.commit()

    //wait forever while topology executes in background
    while (true)
    {
        sleep(1);
    }
}
Notes:
- myDataConsumer is a block that consumes data on input port "Y".
- myDataProducer is a block that produces data on output port "X".
- The names of the ports can be seen clearly in the connect() call.
- The topology is executing as long as the program waits in the loop.
- The topology would cease execution and destruct if the function exited.
A topology can be reconfigured while its executing. Simply create new blocks, call combinations of connect() and disconnect() to create the new desired data flow paths, then call commit(). The commit method() is resonsible for removing old connections and creating new ones in a thread-safe manner. The parts of the topology that are exclusively separate from the changes continue to execute while the topology reconfigures as if nothing happened.
//instantiate a topology
Pothos::Topology topology;

//connect the producer to the consumer
topology.connect(myDataProducer0, "X", myDataConsumer, "Y");

//execute the topology to perform useful work
topology.commit()

//wait for some external event...

//replace the data producer with another
topology.disconnect(myDataProducer0, "X", myDataConsumer, "Y");
topology.connect(myDataProducer1, "X", myDataConsumer, "Y");

//commit the new design while the topology is still active
topology.commit()
More notes on thread safety: The topology can reconfigure the design in a thread-safe way. However, the topology object itself is not thread-safe. The user should only call connect(), disconnect(), and commit() from only one thread-context at a time.

Just like blocks, hierachies of interconnected blocks can be created, registered, and instantiated.
MyHierachy.cpp
#include <Pothos/Framework.hpp>

class MyHierachy : public Pothos::Topology
{
public:
    MyHierachy(args...)
    {
        auto env = Pothos::ProxyEnvironment::make("managed")
        auto registry = env->findProxy("Pothos/BlockRegistry");
        myBlockA = registry.callProxy("/path/to/my_block_a", args...);
        myBlockB = registry.callProxy("/path/to/my_block_b", args...);

        this->connect(this, "in0", myBlockA, "0");
        this->connect(myBlockA, "0", myBlockB, "0");
        this->connect(myBlockB, "0", this, "out0");

        //example registering a call on this topology
        this->registerCall(this, POTHOS_FCN_TUPLE(MyHierachy, setFooBar));
    }

    static Topology *make(args...)
    {
        //a factory function to create an instance of MyHierachy
        return new MyHierachy(args...);
    }

    void setFooBar(const int fooBar)
    {
        myBlockA.callVoid("setFooBar", fooBar);
    }

private:
    Pothos::Proxy myBlockA, myBlockB;
};

//register MyHierachy into the block registry
static Pothos::BlockRegistry registerMyHierachy(
    "/path/to/my_hierarchy", &MyHierachy::make);
Notes:
- The hierarchy has a factory function that returns Topology*
- Inside MyHierachy are two blocks myBlockA and myBlockB
- MyHierachy has an input port named in0
- MyHierachy has an output port named out0
- MyHierachy has a call named setFooBar
More notes:
The hierarchy is fundamentally no different than any other block. Hierachies follow the same documentation and examples for blocks in reguards to: compilation, instantiation, configuration, and connections. In addition, hierachies can be instantiated and nested within other hierachies.
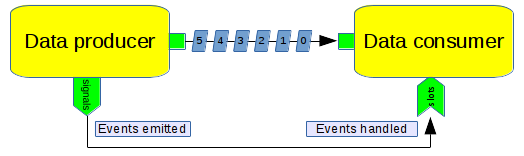
Signals and slots allow blocks to interact in a programitic way for the purposes of configuration. A signal is something that a block can emit to indicate that an event or change occured. A slot is a handler function within a block to deal with a signal event. Signals and slots are connected within a topology to subscribe one or more slots to a signal.
- Read more about signals and slots: https://en.wikipedia.org/wiki/Signals_and_slots
class MySignalBlock : public Pothos::Block
{
public:
    MySignalBlock(args...)
    {
        this->registerSignal("eventOccured");
    }

    void work(void)
    {
        //call takes a signal name, and any number of arguments
        this->callVoid("eventOccured", 1234, "example");
    }
};
class MySlotBlock : public Pothos::Block
{
public:
    MySlotBlock(args...)
    {
        this->registerCall(this, POTHOS_FCN_TUPLE(MySlotBlock, eventHandler));
    }

    //The handler needs to handle the same number of arguments
    //and the same argument types as the signal emitter.
    void eventHandler(const int foo, const std::string &bar)
    {
        //handle here...
    }
};
Connecting a signal to a slot is no different than connecting an output port to an input port:
auto mySlotBlock = ...;
auto mySignalBlock = ...;

Pothos::Topology t;
t.connect(mySignalBlock, "eventOccured", mySlotBlock, "eventHandler");
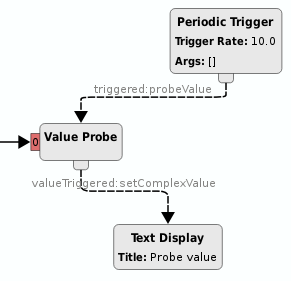
A probe is a special type of signal+slot combo that allows a slot to trigger a readback signal from an arbitrary registered call.
class MyProbeBlock : public Pothos::Block
{
public:
    MyProbeBlock(args...)
    {
        this->registerCall(this, POTHOS_FCN_TUPLE(MyProbeBlock, value));

        //create "probeValue" slot to trigger "valueTriggered" signal...
        this->registerProbe("value");
    }

    double value(void) const
    {
        //TODO: return some sort of value...
    }
};
Signals and slots actually operate through the messaging infrastructure, and can be easily interfaced with the messaging API. That means that message output ports can call slots, and that signals can send to message input ports. This flexibility allows users to handle slots in the work() function rather than through a registered slot handler; or to emit signals through the postMessage() interface.
Handling a slot as an input message:
//A signal emitter's arguments will appear in the message queue,
//as long as there is no registered handler for this slot.
//DO NOT this->registerSlot("mySlotHandler")!
//DO NOT this->registerCall("mySlotHandler")!

void work(void)
{
    auto slotHandlerPort = this->input("mySlotHandler");
    if (slotHandlerPort->hasMessage())
    {
        auto msg = slotHandlerPort->popMessage();

        //the message is always a vector of opaque arguments
        auto args = msg.extract<std::vector<Pothos::Object>>();

        //cast the argument carefully (depends on upstream signal)
        auto arg0 = args.at(0).convert<int>();
    }
}
Emitting a signal as an output message:
void work(void)
{
    //create the opaque argument vector
    //The downstream slot handler should take a single integer argument.
    std::vector<Pothos::Object> args;
    args.emplace_back(42);

    //emit the signal's argument vector
    auto signalPort = this->input("mySignalPort");
    signalPort->postMessage(args);
}
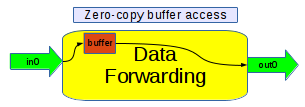
The buffer API allows the user to get direct access to the input and output buffer objects. The powerful capability allows a block to move buffers between streaming and message domains. For example, part of an input stream can be included into an output message without copying it. This feature also enables zero-copy for blocks that must route data from input streams to output streams.
Every input port contains a BufferAccumulator that holds a pool of buffers from upstream producers. The user can get access to the underlying buffer object through the buffer() API call on an InputPort. The buffer object holds a reference to a buffer managed by an upstream resource producers. Be careful about keeping copies of the buffer object; keeping copies may starve the upstream producer of resources and cause pipeline stalls.
To remove the buffer from the input port, use the standard consume() API call on the InputPort. Be careful to coordinate the buffer length field with the number of elements consumed. The relationship is: the buffer.length should equal port->elements()*port->dtype().size()
void work(void)
{
    //get a pointer to input port 0
    auto inputPort0 = this->input(0);

    //get a reference to the underlying buffer
    auto buff = inputPort0->buffer();

    //do things with the buffer...
    //Example, post it to an output port

    //remove the buffer from the input port
    size_t numElems = buff.length/inputPort0->dtype().size();
    inputPort0->consume(numElems);
}
Every output port contains a BufferManager that holds a finite pool of buffer resources. The user can get access to the underlying buffer object through the buffer() API call on an OutputPort. The buffer object holds a reference to a buffer managed the output port's BufferManager. Be careful about keeping copies of the buffer object; keeping copies may starve the BufferManager of resources and cause pipeline stalls.
To remove the buffer from the output port, use the popBuffer() API call on the OutputPort. For best practice, only pop the number of bytes actually used from the buffer for efficiency.
void work(void)
{
    //get a pointer to output port 0
    auto outputPort0 = this->output(0);

    //get a reference to the underlying buffer
    auto buff = outputPort0->buffer();

    //do things with the buffer...
    //Example, fill it with data and post it to an output message

    //remove the buffer from the output port
    outputPort0->popBuffer(buff.length);
}

The buffer resource API allows a block to customize the buffer resources used in the input and output streams. Processing blocks may need to customize their streaming memory resources for a variety of reasons, such as:
- Controling size of a buffer slab presented to the in/output port.
- Using circular/contiguous buffers vs discontiguous memory slabs.
- Using buffer memory allocated from a device node such as mmap().
The custom buffer memory allows a block to integrate with DMA device such as a PCIe board, a GPU, or a Zynq FPGA. The memory buffers allocated for the DMA device can be used directly with the input and output streams to support zero-copy interconnections between processing blocks.
See the Pothos OpenCl and Zynq toolkit pages for good examples of this feature:
The last argument to setupInput() and setupOutput() is the name of a memory domain. This domain string is used to advertise to the topology that this port interacts with specially allocated memory. The domain string is an arbitrary string created by the user that should represent the DMA device. In practice, this domain string is passed into the custom buffer manager calls in the next section to allow the calls to determine if and how the memory domain will be interacted with.
class MyDMABlock : public Pothos::Block
{
public:
    MyDMABlock(args...)
    {
        this->setupInput("0", "int32", "ACME_DSP0");
        this->setupOutput("0", "int32", "ACME_DSP0");
    }
};
A BufferManager manages a pool of pre-allocated buffers, providing buffer resources to an OutputPort. The resources will be passed to downstream blocks and returned to the manager when all copies dereference. A BufferManager can handle allocating memory for a DMA device, and performing DMA read/writes.
A custom buffer manager can be created by inheriting from Pothos::BufferManager, and overloading, init(), empty(), front(), pop(), and push(). These overloaded methods allow for interaction with the execution engine.
class MyCustomBufferManager : public Pothos::BufferManager
{
public:
    MyCustomBufferManager(userProvidedArgs)
    {
        //store args, but do not allocate here
        //use init() for allocation operation
    }

    void init(const Pothos::BufferManagerArgs &args)
    {
        //do allocation here
        //the args can be used to hint number of buffer and size,
        //or the user can do something custom
    }

    bool empty(void) const
    {
        //does the manager have available buffers?
    }

    const Pothos::ManagedBuffer &front(void) const
    {
        //access to an available buffer
    }

    void pop(const size_t numBytes)
    {
        //called to remove a buffer/bytes from the manager
    }

    void push(const Pothos::ManagedBuffer &buff)
    {
        //called when the buffer is returned to the manager
    }
};
The getInputBufferManager() and getOutputBufferManager Block API calls allow a user to provide custom BufferManagers for an input or output port, or to indicate to the topology conditions under which the domain is incompatible.
class MyDMABlock : public Pothos::Block
{
public:
    Pothos::BufferManager::Sptr getIn/OutputBufferManager(const std::string &name, const std::string &domain)
    {
        //Given the port name and the domain, the user has several options:

        //1) Abdicate: let the topology determine the buffer manager.
        //Perhaps the domain is the same, and the other port will provide the manager.
        //This can avoid DMA reading/writing between two blocks in the same domain.
        return Pothos::BufferManager::Sptr();

        //2) Custom: return a custom buffer manager
        //The domain is acceptable to interact with.
        //An empty domain indicates an interaction with a normal GPP-based block.
        return Pothos::BufferManager::Sptr(new MyCustomBufferManager());

        //3) Error: cant handle this domain, throw an exception.
        //Perhaps its the domain of another/incompatible DMA device.
        throw Pothos::PortDomainError();
    }
};
Most blocks operate on input and produce output, all within the domain of the scheduler. However, some of the most interesting blocks routinely step outside of this paradigm. And you, the author, will need to understand some of the intricacies of the scheduler, and how to effectively deal with these situations.
A block may need to acquire read or write access to an external resource like a network socket. Acquiring this access may be a blocking operation which sleeps on a system call like select() or poll(). Here-in lies the problem with blocking in the work() function: Every block is an "actor" in the Actor model protected with sequential access. Whenever a block is stuck inside of its work() function, its also not handling external function calls or slots.
The way we have selected to mitigate the sleep issue in the Pothos scheduler is to provide a specified maximum sleep time to the work() function. Blocks that require sleeping should use the specified sleep time as a timeout.
A timeout example:
void work(void)
{
    const long timeoutUs = this->workInfo().maxTimeoutNs/1000;
    const int ret = _device->readStream(_stream, timeoutUs);
    //TODO handle data or handle timeout
}
- For additional information, checkout the Scheduler Explained wiki page.
There is a very simple stimulus-response relationship that determines when the work() function gets called by the scheduler. The scheduler only calls into the block's work() function when resources arrive at one the input or output ports, when an external function call was made on the block, or the block previously had successfully consumed or produced resources. If there is no stimulus, then the work function is not called.
Consider the above "timeout" example; if the blocking call times-out, then work() must return immediately because it has reached its maximum alloted sleep time. We would like the scheduler to call the block's work function again ASAP. However, the scheduler will not call work() again since we have not produced or consumed any resources.
Enter the Block::yield() function; yield is an internally generated stimulus. It simply the flags the block so that work() is called again.
The timeout example revisited:
void work(void)
{
    const long timeoutUs = this->workInfo().maxTimeoutNs/1000;
    const int ret = _device->readStream(_stream, timeoutUs);
    if (ret == SOAPY_SDR_TIMEOUT) return this->yield();
    //TODO handle data
}